
Related Manuals for Cayin HA-2A


Summary of Contents for Cayin HA-2A
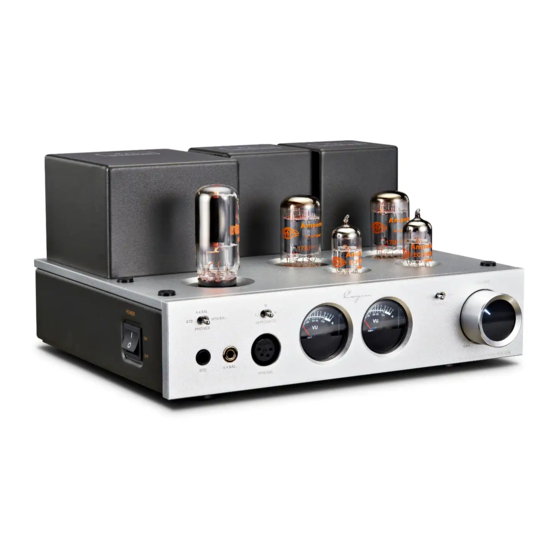
- Page 1 HA-2A HEADPHONE AMPLIFIER VOLUME 4.4 BAL. 4PIN BAL. PHONES IMPEDANCE SOURCES 4.4 BAL. 4PIN BAL. HA-2A HEADPHONE AMPLIFIER User's Manual...
-
Page 2: Table Of Contents
Thank you for choosing Cayin HA-2A Headphone Amplifier We have inserted protective foam inside the Vacuum Tube Cage in order to protect the vacuum tubes during transportation. Please remove these foams before you connect the amplifier into your sound system. Fail to do so might cause serious damage to the amplifier or disaster such as fire accident. -
Page 3: Package Contents
This amplifier is designed, optimized and manufactured by factory designated components. Cayin reserves the right to void the warranty of the product in case of unauthorized repair, modification or change to the product, and we shall not responsible to any failure or damage caused by replacement of non-designated components. -
Page 4: Product Features
◆ Dedicated implementation of single-ended amplification circuit offer simple, pure and devoted music presentation. ◆ All tubes used for HA-2A are NOS Tubes with an unique mellow and warmth. ◆ Amperex ECF82/6U8 are used for voltage amplification. ◆ Amperex 17BF11 are used for power amplification. -
Page 5: Specifications
● Specifications ---------------------------------------------------------------------- ITEM SPECIFICATIONS 330mW+330mW(L);550mW+550mW(M);750mW+750mW(H) Rated 4.4 BAL. 200mW+200mW(L);300mW+300mW(M);270mW+270mW(H) Output 4PIN BAL. 800mW+800mW(L);900mW+900mW(M);1000mW+1000mW(H) Frequency Response 20Hz~50kHz ±3dB TH+D 0.2% (1kHz, 100mW; 5% Under Rated Power) Sensitivity 450mV~600mV S/N Ratio 100dB(A-Weighted) Headphone Impedance L:8~64Ω; M:65~250Ω; H:251~600Ω Headphone Connectors 6.35mm x1 ;4.4mm BALANCEx1; 4pin XLR x1 Input Impedance RCA:25KΩ;XLR:10KΩ... -
Page 6: Safety Precautions
5.Do not attempt to service this product yourself. Opening the cover may expose you to electric shock or other hazards. 6.Do not attempt to disassemble the machine. Cayin reserves the right to void the warranty of the product in case of unauthorized repair, modification or change to the product. -
Page 7: Front Panel Functional Description
②.Headphone Output Selector: With the (L:8~64Ω; M:65~250Ω; H: 251~600Ω) switch you can select the suitable type of ⑦.VU Meter: Monitor output level of the headphone output. HA-2A offers three amplifier types output. ⑧.VU Meter Backlight Turn on the Amplifier ③.STANDARD: Output for headphones... -
Page 8: Rear Panel Functional Description
③.AC Power Input with Fuse Holder: please replace fuse with the same specification Attention: Please make sure the AC voltage of your local power supply match the voltage of the amplifier. Cayin will not be responsible for the damage or accidents such as fire caused by incorrect input voltage... -
Page 9: Top Panel Functional Description
● Top Panel Functional Description ----------------------------------------------- 17BF11 17BF11 ECF82/6U8 ECF82/6U8 17AX4GT Diagram 3: HA-2A Top Panel ① V5: RCA 17AX4GT Vacuum TUBE ② V3、V4: Amperex 17BF11 Vacuum TUBE ③ V1、V2: Amperex ECF82/6U8 Vacuum TUBE Attention: ◆ The vacuum tube will become very hot during operation, please be careful and don’t get burned. -
Page 10: Installation
● Installation ------------------------------------------------------------------------- Please make sure all associated equipment are in perfect working condition before you install the amplifier Please pay attention to the following details when you install the amplifier. ◆Do not place the power amplifier under direct sunlight or near other heat sources. ◆To prevent the amplifier from overheating, please keep the amplifier at a well-ventilated environment and do not cover the amplifier or blocked the vents. -
Page 11: Connect To Audio Equipment
● Connect to Audio Equipment ---------------------------------------------------- This section will illustrate how to connect audio equipment to the HA-2A amplifier. Connect to the Power Socket. Connect to HA-2A Headphone Amplifier. AC INPUT SOURCES ~230V 50Hz 60W CAUTION RISK OF ELECTRIC SHOCK... -
Page 12: Connect To Headphones
6.35mm headphone output. ◆Single-ended headphone cannot use an adapter to plug into the XLR4 balanced headphone output of the HA-2A, it can cause damage to your headphone and/or headphone amplifier. ◆Turning the volume to the minimum when you exchange the Headphone. -
Page 13: Basic Operation
Attention: ◆Connect power cord after all equipments are well connected. ◆It is normal that the transformers will emit heat when the amplifier is used for long hours ◆Please unplug the power plug if you won’t use the amplifier for a long time ●... -
Page 14: Warranty Service
● Warranty Service -------------------------------------------------------------------- 1.The Product is warranted for a period of twelve (12) months from the date of original purchase (the “Warranty Period”). Replacement Products are warranted for the remainder of the original twelve (12) month warranty period. Six-month warranty on stock vacuum tubes. -
Page 15: Troubleshooting
● Troubleshooting -------------------------------------------------------------------- Please follow the instruction in the manual in order to keep the amplifier under proper working condition. If the amplifier is not functioning as intended, please check according to following tip to look for the possible reason. Problem Cause Solution... -
Page 16: How To Install Vacuum Tubes
● How to Install Vacuum Tubes ----------------------------------------------------- How to Install 9-Pin Vacuum Tubes How to Install 8-Pin Vacuum Tubes Positioning Pin Pin No. 9 Pin No.1 Applicable vacuum tube: Applicable vacuum tube: 12AU7(ECC82)、12AX7(ECC83)、ECF82、6U8、12BH7、 KT150、KT170、KT88、6550、EL34、6V6、6SN7、 12AT7(ECC81)、6922(ECC88) etc. 9-Pin vacuum tubes. 6SL7、5AR4、17AX4GT, etc. 8-pin vacuum tubes. Instructions to Change and Install the vacuum tubes: Instructions to Change and Install the vacuum tubes: To install a nine-pin vacuum tube, align the pins of the... - Page 18 欢迎扫描二维码访问: Please follow us: 官网 微信号 新浪微博 Cayin Website Cayin Wechat Cayin SINA Weibo Cayin Facebook 珠海斯巴克电子设备有限公司 Zhuhai Spark Electronic Equipment Co., LTD www.cayin.cn 电话:0756-3828711 传真:0756-3828722 E-mail:market@cayin.cn 地址: 广东省珠海市联港工业区联发路9号 邮编: 519045 Tel::0756-3828711 Fax:0756-3828722 Email: market@cayin.cn Address: 9 Lianfa Road, Liangang Industrial Park, Shuanglin Zone,Zhuhai, Guangdong, China Post Code:519045...
Need help?
Do you have a question about the HA-2A and is the answer not in the manual?
Questions and answers