Table of Contents
Advertisement
Quick Links
Advertisement
Table of Contents

Related Manuals for urban ambiance UHP9150


Summary of Contents for urban ambiance UHP9150
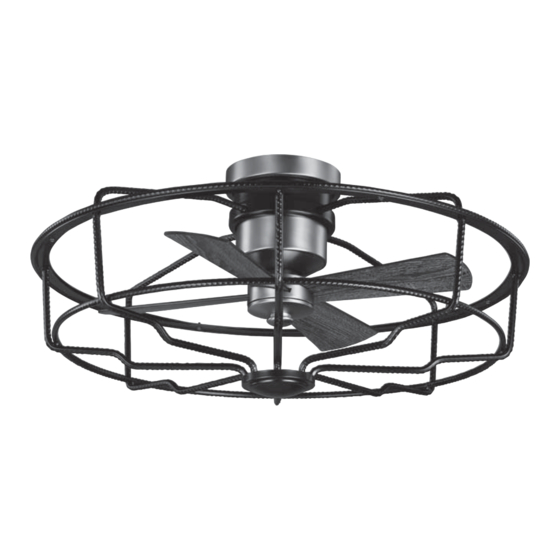
- Page 1 Ceiling Fan Installation Manual UHP9150 UHP9151...
-
Page 2: Table Of Contents
Safety Rules..................................... Unpacking Your Fan ..................................Installing Your Fan ..................................Attaching the Fan Blades................................. Installing the Decorative Cover............................... Operating Your Transmitter ................................Care of Your Fan ................................... Troubleshooting .................................... Specifications ....................................Table of Contents... -
Page 3: Safety Rules
To reduce the risk of electric shock, ensure electricity has been turned off Suitable for use with solid-state speed control. at the circuit breaker or fuse box before beginning. WARNING All wiring must be in accordance with the National Electrical Code TO REDUCE THE RISK OF PERSONALL INJURY, DO NOT BEND THE “ANSI/NFPA 70-1999”... -
Page 4: Unpacking Your Fan 2
Unpack your fan and check the contents. You should have the following items: 12. Loose parts bag containing: Set of blades (4) Mounting bracket Receiver with 6 wire nuts a. Blade attachment hardware Transmitter incl. holder + 2 mounting screws Fan motor assembly (13 screws, 13 fiber washers) 12V battery... -
Page 5: Installing Your Fan
Installing Your Fan Figures 1&2 are examples of different ways to Tools Required mount the outlet box. Phillips screwdriver, straight slot screwdriver, step ladder and wire cutters. Outlet Box Figure 3 Mounting Options To hang your fan where there is an existing fixture but no ceiling joist, you may need an installation Outlet Box hanger bar as shown in Figure 3. - Page 6 Making the Electrical Hanging the Fan Connections REMEMBER to turn off the power. Follow the steps below to hang your fan properly. NOTE Attach the mounting bracket to the outlet box TO AVOID POSSIBLE ELECTRICAL SHOCK, BE with two screws and washers provided with the SURE ELECTRICITY IS TURNED OFF AT THE outlet box.
- Page 7 CAUTION (Figure 8) Motor to receiver electrical SUPPLY CIRCUIT connections: Connect the black wire from the DO NOT USE WITH A WALL LIGHT DIMMER fan to black wire marked "TO MOTOR L". SWITCH. Connect the white wire from the fan to the Ground white wire marked "TO MOTOR N"...
-
Page 8: Attaching The Fan Blades
Finishing the Fan WARNING: TO REDUCE THE RISK OF PERSONAL INJURY, DO NOT BEND THE BLADE Installation WHILE INSTALLING, BALANCING THE BLADES, OR CLEANING THE FAN. DO NO INSERT Studs Decorative FOREIGN OBJECTS BETWEEN ROTATING FAN Move fan into position over the mounting BLADES. -
Page 9: Installing The Decorative Cover
Installing the battery Before starting installation, CAUTION: disconnect the power by turning off the circuit Install 12V battery (included), to prevent damage breaker or removing the fuse at fuse box. Turning to transmitter, remove the battery if not used for power off using the fan switch is not sufficient to long periods. -
Page 10: Operating Your Transmitter 8
Restore power to ceiling fan and test for proper Speed settings for warm or cool weather depend operation. on factors such as the room size, ceiling height, number of fans, etc. 1. " " buttons: These three buttons are used to set the fan The reverse switch is located on the top of motor speed as follows: housing. - Page 11 Installing the Remote Control Blade balancing WARNING Holder TO REDUCE THE RISK OF PERSONAL INJURY, All blades are grouped by weight. Because DO NOT BEND THE BLADE HOLDERS Attach the remote control holder with the remote natural woods very in density, the fan may WHILE INSTALLING, BALANCING THE wobble even though the blades are weighed control holder mounting screw.
-
Page 12: Care Of Your Fan 10
Here are some suggestions to help you maintain You can apply a light coat of furniture polish your fan to the wood blades for additional protection and enhanced beauty. Cover small scratches Because of the fan's natural movement, some with a light application of shoe polish. connections may become loose. -
Page 13: Troubleshooting
Problem Solution 1. Check circuit fuses or breakers. Fan will not start. 2. Check line wire connections to the fan and switch wire connections in the switch housing. CAUTION: Make sure main power is off. 3. Check to make sure the dip switches from the transmitter and receiver are set to the same frequency. 1. -
Page 14: Specifications 12
Volts Fan Size Speed Amps Watts N.W. G.W. C.F. 0.204 12.93 790.98 13.04' 32.84 47.48 26" High 0.36 42.89 1766.21 These are approximate measures. They do not include Amps and Wattage used by the light kit. Specifications 12.