Advertisement
SAFETY WARNINGS AND PRECAUTIONS
 PLEASE READ AND UNDERSTAND THE FOLLOWING SAFETY HIGHLIGHTS. BE SURE THAT ALL INSTALLATION, OPERATION, MAINTENANCE AND REPAIR PROCEDURES ARE PERFORMED ONLY BY QUALIFIED INDIVIDUALS. ARC AND TIG WELDING CAN BE HAZARDOUS. PROTECT YOURSELF AND OTHERS FROM POSSIBLE SERIOUS INJURY OR DEATH. KEEP CHILDREN AWAY. PACEMAKER USERS SHOULD CONSULT WITH THEIR DOCTOR BEFORE OPERATING.
WHEN USING THE WELDER, ALL BASIC SAFETY PRECAUTIONS SHOULD ALWAYS BE FOLLOWED TO REDUCE THE RISK OF PERSONAL INJURY AND DAMAGE TO EQUIPMENT.
READ ALL INSTRUCTIONS BEFORE USING THIS WELDER.
- Keep work area clean. Cluttered areas invite injuries.
- Observe work area conditions. Do not use machine or power tools in damp or wet locations. Do not expose to rain. Keep work area well-lit. Do not use electricallypowered tools in the presence of flammable gases or liquids.
- Keep children away. Children must never be allowed in the work area. Do not let them handle machines, tools or extension cords.
- Store idle equipment. When not in use, tools must be stored in a dry location to inhibit rust.
- Always lock up tools and keep them out of the reach of children.
- Do not force tool. It will do the job better and safer at the rate for which it was intended. Do not use inappropriate attachments in an attempt to exceed the tool capacity.
- Use the right tool for the job. Do not attempt to force a small tool or attachment to do the work of a larger industrial tool. There are certain applications for which this welder was designed. Do not modify this welder, and do not use this welder for any other purposes for which it was not intended.
- Dress properly. Do not wear loose clothing or jewelry as they can be caught in moving parts. Protective, flame retardant, electrically non-conductive clothing and non-slip footwear are recommended when working. Wear restrictive hair netting to contain long hair.
- Use eye and ear protection. Always wear ANSI-approved, Arc-shaded, impact safety face shield (welding helmet). Always use a full-face shield when welding. Always wear ANSI-approved eyewear under face shield, and while in the workplace. Wear a NIOSH-approved dust mask or respirator when working around metal, chemical dusts, fumes and mists.
- Do not over reach. Keep proper footing and balance at all times. Do not reach over or across running machines.
- Maintain tools with care. Keep tools sharp and clean for better and safer performance. Follow instructions for lubricating and changing accessories. Inspect tool cords periodically and, if damaged, have them repaired by an authorized technician. The handles must be kept clean, dry, and free from oil and grease at all times.
- Disconnect power. Unplug tool when not in use.
- Remove adjusting keys and wrenches. Check that keys and adjustment wrenches are removed from the welder and work area before plugging in.
- Avoid starting unintentionally. Be sure the switch is in the off position when not in use and before plugging in. Do not carry any tool with your finger on the trigger, whether it is plugged in or not.
- Stay alert. Watch what you are doing. Use common sense. Do not operate any tool when tired.
- Check for damaged parts. Before using any tool, any part that appears damaged should be carefully checked to determine that it would operate properly and perform its intended function. Check for alignment and binding of moving parts; any broken parts or mounting fixtures; and any other condition that may affect proper operation. Any part that is damaged should be properly repaired or replaced by a qualified technician. Do not use the tool if any switch does not turn on and off properly.
- Guard against electric shock. Prevent body contact with grounded surfaces such as pipes, radiators, ranges and refrigerator enclosures.
- Replacement parts and accessories. When servicing, use only identical replacement parts. Use of any other parts will void warranty. Only use accessories intended for use with this welder. Approved accessories are available from www.uwelding.com.
- Do not operate tool if under the influence of alcohol or drugs. Read warning labels on prescriptions to determine if your judgment or reflexes are impaired while taking drugs. If there is any doubt, do not operate the welder.
- Maintenance. For your safety, service and maintenance should be performed regularly by a qualified technician.
![burn hazard]() Use proper size and type extension cord. If an extension cord is required, it must be of the proper size and type to supply the correct current to the welder without heating up. Otherwise, the extension cord could melt and catch fire, or cause electrical damage to the welder. This welder requires use of an extension cord of 20 Amps minimum capability up to 30 feet, with a wire size rated at 12 AWG. Longer extension cords require larger size wire. If you are using the welder outdoors, use an extension cord rated for outdoor use, signified by "WA" on the jacket. Performance of this welder may vary depending on condition in local line voltage. Extension cord usage may also affect welder performance.
Use proper size and type extension cord. If an extension cord is required, it must be of the proper size and type to supply the correct current to the welder without heating up. Otherwise, the extension cord could melt and catch fire, or cause electrical damage to the welder. This welder requires use of an extension cord of 20 Amps minimum capability up to 30 feet, with a wire size rated at 12 AWG. Longer extension cords require larger size wire. If you are using the welder outdoors, use an extension cord rated for outdoor use, signified by "WA" on the jacket. Performance of this welder may vary depending on condition in local line voltage. Extension cord usage may also affect welder performance.
The warnings, cautions and instructions discussed in this instruction manual cannot cover all possible conditions and situations that may occur. It must be understood, by the operator, that common sense and caution are factors, which cannot be built into this product, but must be observed at all times by the operator.
PRODUCT SAFETY WARNINGS AND PRECAUTIONS

This product, when used for welding and similar applications, produces chemicals known to cause cancer and birth defects (or other reproductive harm).
 ELECTRIC SHOCK can be fatal
The electrode and work (or ground) circuits are electrically "hot" when the machine is on. Do not touch these "hot" parts with your bare skin or wet clothing. Protective clothing should be hole free, dry and ANSI approved. Wear dry, hole-free gloves to insulate hands.

- Do not permit electrically live parts, cables, or electrodes to contact skin, clothing or gloves.
- This unit draws enough current to cause serious injury and or death.
- Before turning the welder on, check the welder gun to be sure that there are no protruding screw heads and that all insulation is secure.
- Insulate yourself from work and ground using dry insulation. Make certain the insulation is large enough to cover your full area of physical contact with work and ground.
- Always be sure the work cable makes a good electrical connection with the metal being cut. The connection should be as close as possible to the area being cut.
- Ground the work metal to be cut to a good electrical (earth) ground.
- Maintain the welding torch, work clamp, power cable and cutting machine in a safe operating condition. Replace damaged insulation wherever it is needed.
- Never dip the electrode in water for cooling.
- When working above floor level, use a safety belt to protect yourself from a fall should you get a shock.

FUMES & GASES can be dangerous
Plasma cutting may produce fumes and gases hazardous to health. Avoid breathing these fumes and gases. When cutting, keep your head out of the fume. Use enough ventilation and/or exhaust at the arc to keep fumes and gases away from the breathing zone. In confined spaces or in some circumstances, outdoors, a respirator may be required. Additional precautions are also required when cutting on galvanized steel.
- Do not cut in locations near chlorinated hydrocarbon vapors coming from degreasing, cleaning or spraying operations. The heat and rays of the arc can react with solvent vapors to form phosgene, a highly toxic gas and other irritating products.
- Read and understand the manufacturer's instructions for this equipment and the consumables to be used, including the material safety data sheet (MSDS) and follow your employer's safety practices. MSDS forms are available from your welding distributor or from the manufacturer.

ELECTRIC&MAGNETIC FIELDS may be dangerous
The EMF field that is generated during arc welding may interfere with various electrical and electronic devices such as cardiac pacemakers.
- Anyone using such devices should consult with their physician prior to performing any electric welding operations.
- Exposure to EMF fields while welding may have other health effects, which are not known.

ARC RAYS can burn

- Avoid eye and body damage. Arc rays and infrared radiation can cause injury to the eyes and burn the skin. Wear ANSI- approved eye and body protection. Do not allow viewing by visitors without proper eye and body protection.
- Use a shield with the proper filter and cover plates to protect your eyes from sparks and the rays of the arc when plasma cutting or observing open arc plasma cutting.
- Use suitable clothing made from durable flame-resistant material to protect your skin and that of your helpers from the arc rays.
- Protect other nearby personnel with suitable, non-flammable screening and/or warn them not to watch the arc nor expose themselves to the arc rays or to hot spatter or metal.
WELDING SPARKS can cause fire or explosion
Avoid eye and body damage. Arc rays and infrared radiation can cause injury to the eyes and burn the skin. Wear ANSI-approved eye and body protection. Do not allow viewing by visitors without proper eye and body protection.

- Use a shield with the proper filter and cover plates to protect your eyes from sparks and the rays of the arc when plasma cutting or observing open arc plasma cutting.
- Use suitable clothing made from durable flame-resistant material to protect your skin and that of your helpers from the arc rays.
- Protect other nearby personnel with suitable, non-flammable screening and/or warn them not to watch the arc nor expose themselves to the arc rays or to hot spatter or metal.

CYLINDER may explode if damaged
Use only compressed gas cylinders containing the correct shielding gas for the process used and properly operating regulators designed for the gas and pressure used. All hoses, fittings, etc. should be suitable for the application and maintained in good condition.
- Always keep cylinders in an upright position securely chained to an undercarriage or fixed support.
- Cylinders should be located:
- Away from areas where they may be struck or subjected to physical damage.
- A safe distance from arc welding or cutting operations and any other source of heat, sparks, or flame.
- Never allow any electrically "hot" parts to touch a cylinder.
- Keep your head and face away from the cylinder valve outlet when opening the cylinder valve.
- Valve protection caps should always be in place and hand tight except when the cylinder is in use or connected for use.

ELECTRICALLY POWERED EQUIPMENT can be dangerous
Turn off input power using the disconnect switch at the fuse box before working on the equipment.
- Install equipment in accordance with the local codes and the manufacturer's recommendations.

MOVING PARTS can cause injury
Ground the equipment in accordance with the manufacturer's recommendations. Keep away from moving parts such as fans.
- Keep all doors, panels, covers and safety guards closed and securely in place.
CALIFORNIA PROPOSITION 65 WARNINGS
Welding or cutting equipment produces fumes or gases which contain chemicals known to the State of California to cause birth defects and, in some cases, cancer. (California Health & Safety Code Section 25249.5 et seq.)
Battery posts, terminals and related accessories contain lead and lead compounds, chemicals known to the State of California to cause cancer and birth defects or other reproductive harm. Wash hands after handling.
For Gasoline Engines:
Engine exhaust contains chemicals known to the State of California to cause cancer, birth defects, or other reproductive harm.
For Diesel Engines:
Diesel engine exhaust and some of its constituents are known to the State of California to cause cancer, birth defects, and other reproductive harm.
PLEASE READ THIS OPERATION MANUAL CAREFULLY AND THOROUGHLY BEFORE ATTEMPTING TO OPERATE THIS MACHINE.
KEEP THIS MANUAL HANDY FOR QUICK REFERENCE. PAY CLOSE ATTENTION TO THE SAFETY INSTRUCTIONS PROVIDED FOR YOUR OWN PROTECTION.
SPECIFICATIONS
GENERAL DESCRIPTION
The new, redesigned LOTOS LTP7500CNC is a non-high frequency start machine. The "blow-back" arc start type that is used is generally safe for use in CNC applications and is ideal for general use. Blow-back arc start type involves a rearward movement of the electrode within the torch head when forced by the air pressure. When air pressure is applied the movement of the electrode off its seated position against the inner surface of the circuit grounded nozzle creates a spark, energizing the plasma stream. With this machine's start type and pilot arc design, you are able to cut on any metal surface without having to contact to strike an arc which is ideal for cutting items like expanded metal or uneven surfaces. This Cutting machine has a wide range of uses which is suitable for cutting: stainless steel, alloy steel, mild steel, copper and other color metal materials.
There are several other key features on the LTP7500CNC plasma cutter:
- With the reliable "Blow-Back" non-high frequency start, the LOTOS LTP7500CNC plasma cutter is suitable for CNC application meaning there will be no interference to your CNC computer system.
- The IPT60 torch comes with the plasma cutter features a "BLOWBACK" design with a Euro-type Central connector. Offering improved consumable life with a patented "BACK STRIKING" design.
- Latest IGBT Inverter Technology
- 2T/4T Function enabled.
- Built-In Air Regulator with preset air pressure
- The pre-installed NPT 1/4" industry type D plug and air filter regulator allows you to quickly connect to your air compressor by using the existing coupler on your air compressor.
WHAT'S INCLUDED

POWER SUPPLY RATINGS
| LTP7 500CNC | |
| Specification | 220V±15% |
| Inverter Type | IGBT |
| Maximum Rated Output | 75 A |
| Start Type | Blow-Back Type |
| Torch Type | IPT80 Non HF Plasma Torch |
| Duty Cycle @ Rated Amps/Volts (40°C) 1 (Output V/A) | 60% @ 75 A 100% 100% @ 50 A |
| No load voltage (V) | 284 V |
| Voltage Input (U1) | Standard 220/240 V (+-15%) 50/60Hz 1 Phase |
| Maximum Inrush Amps (I1MAX) | 70 A |
| Maximum Rated Effective Amps (I1EFF) | 48.5 A |
| CNC Port | YES |
| Air Post Flow Timer | Adjustable |
| Minimum Air Compressor Requirement | 4.5 CFM @ 80 psi/ 30-60 Gallon reserve |
| Duty Cycle/Over Current Protection | Yes |
| Minimum Operating Air Pressure (Safety Cut-Out Threshold) | 35 psi |
| Recommended Operating Air Pressure (Set with Air Flow set to "Constant Flow") | 40-70 psi |
| Maximum Supplied Air Pressure (From Compressor/Tank) | 75 psi |
| Ideal Cut Thickness (Hand Torch) | 1'' (20mm) |
| Max Severance Cut @ 3 IPM (Steel) | 1.25'' (30mm) |
| Minimum Water Ingress Protection Standard | IP21S |
| Efficiency | > 90% |
| Cooling Method | Full Time High Velocity Fan with Tunnel Design |
| Dimensions (approximate) | 620 x 375 x 400mm |
| Weight (Bare Unit) | 36 lbs. |
1 Duty Cycle is percentage of 10 minutes that unit can weld at rated load without overheating.

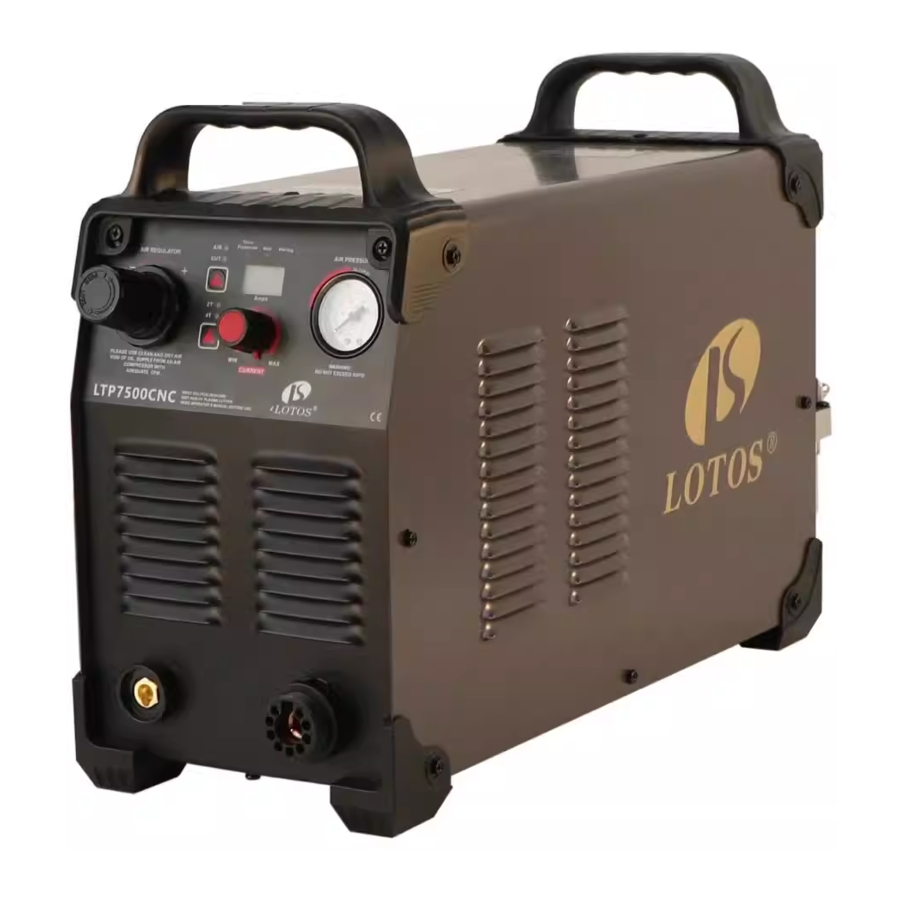
Front & Rear Panel Layout


| 1 |  | Torch protection indicator, it illuminates when the consumable parts of the machine are not well installed, or the torch head is shorted. Meanwhile the Machine stops working. | ||
| 2 |  | Power indicator, it illuminates when the machine is powered on And it flashes after arc is successfully ignited. | ||
| 3 |  | Warning Overheating indicator, It illuminates when the working temperature of the IGBT is overly high. Meanwhile, The machine stop working. | ||
| 4 |  | Air-check indicator, it illuminates when the machine is under air check status. At this moment, the machine cannot cut |  | Normal cutting mode, the machine can cut when this indicator illuminates. |
| 5 |  | 2T indicator torch switch when the machine is under 2T status. |  | 4T indicator torch switch when the machine is under 4T status. |
Explosive view of machine

Quick Setup

- Connect the IPT80 Plasma torch to the machine. Insert the torch connection into the torch connection receptacle at the front of the machine and screw up hand tight.

Do not to bend the pins located insde the torch connector.
- Connect the ground clamp to the output terminal of the machine and tighten.
- Connect the air supply to the air connection located at the rear of the machine. Turn on the air supply.
![]()
- Connect the machine to the correct power supply and switch on the machine using the on/off Switch located at the rear of the machine.
![]()
- Select 2T or 4T torch control
![]()
- Set the amperage dial Set the air pressure at 60-70PSI
![]()


CNC connection:
ARC VOLTAGE OUTPUT:
Pin 1+/2-, Ratio 1:1
This is signal of arc voltage, 1:1 output for CNC system torch high or low movement
SIGNAL CONTROL:
Pin 1/2 for ON signal control input.
This is torch switch control torch ON/OFF
Pin 3/4 for successful arc starting signal output for CNC system right or left movement.

Consumable Installation

INSTALLATION
PLEASE READ ENTIRE INSTALLATION SECTION BEFORE STARTING INSTALLATION. BE SURE THAT ONLY QUALIFIED PERSONNEL PERFORM THIS INSTALLATION.
ELECTRIC SHOCK can be fatal

![danger]() Have a qualified electrician install and service this equipment.
Have a qualified electrician install and service this equipment.- Turn the input power OFF and unplug the machine from the receptacle before working on this equipment.
- Allow machine to sit for 5 minutes minimum to allow the power capacitors to discharge before working inside this equipment.
- Do not touch electrically hot parts.
- Machine must be plugged into a receptacle that is grounded according to the National Electrical Code and local codes.
- Do not remove or defeat the purpose of the power cord ground pin.
SELECT SUITABLE LOCATION:
The machine will operate in harsh environments. Even so, it is important that standard measures are followed in order to assure the machine is long-lasting and reliable in operation.
- The machine must be located where there is open space such that the air circulation in the back and out the front will not be restricted.
- Avoid getting dirt and dust in the machine. Failure to observe these precautions can result in excessive operating temperatures, and the machine will shut down by itself.
ENVIRONMENTAL AREA
Keep the machine dry. Do not place it on wet ground or in puddles. Avoid rain water. Operating in rain is not allowed.
INPUT CABLE CONNECTION (enclose installing diagram):
- Every machine has an included power cable which must be connected to coordinated voltage class in compliance and according to input voltage of cutting machine. We recommend connecting this machine to 60A circuit breaker under 220/240V and 50A circuit breaker under 120V. If cutting machine power voltage is 220/240V and is connected wrong to AC 380V, it may cause internal components to burn up.
- Make sure power cable is connected to power switch reliably and prevent from oxidizing.
- Make sure power voltage is inside the waved range.
OUTPUT CABLE CONNECTION:
- Make sure copper screw at end of torch is connected to gas-electrical integration terminal, then tighten them clockwise (prevent from leaking gas).
- Connect the ground cable to the positive terminal in front panel, then tighten it.
Note: The receptacle is keyed. Align the key on the work lead connector with the opening at the top of the receptacle on the power supply.


Push the work lead connector all the way into the receptacle on the power supply and turn clockwise, approximately 1/4 turn, until the connector is fully seated against the stop in order to achieve an optimal electrical connection.
Ensure the work lead is fully seated in the receptacle to prevent overheating.
CHECK:
- Check if cutting machine is grounded reliably and according to standard.
- Check if all connectors are connected firmly.
- Check if power voltage is correct.
NOTE THE FOLLOWING:
- Ensure that the work clamp and the work piece make good metal-to-metal contact. Remove rust, dirt, paint, coatings and other debris to ensure the power supply makes proper contact with the work piece.
- For the best cut quality, attach the work clamp as close as possible to the area being cut.
- Do not attach the work clamp to the portion of the work piece which will be cut away.
OPERATION
PLEASE READ AND UNDERSTAND THIS ENTIRE SECITON BEFORE OPERATING YOUR MACHINE. ONLY QUALIFIED PERSONNEL SHOULD OPERATE THIS EQUIPMENT. OBSERVE ALL SAFETY INFORMATION THROUGHOUT THIS MANUAL.
SAFETY OPERATIONS
ELECTRIC SHOCK can be fatal

- Have an electrician install and service this machine and its equipment.
- Turn the input power off at the fuse box, disconnect or unplug supply lines, and allow machine to sit for a minimum of five minutes to allow the power capacitors to discharge before working inside this machine.
- Do not touch electrically "hot" parts. Turn the input power OFF and unplug the machine from the receptacle before working on this equipment.
FUMES AND GASES can be dangerous

- Keep your head out of fumes.
- Use ventilation or exhaust to remove fumes from breathing zone.
 WELDING SPARKS can cause fires or explosions

- Keep flammable material away.
- Do not weld, cut, or gouge on containers that have held or are currently holding combustibles.
ARC RAYS can burn

- Wear eye, ear and body protection.
OPERATION STEPS
- Turn on the system: Set the ON/OFF switch to the ON (I) position. Screen will turn on and will show the current volume after 5 Seconds.
- Set the 2T/4T model switch
2T/4T Locks the torch in the ON (fire) position.
![]()
- With the 4T option selected, press the trigger to fire the torch. You can then release the trigger while continuing to cut. Press the trigger again to stop the arc. The arc also stops if you lose transfer.
- With the 2T option selected, press the trigger to fire the torch. You need to hold the trigger while continuing to cut. Release the trigger to stop the arc.
- Adjust the air flow
Set the mode switch to Air Check mode.
![]()
- Adjust your air compressor's output air flow and pressure and make it is adequate to machine, open the valve of your air compressor.
- Adjust the Pressure-Reducing Valve and set the input PSI for your cutting.
- Set the output AMPs
- Turn the adjustment knob to change the amperage. Make sure cutting current is adequate to machine specifications according to thickness of cutting piece.
- Keep a distance of 0.06 Inch(1.5 mm) * from cutting nozzle to the work piece, press the trigger of the torch and burn/strike arc, sparks of arc striking will diminish immediately. User can begin to cut.
* Please use the Stand Off Guide mounted to PT60 torch to keep the distance


Operating the PT60 Torch with Stand Off Guide
The standoff guide is placed on the cutting surface. This maintains an optimal 1/8" standoff distance between the plasma cutting tip and the work, this is especially suitable if your hands are unsteady, or if you wish to use a straight edge guide or pattern guide. It also helps extend consumables' life.

- Wear your safety gear. Generally, you want the same type of protective gear when Welding and cutting, plasma has high arc voltage if the job or bench is wet and you place your hand or arm on it you can become part of the circuit and receive a shock. Be sure you are wearing insulated shoes and gloves, full length pants and covered shoes, wear eyes protection(a #5 shade is the minimum eyes protection) with other shade required depending on amperage a face shield is also recommended.
![]()
- Connect the earth clamp securely to the work piece or the work bench.
![]()
- Place and hold the torch vertical at the edge of the plate.
![]()
- Pull the trigger to energize the pilot arc. The cutting arc will start when the nozzle is moved closer to the edge of the work piece. When the cutting arc has cut through the edge of the plate, start moving evenly in the direction you wish to cut.
- Correct amperage and travel speed are important and relevant to material thickness and are correct when sparks are exiting from the work piece. If sparks are spraying up from the work piece, there is insufficient amps selected or the travel speed is too fast.
- To finish cutting, release the torch switch. The air flow will continue for 20 seconds to cool the torch head.


Hand torch cutting suggestions
- It is easier to pull the torch through the cut than to push it.
- To cut thin material reduce the amperage until you get the best quality cut.
- Use the correct size tip orifice for the amperage being used.
- For Straight cuts use a straight edge or cutting buggy as a guide. For circles, use a template or circle cutting attachment.
- Check that the front-end consumable parts of the plasma cutting torch are in good condition.
- Drag the torch tip lightly along the work piece to maintain a steady cut.
- While cutting, make sure that sparks exit from the bottom of the work piece. The sparks should lag slightly behind the torch as you cut (15° — 30° angle from vertical).
- If sparks spray up from the work piece, move the torch at a slower pace, or set the output current higher.
- With either the 75-degree or 15-degree hand torch, hold the torch nozzle perpendicular to the work piece so that the nozzle is at a 90° angle to the cutting surface. Observe the cutting arc as the torch cuts.

- If you fire the torch unnecessarily, you will shorten the life of the nozzle and electrode.
- Pulling, or dragging, the torch along the cut is easier than pushing it.
- For straight-line cuts, use a straight edge as a guide. To cut circles, use a template or a radius cutter attachment (A circle cutting guide).

STARTING A CUT

- Hold the torch 90° to the edge of the work piece.
![]()
- Press the trigger of the torch to start the pilot arc. Hold the torch at the edge (Do not continue the cut) until the arc has cut completely through the work piece.

- Drag the torch across the work piece to proceed with the cut smoothly. Maintain a steady, even pace. Make sure the arc cuts completely through the work piece.


- When cutting make sure that sparks are exiting from the bottom of the work piece.
- If sparks are spraying up from the work piece, you are moving the torch too fast, or you don't have enough amps set.
- Hold the torch vertical and watch the arc as it cuts along the line.
PIERCE A WORK PIECE

Recommend using 2T function while piercing
- Hold the torch at an approximate 30° to the work piece, the distance between the torch tip and the work piece should be within 1/16 inch (1.5 mm).
![]()
- Fire the torch. Slowly rotate the torch to from 30° to 90°.
![]()
- Hold the torch in place while continuing to press the trigger. When the arc goes completely through the work piece, then the arc has pierced the material.
![]()
- When the pierce is complete, drag the torch lightly along the work piece to proceed with the cut.


CUT QUALITY RELATED FACTORS
The best quality cut will be produced when all these variables are set correctly for the material thickness and type of material being cut.
- Amperage
Standard rule of thumb is the thicker the material the more amperage required. On thick material, set the machine to full output and vary your travel speed. On thinner material, you need to turn down the amperage and change to a lower-amperage tip to maintain a narrow kerf. The kerf is the width of the cut material that is removed during cutting. - Speed
Amperage and speed are critical to producing a good quality cut. The faster you move (especially on aluminum), the cleaner your cut will be. To determine if you're going too fast or too slow, visually follow the arc that is coming from the bottom of the cut. The arc should exit the material at a slight angle away from the direction of travel. If it's going straight down, that means you're going too slow, and you'll have an unnecessary buildup of dross or slag. If you go too fast, it will start spraying back onto the surface of the material without cutting all the way through. Because the arc trails at an angle, at the end of a cut, slow your cutting speed and angle the torch in to cut through the last bit of metal. - Direction
It is easier to pull the torch towards you than push it. The plasma stream swirls as it exits the tip, biting one side and finishing off on the other leaving a beveled edge and a straight edge. The bevel cut effect is more noticeable on thicker material and needs to take into consideration before starting your cut as you want the straight side of the cut to be on the finished piece you keep. - Torch nozzle height & position
The distance and position of the plasma torch cutting tip has an effect on the quality of the cut and the extent of the bevel of the cut. The easiest way to reduce bevel is by cutting at the proper speed and height for the material and amperage that is being cut.

Correct torch height and square to the material, minimum bevel & equal bevel gives the longest consumable life.

Torch angled to the material unequal bevel, one side may be excessively beveled.

Torch height too high excessive bevel, plasma Stream may not cut all the way through the material.

Torch height too low, reverse bevel. Tip may contact the work piece and short out or damage the tip.
- Nozzle Condition
The condition of the Nozzle orifice is critical to the quality of the cut result, a worn or damaged nozzle orifice will produce a distorted plasma stream resulting in a poor cut quality. - Electrode condition
A fixed gap is established between the electrode and the inside of the cutting tip. Electrons arc across the gap, ionizing and super heating the air creating the plasma stream. The electrode contains an insert in the end made of a highly conductive material called hafnium. This insert erodes with use and develops a pit in the end of the electrode, when the pit becomes too worn, poor-quality cuts will result, and necessitate replacement of the electrode. - Air pressure and volume
Air pressure, flow rate and air quality are critical to quality plasma cutting and consumable life span. The required air pressure and volume can vary from model to model and the manufacturer will provide the specs. The LOTOS LTP7500CNC air pressure is pre-set at 4.5 psi and requires a flow rate of 6.0 CF/M. The volume capacity of your compressor is important, if you have a small compressor with exactly the same CF/M rating as the plasma, then the compressor will run continuously when you are plasma cutting, a compressor with a CF/M rating slightly higher than the plasma would be more adequate. If you are doing a lot of cutting, cutting thick plate (same air consumption but slower cut speeds = longer cut time) then choose a compressor at 1.5 to 2 times the plasma system requirement. - Air quality
Good air quality is essential to quality plasma cutting and consumable life span. Compressors take in air at atmospheric pressure and increase the pressure and store it in a tank. Humidity in the air is condensed in the tank and in the airlines producing water, more so in humid environments. Moisture that forms in air lines has a tendency to condense into larger drops when the air pressure decreases as it is entering the plasma torch. When these droplets enter into the high temperatures (as much as 19832° f) in the plenum of the torch, they immediately break down into oxygen and hydrogen, which alters the normal chemical content of air in the torch. These elements will then dramatically change the plasma arc which causes the torch consumable parts to wear very quickly, alters the shape of the nozzle orifice, dramatically affecting cut quality in terms of squared edge, dross formation, and edge smoothness. Minimizing the moisture in the air supply is absolutely critical to quality plasma cuts and longevity of consumable parts. As a minimum, be sure, to drain the receiver (tank) on the air compressor at least daily. Most air plasma systems from reputable manufacturers have an on board particulate filter and or a coalescing filter with an auto drain that will remove some moisture from the air supply. For home workshop and light industrial users, the on-board air filter is adequate. Most situations however will require additional filtration to prevent moisture from affecting the quality of the plasma cutter and in most cases, it is recommended to install a filter that is designed to trap water through absorption. This style of filter has a replaceable filter cartridge that absorbs water and must be changed after it is near saturation, it should be installed close as possible to the air intake of the plasma cutter.
CAUSES OF COMMON HAND-CUTTING ISSUES
The work piece is not cut completely through. This can be caused by:
- The amperage setting is too low for the thickness of the work piece.
- The cutting speed is too fast.
- The consumables are too worn.
- The amperage setting is set too low for the thickness of the work piece.
- Gouging consumables are installed instead of cutting consumables.
- The work clamp is not attached properly to the work piece.
- The air pressure is too low, or the air flow rate is not high enough.
Cut quality is poor. This can be caused by:
- The amperage setting is too low for the thickness of the work piece.
- Your cutting speed is too quick or too slow.
Consumables' life is shorter than expected. This can be caused by:
- Moisture in the air supply.
- Incorrect air pressure.
- Consumables are incorrectly installed.
MAINTENANCE
- Remove dust by using compressed air regularly. If plasma cutter is placed in environment where condition is polluted with smoke and dust, the plasma cutter must have dust removed every day.
- Pressure is adequate to cutting in order to protect smaller components.
- Check the electric connectors and make sure the connectors are connected firmly (specially connect and insert components), tighten the connectors.
- Avoid water getting into machine and prevent machine becoming damp, or the machine must be dried in time and measured insulation by meter. After there is no problem, the machine can be operated.
- If the machine will not be used for a long time, it should be put in its own packing box and stored in a dry environment.
TROUBLESHOOTING
For Customer Service, please contact us by support@lotostechnology.com or Call us at 408-739-2329.
| Issues | Resolvable Methods |
| Digital display is on, fan is not working, and control knob is not working. |
|
| Digital display is on and fan is working. However, while pressing the trigger of torch, there is no arc-striking and electromagnetic valve is not working. |
|
| Digital display is on and fan is working. However, pressing the trigger of the torch, there is no arc striking and inter red LED light is on (need to remove the cover). |
|
| Digital display is on, fan is working, and Airflow comes out while press the trigger on the torch. However, there is no arc-striking and inter red LED light is not on (need to remove the cover). | There may be some damage on the PCB board:
|
| Pilot arc is not striking when pressing the trigger on the torch. |
|
REFERENCE
Note: LOTOS collects its data under laboratory test conditions using new consumables. User experience may vary if the operation conditions are different.
PSI SETTING REFERENCE TABLE
| Output AMP | Air Pressure (PSI) |
| 15-35 A | 40-50 |
| 35-55 A | 40-50 |
| 55-75 A | 60-70 |
CUTTING SPEED REFERENCE TABLE

CONSUMABLES
The following accessories and consumables can be purchased on www.uwelding.com, or call 408-739-2329 to order.

Cutting Consumables
Visit Our Website at: www.uwelding.com
Documents / Resources
References

Download manual
Here you can download full pdf version of manual, it may contain additional safety instructions, warranty information, FCC rules, etc.
Advertisement


Need help?
Do you have a question about the LTP7500CNC and is the answer not in the manual?
Questions and answers