Advertisement
Reading Guide
Note
 Important consideration
Tutorial Video
User could access and watch tutorial videos through the following links to use the product correctly.
https://obsbot.com/obsbot-tiny-4k/explore
OBSBOT Tiny 4K Overview
About Tiny 4K
OBSBOT Tiny 4K is an AI-powered PTZ webcam that uses deep learning neural networks computing to achieve AI tracking & auto framing, gesture control. It's designed to give users exciting new abilities and high-quality video for live streaming, video calls, and conferences. The standard for fast and reliable connections, OBSBOT Tiny 4K uses USB-C to ensure e cient video transfer speeds. Compatible with Windows® and macOS®. Using OBSBOT TinyCam, to expand more functions for the users.
Connecting Suggestions:
- USB 3.0 Port (Recommendation)
- USB 2.0 Port + DC Port
If the following phenomenon occurs when you use the OBSBOT Tiny 4K for the first time: videos lagging/choppy/flickering or automatic reset and restart. It means your product may be in use with the USB 2.0 port. Please use an extra DC adapter or change your connection port to the USB 3.0 to support the power supply.
System Requirements
Windows 7, Windows 8, Windows 10 or later macOS 10.13 or later
7th Gen Intel® Core™ i5 or later
Recommended for 1080p 60 fps and 4K
Recommended Apple computers:
- MacBook Pro (2018, 8th Gen Intel® Core™ i5 Processors or later)
- MacBook Air (2018, 8th Gen Intel® Core™ i5 Processors or later)
- iMac Retina (2019, 8th Gen Intel® Core™ i5 Processors or later)
Recommended PC configuration:
- CPU: 7th Gen Intel® Core™ i5 Processors or later
- RAM: 8GB
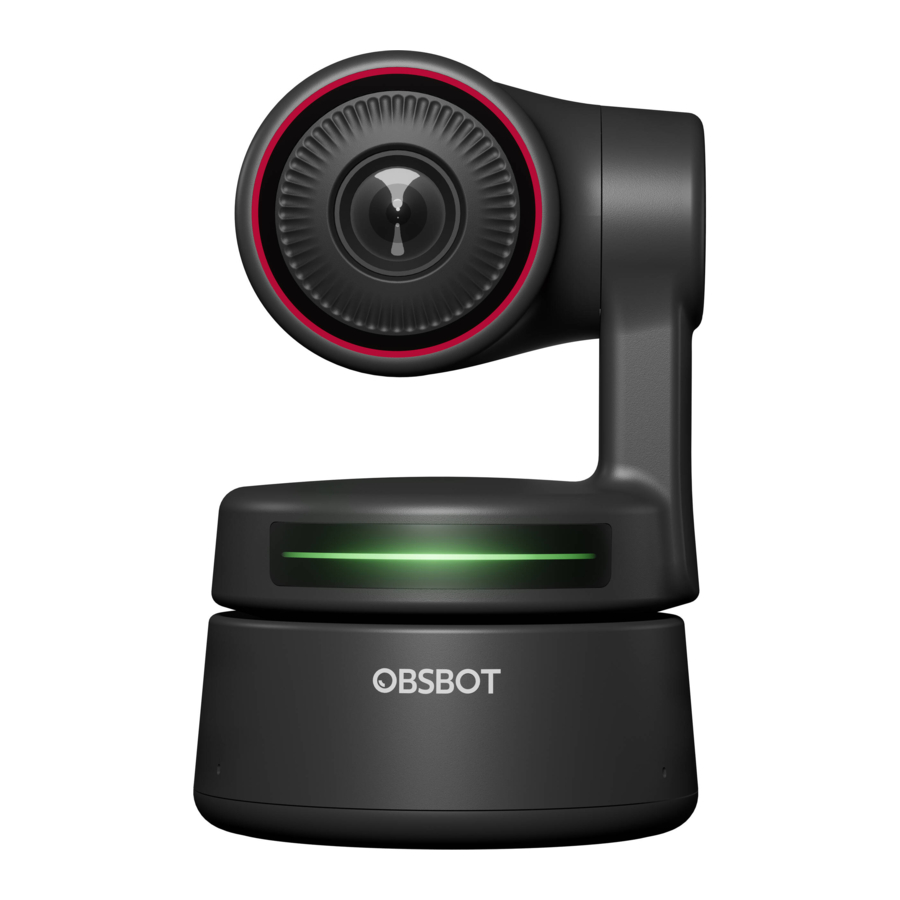
Parts Info

- 4K Ultra HD lens
- Camera Indicator
- Dual Microphone
- DC Power Port
- USB-C Port
- UNC 1/4-20 Interface
- Magnetic Base
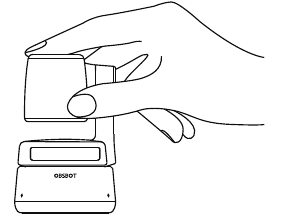
Setting Up Tiny 4K
Placing Tiny 4K
The webcam has an adjustable magnetic mount to fix the device to a monitor, desktop, or tripod.
-
Placement on a Monitor
Please operate as shown in the following figure:

-
Open the flexible base and mount it, attach one side of the gluing to the back of the monitor.
-
Making sure the foot on the flexible base is flush with the back of your monitor.
-

-
Placement on a Desktop
Place OBSBOT Tiny 4K directly on your desktops.
-
Placement on a Tripod
OBSBOT Tiny 4K is equipped with a standard UNC ¼-20 nut connector on the base for mounting the camera to a stand/tripod.
Connecting Tiny 4K
The webcam is compatible with Windows and Mac computers. To set up your OBSBOT Tiny 4K, please use the provided USB-C data cable for connecting. In addition, please use the provided USB-C to USB-A adapter if necessary. The webcam will begin to install automatically on your device. Please allow the webcam a few seconds to finish installing before attempting to access it. Then you can feel free to use any popular calling platforms such as Zoom, Microsoft Teams, Skype, Google Meet to get Tiny 4K streaming.
If the product is in working condition for a long time, the bottom of the product will get hot, which is normal.
Connecting Suggestions:
- USB 3.0 Port (Recommendation);
- USB 2.0 Port + DC Port.
4K streaming requires compatible third-party software.

Gimbal
OBSBOT Tiny 4K is equipped with a 2-axis gimbal. The controllable rotation range for the pan is ±150°, and for the tilt is ±45°.
Privacy Mode
Point the lens straight down. When the indicator light is off, it means that the privacy mode is turned on.
The product cuts off both the video and audio in the privacy mode.
Upside Down Mode
OBSBOT Tiny 4K supports using with upside down mode. It can be mounted upside down, then the screen will rotate automatically for use.
Gesture Control
OBSBOT Tiny 4K has the first of the kind implementation of gesture control in AI webcam, empowering users to access a series of functions such as select/cancel tracking target, zoom in/out with natural simple gestures. No need to press the button or interrupt your flow. First of all, please put your hand nearby your face and keep your fingers splay out when you making gestures, and then the camera indicator light will turn blue. The three blue lights flash one by one and then all of them flash once together means your gesture is recognized successfully.
Please go to the link below to find the tutorial video for gesture control: https://obsbot.com/obsbot-tiny-4k/explore

Zoom
OBSBOT Tiny 4K supports 4x digital zoom.
- Gesture Control
By default, the zoom settings is 2x. Users can create customized zoom settings from 1x to 4x via OBSBOT TinyCam. - Manual Control
Users can do the manual control for zoom settings from 1x to 4x via OBSBOT TinyCam.
Focus
OBSBOT Tiny 4K supports two focusing methods.
- Auto-Focus
Based on OBSBOT's AI technology, the auto-focus intelligently adjusts the lens in real-time so you always stay in focus, no matter you move toward or away from the camera. - Manual Focus
Users can close the auto-focus function and switch to manual focus in OBSBOT TinyCam.
HDR
By default, HDR is off. Users can switch it in OBSBOT TinyCam. You look your best over video, even in low light and direct sunlight with HDR.
Indicator Statuses
Camera Indicator
The camera indicator is made up of four colors: red, yellow, blue and green. Different combinations of light colors and flicker frequencies represent different indications. They can show the current working status to the users.
 | All three blue lights flash in a cycle which means the product is being initialized. |
 | The three blue lights flash one by one and then all of them flash once together means your gesture is recognized successfully. |
 | The middle of the green light keeps on which means no target was locked. |
 | All three green lights keep on which means the target was locked. |
 | All three yellow lights keep on which means losing target. |
 | During the upgrade, blue lights and yellow lights flash alternatively. |
 | All three red lights flash slowly which means upgrade failed. |
 | All three red lights keep on which means product failure including PTZ failure or AI error and so on. |
OBSBOT TinyCam
Software Overview
OBSBOT TinyCam is the software that comes with OBSBOT Tiny 4K for advanced setting. It is compatible with Windows and macOS. The users can do some control such as adjust the rotation of the gimbal, select target or unlock target, zoom in or out, set preset positions and so on.
Installation
Please visit https://obsbot.com/download to download the OBSBOT TinyCam to get further user experience.
Homepage

- Homepage
- System Setting
- Connect
Displaying the connection status of devices. The software can connect up to 4 devices and users can also switch the connection amongst multiple devices. - Smart Shooting
One-click to lock/cancel the tracking target. - Device Status
One-click to put your device to sleep or wake it. - Zoom
Manually adjust the zoom settings. It supports up to 4x digital zoom.
- Gimbal Reset
Reset the gimbal to the initial position. - Gimbal Control
Manually control the gimbal. - Preset Position
Find and open it in the system settings. There are 3 preset positions can be added. Users can also delete it and rename it by right-click.
System Setting
- Software Version
Find the current software version. The update will be pushed to the device automatically when the new version has been released. - Firmware Version
Find the current firmware version. The update will be pushed to the device automatically when the new version has been released. - Gesture Control-Locked Target
By default, it's on. The product cannot be used with gesture control for locked the target if you close this function. - Gesture Control-Zoom
By default, it's on. The product cannot be used with gesture control for zoom settings if you close this function. - Gesture Control-Zoom Factor
By default, the zoom settings is 2x. Users can create customized zoom settings from 1x to 4x. - Tracking Mode
There are 3 tracking modes. By default, it's standard mode.- Headroom Mode: Leave more space above your head. *Recommended Usage Scenario: The close-range video call.
- Standard Mode: It provides a standardized level for the auto-frame and tracking speed, which can cover most usage scenarios.
- Motion Mode: It adjusts the auto-frame to capture the whole body and improved the speed of Ai tracking. *Recommended Usage Scenarios: Dance, Yoga and any other indoor sports.
- Configure Video
Adjusting camera parameters, which only supports Windows. - Anti-Flicker
By default, it's off. This feature helps reduce flicker if you are in a room with fluorescent lights or you plan on shooting a television screen. - HDR By default, it's off. The exposure difference can be automatically repaired after being turned on it.
- Auto-Focus
By default, it's on. Users can close the auto-focus function and switch to manual focus. - Face Focus
By default, it's on. The focus area is on the center of the frame when you turned it off. This setting can be only supported when the auto-focus is on. - Initial Boot Position
Preset PTZ initial position. - Preset Position
By default, it's off. There are 3 preset positions that can be added to the homepage after being turned on it. - Global Hotkeys
By default, it's off. Click![]() to view the list of global keys.
to view the list of global keys. - Remote Controller
By default, it's off. Users can control the Tiny 4K by remote controller after the mode is turned on.
![caution]() Please go for buy it on OBSBOT official online store.
Please go for buy it on OBSBOT official online store.
 to view the list of global keys.
- Language Switching languages.
- More
- Export Log: Manually export the log file.
- Upgrade Manual: Firmware upgrade manual.
- Firmware Upgrade: Entry for manually firmware upgrade.
- Restore Factory Settings.
Firmware Upgrade
OBSBOT Tiny 4K can be upgraded in OBSBOT TinyCam. A prompt will be displayed after the device is connected when the firmware is available to upgrade. Please follow the instructions.
Do not disconnect the OBSBOT Tiny 4K during firmware upgrade. Please check the Firmware Upgrade Guide on https://obsbot.com/service/user-guide
Documents / Resources
References
Download manual
Here you can download full pdf version of manual, it may contain additional safety instructions, warranty information, FCC rules, etc.
Advertisement


Need help?
Do you have a question about the Tiny 4K and is the answer not in the manual?
Questions and answers