Table of Contents
Advertisement
Available languages
Available languages
Quick Links
Bedienungsanleitung
celexon elektrisch
höhenverstellbarer Schreibtisch
Economy eAdjust-71121
Vielen Dank für den Kauf dieses Produkts.
Für eine optimale Leistung und Sicherheit lesen Sie diese Anweisungen bitte sorgfältig
durch, bevor Sie dieses Produkt anschließen oder betreiben. Bitte bewahren Sie diese
Anleitung für eine spätere Verwendung auf.
Version: 32423_081
Advertisement
Table of Contents

Subscribe to Our Youtube Channel
Related Manuals for Celexon Economy eAdjust 71121


Summary of Contents for Celexon Economy eAdjust 71121
- Page 1 Bedienungsanleitung celexon elektrisch höhenverstellbarer Schreibtisch Economy eAdjust-71121 Vielen Dank für den Kauf dieses Produkts. Für eine optimale Leistung und Sicherheit lesen Sie diese Anweisungen bitte sorgfältig durch, bevor Sie dieses Produkt anschließen oder betreiben. Bitte bewahren Sie diese Anleitung für eine spätere Verwendung auf.
- Page 2 WARNHINWEISE Diese Bedienungsanleitung dient dazu, Sie mit der Funktionsweise dieses Produktes ver- traut zu machen. Bewahren Sie diese Anleitung daher gut auf, damit Sie jederzeit darauf zugreifen können. • Um einen störungsfreien Betrieb sicherzustellen, darf das Gerät ausschließlich in Innenbereichen eingesetzt werden, es ist NICHT zur Nutzung im Freien geeignet. •...
- Page 3 Strom. Kontaktieren Sie umgehend den Händler, bei dem Sie das Produkt ge- kauft haben oder celexon direkt (Web: www.celexon.de, Mail: info@celexon.de) für weitere Informationen. • Bei Nichtbeachtung obiger Anweisungen kann es zu Personenschäden und Beschädigungen des Produktes oder Geräten die daran angeschlossen sind kommen.
- Page 4 LIEFERUMFANG KURZINFORMATIONEN: Säulen Anzahl Max. Zuladung 70 Kg Max. Fahrgeschwindigkeit 25 mm/s Spannung 100 - 240V, 50/60Hz Max. Ausfahrhöhe 1210 mm Min. Ausfahrhöhe 710 mm Geeignet für Tischplattengrößen Breite | 1000-1800 mm Tiefe | 500-800 mm Betriebstemperatur 0~40°C...
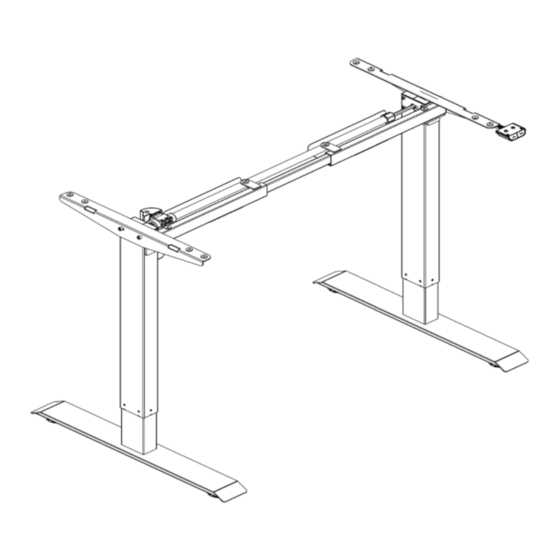
- Page 5 SCHRITT 1: MONTAGE FÜSSE Verbinden Sie die Füße (1) jeweils mit einer Säule (2) & (3) und verwenden Sie hierzu die Schrauben (A) und ziehen alles mit dem Innensechskantschlüssel (C) fest. SCHRITT 2: MONTAGE STÜTZSTREBE Lösen Sie alle vier Schrauben in der Stützstrebe (4) mit dem Innensechskant- schlüssel (C).
- Page 6 SCHRITT 2: MONTAGE STÜTZSTREBE Montieren Sie die Stützstrebe (4) an die Säulen (2) & (3) (gemäß Zeich- nung). Verwenden Sie dazu die Schrau- ben (B) und ziehen Sie diese mit dem Innensechskantschlüssel (C) fest. Achten Sie darauf, dass die Stützstre- be mit ausreichender Breite zu der verwendeten Tischplattenbreite einge- stellt ist.
- Page 7 SCHRITT 4: MONTAGE TISCHAUFNAHME(3). Montieren Sie die Tischaufnahmen (6) an den Säulen (2) & (3) (gemäß Zeich- nung). Verwenden Sie dazu die Schrauben (A) und ziehen Sie diese mit dem Innensechskantschlüssel (C) fest. SCHRITT 5: MONTAGE TISCHPLATTE 1. Setzen Sie die Netzteil-Halterung 2.
- Page 8 SCHRITT 6: MONTAGE SCHUTZBLECHE UND NETZTEIL Montieren Sie die Schutzbleche (8) an die Stützstrebe (4) (gemäß Zeichnung). Achten Sie darauf, dass die Löcher in den Schutzblechen passend zu den Lö- chern in der Stützstrebe liegen. Verwenden Sie die Schrauben (E) und ziehen Sie diese mit dem Innensechskantschlüssel (D) fest.
-
Page 9: Fehlerbehebung
BEDIENFELD Der Tisch fährt hoch Der Tisch fährt runter Achtung: Die jeweilige Taste muss so lange gedrückt gehalten werden, bis die gewünschte Höhe erreicht ist. FEHLERBEHEBUNG Fehler Lösung Der Tisch fährt nicht runter, obwohl der Überprüfen Sie alle Kabelverbindungen Knopf dauerhaft gedrückt wird. und stellen Sie sicher, dass wirklich jedes Kabel korrekt angeschlossen ist. - Page 10 Hersteller: celexon Europe GmbH Adresse: Gutenbergstraße 2, 48282 Emsdetten, DE Produktname: celexon elektrisch höhenverstellbarer Schreibtisch Economy eAdjust-71121 Produkte, die mit dem CE-Zeichen gekennzeichnet sind, entsprechen allen Anforderungen der entsprechenden EU-Direktiven. Die EU-Konformitäts- erklärung kann unter folgender Adresse heruntergeladen werden: www.celexon.de/zertifikate Das Symbol weist auf die getrennte Rücknahme elektrischer und...
- Page 11 User Manual celexon electric height-adjustable desk Economy eAdjust-71121 Thank you for purchasing this product. For optimum performance and safety please read these instructions carefully before using this product. Please keep this manual for for later use. Version: 32423_081...
- Page 12 In such cases, switch off the product immediately and take it out of service. Immediately contact the dealer from whom you purchased the product or celexon directly (Web: www.celexon.co.uk, Mail: info@celexon.co.uk) for further information.
- Page 13 • If you are unsure about using the product, contact a specialist, your dealer or celexon directly (Web: www.celexon.co.uk, Mail:info@celexon.co.uk). • Technical changes and errors excepted DISCLAIMER The information in this document is subject to change without prior notice by the manufacturer.
-
Page 14: Brief Information
IN THE BOX Footplate x2 Column L x1 Column R x1 Support Strut x1 Gear rod x1 Table Mount x2 Power Supply x1 Guard x2 Power cable x1 Cable Ties x4 Power supply bracket Control panel x1 Connection cable Control box x1 BRIEF INFORMATION: Number of columns: Max. - Page 15 STEP 1: MOUNTING FEET Connect each of the feet (1) to a column (2) & (3) and use the screws (A) and tighten everything with the Allen key (C). STEP 2: MOUNTING THE SUPPORT STRUT Loosen all four screws in the support strut (4) using the Allen key (C). Make sure that the screws are well loosened, but not completely unscrewed.
- Page 16 STEP 2: MOUNTING THE SUPPORT STRUT Fit the support strut (4) to the columns (2) & (3) (according to the drawing). Use the screws (B) and tighten them with the Allen key (C). Ensure that the support strut is set at a sufficient width for the tabletop width used.
- Page 17 STEP 4: MOUNTING THE TABLE HOLDER Fit the table supports (6) to the columns (2) & (3) (as shown in the drawing). To do this, use the screws (A) and tighten them with the Allen key (C). STEP 5: ASSEMBLING THE TABLE TOP 1.
- Page 18 STEP 6: MOUNTING THE PROTECTIVE GUARDS AND POWER SUPPLY UNIT Fit the guards (8) to the support strut (4) (as shown in the drawing). Ensure that the holes in the guards are aligned with the holes in the support strut. Use the screws (E) and tighten them with the Allen key (D).
-
Page 19: Control Panel
CONTROL PANEL The table moves up The table moves down Down Attention: The respective button must be held down until the desired height is reached. TROUBLESHOOTING Error Solution The table does not move down even Check all cable connections and make though the button is pressed continuous- sure that every cable is connected cor- rectly. - Page 20 Address: Gutenbergstraße 2, 48282 Emsdetten, DE Product name: celexon electric height-adjustable desk Economy eAdjust-71121 Products that are marked with the CE mark meet all requirements of the relevant EU directives. The EU declaration of conformity can be downloaded from the following address: www.celexon.de/zertifikate...
- Page 21 Notice d’utilisation Bureau celexon réglable en hauteur électriquement Economy eAdjust-71121 Merci d’avoir choisi ce produit. Pour une performance et une sécurité optimales, veuillez lire attentivement les présentes instructions avant de connecter ou d’utiliser ce produit. Veuillez conserver la présente notice pour une consultation ultérieure.
- Page 22 Dans ce cas, éteignez immédiatement le produit et débranchez-le. Contactez immédiatement le reven- deur auprès duquel vous avez acheté le produit ou directement celexon (web : www.celexon.fr, mail : info@celexon.fr) pour de plus amples informations.
-
Page 23: Exclusion De Responsabilité
Une installation ou une utilisation incorrecte peut entraîner l’annulation de la garantie. • Si vous n’êtes pas sûr lors de l’utilisation du produit, contactez le personnel spé- cialisé, votre revendeur ou directement celexon (Web : www.celexon.fr, Mail : info@celexon.fr). • Sous réserve de modifications techniques et d’erreurs. - Page 24 CONTENU DE LA LIVRAISON Plaque de base Colonne D x1 Colonne G x1 Entretoise Tige de support x1 transmission x1 Support de Bloc d’alimenta- Tôle de protection Câble électrique Serre-câble bureau x2 tion x1 Support pour bloc Panneau de com- Câble de Boîtier de com- d’alimentation x1...
- Page 25 ÉTAPE N°1 : MONTAGE DES PIEDS Reliez les pieds (1) aux colonnes (2) et (3) en utilisant les vis (A) et en serrant le tout à l’aide de la clé Allen (C). ÉTAPE N°2 : MONTAGE DE L’ENTRETOISE DE SUPPORT Desserrez les quatre vis dans l’entretoise de support (4) à...
- Page 26 ÉTAPE N°2 : MONTAGE DE L’ENTRETOISE DE SUPPORT Montez l’entretoise de support (4) sur les colonnes (2) et (3) (conformément au dessin). Pour ce faire, utilisez les vis (B) et serrez-les à l’aide de la clé Allen (C). Vérifier que l’entretoise de support est réglée avec une largeur suffisante par rapport à...
- Page 27 ÉTAPE N°4 : MONTAGE DU SUPPORT DE BUREAU (3). Montez les supports de bureau (6) sur les colonnes (2) et (3) (conformément au dessin). Pour ce faire, utilisez les vis (A) et serrez-les à l’aide de la clé Allen (C). ÉTAPE N°5 : MONTAGE DU PLATEAU DE BUREAU 1.
- Page 28 ÉTAPE N°6 : MONTAGE DES TÔLES DE PROTECTION ET DU BLOC D’ALIMENTATION Montez les tôles de protection (8) sur l’entretoise de support (4) (confor- mément au dessin). Veillez à ce que les trous des tôles de protection corres- pondent aux trous dans l’entretoise de support. Utilisez les vis (E) et serrez-les à...
-
Page 29: Panneau De Commande
PANNEAU DE COMMANDE Haut Le bureau monte Le bureau descend Attention : la touche correspondante doit être maintenue enfoncée jusqu’à ce que la hauteur souhaitée soit atteinte. DÉPANNAGE Erreur Solution Le bureau ne descend pas, bien que le Vérifiez toutes les connexions de câbles bouton soit enfoncé... - Page 30 Adresse : Gutenbergstraße 2, 48282 Emsdetten, DE Nom du produit : celexon bureau réglable en hauteur électriquement Economy eAdjust-71121 Les produits qui comportent la marque CE respectent toutes les exigences des directives européennes applicables. La déclaration de conformité UE peut être téléchargée à...
- Page 31 Manual de instrucciones Escritorio eléctrico de altura regulable Economy eAdjust-71121 celexon Gracias por adquirir este producto. Para un rendimiento y seguridad óptimos, lea atentamente estas instrucciones antes de conectar o utilizar este producto. Conserve estas instrucciones para futuras consultas. Versión: 32423_081...
- Page 32 En estos casos, apague in- mediatamente el producto y desconéctelo de la red eléctrica. Póngase en contacto inmediatamente con el distribuidor al que compró el producto o di- rectamente con celexon (web: www.celexon.es correo: info@celexon.es) para obtener más información. •...
-
Page 33: Exención De Responsabilidad
él. Asimismo, la instalación o el uso incorrectos pueden invalidar la garantía. • Si tiene dudas sobre el uso del producto, póngase en contacto con un especialis- ta, con su distribuidor o directamente con celexon (web: www.celexon.es, correo: info@celexon.es). • Salvo cambios y errores técnicos. - Page 34 VOLUMEN DE SUMINISTRO 2x placas base 1x columna iz- 1x columna de- 1x soporte de 1x barra de transmi- quierda recha apoyo sión 2x alojamientos 1x fuente de 2x placas de pro- 1x cable eléctrico 4x bridas para de mesa alimentación tección cables...
- Page 35 PASO 1: MONTAJE DE LAS PATAS Una cada una de las patas (1) con una columna (2) y (3) mediante los tornillos (A) y apriételos con la llave Allen (C). PASO 2: MONTAJE DEL SOPORTE DE APOYO Suelte los cuatro tornillos del soporte de apoyo (4) con la llave Allen (C). Ase- gúrese de que los tornillos estén bien sueltos, pero no completamente desen- roscados.
- Page 36 PASO 2: MONTAJE DEL SOPORTE DE APOYO Monte el soporte de apoyo (4) en las columnas (2) y (3) (siga el esquema). Para ello, utilice los tornillos (B) y aprié- telos con la llave Allen (C). Asegúrese de que el soporte de apo- yo se haya ajustado con un ancho sufi- ciente con respecto al ancho de tablero utilizado.
- Page 37 PASO 4: MONTAJE DEL ALOJAMIENTO DE LA MESA (3). Monte los alojamientos de la mesa (6) en las columnas (2) y (3) (según esque- ma). Para ello, utilice los tornillos (A) y apriételos con la llave Allen (C). PASO 5: MONTAJE DEL TABLERO DE LA MESA 1.
- Page 38 PASO 6: MONTAJE DE PLACAS DE PROTECCIÓN Y FUENTE DE ALIMENTACIÓN Monte la placa de protección (8) al soporte de apoyo (4) (siga el esquema). Asegúrese de que los orificios de las placas de protección coincidan con los del soporte de apoyo. Utilice los tornillos (E) y apriételos con la llave Allen (D). Coloque la fuente de alimentación (7) en su soporte (11) (según el esquema).
-
Page 39: Panel De Control
PANEL DE CONTROL Arriba La mesa sube La mesa baja Abajo Atención: es necesario presionar el botón correspondiente hasta haber alcan- zado la altura. RESOLUCIÓN DE PROBLEMAS Error Solución La mesa no baja aunque se mantenga Compruebe todas las conexiones del ca- presionado el botón. - Page 40 Los productos que llevan la marca CE cumplen todos los requisitos de las direc- tivas comunitarias pertinentes. La declaración de conformidad de la UE puede descargarse en la siguiente dirección: www.celexon.de/zertifikate El símbolo hace referencia a la recogida selectiva de dispositivos eléctricos y electrónicos en los países de la UE.
- Page 41 Manuale di istruzioni celexon scrivania con regolazione elettrica dell’altezza Economy eAdjust-71121 Grazie per aver acquistato questo prodotto. Per garantire prestazioni e sicurezza ottimali, leggere attentamente le presenti istruzioni prima di collegare o utilizzare lo schermo di proiezione Conservare queste istruzioni per riferimenti futuri.
- Page 42 In questi casi, spegnere immediatamen- te il supporto e scollegarlo dall’alimentazione elettrica. Contattare imme- diatamente il rivenditore presso il quale è stato acquistato il prodotto o contattare direttamente celexon (sito: www.celexon.it, e-mail: info@celexon.it) per ulteriori informazioni.
-
Page 43: Esclusione Di Responsabilità
• In caso di incertezze sull’uso del supporto, rivolgersi al personale specializ- zato, al rivenditore o direttamente a celexon (sito: www.celexon.it, e-mail: info@celexon.it). • Con riserva di modifiche tecniche e salvo errori di stampa. ESCLUSIONE DI RESPONSABILITÀ... - Page 44 CONTENUTO DELLA FORNITURA 2 piastre di ap- 1 colonna sx 1 colonna dx 1 elemento tra- 1 asta del riduttore poggio sversale 2 attacchi per 1 cavo di 4 fascette la scrivania alimentatore protezioni alimentazione per cavi 1 supporto 1 Pannello di 1 cavo di collega- 1 scatola dell’alimentatore...
- Page 45 PASSAGGIO 1: MONTAGGIO DEI PIEDI Collegare entrambi i piedi (1) alle co- lonne (2) e (3) utilizzando le viti (A) e serrare con la chiave a brugola (C). PASSAGGIO 2: MONTAGGIO DELL’ELEMENTO TRASVERSALE Allentare le quattro viti dell’elemento trasversale (4) utilizzando la chiave a brugola (C).
- Page 46 PASSAGGIO 2: MONTAGGIO DELL’ELEMENTO TRASVERSALE Montare l’elemento trasversale (4) sulle colonne (2) e (3) (come da disegno). Utilizzi le viti (B) e serrarle con la chia- ve a brugola (C). Attenzione accertarsi che l’elemento trasversale sia impostato su una lar- ghezza sufficiente per la misura della scrivania utilizzata.
- Page 47 PASSAGGIO 4: MONTAGGIO DELL’ATTACCO DELLA SCRIVANIA Montare l’attacco della scrivania (6) sulle colonne (2) e (3) (come da disegno). Utilizzare le viti (A) e serrarle con la chiave a brugola (C). PASSAGGIO 5: MONTAGGIO DELLA SCRIVANIA 1. Posizionare il supporto dell’alimen- 2.
- Page 48 PASSAGGIO 6: MONTAGGIO DELLE PROTEZIONI E DELL’ALIMEN- TATORE Montare le protezioni (8) sull’elemento trasversale (4) (come da disegno). Ac- certarsi che i fori delle protezioni coincidano con i fori dell’elemento trasversa- le. Utilizzare le viti (E) e serrarle con la chiave a brugola (C). Inserire l’alimenta- tore (7) nel supporto (11) (come mostrato nel disegno).
-
Page 49: Pannello Di Controllo
PANNELLO DI CONTROLLO In alto La scrivania si solleva La scrivania si abbassa In basso Attenzione: Il tasto deve essere tenuto premuto fino a raggiungere l’altezza prescelta. RISOLUZIONE DEI PROBLEMI Guasto Risoluzione La scrivania non si abbassa anche se il Controllare tutti i collegamenti dei cavi tasto viene premuto continuamente. - Page 50 Europe GmbH Indirizzo: Gutenbergstraße 2, 48282 Emsdetten, DE Nome del prodotto: celexon carrello per display con regolazione Economy eAdjust-71121 I prodotti etichettati con il marchio CE soddisfano tutti i equisiti delle direttive UE vigenti. La dichiarazione di conformità UE può essere scaricata dal seguente indirizzo: www.celexon.de/zertifikate...
- Page 51 Instrukcja obsługi biurko z elektrycznie regulowa- ną wysokością celexon Economy eAdjust-71121 Dziękujemy za zakup produktu. Aby zapewnić optymalne działanie i bezpieczeństwo, przed podłączeniem lub obsługą tego produktu należy uważnie przeczytać niniejsze instrukcje. Prosimy o zachowanie niniejszej instrukcji do wykorzystania w przyszłości.
-
Page 52: Wskazówki Ostrzegawcze
W takich przypadkach należy natychmiast wy- łączyć produkt i odłączyć go od źródła zasilania. Należy bezzwłocznie skon- taktować się ze sprzedawcą, u którego nabyto produkt lub bezpośrednio z firmą celexon (Internet: www.celexon.pl, e-mail: info@celexon.pl), aby uzyskać więcej informacji. •... -
Page 53: Wyłączenie Odpowiedzialności
(Internet: www.celexon.pl, e-mail: info@celexon.pl). • Zastrzega się możliwość zmian technicznych i błędów. WYŁĄCZENIE ODPOWIEDZIALNOŚCI Informacje zawarte w tym dokumencie mogą ulec zmianie bez uprzedniego powiadomienia ze strony producenta. Zmiany będą dodawane do kolejnych wersji niniejszej instrukcji. - Page 54 ZAKRES DOSTAWY Stopa x2 Kolumna L x1 Kolumna P x1 Wspornik pod- Drążek przekładni x1 pierający x1 Podpora blatu Zasilacz Blacha ochronna Kabel zasilający Opaska kablowa Uchwyt zasilacza Panel obsługi Kabel Skrzynka steru- połączeniowy x1 jąca x1 SKRÓCONA INFORMACJA: Liczba kolumn Maks.
- Page 55 KROK 1: MONTAŻ STÓP Połączyć każdą ze stóp (1) z jedną ko- lumną (2) i (3), używając do tego śrub (A) i dokręcając wszystko kluczem im- busowym (C). KROK 2: MONTAŻ WSPORNIKA PODPIERAJĄCEGO Odkręcić wszystkie cztery śruby we wsporniku podpierającym (4) kluczem im- busowym (C).
- Page 56 KROK 2: MONTAŻ WSPORNIKA PODPIERAJĄCEGO Zamontować wspornik podpierają- cy (4) na kolumnach (2) i (3) (zgodnie z rysunkiem). Użyć do tego śrub (B) i dokręcić je kluczem imbusowym (C). Zwrócić uwagę, aby wspornik pod- pierający był ustawiony z dostateczną szerokością względem stosowanej sze- rokości blatu.
- Page 57 KROK 4: MONTAŻ PODPORY BLATU (3). Zamontować podpory blatu (6) na kolumnach (2) i (3) (zgodnie z rysunkiem). Użyć do tego śrub (A) i dokręcić je kluczem imbusowym (C). KROK 5: MONTAŻ BLATU 1. Założyć uchwyt zasilacza (11) na 2. Następnie zamontować blat śrubami wspornik podpierający (4) (patrz (F) do stelaża stołu (zgodnie z rysun- rysunek na dole).
- Page 58 KROK 6: MONTAŻ BLACH OCHRONNYCH I ZASILACZA Zamontować blachy ochronne (8) na wsporniku podpierającym (4) (zgodnie z rysunkiem). Upewnić się, że otwory w blachach ochronnych są ułożone od- powiednio do otworów we wsporniku podpierającym. Użyć śrub (E) i dokręcić je kluczem imbusowym (D). Włożyć zasilacz (7) w mocowaniu (11) (zgodnie z rysunkiem).
-
Page 59: Panel Obsługi
PANEL OBSŁUGI W górę Blat przesuwa się do góry Blat przesuwa się w dół W dół Uwaga: Dany przycisk musi być przytrzymany w stanie wciśniętym aż do uzy- skania żądanej wysokości. USUWANIE BŁĘDÓW Błąd Rozwiązanie Stół nie przesuwa się w dół, mimo że Sprawdzić... - Page 60 Producent: celexon Europe GmbH Adres: Gutenbergstraße 2, 48282 Emsdetten, DE Nazwa produktu: Biurko z elektrycznie regulowaną wysokością celexon Economy eAdjust-71121 Produkty oznaczone znakiem CE spełniają wszelkie wymagania odpowiednich dyrektyw UE. Deklarację zgodności UE można pobrać pod następującym adre- sem: www.celexon.de/zertifikate Ten symbol oznacza, że w krajach UE urządzenia elektryczne i elek-...
- Page 61 Bedieningshandleiding celexon elektrisch in hoogte verstelbaar bureau Economie eAdjust-71121 Hartelijk dank voor uw aankoop van dit product. Voor optimale prestaties en veiligheid moet u deze aanwijzingen zorgvuldig doorlezen voordat u dit product aansluit of gebruikt. Bewaar deze handleiding voor later gebruik.
- Page 62 WAARSCHUWINGEN Deze handleiding is bedoeld om u vertrouwd te maken met de werking van dit product. Bewaar deze handleiding daarom goed, zodat u deze op elk gewenst moment kunt raad- plegen. • Om te zorgen voor een storingsvrij gebruik mag het product uitsluitend in binnen- ruimtes worden gebruikt.
-
Page 63: Uitsluiting Van Aansprakelijkheid
Schakel in deze gevallen het product onmiddellijk uit en koppel het los van de stroomvoorziening. Neem onmiddellijk contact op met de dealer bij wie u het product hebt gekocht of rechtstreeks met celexon (web: www.celexon.nl, e-mail: info@celexon.nl) voor verdere informatie. - Page 64 LEVERINGSOMVANG Voetplaat x2 Kolom L x1 Kolom L x1 Steunstang x1 Drijfstang x1 Tafelbevestiging Voeding Beschermplaat Stroomkabel Kabelbinders Voedingshouder Bedieningspaneel Verbindingskabel Controlebox BEKNOPTE INFORMATIE: Aantal kolommen Max. belasting 70 kg Maximale bewegingssnelheid 25 mm/s Spanning 100 - 240V, 50/60Hz Max. uitschuifhoogte 1210 mm Min.
- Page 65 STAP 1: MONTAGE VAN DE VOETEN Verbind de voeten (1) telkens met een kolom (2) & (3) met behulp van de schroeven (A) en draai alles vast met de inbussleutel (C). STAP 2: MONTAGE STEUNSTANG Draai alle vier de schroeven in de steunstang (4) los met de inbussleutel (C). Zorg ervoor dat de schroeven goed losgedraaid zijn, maar niet volledig eruit zijn gedraaid.
- Page 66 STAP 2: MONTAGE STEUNSTANG Monteer de steunstang (4) aan de ko- lommen (2) en (3) (volgens tekening). Gebruik hiervoor de schroeven (B) en draai deze vast met de inbussleutel (C). Let erop dat de steunstang voldoende breed is ingesteld ten opzichte van de breedte van het gebruikte tafelblad.
- Page 67 STAP 4: MONTAGE TAFELBEVESTIGING (3). Monteer de tafelbevestigingen (6) aan de kolommen (2) & (3) (volgens teke- ning). Gebruik hiervoor de schroeven (A) en draai deze vast met de inbussleu- tel (C). STAP 5: MONTAGE TAFELBLAD 1. Plaats de voedingshouder (11) op 2.
- Page 68 STAP 6: MONTAGE VAN BESCHERMPLATEN EN VOEDING Monteer de beschermplaten (8) aan de steunstang (4) (volgens tekening). Zorg ervoor dat de gaten in de kolommen overeenkomen met de gaten in de steunstang. Gebruik de schroeven (E) en draai ze vast met de inbussleutel (D). Plaats de voeding (7) in de houder (11) (volgens de tekening).
- Page 69 BEDIENINGSPANEEL Hoog De tafel gaat omhoog De tafel gaat naar beneden Omlaag Let op: De betreffende knop moet ingedrukt worden gehouden tot de gewens- te hoogte is bereikt. PROBLEEMOPLOSSING Fout Oplossing De tafel beweegt niet naar beneden, Controleer alle kabelverbindingen en ver- ook al wordt de knop continu ingedrukt zeker u ervan dat alle kabels correct aan- gehouden.
- Page 70 Europe GmbH Adres: Gutenbergstraße 2, 48282 Emsdetten, DE Productnaam: celexon elektrisch in hoogte verstelbaar bureau Economy eAdjust-71121 Producten die met het CE-keurmerk gemarkeerd zijn, voldoen aan alle eisen van de relevante EU-richtlijnen. De EU-conformiteitsverklaring kan via het volgende adres worden gedownload: www.celexon.de/zertifikate Dit symbool maakt attent op de gescheiden inzameling van elektri- sche en elektronische apparaten in EU-landen.
- Page 71 Bruksanvisning celexon elektriskt höjdjusterbart skrivbord Economy eAdjust-71121 Tack för att du har valt denna produkt! Läs igenom denna bruksanvisning noga innan du ansluter eller använder produkten för att garantera säkerheten och uppnå bästa möjliga prestanda. Spara denna bruksanvis- ning för framtida bruk.
- Page 72 Stäng i så fall omedelbart av produkten och koppla bort strömmen till produkten. Kon- takta omedelbart återförsäljaren som du köpte produkten av eller vänd dig direkt till celexon (webbplats: www.celexon.se, e-post: info@celexon.se) för ytterligare information.
- Page 73 • Om du är osäker på hur produkten ska användas ber vi dig kontakta en ex- pert, din återförsäljare eller celexon direkt (webbplats: www.celexon.se, e-post: info@celexon.se). • Med reservation för tekniska ändringar och fel.
- Page 74 LEVERANSOMFATTNING 2 fotplattor 1 pelare L 1 pelare R 1 stödstag 1 transmissionsstång Bordsfästen Nätadapter Skyddsplåt Elkabel Buntband Fäste till nätadapter Operatörspanel Anslutningskabel Styrbox KORTFATTAD INFORMATION: Pelare antal Max. nyttolast 70 kg Max. körhastighet 25 mm/s Spänning 100–240 V, 50/60 Hz Max.
- Page 75 STEG 1: MONTERING AV FÖTTER Anslut fötterna (1) till vardera en pelare (2) och (3) med hjälp av skruvarna (A) och dra åt allt med insexnyckeln (C). STEG 2: MONTERING AV STÖDSTAG Lossa alla fyra skruvarna i stödstaget (4) med insexnyckeln (C). Se till att skru- varna är väl lossade men inte fullständigt utskruvade.
- Page 76 STEG 2: MONTERING AV STÖDSTAG Montera stödstaget (4) på pelarna (2) och (3) (enligt ritning). För detta ända- mål använd skruvarna (B) och dra åt dem med insexnyckeln (C). Säkerställ att stödstaget har ställts in med tillräckligt bredd till den bordsski- va som används.
- Page 77 STEG 4: MONTERING AV BORDSFÄSTE (3). Montera bordsfästena (6) på pelarna (2) och (3) (enligt ritningen). För detta ändamål använd skruvarna (A) och dra åt dem med insexnyckeln (C). STEG 5: MONTERING AV BORDSSKIVA 1. Placera nätadapterns fäste (11) på 2.
- Page 78 STEG 6: MONTERING AV SKYDDSPLÅTAR OCH NÄTADAPTER Montera skyddsplåtarna (8) på stödstaget (4) (enligt ritningen). Se till att hå- len i skyddsplåtarna ligger matchande över hålen i stödstaget. För detta än- damål använd skruvarna (E) och dra åt dem med insexnyckeln (D). Sätt in nätadaptern (7) i fästet (11) (enligt ritningen).
- Page 79 OPERATÖRSPANEL Bordet körs upp Bordet körs ned OBS: Respektive knapp måste hållas intryckt tills önskad höjd uppnås. FELSÖKNING Lösning Bordet körs inte ner trots att knappen Kontrollera alla kabelanslutningar och sä- hela tiden hålls intryckt. kerställ att verkligen varje kabel är korrekt ansluten.
-
Page 80: Information Om Eu-Försäkran Om Överensstämmelse
Tillverkare: celexon Europe GmbH Adress: Gutenbergstraße 2, 48282 Emsdetten, DE Produktens namn: celexon elektriskt höjdjusterbart skrivbord Economy eAdjust-71121 Produkter som är försedda med CE-märkning uppfyller alla krav i de relevanta EU-direktiven. EU-försäkran om överensstämmelse kan laddas ner på följande adress: www.celexon.de/zertifikate Denna symbol anger att elektrisk och elektronisk utrustning måste...
Need help?
Do you have a question about the Economy eAdjust 71121 and is the answer not in the manual?
Questions and answers