Advertisement
PRODUCT SAFETY PRECAUTIONS
READ BEFORE USING
 Protect yourself and others from injury - read and follow these precautions.
Symbol Usage
DANGER! - Indicates a hazardous situation which, if not avoided, will result in death or serious injury. The possible hazards are shown in the adjoining symbols or explained in the text.
Indicates a hazardous situation which, if not avoided, could result in death or serious injury. The possible hazards are shown in the adjoining symbols or explained in the text.
NOTICE - Indicates statements not related to personal injury.
 Indicates special instructions.

This group of symbols means Warning! Watch Out! ELECTRIC SHOCK, MOVING PARTS, and HOT PARTS hazards. Consult symbols and related instructions below for necessary actions to avoid the hazards.
Arc Welding Hazards
Only qualified persons should install, operate, maintain, and repair this unit.
ARC RAYS can burn eyes and skin.
Arc rays from the welding process produce intense visible and invisible (ultraviolet and infrared) rays that can burn eyes and skin. Sparks fly off from the weld.

- Wear a welding helmet fitted with a proper shade of filter to protect your face and eyes when welding or watching (see ANSI Z49.1 and Z87.1 listed in Safety Standards). Refer to Shade and Sensitivity charts.
- Wear approved safety glasses with side shields under your helmet.
- Use protective screens or barriers to protect others from flash, glare, and sparks; warn others not to watch the arc.
- Wear protective clothing made from durable, flame-resistant material (leather, heavy cotton, and wool) and foot protection.
- Before welding, adjust the auto-darkening lens sensitivity setting to meet the application.
- Stop welding immediately if the auto-darkening lens does not darken when the arc is struck. See the Owner's Manual for more information.
WELDING HELMETS do not provide unlimited eye, ear and face protection.
Arc rays from the welding process produce intense visible and invisible (ultraviolet and infrared) rays that can burn eyes and skin. Sparks fly off from the weld.

- Use impact resistant safety spectacles or goggles and ear protection at all times when using this welding helmet.
- Do not use this helmet while working with or around explosives or corrosive liquids.
- Do not weld in the overhead position while using this helmet.
- Inspect the auto-lens frequently. Immediately replace any scratched, cracked, or pitted cover lenses or auto-lenses.
NOISE can damage hearing.
Noise from some processes or equipment can damage hearing.

- Wear approved ear protection if noise level is high.
READ INSTRUCTIONS.
- Read and follow all labels and the Owner's Manual carefully before installing, operating, or servicing unit. Read the safety information at the beginning of the manual and in each section.
- Use only genuine replacement parts from the manufacturer.
- Perform maintenance and service according to the Owner's Manuals, industry standards, and national, state, and local codes.
FUMES AND GASES can be hazardous.
Welding produces fumes and gases. Breathing these fumes and gases can be hazardous to your health.

- Keep your head out of the fumes. Do not breathe the fumes.
- If inside, ventilate the area and/or use local forced ventilation at the arc to remove welding fumes and gases.
- If ventilation is poor, wear an approved air-supplied respirator.
- Read and understand the Material Safety Data Sheets (MSDSs) and the manufacturer's instructions for metals, consumables, coatings, cleaners, and degreasers.
- Work in a confined space only if it is well ventilated, or while wearing an air-supplied respirator. Always have a trained watchperson nearby. Welding fumes and gases can displace air and lower the oxygen level causing injury or death. Be sure the breathing air is safe.
- Do not weld in locations near degreasing, cleaning, or spraying operations. The heat and rays of the arc can react with vapors to form highly toxic and irritating gases.
- Do not weld on coated metals, such as galvanized, lead, or cadmium plated steel, unless the coating is removed from the weld area, the area is well ventilated, and while wearing an airsupplied respirator. The coatings and any metals containing these elements can give off toxic fumes if welded.
Proposition 65 Warnings
Welding or cutting equipment produces fumes or gases which contain chemicals known to the State of California to cause birth defects and, in some cases, cancer. (California Health & Safety Code Section 25249.5 et seq.)
This product contains chemicals, including lead, known to the state of California to cause cancer, birth defects, or other reproductive harm. Wash hands after use.
SPECIFICATIONS
| Filter Model | LH1300 |
| Filter Size | 133×114×22mm/5.23" * 4.48" 0.86" |
| Active Viewing Area | 100×59.5mm/3.93" * 2.34" |
| Light Shade | DIN4±0.5# |
| Dark Shade | DIN13 |
| Power supply | AC12~15V/0.2A/100KHZ  |
| Mode Swapping | Two switches |
| Number of LED | 6 high-bright cold white leds |
| Protect Grade against UVB | DIN13 |
| Operating Temperature | -4°F to 131°F/-10°C to +55°C When stored in extremely cold temperatures, warm helmet to ambient temperatures before welding. |
| Storage Temperature | -4°F to 131°F/-10°C to +55°C When stored in extremely cold temperatures, warm helmet to ambient temperatures before welding. |
| Standards | ANSI ISEA Z87.1-2015 and CSA |
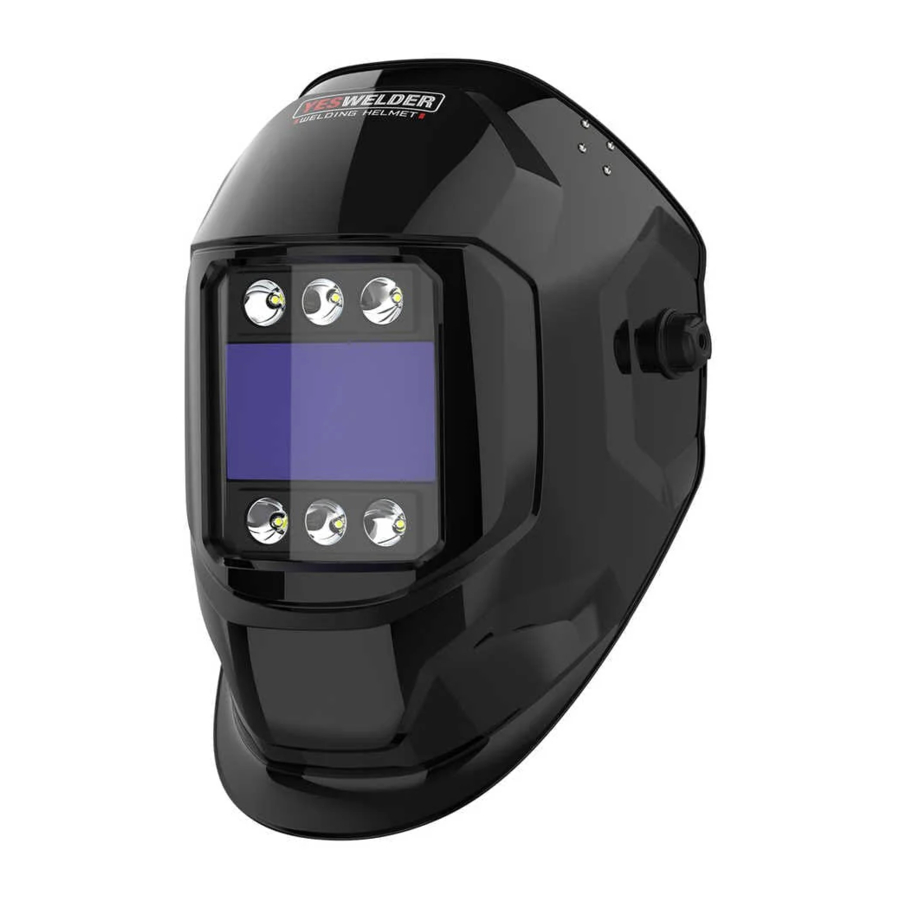
STRUCTURE OF THE PRODUCT


- Mask shell part (See below)
- LED (See below)
- LCD (See below)
- Aviation plug fixed point
- AC POWER
Different from the traditional shading lens, passive and made of pigment, we apot advanced high-speed liquid crystal as a lens. The filter can protect users against ultraviolet/infrared rays. The lens adopts a new linkage control to the welding machine or external power supply. The LCD screen will auto-dark with the signal such as the torch trigger on or off. Thus, protect the welding operator from being injured by harmful rays such as ultraviolet rays, infrared rays, etc. With an external power supply, the welder could use the helmet indefinitely and get rid of the hand to control it. This could supply accurate arc ignition, and improve welding quality and effi- ciency.


- Mode swapping
- LED X 6
- LCD
Mode Swapping: Switching spot TIG mode or TIG mode
LED Light: Unique design anti-interference switch avoids not seeing welding objects clearly due to complex surroundings nearby.
LCD Screen: Will Auto-dark with delay on receipt the signal from welder, protect welder from injury for the welder's eyes and face.
ADJUSTING HEADGEAR

 There are four headgear adjustments: headgear top, tightness, angle adjustment, and distance adjustment.
- Headgear Top
Adjusts headgear for proper depth on the head to ensure correct balance and stability. - Headgear Tightness
To adjust, push in the adjusting knob located on the back of the headgear and turn left or right to desired tightness.
![]() If adjustment is limited, it may be necessary to remove the comfort cushion.
If adjustment is limited, it may be necessary to remove the comfort cushion. - Distance Adjustment
Adjusts the distance between the face and the lens. To adjust, loosen both outside tension knobs and press inward to free from adjustment slots. Move forward or back to desired position and retighten. (Both sides must be equally positioned for proper vision) - Angle Adjustment
Four pins on the right side of the headband top provide adjustment for the forward tilt of the helmet. To adjust, loosen the right outside tension adjustment knob then lift on the control arm tab and move it to the desired position. Retighten tension adjustment knob.
![]() When using the back distance adjustment positions, only the back three angle adjustment pins can be used.
When using the back distance adjustment positions, only the back three angle adjustment pins can be used.
REPLACING THE LENS COVERS

 Never use the auto-darkening lens without the inside and outside lens covers properly installed. Welding spatter will damage the auto - darkening lens and void the warranty.
- Outer Len Protective Cover
- Auto-darkning Len Filter
- Inner Len Protective Cover
- Len Frame
- Push the tab on bottom frame to the central part to unlock the frame. (See Fig. 1)
![]()
- Lift up the Len Filter and push the filter against the frame. (See Fig. 2)
![]()
- Remove the inner lens cover by pulling up from the central part Place a new inner lens cover. (See Fig. 3)
![]()
- Install the lens filter back into the frame by slightly bending and sliding it with the tabs at the sides of lens filter till it snaps.
- Remove the outer lens cover and place a new one.
- Re-install the Len Filter and frame into the helmet and lock the tab. (See Fig. 4)
![]()


NOTE: Remove the protective film from the lens cover if it is a new lens.
MAINTENANCE
NOTICE - Never use solvents or abrasive cleaning detergents.
NOTICE - Do not immerse the lens assembly in water.
The helmet requires little maintenance. However, for best performance clean after each use. Using a soft cloth dampened with a mild soap and water solution, wipe the cover lenses clean. Allow to air dry. Occasionally, the filter lens and sensors should be cleaned by gently wiping with a soft, dry cloth.
HEADBAND INSTALLATION
Description of Headband Installation
Take out the headband, and disassemble it according to the exploded view below:

- Sweat Band
- Plastic Nut
- Fix Set
- Adjusting Rack
- Angle Adjusting Shim
- Position Sleeve
- Locking Bolt
- Head Band
- Adjusting Seat
- Tightness Knob
 To help us serve you better, go to www.YesWelder.com
support@yeswelder.com
Documents / Resources
References
Download manual
Here you can download full pdf version of manual, it may contain additional safety instructions, warranty information, FCC rules, etc.
Download YESWELDER LYG-17-1300 - Auto-Darkening Welding Helmet Manual
Advertisement


Need help?
Do you have a question about the LYG-17-1300 and is the answer not in the manual?
Questions and answers