Advertisement
PRODUCT OVERVIEW
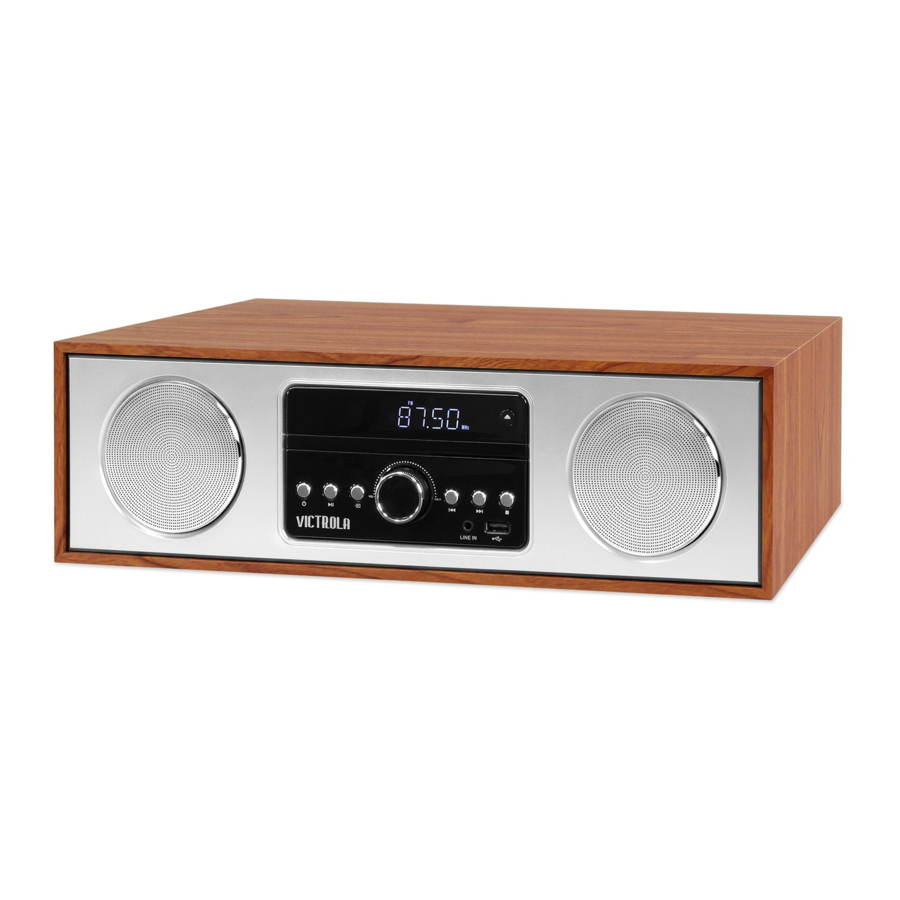
FRONT:

- SPEAKER
- STANDBY (ON/OFF)
- PLAY/PAUSE
- SOURCE
- DISC TRAY
- VOLUME
- PREVIOUS
- LINE IN
- NEXT
- USB
- STOP
- OPEN/CLOSE
Note: To save more power efficiently in standby. unplug any idle USB device connected to the product since standby mode is not intended with a USB device connected.
BACK:

- FM ANTENNA
- AC POWER INPUT
REMOTE CONTROL
REMOTE CONTROL OPERATION
Insert the batteries into the remote control. Point the remote control at the remote sensor on the front panel. The remote control works within a distance of about 8 meters (26') from the sensor and within an angle of about 30 degrees from the left and right sides
Battery Installation
- Remove the battery compartment cover on the back of the remote control.
![]()
- Load one AAA/I T5V battery into the battery compartment making sure that the batteries have been inserted with the correct polarities matching the symbols + /- as indicated inside the battery compartment.
![]()
- Replace the cover.
![]()


Note:
- Remove the batteries when you do not intend to use the remote control for a long time.
- Do not mix new and used batteries, or different types of batteries.
- Weak batteries can leak and severely damage the remote control.
- The batteries must not be exposed to excessive heat source, such as sunshine, fire or any other things like that.
- Be environmentally friendly and dispose of batteries according to your government regulations.
- Batteries NOT included.

- STANDBY(ON/OFF)
- CLOCK
- SLEEP/TIMER
- DIMMER
- MEMORY/PROG
- REWIND/PREVIOUS
- PLAY/PAUSE
- FOLD-
- FOLD+
- TUNE-/IO-
- TUNE+/10+
- VOLUME-
- OPEN/CLOSE
- SOURCE
- REPEAT
- FAST FORWARD/NEXT
- RANDOM
- AUTO
- VOLUME+
- MUTE
*Please note: Some buttons only work in certain SOURCE modes.
OPERATION AND CONTROLS
STANDBY | Press to switch on the unit. Press it again to put the unit in standby mode. |
OPEN/CLOSE | Press to open or close the disc tray. |
SLEEP | Press repeatedly to select a sleep time or choose option S-OFF to disable the sleep function, after which the unit will go into standby mode automatically. Then press [STANDBY] to wake it up. In standby mode, press and hold to enter into alarm timer setting mode, then make sure that you have set the clock correctly by pressing [  ] keys, press it again to confirm and set the volume value by the same method. ] keys, press it again to confirm and set the volume value by the same method. |
DIMMER | Press repeatedly to adjust the display brightness of the display screen. |
| CLOCK | In standby mode, press this button to set the clock. Press [] button to select 12H or 24H clock display, press clock button to confirm, then use [] button to set the clock time, press it again to confirm it. Note: only available in standby mode. |
| SOURCE | Press repeatedly to switch among CD, LINE IN, BLUETOOTH, USB and FM mode. |
AUTO | Press to stop playback. |
 | Press to temporarily pause a playback. Press it again to resume the playback. Hold down this button for 3 seconds to disconnect Bluetooth. |
 | Press to skip to the next track. Hold down to fast forward playback. |
 | Press to return to the previous track. Hold down to rewind playback. |
 | Press [VOLUME+J to turn up the volume. |
 | Press [VOLUME-I to turn down the volume. |
MEMORY | In stop mode, place a CD and press [PROGRAM] to access to the program mode, Press the arrows [] to select the desired track and press once again [PROGRAM] to confirm your selection. Press  to start program playback. Note: Up to 20 tracks can be stored in the playlist. to start program playback. Note: Up to 20 tracks can be stored in the playlist. |
 | Press to temporarily switch off the sound. Press it again to switch it on. |
| RANDOM | Press to switch the RANDOM play mode. |
| REPEAT | Press repeatedly to switch the repeat modes. |
TUNE+ | Press this button for each time to increase ten tracks. |
TUNE- | Press this button for each time to decrease ten tracks. |
| FOLD+ | Press to skip the next folder. |
| FOLD- | Press to return to the previous folder. |
EQ | Press to switch the equalizer modes: flat* rock, pop, jazz or classic. |
FM RADIO OPERATION
Press SOURCE to select FM mode.
For optimal connection, attach the provided FM Antenna.
 | TUNE+: press to fine tune (increase) the frequency TUNE-: press to fine tune (decrease) the frequency. Hold down [TUNE+/-I to increase/decrease the frequency continuously. |
 | After tuning in a new frequency, press [MEMORY], then select a preferred station by pressing  or or  button, press it again to save it as a preset station. button, press it again to save it as a preset station. |
 | Hold down to auto scan for the broadcasting radio channels, press it again to stop auto scanning. |
 | Press to skip to the next preset station. |
 | Press to skip to the previous preset station. |
NOTE.' In Tuner mode, [VOLUME+/-], [MUTE] buttons are also active.
CONNECTING TO BLUETOOTH
An external device with Bluetooth Connectivity can be wirelessly connected to this unit using the Bluetooth function.
- Power ON the unit by pressing the Standby Button.
- Press the source button until "BT" displays on the LED Screen,
- Turn your external device's Bluetooth Setting ON. Wait a moment, then look for the Bluetooth pairing name "VS-120".
- Select the Bluetooth pairing name, to connect the unit. Once connected, there will be an audible tone indicating device has been successfully paired.
- Rotate the VOLUME CONTROL KNOB to adjust the sound level. Use all Play/Pause/Next/Previous functions as usual,
LINE IN OPERATION
An external (auxiliary) audio source (i.e. personal CD/MP3 Player/Mobile phone or computer) can be connected to this unit via LINE IN.
- Plug a detachable Audio Cable (not provided) into the LINE IN socket on the front of the unit.
- Press the source button until the LED Screen displays "LINE IN"
- Plug the other end of the Audio Cable into the Headphone or Line Out socket of your External Source.
- Rotate the VOLUME CONTROL KNOB to adjust the sound level.
USB OPERATION
- For USB playback insert USB (not provided) into the USB Port on the front of the unit.
- Press the Source Button until the LED Display shows "USB"
- Playback will start automatically,
- Use FOLD+ and FOLD- Buttons to switch between folders (if applicable).
TROUBLESHOOTING
Before contacting customer service, please check the following chart for simple troubleshooting solutions.
| Symptom | Cause(s) | Remedy |
No Power |
|
|
SoundThere is no sound or the sound is distorted. |
|
|
Unable to play disc |
|
|
| The player stops when a USB drive is inserted into the player. |
|
|
The buttons on the unit do not work |
|
|
The remote control does not function |
|
|
IMPORTANT SAFETY INSTRUCTIONS
Safety precautions
The information you need to prevent danger to the user and other people as well as property damage is described below. 'Description of signs" shows different levels of danger or damage that may occur due to wrong handling.
Important notes
This book is only a guide for user's operation, not a criterion for configuration.
Only use attachments/accessories specified by the manufacturer.
 | The lighting flash is intended to alert the user to the presence Of dangerous voltage within the product's enclosure, and touching the internal components may result in a risk of electric shock to persons. | ||
 | The exclamatory mark is intended to alert the user to the presence of important operating instructions. | ||
 | To reduce the risk of electric shock or fire, do not open the cover. Refer servicing to qualified service personnel. | ||
 | This mark indicates this unit belongs to class produce radiation harm to the directly touching human body. I laser product. The laser beam may | ||
 | Refers to alternating current (AC). |  | Refers to stand-bye |
 | Refers to direct current (DC). |  | Refers to "NO" (power). |
 | Refers to class II equipment. |  | Refers to dangerous voltage. |
Important Safety Instructions
- Read these instructions.
- Keep these instructions.
- Heed all warnings.
- Follow all instructions.
- Do not use this apparatus near water.
- Clean only with dry cloth.
- Do not block any ventilation openings. Install in accordance with the manufacturer's instructions,
- Do not install near any heat sources such as radiators, heat registers, stoves, or other apparatus (including amplifiers) that produce heat.
- Do not defeat the safety purpose of the polarized or grounding-type plug. A polarized plug has two blades with one wider than the other. A grounding type plug has two blades and a third grounding prong. The wide blade or the third prong are provided for your safety. If the provided plug does not fit into your outlet, consult an electrician for replacement of the obsolete outlet.
- Protect the power cord from being walked on or pinched particularly at plugs, convenience receptacles, and the point where they exit from the apparatus.
- Only use attachments/accessories specified by the manufacturer.
- Use only with the cart, stand, tripod, bracket, or table specified by the manufacturer, or sold with the apparatus. When a cart is used, use caution when moving the cart/apparatus combination to avoid injury from tip-over.
![]()
- Unplug this apparatus during lightning storms or when unused for long periods of time.
- Refer all servicing to qualified service personnel, Servicing is required when the apparatus has been damaged in anyway, such as power-supply cord or plug is damaged, liquid has been spilled or objects have fallen into the apparatus, the apparatus has been exposed to rain or moisture, does not operate normally, or has been dropped.
- This equipment is a Class II or double insulated electrical appliance. It has been designed in such a way that it does not require a safety connection to electrical earth
![]()


- No naked flame sources, such as lighted candles, should be placed on the apparatus.
- Attention should be drawn to environmental aspects of battery disposal.
- The product is designed to use in moderate climates.
- The mains plug or an appliance coupler is used as a disconnecting device, the disconnecting device shall remain readily operable,
- Do not expose the device to rain, moisture, dripping, or splashing,
- Do not place objects filled with liquids. such as vases, on the device.
Accessories Included:
- User Manual
- Remote Control
- FM Antenna
- Detachable Power Cord (2 PCS)
SPECIFICATIONS
| Power supply | AC -100-240V, 50/60Hz | |
| Power consumption | 30W | |
| Working environment | Temperature | -10~+35ºC |
| Relative humidity | 5%-90% | |
| Disc output | S/N (A weight) | >75 dB (1 kHz) |
| Dynamic Range |  70 dB (1 kHz) 70 dB (1 kHz) | |
| THD+NOISE |  -60dB (1 kHz) -60dB (1 kHz) | |
| WOW FLUTTER | Below the limit of apparatus measure | |
| Tuner | FM band Range | 87.5MHz~108MHz |
| Power output (Max) | 15WX2 | |
| Frequency response |  3dB (20Hz~20kHz) 3dB (20Hz~20kHz) | |
| Unit Size | 16" (405mm) x 11" (275mm) x 4.7" (119mm) | |
| Unit Weight | 9.51bs (4.3kg) | |
| Bluetooth Transmitted power | < 13dBm | |
| Bluetooth Frequency | 2402MHz-2480MHz | |
| Accessories | CD Micro System, Remote Control, FM Antenna, Instruction Manual | |
Design and specification are subject to change without notice.
Documents / ResourcesDownload manual
Here you can download full pdf version of manual, it may contain additional safety instructions, warranty information, FCC rules, etc.
Advertisement


Need help?
Do you have a question about the VS-120 and is the answer not in the manual?
Questions and answers