Table of Contents
Advertisement
Advertisement
Table of Contents

Related Manuals for Victrola VTA-270B


Summary of Contents for Victrola VTA-270B
- Page 1 MODEL: VTA-270B 6-IN-1 TURNTABLE...
-
Page 2: Table Of Contents
Important Safety Instructions ..................3 Product Overview ...................... 5 Setup / Basic Operation ..................... 8 Listening to the FM Radio ..................8 Listening to a CD....................... 8 Listening to an External Audio Device (BT Mode) ..........10 Listening to an External Audio Device (AUX Mode)..........10 Listening to a Vinyl Record.................. -
Page 3: Important Safety Instructions
CAUTION: To reduce the risk of fire or electric shock, do not expose this appliance to rain or moisture. WARNING: To prevent electric shock, do not use this (polarized) plug with an extension cord, receptacle or other outlet unless the blades can be fully inserted to prevent blade exposure. WARNING: Invisible laser radiation when open and interlock failed or defeated. - Page 4 -This lightning flash with arrowhead symbol within an equilateral triangle is intended to alert the user to the presence of non-insulated “dangerous voltage” within the product’s enclosure that may be of sufficient magnitude to constitute a risk of electric shock. -Warning: To reduce the risk of electric shock, do not remove cover (or back) as there are no user-serviceable parts inside.
-
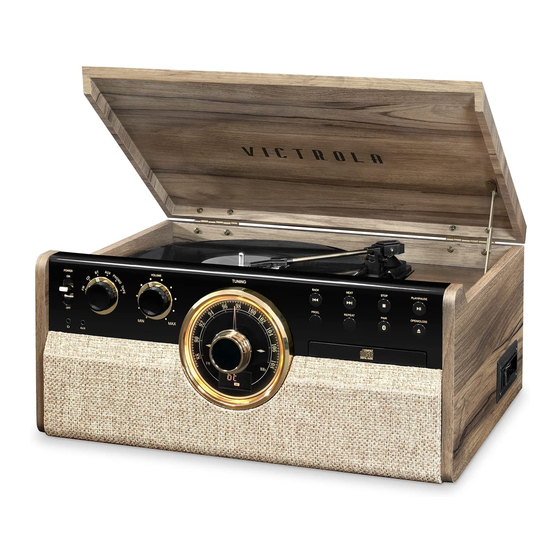
Page 5: Product Overview
Product Overview Front View POWER Toggle to turn the unit on or off. 3.5mm AUX IN JACK: Connect your external source to the AUX IN jack. 3.5mm HEADPHONE JACK STEREO SPEAKERS DISC TRAY PLAY/PAUSE : Press to start playback, press again to pause. (Note: This button only works in CD &... - Page 6 Left side View 18. CASSETTE FF & EJECT: Press halfway to fast forward, press all the way to end and eject the tape. Rear View 19. LINE OUT jacks For amplifier device with RCA auxiliary input sockets, insert the white and red plugs on the RCA cable into the unit.
- Page 7 Parts of the Turntable Turntable. Safety Screw (for transport) Before using the unit, turn the screw clockwise using a coin or screwdriver. Important: When you transport the unit, turn the screw counterclockwise to secure the turntable. Speed Selector. Tone Arm holder. Before use, completely loosen the twist Tone Arm.
-
Page 8: Setup / Basic Operation
Setup / Basic Operation Setup 1. Remove white protective needle cover by gently pulling towards front of unit. 2. Remove any packaging materials from the unit. 3. Connect the AC power cord to a wall outlet. Note: -You’re strongly recommended that this product should be operated only from the type of power source indicated on the marking label. - Page 9 After that the number of tracks will show on the display and it will begin to playback from the first track automatically. 6. To temporarily pause playback, press the PLAY/PAUSE button ( ). Press again to resume. 7. To return to the previous or skip tracks, press the corresponding button ( ).
-
Page 10: Listening To An External Audio Device (Bt Mode)
NOTE: The effective distance between your external device and this apparatus is 10 meters (33ft). 4. Wait a moment for “VTA-270B”to appear on the devices list. Press “VTA-270B” to connect to the unit. Sometimes a window will ask you for a password. Fill in “0000” then press “OK”... -
Page 11: Listening To A Vinyl Record
Listening to a Vinyl Record 1. Rotate to select “PHONO” function. The LED Display will display “PHON”. 2. Gently open the top cover. Note: Be careful not to pinch your finger when opening/closing the top cover. 3. Place a vinyl record on the turntable. When playing a 45 RPM record, use the included adaptor. 4. - Page 12 Handling Vinyl Records Do not touch the record’s grooves. Only handle records by the edges or the label with clean hands. • Touching the record surface will cause your record’s quality to deteriorate. To clean a record, use a soft anti-static cloth to gently wipe the record surface. •...
-
Page 13: Specifications
Specifications GENERAL Power Requirements AC 120 V~60 Hz Power Consumption x 15 in x 7.87 in Dimensions (W x H x D) 18.9 in (approx.) x 380 mm x 200 mm 480 mm (approx.) Weight 18.15 lbs (approx.) 8.25 (approx.) AMPLIFIER Output Power 5 W + 5 W... -
Page 14: Troubleshooting Guide
Troubleshooting Guide Symptom Possible Cause Solution Unit will not power Unit is unplugged. Connect the unit to the • • • AC power supply. No sound output from The volume level is set too low. Adjust the volume. • • •... - Page 15 No sound. The unit is not switch to Bluetooth Ensure the unit is • • • mode. switched to BT mode. Your device’s and/or the unit’s Move your Bluetooth • • volume not turn up. device closer to unit. Your device is too far from the unit or Turn up the volume on •...
-
Page 16: Fcc Statement
FCC Statement This device complies with Part 15 of the FCC Rules. Operation is subject to the following two conditions: (1) This device may not cause harmful interference, and (2) this device must accept any interference received, including interference that may cause undesired operation. NOTE: This equipment has been tested and found to comply with the limits for a Class B digital device, pursuant to Part 15 of the FCC Rules. -
Page 17: Ic Statement
IC Statement This device complies with RSS247 of Industry Canada. Cet appareil se conforme à RSS247 de Canada d'Industrie. This device complies with Industry Canada license-exempt RSS standard(s). Operation is subject to the following two conditions: (1) this device may not cause interference, and (2) this device must accept any interference, including interference that may cause undesired operation of the device. -
Page 18: Warranty
To obtain service, the purchaser MUST present an original sales receipt / proof of purchase. Please contact us at www.victrola.com to request an RMA (Return Material Authorization) number to return products for service or replacement. Returns without an RMA number on the package will be refused and returned to sender.
Need help?
Do you have a question about the VTA-270B and is the answer not in the manual?
Questions and answers