Advertisement
Product Features
- 1200 wide angle lens, 6-layer glasses, F2.0 large aperture.
- 1296P high-definition video recording, makes every makes every detail clear.
- Max 3200MP resolution, support 6532*4900 image.
- There are four video resolution options to select from:
- 1296P (1728*1296) 30 fps
- 1080P (1920*1080) 30 fps
- 720P (1280*720) 30 fps
- 480P (848*480) 30 fps
- Built-in 1200 mAh lithium battery. In 1080P resolution (Wi-Fi off), it can record video continuously for about 4 hours.
- SONY IMX323 back-illuminated image sensor, the imaging effect is fully upgraded.
- Super storage function for doubling video recording time, improving storage memory usage.
- Auto exposure, auto white balance, easy to operate.
- Perfect color restoration, clearer and more realistic image.
- Smart distortion correction program, solving wide lens distortion.
- 0.66 Inch OLED screen, it shows the state of the device, more convenient to set.
- Standard OTG protocol, the data which is stored in this unit can be transmitted to Android mobile phones which support OTG function.
- Loop recording, when storage is full, the machine will keep recording by covering old data.
- Turn on/off indicator, after turned it off, the red light will not flash when recording.
- Equipped with a magnetic back clip, can be clipped in the front and back of camera to use.
- Quick operation, very simple and convenient to use.
- 1/4" standard threaded interface, can be used with other accessories such as tripods.
- Can be connected to external power bank for longer time recording.
- MOV video recording format, easy to playback in PC.
- Supports recording audio separately, generates high fidelity WAV audio files.
- Built-in microphone for synchronized audio recording.
- Camera ID setting, can set single camera ID for group use.
- Time watermark, all files are superimposed the recording time, unable to clip and modify.
- Battery capacity detection and Micro SD card capacity availability detection.
- Drive-free installation, plug and play, supports Windows winXP/win7/win8/win10.
- Built-in Wi-Fi (only for C18), can remotely operate and view via mobile phone APP.
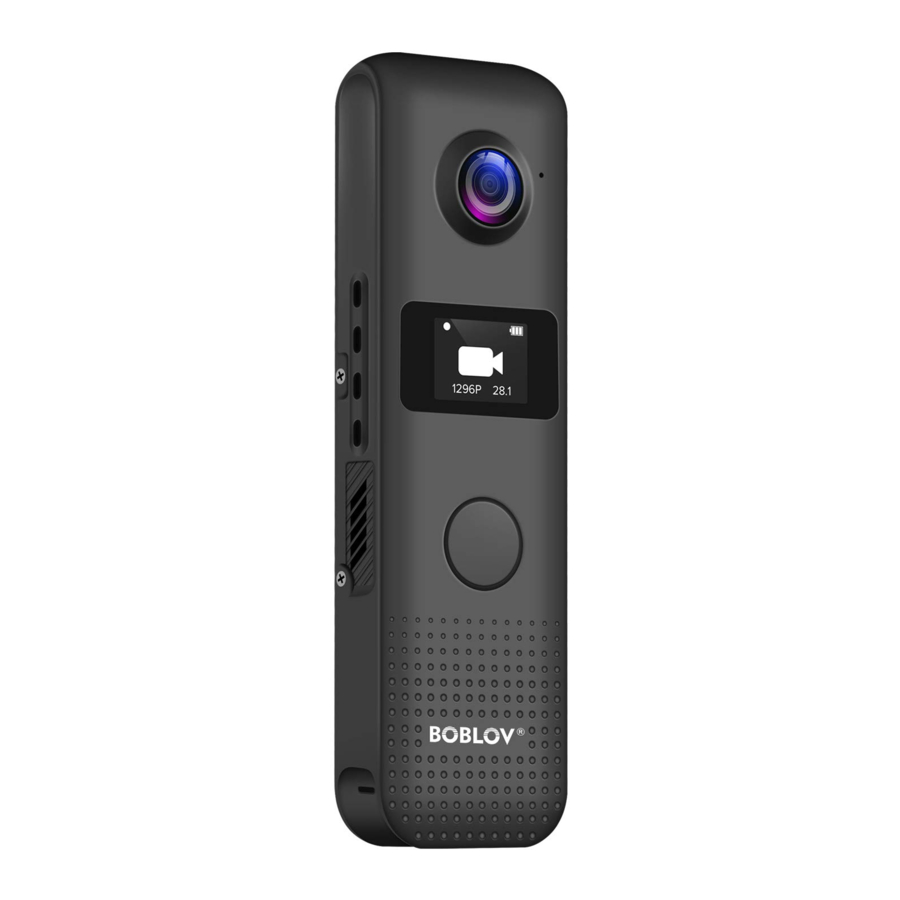
Product Structure


Using Instruction
Power On/Off
Short press the Power button, the unit will vibrate with sound, the unit will turn on and enter video mode interface; short press the "Up/Down" button to switch the four modes (Video/Photo/Audio/Setting), press and hold the Power button for 2 seconds to power off the camera.

 Attentions
- When the battery level is less than 5%, camera will prompt "Low Battery", but it still can be used for about 30 minutes.
- Please charge after powering off. When charging, the blue indicator stays on. When fully charged, the blue indicator will be off. It takes about 2 hours to fully charge.
- It might cause camera reset/slow charging/adapter hot/or even damage camera if not used the original included power cord when charging.
Video Recording
In video recording mode, short press the "OK" button to start recording; during recording, the red indicator and the white dot in the upper left corner of the display flashes slowly. Short press the "OK" button again to stop recording, the red indicator will stop flashing, its video footage will be saved as a MOV file.
In current mode, long press the "Down" button for 1 second to start/stop recording video.

Attentions
- During video recording, if the battery power is insufficient, the system will save current record and warn "low battery power" until the machine turned off.
- During video recording process, if the memory is full (cycle video recording is disabled), the system will save current record and return to video mode interface.
- After loop recording is on, the system will save recording video in segments. When storage is full, the camera will keep recording by covering old data.
- To turn off motion detection, please long press the "Power" button to power off the camera. The motion detection option takes effect only once. Motion detection is designed for long time monitoring; Please turn off this motion detection function when in normal daily use.
Take Photos
In photo mode, press the "OK" button, the unit will vibrate with sound and take one photo and save a JPG file.
In current mode, long press the "Down" button for 1 second to start/stop taking photos.

Attentions
As the unit adopts wide-angle lens, the edge of the photos may be deformed. It is normal.
Audio Recording
In audio recording mode, short press the "OK" button to start recording audio. During recording, the orange indicator and the white dot in the upper left corner of the display flash slowly, short press the "OK" button again to stop recording and saved as a "WAV"
In current mode, long press the "Down" button for 1 second to start/stop recording audio.

Attentions
When recording audio, only a separate audio file will be saved, it doesn't record video.
Turn On/Off Screen
In the power on state, if there is no operation within 20 seconds(default), the device will turn off screen automatically, you can press any key to wake up the screen.
Reset
When the camera crashes and can't be turned off, please use a needle to short press the " " button to reset it.
Charging with USB
Please use the original USB cable and charging plug to avoid potential damage to the camera, please charge the camera when it is powered off. During charging, blue charging indicator stays on and will be off when fully charged, the charging time is about 2 hours.
Connect with USB
In the power on status, data of the camera can be read on the PCvia USB cable. Wrong usage of USB can cause dysfunction. If so, please press the "Reset" button to solve it.
Date/Time Setting
In setting mode, press the "Up/Down" button to enter the "Date/Time" interface to revise date and time. That information can be showed on the video/photo.
Unit ID Setting
In setting mode, press the "Up/Down" button to enter the "Unit ID" interface to revise the number. That information can be showed on the video/photo.
Wi-Fi Network ( for C18 )
After Wi-Fi is connected, you can operate camera on the mobile phone APP. (Please refer "Wi-Fi Network" section of this manual for more details.)
Parameter Setting/Operating
In setting mode, press the "Up/Down" button to enter parameters interface, press the "OK" button to access setting options, press the "Up/Down" button again to select parameter option, then press the "OK" button to save and return to the previous interface, long press the "OK" button for 1 second to exit setting menu and return to video mode interface.

Video Resolution

"1296P30/1080P30(Recommend)/720P30/480P30" Memory capacity and video recording time.
Video Recording Time (just for reference)
| Memory Capacity | 16GB | 32GB | 64GB | 128GB |
| 1296P | 160minutes | 320minutes | 640minutes | 1280minutes |
| 1080P | 180minutes | 360minutes | 720minutes | 1440minutes |
| 720P | 220minutes | 440minutes | 880minutes | 1760minutes |
| 480P | 250minutes | 500minutes | 1000minutes | 2000minutes |
Attentions
The camera supports loop video recording.when storage is full, it will automatically overwrite the oldest files and continue video recording. When super storage is on, recording time is doubled.
Image Size

32 Million/24 Million/12 Million (recommend)
More memory is needed if photo size is larger; meanwhile the photo will be more clear.
Super Store

ON/OFF (recommend)
When setting is "ON", camera will be double in recording time, but video quality will be fallen.
Loop Recording

ON (recommend)/OFF
When setting is "ON", the camera record and save videos according to the recording time setting. When storage is full, it will delete the oldest data and continue recording. When setting is "OFF", if memory is full, the camera stops recording and return to preview mode, it won't delete video.
Video Time

5 minutes (recommend)/10 minutes/15 minutes
If setting is "5 minutes", it means each video clip saves per 5mins. Video clip will use more memory room if setting is longer minutes in this section.
Note: When recording audio, only a separate audio file will be saved, it doesn't record video.
Detection

ON/OFF (recommend)
When motion detection is "ON", camera starts recording video for 10 seconds when it detects moving object; If there is no moving object for 10 seconds, the camera will stop recording. When motion detection is "ON", there is " " on the screen.
Note: This function is only for longtime monitoring. When in normal use, please disable it. Disable motion detection: long press the power button, motion detection option is only for single time use. After shut down it automatically revert to "off ".
Power Off

1 minute (recommend)/3 minutes/5 minutes
When setting is "1 minute" and camera is on standby, screen turns off automatically if no operation within 1 minute.
Vibrate

ON (recommend)/OFF
When setting is "OFF",the indicator vibrating of all keys is disabled.
Wi-Fi Switch

ON/OFF (for C18)
When setting is "ON", you can record video/ take photos/ playback or other operations on cell phone APP. In the power on state, long press the "OK" button for 1.5 seconds to turn on Wi-Fi.
Indicator

ON (recommend)/OFF
When setting is "OFF", red video recording and orange voice recording and purple Wi-Fi connecting indicators are off when the camera is working.
Language

English (DefauIt)
Date/Time

Revise system time
Use the "Up/Down/OK" button to revise.
Unit ID

Revise ID number
Use the "Up/Down/OK" button to revise.
Format

Format memory
This operation will delete all files stored in the camera.
Please use with caution!
Version

Display the software version of the system
Please be sure that proper firmware for the software version is downloaded before upgrading.
Exit

Exit setting
Short press the "OK" button to exit setting and return to video mode interface.
Files Saving / Playback
After powered on, connect the camera to the computer with USB cable, then copy the files from camera to the PC for playing.

- Plug and Play. The connection between the camera and PC is drive free in various operating system such as Win XP/Win7/Win8/Win10.
- Please be sure that the USB cable is connected with the rear USB connector of the PC (as front USB connector may be insufficient in power supply).
- After connected successfully, the screen will display "
![]() " otherwise, the connection is unsuccessful.
" otherwise, the connection is unsuccessful.
 " otherwise, the connection is unsuccessful.
 Attentions
- Please copy important data to the hard disk of PC in time for permanent storage.
- If video and sound are out of sync, please install professional video player to play the video.
- If there is no portable disk showing in the PC, please try again with another USB connector or cable.
Wi-Fi Network (for C18)
- Before Wi-Fi is connected, please turn off mobile phone Bluetooth/VPN service.
- The default Wi-Fi name of the camera is "CS109". Initial password: 12345678. If you forget your password, please review the "Version" option in the setting of camera.
- Wi-Fi effective distance is about 15 meters, if there is a building wall blocking or range is more than 15 meters, Wi-Fi signal will weaken.
- The mobile phone and the camera use a point-to-point direct connection. It does not use the 2G/3G/4G network, so it does not consume mobile phone traffic when you view in real time and download videos on phone APP.
- After Wi-Fi is turned on, the power consumption of the whole machine will increase, continuous recording time will be reduced by 1~2 hours.
- The Wi-Fi function is for both apple phones and Android phones.
- Search for "ZFXF"App in "App Store" or "Google Play", then download and install it
 - Step 1")
 - Step 1")


Android


IOS
- After the installation is complete, enter the "ZFXFCAM"App, then click Add Device to add the camera.
 - Step 2")
- Turn on the camera Wi-Fi, enter mobile phone's the Wi-Fi settings to find Wi-Fi "CS109"and connect it. Initial password "12345678"
Please turn off the phone Bluetooth/VPN proxy before connecting.
![]()
If the connection is failed with a message: No Internet Connection, the device may already be connected to other devices, please disconnect it first.
How to turn on the Wi-Fi?
First method: In standby mode, long press the "OK" button for 1 second to turn on Wi-Fi.
Second method: Enter the camera setting to turn on Wi-Fi.
 - Step 3")
 - Step 2")

 - Step 3")
If Wi-Fi connection is unsuccessful, please check below points:
- Please confirm if the name of Wi-Fi connected is "CS109"
- The mobile phone Bluetooth will interfere with Wi-Fi and cause connection failure.
Please turn off phone Bluetooth temporarily. - Please turn off Wi-Fi in the mobile phone's settings, then turn it on again; or reboot the phone then try to connect again.
- The VPN proxy set on the phone will cause connection failure. Please disable the VPN proxy service temporarily.
- After Wi-Fi name or password of camera is changed, please ignore the "CS109" Wi-Fi then connect it again.
- The mobile phone and camera use a point-to-point direct connection, it does not use the 2G/3G/4G network, so it will not consume mobile phone traffic when you view in real time or download videos on the phone APP.
- Go to the "ZFXFCam" App, the live preview interface is as follows:
 - Step 4")
![warning]() Note: C18 camera doesn't come with a night vision feature, the Nights icon is available for other models.
Note: C18 camera doesn't come with a night vision feature, the Nights icon is available for other models. - "ZFXF Cam' App settings & data download / playback.
 - Step 5")
 - Step 4")
 - Step 5")
OTG Online Usage
Attentions
This OTG function only support Android phones with OTG Function.
Use the OTG function, all video/photo/audio files which are stored in the camera can be directly accessed through file manager in the Android phone, easy to operate without a computer.

- Please confirm if your mobile phone supports OTG function.
![warning]() Note: All Apple phones are not supported.
Note: All Apple phones are not supported. - After the connection is successful, the screen will display "
![]() " otherwise, the connection is unsuccessful.
" otherwise, the connection is unsuccessful.
 " otherwise, the connection is unsuccessful.
 Note:
- Some Android phones need to turn on the OTG function in the "Settings" to be used.
- OTG adapter is an optional accessory, please contact us if necessary.
Product Accessories

Specification Parameters
| Specification | NOVATEK 96658 | Display | 0.66 inch OLED screen |
| Sensor | SONY IMX323 | Storage | C18: 32G / 64G / 128G C19: without card |
| Photo Resolution | 32 Million Pixel | Battery Capacity | 1200mAh |
| Lens | 1200 / 6-layer glass / F2.0 aperture | Charging Time |  2 hours 2 hours |
| Video Resolution | 1728*1296; 1920*1080; 1280*720; 848*480 | Recording Time | 4 hours (1080P, Wi-Fi off), 6 hours (480P, Wi-Fi off) |
| Video Forrnat | MOV H.264 compressed format | Vibration Prompt | Support |
| Photo Format | JPG | Motion Detection | Support |
| Photo Resolution | 6532*4900; 6000*4500; 4032*3024 | Loop Recording | Support |
| Audio Recording | Support | Wi-Fi | Available for C18 |
| Audio Format | WAV | Size | 104 mm * 29 mm * 16 mm |
| Video Frames | 30fps | Weight | 50g |
Customer Service
BOBLOV is dedicated to offer the best service
To reach BOBLOV customer service, please
e-mail us: Support@boblov.com
Official Website: www.boblov.com
Facebook: www.facebook.com/BOBLOVGlobal/

 BOBLOV
Documents / Resources
References
![play.google.com]() Google Play
Google Play![apps.apple.com]() ZFXF CAM on the App Store
ZFXF CAM on the App Store![www.boblov.com]() Police Body Camera | Body Worn Camera
Police Body Camera | Body Worn Camerahttp://facebook.com/BOBLOVGlobal/

Download manual
Here you can download full pdf version of manual, it may contain additional safety instructions, warranty information, FCC rules, etc.
Advertisement


Need help?
Do you have a question about the C18 and is the answer not in the manual?
Questions and answers