Advertisement
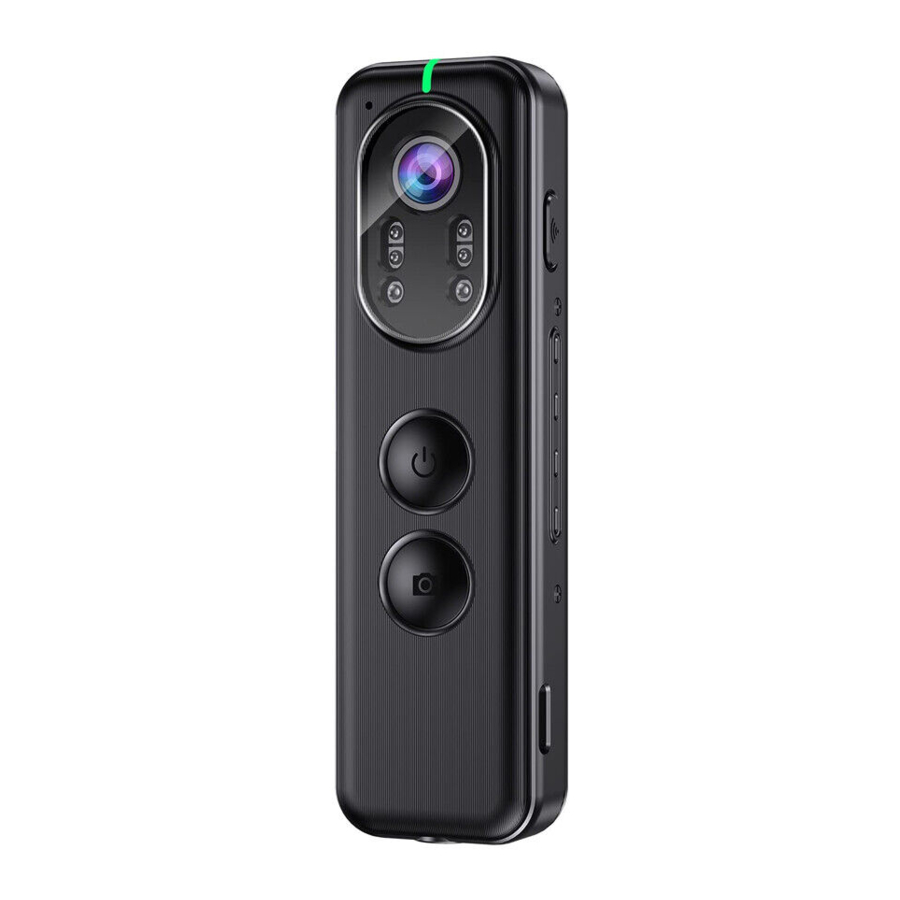
Overview


Functions Introduction
LCD indications

The Time Settings Methods
Two methods for Setting:
Method 1
- Inserting a compatible SD card into the camera, connecting it into a PC device using the Type-C cable
- Finding the USB DRIVE on the computer, click the file named "TIMEREST"
- Editing the time text as the below format and save:
"Year" "Month" "Day" "Seconds" plus an character "Y"
Sample as below pictures:
![]()

Method 2
- Inserting a compatible SD card into the camera, connecting it into a PC device using the Type-C cable
- Finding the USB DRIVE on the computer, double click the file named "Time synchro"
- A new file (time.txt) appear, entering it could find the time has been synchronized with the computer time
Sample as below pictures:
![]()

How to Select Camera Settings
- After inserting the memory card in the product, you need to connect it to the computer after booting.
The root directory of the card will automatically generate the file setting.txt.
![]()
- Click and open this text to set parameters and save.
For example: Set video resolution,
VIDEO_RESOLUTION = 3 means 1080P
(0=2160p@24fps, 1=1440p@30fps, 2=1296p@30fps, 3=1080p@30fps)
![]()


Specifications
| Display | 0.66inch OLED single color LCD |
| View angle | 120 degree wide angle |
| Photo format | JPEG |
| IR Night vision | Manual/Auto |
| Video format | MPEG-4/H.265 |
| Photo resolution | 16M, 12M, 10M, 8M, 5M, 3M |
| Video resolution | 1080p@30fps, 720p@30fps |
| Storage capacity | 16GB-256GB |
| White balance | Automatic |
| Video watermark | Support |
| WDR | Optional |
| Focus | Fixed |
| Anti-shake | Electronics anti-shake |
| Size | 104 mmx30mmx16mm |
| Weight | 70g |
| Battery | 1400mAh |
| Battery life | 1080P 6 hours, night vision and flashing lights are off, with ±20% deviation depending on the environment |
| Special features | Infrared night vision lights, red-blue flashing lights, motion detection, vibration indication |
| Audio only recording | None |
| Loop recording | Support |
| GPS | None |
| Working temperature | -20-60°C |
| Remote control | None |
| WIFI | Optional |
| Dock charger | None |
| PTT function | None |
| External camera | None |
| Log function | Support |
| Standard accessories | USB cable, Pocket Clip, Rope, Mini Tripod, User manual |
Operation Guide
Charging
This camera has a built-in rechargeable lithium battery.
When you use it for the first time, please charge it as follows:
- Use a USB cable or connect to a computer to charge.
- The camera can work while charging.
- The red light is on when charging, and the indicator will turn green when it is fully charged for about 3-4 hours.
Turn on
Short press the power button and wait for three seconds for the screen to display, the green light turns to be solid on, camera enters to standby mode.
Record videos
Short press Video button once to start video recording, green LED will flash slowly.
Short press Video button again to stop video recording, green LED will stop flashing and get back to solid on.
Recorded videos will be saved in splits automatically.
In loop recording mode, user can select video split length.
Take photos
In standby mode, short press photo button once to take a photo, the green LED will flash once.
WiFi
In standby mode, long press WiFi button for 3 seconds, green LED flashes, WiFi signal will show on display.
Mobile phone can connect to camera via the APP. Long press WiFi button for 3 seconds again to turn off WiFi, the WiFi signal on display will disappear.
WiFi name: D1-*******
WiFi password: 12345678
Red-Blue flashing lights
In standby mode, short press WiFi button once to turn on Red-Blue flashing lights, short press again to turn off the Red Blue lights. (This function is for alarm reminder or lights signal during work.)
Night vision mode
In standby mode, Long press Photo button for 3 seconds to turn on infrared night vision mode, long press Photo button 3 seconds again to turn off the infrared night vision mode.
Stealth mode
In video recording mode, long press video button for 3 seconds to enter stealth mode, LED indicator will be off, long press for 3 seconds again to get back to normal video recording mode with flashing green LED.
Reset
In standby state, short press reset button to restart camera, settings will remain.
Connect to computer
After powered on, connect the camera to the computer with USB cable, then copy the files from camera to the PC for playing.
The connection between the camera and PC is drive free in various operating system such as Win 7/in8/in10, Please be sure that the USB cable is connected with the rear USB connector of the PC (as front USB connector may be insufficient in power supply).
Click to enter, the video files are saved in the Movie folder, and the photos are saved in the Photo folder. (If not, click on the DCIM folder).

 Attentions:
Please copy important data to the hard disk of PC in time for permanent storage.
If video and sound are out of sync, please install professional video player to play the video, like VLC media player.
If there is no portable disk showing in the PC, please try again with another USB connector or cable.
After connected successfully the screen will display " " otherwise, the connection unsuccessful.
WIFI Network
- Search apk named "WIFI Body Cam" on Apple Store (IOS phone).

Search apk named "MPCAM" on Google Play (Android phone).

Then download and install

- Turn on the camera WIFI, enter mobile phone's the WIFI settings to find WIFI "D1-*******" and connect it. Initial password: 12345678.
If the connection is failed with a message: No Internet Connection.
The device may already be connected to other devices, please disconnect first.
NOTE:- In standby mode, long press the "WIFI" button for 2 second to turn on WIFI, The green indicator will flash.
- Before connecting the app, it is recommended to turn off the phone Bluetooth/VPN proxy/mobile data and keep the WiFi connection process stable.
![]()
- After the installation is complete, enter the "WIFI Body Cam" App, then click "+" to add the camera, a green tick indicates that the connection is successful.
![]()
- Go to the "WIFI Body Cam" App, the live preview interface is as follows:

- "WIFI Body Cam" App settings and data download / playback.
Instructions: After the camera is successfully connected to the app, you can take photos or videos directly on the app. The photos and videos needs to be downloaded first![]() and then played on local
and then played on local ![]() . Photos and videos are placed on different interfaces and you need to click the
. Photos and videos are placed on different interfaces and you need to click the ![]() button to switch.
button to switch.
Playback Interface & Setting pages in the APP
![]()


 and then played on local
  . Photos and videos are placed on different interfaces and you need to click the
  button to switch.
Product Accessories

Troubleshooting
Q: The camera cannot be turned on, and the operation has no response
A:
- Please connect the charger to charge the camera and check if the problem is solved after 2 hours of charging;
- Please check whether the charger and the connection cable are normal;
- Please press the reset button to restart the camera, and then check whether the problem is solved;
- If the problem cannot be solved, please contact the after-sales personnel to return to the factory for repair.
Q: The camera failed to connect to the computer and failed to enter upload mode
A:
- Please check if the interface between the camera and the computer is normal.
- Please check if the cable and the memory card are normal and try a new SD card.
- It should be compatible issue, try to change another computer to connecting.
- If the problem cannot be solved, please contact the after-sales staff to solve!
Q: The WiFi function doesn't function well or disconnect.
A:
- Make sure you have entered the correct WiFi password and have turned off the Bluetooth/VPN/Mobile Data of the phone.
- Please confirm whether the camera has been connected by the other phones. Delete the data from other phones and reconnect it first.
- Please change another mobile phone to have a try.
Q: The camera don't recognize the SD card
A:
- Please format the SD card on the PC side using a card reader first.
- Please change another compatible Classic 10 SD card, please select the reliable brand, such as SAMSUNG/Kingston/SanDisk.
- If changing cards doesn't work, please check whether the card slot is intact or not and contact the customer service for more help.
Customer Service
BOBLOV is dedicated to offer the best service to our valuable customer.
To reach BOBLOV customer service, please e-mail us:
Official Email address: Support@boblov.com
Official Website: www.boblov.com
Facebook: www.facebook.com/BOBLOVGlobal/


Documents / Resources
References
![www.apple.com]() App Store - Apple
App Store - Apple![play.google.com]() Google Play
Google Play![www.boblov.com]() Police Body Camera | Body Worn Camera
Police Body Camera | Body Worn Camerahttp://www.facebook.com/BOBLOVGlobal/

Download manual
Here you can download full pdf version of manual, it may contain additional safety instructions, warranty information, FCC rules, etc.
Advertisement


Need help?
Do you have a question about the D1 and is the answer not in the manual?
Questions and answers