Bucktool SSA16LVF - 16 VARIABLE SPEED SCROLL SAW WITH FOOT PEDAL SWITCH Manual
- Instruction manual (24 pages)
Advertisement
SPECIFICATIONS

For your own safety, read and follow all of the Safety Guidelines and Operating Instructions before operating this product.
| Input | 120VAC, 60Hz, 1.2A |
| No Load Speed | 550-1,600 r/min(RPM) |
| Table Size | 16" x 9" |
| Table tilting | 0°- 45° |
| Weight Net (lbs) | 32 |
| Saw blade length | 5" |
| Max cutting depth | 2" |
SAFETY GUIDELINES - DEFINITIONS

Indicates a potentially hazardous situation which, if not avoided, could result in death or serious injury.
- READ AND UNDERSTAND the instruction manual before operating this machine.
- DO NOT OPERATE THIS MACHINE until it is completely assembled and installed according to the instructions.
- OBTAIN ADVICE from your supervisor, instructor, or another qualified person if you are not thoroughly familiar with the operation of this machine.
- FOLLOW ALL WIRING CODES and recommended electrical connections.
- DO NOT OPERATE THIS MACHINE while under the influence of drugs, alcohol, or medication.
- USE CERTIFIED SAFETY EQUIPMENT. Eye protection equipment should comply with ANSI Z87.1 standards, hearing equipment should comply with ANSI S3.19 standards, and dust mask protection should comply with MSHA/NIOSH certified respirator standards.
- DO NOT WEAR TIE, GLOVES, or loose clothing. REMOVE WATCH, RINGS, and other jewelry.ROLL UP SLEEVES.
- USE THE GUARDS WHENEVER POSSIBLE. Check to see that they are in place, secured, and working correctly.
- SECURE THE MACHINE TO A SUPPORTING SURFACE.
- NEVER START THE MACHINE BEFORE CLEARING THE TABLE OF ALL OBJECTS(tools, scrap pieces, etc.).
- NEVER START THE MACHINE with the workpiece against the blade.
- NEVER START THE MACHINE until all handles are locked and the blade is at
- AVOID AWKWARD OPERATIONS AND HAND POSITIONS.
- KEEP ARMS, HANDS, AND FINGERS away from the blade.
- NEVER REACH UNDER THE TABLE while the machine is running. A moving blade under the table can cause injury.
- ADJUST THE "HOLD-DOWN" FOOT for each new operation. Loss of control of the workpiece can cause injury.
- HOLD THE WORKPIECE FIRMLY AGAINST THE TABLE.
- DO NOT CUT A WORKPIECE THAT IS TOO SMALL TO BE SAFELY SUPPORTED.
- DO NOT CUT A WORKPIECE THAT DOES NOT HAVE A FLAT SURFACE against the table.
- M AKE RELIEF CUTS before cutting long curves. Never attempt to cut a curve that is too tight.
- NEVER BACK A BOUND BLADE OUT OF A KERF with the saw running. Turn the saw "OFF", disconnect the saw from the power source, wedge the kerf and remove the blade.
- USE CAUTION WHEN CUTTING IRREGULAR WORKPIECES. This type of workpiece can pinch the blade before the cut is complete.
- USE CAUTION WHEN CUTTING ROUND MATERIAL. This type of workpiece has a tendency to "roll" and can cause the blade to bite.
- PROPERLY SUPPORT LONG OR WIDE WORK-PIECES.
- NEVER PERFORM LAYOUT, ASSEMBLY, or set-up work on the table/work area when the machine is running.
- TURN THE MACHINE "OFF" AND DISCONNECT THE MACHINE from the power source before installing or removing accessories, before adjusting or changing set-ups, or when making repairs.
- TURN THE MACHINE "OFF", disconnect the machine from the power source, and clean the table/work area before leaving the machine.
- LOCK THE SWITCH IN THE "OFF" POSITION to prevent unauthorized use.
SCROLL SAW DISCLAIMER
Read the entire text of the operating instructions prior to the assembly and operation of the scroll saw. These operating instructions are intended to make it easier for you to get familiar with your saw and utilize its intended use. The operating instructions contain important notes on how to work safely, properly and economically with your machine and how to avoid dangers, save repair costs, reduce downtime, and increase the reliability and working life of the machine.
In addition to the safety regulations contained herein, you must in any case comply with the applicable regulations of your country with respect to the operation of the machine. Put the operating instructions in a clear plastic folder to protect them from dirt and humidity and store them near the machine. The instructions must be read and carefully observed by each operator prior to starting the work. Only persons who have been trained in the use of the machine and have been informed on the the related dangers and risks are allowed to use the machine. The required minimum age must be met.
In addition to the safety notes contained in the present operating instructions and the special regulations of your country, the generally recognized technical rules for the operation of wood working machines must be observed.
To avoid electrical hazards, fire hazards, or damage to the tool, use proper circuit protection. Your scroll saw is wired at the factory for operation. Connect to a branch circuit and use a 15 amp time delay fuse or circuit breaker. To avoid shock or fire, replace power cord immediately if it is worn, cut or damaged in any way. Do not use in wet conditions.
GENERAL SAFETY RULES FOR SCROLL SAWS

When using electric tools basic safety precautions should always followed to reduce the risk of fire, electric shock and personal injury. Read all these instructions before attempting to operate this product. Save these instructions for future reference.
- Keep work area clear. Cluttered areas and benches invite injuries.
- Consider work area environment. Do not expose tools to rain. Do not use tools in damp or wet locations. Keep work area well lit. Do not use tools in the presence to flammable liquids or gases.
- Guard against electric shock. Avoid body contact with grounded surfaces.
- Keep other people away. Do not let others, especially children, not involved in the work touch or the power cord and keep them away from the work area.
- Store idle tools. When not use, tools should be stored in a dry locked-up place, out of reach of children.
- Do not force the tool. It will do the job better and safer at the rate for which it was intended.
- Use the right tool. Do not force small tools to do the job of a heavy-duty tool. Do not use tools for purposes not intended; for example do not use circular saws to cut tree limbs or logs.
- Dress properly. Do not wear loose clothing or jewelry that can be caught in moving parts. On-skid footwear is recommended when working outdoors. Wear protective hair covering to contain long hair.
- Use protective equipment. Use safety glasses. Use face or dust mask if cutting operations create dust.
- Connect dust extraction equipment. If devices are provided for the connectionof dust extraction and collecting equipment, ensure these are connected and properly used.
- Do not abuse the power cord. Never pull the power cord to disconnect it fromthe socket. Keep the lead away from heat, oil and sharp edge.
- Secure work. Where possible use clamps or a vice to hold the work. It's saferthan using your hand.
- Don't over reach. Keep proper footing and balance at all time.
- Maintain tools with care. Keep cutting tools sharp and clean for better and safer performance. Follow instructions for lubricating and changing accessories. Inspect power cables periodically and if damaged have they replaced by an authorized service facility. Inspect extension cables periodically and replace if damaged. Keep handles dry-clean and free from oil and grease.
- Disconnect tools. When not in use, before servicing and when changing acce-ssories such as blades, bits, cutters, Disconnect tools from the power supply.
- Remove adjusting keys and wrenches. Form the habit of checking to see thatkeys and adjusting wrenches are removed from the tool before turning it on.
- Avoid unintentional starting. Ensure switch is in'off'position when plugging in.
- Use outdoor extension leads. When the tool is used outdoors, use only extension leads intended for outdoor use and so marked.
- Stay alert. Watch what you are doing, use common sense and do not operatethe tool when you are tired.
- Check damaged parts. Before further use of the tools, it should be carefullychecked to determine that it will operate properly and perform its intended function. Check the alignment of moving parts, binding of moving parts, breakage of parts, mounting and any other conditions that may affect its operation. A guard or other part that is damaged should be properly repaired or replaced by an authorized service center unless otherwise indicated in this instruction manual. Do not use the tool if the switch does not turn on and off.
- Warning. Repaired by a qualified person. This electric tool compliers with therelevant safety rules. Repairs should only be carried out by a qualified person using original spare parts; otherwise this may result in considerable danger to the user.
ELECTRICAL EXTENSION CORDS
Use only 3-wire extension cords that have 3-prong grounding plugs and 3-pole receptacles that accept the product's plug. When using a power product at a considerable distance from the power source, use an extension cord heavy enough to carry the current that the product will draw. An undersized extension cord will cause a drop in line voltage, resulting in a loss of power and causing the motor to overheat. U se the chart provided below to determine the minimum wire size required in an extension cord. Only round jacketed cords listed by Underwriter's Laboratories (UL) should be used.
| **Ampere rating (on tool data plate) | ||||||
| 0-2.0 | 2.1-3.4 | 3.5-5.0 | 5.1-7.0 | 7.1-12.0 | 12.1-16.0 | |
| Cord Length | Wire Size (A.W.G.) | |||||
| 25' | 16 | 16 | 16 | 16 | 14 | 14 |
| 50' | 16 | 16 | 16 | 14 | 14 | 12 |
| 100' | 16 | 16 | 14 | 12 | 10 | — |
| **Used on 12 gauge - 20 amp circuit. NOTE: AWG = American Wire Gauge | ||||||
Keep the extension cord clear of the working area. Position the cord so that it will not get caught on lumber, products or other obstructions while you are working you are working with a power product. Failure to do so can result in serious personal injury.
Check extension cords before each use. If damaged replace immediately. Never use product with a damaged cord since touching the damaged area could cause electrical shock resulting in serious injury.
ADDITIONAL SAFETY RULES FOR SCROLL SAWS
- This scroll saw is intended for use in dry conditions, and for indoor use only.
- Do not cut pieces of material too small to hold by hand outside the blade guard.
- Avoid awkward hand positions where a sudden slip could cause a hand to move into the blade.
- Always use the blade guard to avoid possible injury due to blade breakage.
- Do not perform layout, assembly or set up work on the table while the cutting tool is in operation.
- Never turn your scroll saw on before clearing the table of all objects:(tools, scraps of wood, etc) expect for the work piece and related feed or support devices for the operation planned.
PROPER USE
Machines meet all valid CSA/US machines guidelines as well as all relevant guidelines for each machine.
- The machine must only be used in technically perfect condition in accordance with its designated use and the instructions set out in the operating manual, and only by safety-conscious persons who are fully aware of the risks involved in operating the machine. Any functions disorders, especially those affecting the safety of the machine, Should therefore be rectified immediatelty.
- The safety, work and maintenance instructions of the manufacturer as well as the technical data given in the calibrations and dimensions must be adhered to.
- Relevant accident prevention regulations and other, generally recognized safetytechnical rules must also be adhered to.
- The machine may only be used, maintained, and operated by persons familiarwith it and instructed in its operation and procedures. Arbitrary alterations to the machine release the manufacturer from all responsibility for any resulting damages.
- The machine may only be used with original accessories and tools made bythe manufacturer.
- Any other use excesses authorization. The manufacturer is not responsible for any damages resulting from unauthorized users are the sole responsibility of the operator.
- The machine has been built using modern technology in accordance with recognized safety rules. Some remaining hazards, however, may still exist.
- Long hair and loose clothing can be hazardous when the work piece is rotating. Wear personal protective gear such as a hair net and tight fitting work clothes.
- Saw dust and wood chips can be hazardous. Wear personal protective gear such as safety goggles and a dust mask.
- The use of incorrect or damaged power cords can lead to injuries caused by electricity.
- Even when all safety measures are taken, some remaining hazards which arenot yet evident Mays still be present.
- Remaining hazards can be minimized by following the instructions in "safetyprecautions"," Proper Use" in this operating manual.
- Do not force the machine unnecessarily: excessive cutting pressure may leadto rapid deterioration of the blade and a decrease in performance in terms of finish and precision. Avoid accidental starts:
Do not press the start button while inserting the plug into the socket.
The installed electric motor is completely wired ready for operation.
The customer's connection to the power supply system, and any extension cables that may be used, must conform to local regulations.
Important remark:
Defective electrical connection cables.
Electrical connection cables often suffer insulation damage.
Possible causes are:
- Pinch points when connection cables are run through window or door gaps.
- Kinks resulting from incorrect attachment of laying of the connection cable.
- Cuts resulting from running over the connecting cable.
- Insulation damage resulting from forcefully pulling out of the wall socket.
- Cracks through aging of insulation. Such defective electrical connection cable must not be used as the insulation damage makes them extremely hazardous. Check electrical connection cables regularly for damage. Make sure this is disconnected from the mains when checking. Electrical connection cables must comply with the regulations applicable in your country. Single-phase motor.
- The power voltage must coincide with the voltage specified on the motor's ratingplate 120V,60Hz.
GROUNDING INSTRUCTIONS
This tool is for indoor use only. Do not expose to rain or use in damp locations.
In the event of a malfunction or breakdown, grounding provides a path of least resistance for electric current to reduce a risk of electric shock. This product is equipped with an electric cord having an equipment grounding conductor and a grounding plug. The plug must be plugged into a matching outlet that is properly installed and grounded in accordance with all local codes and ordinances. Do not modify the plug provided. If it will not fit the outlet, have the proper outlet installed by a qualified electrician.
Improper connection of the equipment-grounding conductor can result in a risk of electric shock. The conductor with insulation having an outer surface that is green with or without yellow stripes is the equipment-grounding conductor. If repair or replacement of the electric cord or plug is necessary, do not connect the equipment model grounding conductor to a live terminal.
Check with a qualified electrician or service personnel if the grounding instructions are not completely understood, or if in doubt as to whether the product is properly grounded.

In all cases, make certain the receptacle is properly grounded. If you are not sure, have a qualified electrician check the receptacle.
ELECTRICAL SAFETY

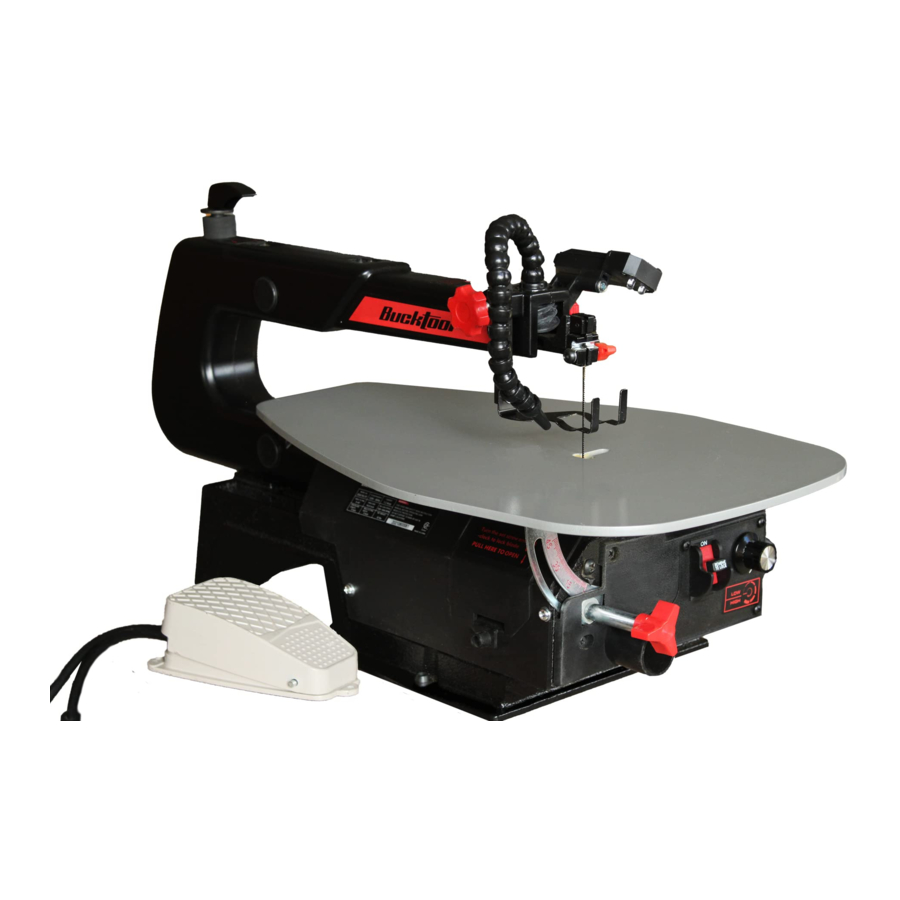
Package contents

| No. Description | Qty. | |
| A | Blade tension knob | 1 |
| B | Bearing covers | 2 |
| C | Work table | 1 |
| D | Sawdust Blower Nozzle | 1 |
| E | Side cover plate | 1 |
| F | Bevel lock knob | 1 |
| G | Dust connection port | 1 |
| H | ON/OFF switch | 1 |
| I | Variable speed control knob | 1 |
| J | Mounting holes | 1 |
| K | LED Light Assy | 1 |
| L | Pressure Rod Locking Knob | 1 |
| M | Foot pedal switch | 1 |
Key parts diagram

| No. | Description | Qty. |
| A | Blade tension knob | 1 |
| B | Bearing covers | 2 |
| C | Work table | 1 |
| D | Sawdust Blower Nozzle | 1 |
| E | Side cover plate | 1 |
| F | Bevel lock knob | 1 |
| G | Dust connection port | 1 |
| H | ON/OFF switch | 1 |
| I | Variable speed control knob | 1 |
| J | Mounting holes | 1 |
| K | LED Light Assy | 1 |
| L | Pressure Rod Locking Knob | 1 |
| M | Foot pedal switch | 1 |
Assembly/Mounting
The machine is designed to operate in closed rooms and must be placed stable on firm and levelled surface. The machine can be bolted down if required. For packing reasons the machine is not completely assembled.
If you notice any transport damage while unpacking, notify your supplier immediately. Do not operate the machine!
Dispose of the packing in an environmentally friendly manner. Clean all rust protected surfaces with a mild solvent.
INSTALLATION OF LED LIGHT
All parts needed shown in Fig. 1


- Open the battery cover. Insert two AAA batteries into the case. If replacing the batteries, take out the old batteries and replace with new AAA batteries. Dispose off old batteries properly. As shown in Fig. 2.

- Install the battery cover.

- Assembly the lamp holder to the arm of scroll saw by two screws. As shown in Fig. 9.
- Assembly the LED light to the lamp holder with philips screw and hex nut. As shown in Fig. 9.
- Use the red knob t o lock the LED light As shown in Fig. 9.
NOTE:
Replace with batteries that have a rating of 1.5 volts (Number 7 series and AAA size or equivalent). When replacing the batteries, the battery guide should be thoroughly cleaned. Use a soft paintbrush or similar device, to remove all sawdust and debris.
INSTALLATION OF FOOT PEDAL SWITCH
Install foot pedal switch as shown in Fig. 13. First connect the plug of the saw to the female plug of the foot pedal switch and then connect the foot switch plug to the power.

SAWDUST BLOWER NOZZLE
Point the Sawdust Blower Nozzle (Fig 2) towards to the cutting area.

DUST CONNECTION
The machine has a 35mm dust port (Fig 3) where it can be connected to a dust extractor.

BEVEL CUTTING
The table can be tilted between 0° and 45° for bevel cutting.
Loosen the locking knob (1,in Fig 11).
Tilt the table to the left until the desired angle on the scale (2,in Fig 11) has been reached.
Retighten the locking knob.

ON /OFF SWITCH

- Press the on/off switch side marked "ON",Start To Work.
- Press the power switch side marked "OFF" to turn the saw off.
- To lock the switch in the "OFF" position, grasp the end, of the switch key, and pull it out.
- With the on/off switch key removed, the switch will not operate.
- If the switch key is removed while the saw is running, it can be turned off but cannot be restarted without inserting the switch key.
Always lock the switch off when the saw is not in use. Remove the key and keep it in a safe place. In the event of a power failure, blown fuse, ortripped circuit breaker, turn the switch off and remove the key, preventing an accidental startup when the power comes on.
USING VARIABLE SPEED
- By turning the variable speed knob, the saw's speed may be adjusted from a high speed of approximately 1,600 SPM (Strokes Per Minute) to a low speed of approximately 550 SPM.
- To increase the strokes per minute, turn the variable speed knob clockwise or to the right.
- To decrease the strokes per minute, turn the variable speed knob counterclock wise or to the left.
Using Foot Switch
- Easy to operate – press the on/off switch side marked "ON", power stays on as long as foot pressure is applied.
- Keep both hands free to control your work at all times.
- Turn machine on and off instantly simply.
Before Operation
Mounting the saw on a work bench
- A work bench made from solid wood is better than one made of plywood, As interfering vibrations and noise are more noticeable with plywood.
- The necessary tools and small parts for assembling the saw on a workbench are not supplied with the saw.
However, use equipment of at least the following size:

| No. | Description |
| 1 | Saw body |
| 2 | Foam rubber base |
| 3 | Work bench |
| 4 | Flat seal |
| 5 | Washer |
| 6 | Hexagonal nut |
| 7 | Lock nut |
| 8 | Hexagonal bolt |
Correct working position:
In front of the machine standing in the direction of cutting.
Workpiece handling:
Insure that the workpiece does not roll when cutting round pieces. Use suitable table extensions and supporting aids for difficult to handle workpieces.
Never cut pieces that are too small.
Press the workpiece down against the table to avoid uncontrollable lifting.
Remove the workpiece from the blade prior to turning the scroll saw ON. Feed the workpiece towards the sawblade in the direction of the sawline, and cut as required by turning to follow the line drawn.
REMOVING SAW BLADE
- Release the blade tension by lift up the blade tension handle. If necessary, turn the handle counterclockwise to loosen the blade holder further.


- Unscrew the inner hex nut of upper blade holder by TURN CLOCKWISE.


- Open the side cover plate by pulling on the little handle.

- Unscrew the inner hex nut of lower blade holder by TURN CLOCKWISE.


- Remove the blade from the blade holders For a pinned blade: push down on the upper blade holder to remove the blade from the upper blade holder and then remove the blade from the lower blade holder. For a pinless blade: ensure that there is slack in the blade and it is not tensioned. Then remove the blade from the holders.
INSTALLING THE BLADE
NOTE: Install the blade with the teeth pointing downward.
- Install the blade on the blade holders.
For Pinned Blade:- Hook the blade pins in the recess of the lower blade holder. While pushing down on the upper blade holder, insert the blade pins into the recess of the upper blade holder.
For Pinless Blade: - Ensure the inner hex nut on the lower blade holder is loose and insert the blade into the opening of the lower blade holder. Secure the blade in the lower blade holder by tightening the inner hex nut ANTICLOCKWISE.
- Ensure the inner hex nut on the upper blade holder is loose and insert the blade into the opening of the upper blade holder. Secure the blade in the upper blade holder by tightening the inner hex nut ANTICLOCKWISE.
- Hook the blade pins in the recess of the lower blade holder. While pushing down on the upper blade holder, insert the blade pins into the recess of the upper blade holder.
- Gently push down the blade tension handle and try the tension of blade. Adjust the tension by turn the handle. Tighten by clockwise and loosen by anticlockwise.
NOTE: A properly-tensioned blade will make a high-C sound (C6, 1047 Hz) when plucked with a finger. A brand-new blade will stretch when first tensioned, and may require adjustment. - Install back the side cover
![]()
Switch off the saw and remove the cord from power supply before installing saw blades in order to avoid injuries caused by unintentional activation of the saw.
This saw is also suitable for inset cuts, or cuts not starting at the edge of the work piece. Proceed as follows:
- Drill a hole in the work piece.
- Loosen the blade tension knob to release the tension in the blade.
- Place the bore hole over the saw blade slot in the work table.
- Install the saw blade through the hole in the piece and through the work blade slot, and the blade to the holes.
- When you have completed the inside cut, remove the saw blade and then remove the work piece from the table.
Maintenance
General notes:
Maintenance, cleaning and repair work may only be carried out after the machine is protected against accidental starting by pulling the mains plug. Repair and maintenance work on the electrical system may only be carried out by a qualified electrician.
Clean the machine regularly.
Inspect the proper function of the dust extraction daily.
All protective and safety devices must be re-attached immediately after completed cleaning, repair and maintenance work.
Defective safety devices must be replaced immediately.
Cleaning:
Regularly clean the machine housing with a soft cloth preferably after each use.
If the dirt does not come off use a soft cloth moistened with soapy water. Never use solvents such as petrol, alcohol, ammoniac water, etc. These solvents may damage the plastic parts.
Saw blades:
Only use sharp saw blades.
Lubrication:
Lubricate the arm bearings after every 50 hours of use.
Remove the 4 bearing covers (B, Fig 14). Apply a generous amount of light oil.

Motor brushes:
The collector brushes are due to wear and may need replacement.
- Disconnect the machine form the power source, pull mains plug.
- Remove the brush covers.
- Replace the collector brushes.
- Reattach the brush covers.
TROUBLE SHOOTING
In the interests of operational safety, always switch off the saw and remove the mains plug before carrying out maintenance work.
| SYMPTOM | PROBABLE CAUSE | CORRECTIVE ACTION |
Saw blades break | Tension incorrectly set | Set the correct tension |
| Load to great | Feed the work piece more slowly | |
| Incorrect saw blade variety | Use the correct saw blades | |
| Work piece not fed straight | Avoid exerting side pressure | |
Motor does not function | Power extension cable faulty | Change faulty cable |
| Motor faulty | Call customer service. Do not attempt to repair the motor yourself as this should be carried out by trained personnel. | |
VibrationNOTE: The saw vibrates slightly when the motor is running in normal operation | Saw incorrectly installed | Refer to the instructions in this manual |
| Unsuitable underlay | The heavier the work bench is the less the vibration. A bench made from plywood always vibrates more than one made from solid wood. Select the work bench best suited to your working conditions. | |
Saw blade swings out Holder not aligned straight | The work bench is not screwed down or is on the motor | Tighten the locking lever |
| The motor is not secured | Securely screw the motor in place | |
| Holders not aligned | Loosen the screws with which the holders are fastened to the arm. Align the holders to that they are perpendicular to each other and retighten the screws. |
Exploded view

Parts list
| ID | Description | Size | Qty. |
| 1 | Philips Screw | M5X8 | 6 |
| 2 | Flat Washer | D5 | 4 |
| 3 | Side Cover | 1 | |
| 4 | Hex Nut | M6 | 6 |
| 5 | Spring Washer | D6 | 10 |
| 6 | Base | 1 | |
| 7 | Oil Cap | 4 | |
| 8 | Left Stand | 1 | |
| 9 | Blade Tension Assy | 1 | |
| 10 | Extension Spring | 1 | |
| 11 | Pressure Plate | 2 | |
| 12 | Spring Washer | D4 | 3 |
| 13 | Hex Screw | M4X10 | 2 |
| 14 | Lower Arm | 1 | |
| 15 | Upper Arm | 1 | |
| 16 | Bearing | 4 | |
| 17 | Philips Screw | M4X6 | 7 |
| 18 | Wire Clip | 5 | |
| 19 | Right Stand | 1 | |
| 20 | Spring Washer | D5 | 11 |
| 21 | Philips Screw | M5X35 | 5 |
| 22 | Rubber Feet | 1 | |
| 23 | Sawdust Blower Nozzle | 1 | |
| 24 | Philips Screw | M5X28 | 1 |
| 25 | Hex Screw | M6X10 | 2 |
| 26 | Pin | 3X14 | 2 |
| 27 | Hex Screw(Left) | M6X10 | 2 |
| 28 | Air Press | 1 | |
| 29 | Fixing Plate | 2 | |
| 30 | Dome Screw | M6X20 | 4 |
| 31 | Clip Seat | 2 | |
| 32 | Lock Washer | D4 | 2 |
| 33 | Hex Screw | M4X20 | 2 |
| 34 | Stand Cushion | 2 | |
| 35 | Blade Pin Type | 1 | |
| 36 | Hex Screw | M5X25 | 1 |
| 37 | Big Cushion | 1 | |
| 38 | Eccentricity Connectior Assy | 1 | |
| 39 | Ball Bearing | 2 | |
| 40 | Type I Hex Nut | M5 | 3 |
| 41 | Eccentricity Pressure Plate | 1 | |
| 42 | Philips Screw | ST4.2X9.5 | 5 |
| 43 | Small Cushion Pad | 1 | |
| 44 | Hex Screw | M5X16 | 2 |
| 45 | Clip | 2 | |
| 46 | Pressure Rod Locking Knob | 1 | |
| 47 | Pressure Rod | 45 | 1 |
| 48 | Philips Screw | M5X30 | 2 |
| 49 | Philips Screw | M5X50 | 1 |
| 50 | Work Piece Plate | 20 | 1 |
| 51 | Flat Washer | D6 | 1 |
| 52 | Philips Screw | M6X10 | 2 |
| 53 | Wire Plate | 2 | |
| 54 | LED Light Assy | 1 | |
| 55 | lamp holder | 1 | |
| 56 | Hex Bolt | M6X16 | 6 |
| 57 | Big Flat Washer | D6 | 4 |
| 58 | Pressure Spring | 1 | |
| 59 | Hex Screw | M6X35 | 1 |
| 60 | Work Table Stand | 1 | |
| 61 | Pointer | 1 | |
| 62 | Miter Gauge | 1 | |
| 63 | Work Table | 1 | |
| 64 | Blade | 2 | |
| 65 | Knob | 1 | |
| 66 | ST Screw | ST4.2X9.5 | 2 |
| 67 | Hex Screw | M6X30 | 1 |
| 68 | Philips Screw | M4X8 | 5 |
| 69 | Hex Socket Screw | M8X8 | 1 |
| 70 | Eccentric Wheel | 1 | |
| 71 | DC Motor | 1 | |
| 72 | Switch Box | 1 | |
| 73 | Cord Clip | 6P4 | 1 |
| 74 | Philips Screw | M4X10 | 4 |
| 75 | Variable Switch | 1 | |
| 76 | Circuit Board | 1 | |
| 77 | Table Tilt Lock Knob | 1 | |
| 78 | Switch Box Cover | 1 | |
| 79 | Switch | 1 | |
| 80 | Variable speed control knob | 1 | |
| 81 | Small Cover | 1 | |
| 82 | Power Cord | 1 | |
| 83 | Hex Screw | M4X8 | 1 |
| 84 | Foot Pedal Switch | 1 | |
| 85 | Wrench | S=3 | 1 |
Having Problems? Give us a chance to help you before returning this product
Email: service@bucktool.com
https://www.bucktool.com
 909-255-1088 (8AM-5PM PST)

https://www.bucktool.com
Documents / Resources
References
Download manual
Here you can download full pdf version of manual, it may contain additional safety instructions, warranty information, FCC rules, etc.
Download Bucktool SSA16LVF - 16 VARIABLE SPEED SCROLL SAW WITH FOOT PEDAL SWITCH Manual
Advertisement


Need help?
Do you have a question about the SSA16LVF and is the answer not in the manual?
Questions and answers