Ryobi P742 / P742ID - 18 VOLT ONE+ RADIO Manual
- Operator's manual (28 pages) ,
- Operator's manual (29 pages)
Advertisement
- 1 SYMBOLS
- 2 OVERVIEW
- 3 ASSEMBLY
-
4
OPERATION
- 4.1 APPLICATIONS
- 4.2 INSTALLING/REMOVING AAA BATTERIES
- 4.3 INSTALLING/REMOVING BATTERY PACK
- 4.4 FOLD-DOWN FLEXIBLE A NTENNA
- 4.5 LCD DISPLAY
- 4.6 MENU NAVIGATION BUTTONS
- 4.7 USING A PHONE/MP3 PLAYER (NOT INCLUDED) WITH THE RADIO
- 4.8 USING A BLUETOOTH ENABLED DEVICE (NOT INCLUDED) WITH THE RADIO
- 4.9 USING THE USB DEDICATED CHARGING PORT
- 5 MAINTENANCE
- 6 IMPORTANT SAFETY INSTRUCTIONS
- 7 Documents / Resources
SYMBOLS
The following signal words and meanings are intended to explain the levels of risk associated with this product.
| SYMBOL | SIGNAL | MEANING |
 | DANGER: | Indicates a hazardous situation, which, if not avoided, will result in death or serious injury. |
 | WARNING: | Indicates a hazardous situation, which, if not avoided, could result in death or serious injury. |
 | CAUTION: | Indicates a hazardous situation, that, if not avoided, may result in minor or moderate injury. |
| NOTICE: | (Without Safety Alert Symbol) Indicates information considered important, but not related to a potential injury (e.g. messages relating to property damage). |
Some of the following symbols may be used on this product. Please study them and learn their meaning. Proper interpretation of these symbols will allow you to operate the product better and safer.
| SYMBOL | NAME | DESIGNATION/EXPLANATION |
| Safety Alert | Indicates a potential personal injury hazard. |
 | Read Operator's Manual | To reduce the risk of injury, user must read and understand operator's manual before using this product. |
 | Eye Protection | Always wear eye protection with side shields marked to comply with ANSI Z87.1. |
 | Electric Shock Alert | Indicates uninsulated material within the unit that may cause electrical shock. Do not remove product covering. |
 | Wet Conditions Alert | Do not expose to rain or use in damp locations. |
 | Recycle Symbol | This product uses lithium-ion (Li-ion) batteries. Local, state or federal laws may prohibit disposal of batteries in ordinary trash. Consult your local waste authority for information regarding available recycling and/or disposal options. |
| V | Volts | Voltage |
| W | Watt | Power |
| min | Minutes | Time |
 | Direct Current | Type or a characteristic of current |
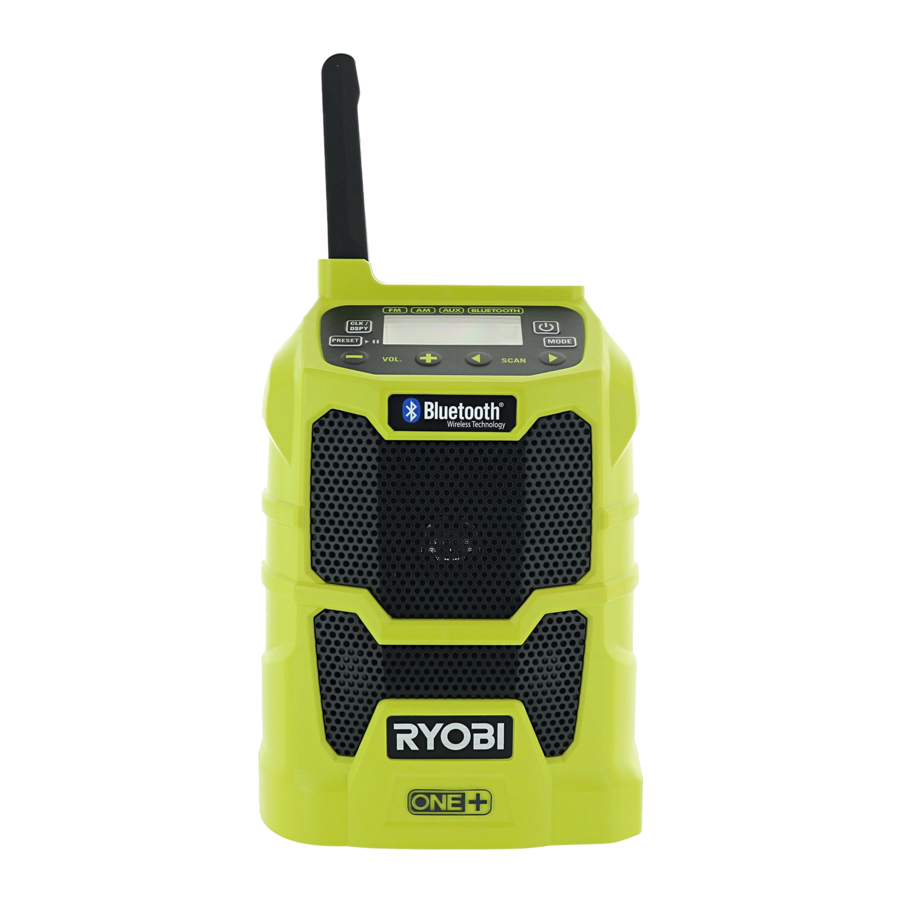
OVERVIEW

- Digital display
- Auxiliary jack
- Retainer strap
- Touch pad controls
- Antenna
- USB charging port
ASSEMBLY

Do not use this product if it is not completely assembled or if any parts appear to be missing or damaged. Use of a product that is not properly and completely assembled or with damaged or missing parts could result in serious personal injury.
Do not attempt to modify this product or create accessories or attachments not recommended for use with this product. Any such alteration or modification is misuse and could result in a hazardous condition leading to possible serious personal injury.
If any parts are damaged or missing, please call 1-800-525-2579 for assistance.
OPERATION
Do not allow familiarity with this product to make you careless. Remember that a careless fraction of a second is sufficient to inflict serious injury.
Always remove the battery pack from the product when you are assembling parts, cleaning, or when not in use. Removing these energy sources will prevent accidental starting that could cause serious personal injury.
The radio is not waterproof. Do not submerge in liquid. Failure to heed this warning could result in serious personal injury.
NOTICE:
Always refer to the manual for any device recommended for use as an attachment or accessory. Proper use of any device, when attached to the radio, is the sole responsibility of the operator. Improper use may damage the device or the product.
This radio is capable of producing sound levels that can be dangerous to long-term hearing. Listening to music at high volume for any period of time can cause noiseinduced hearing loss. The higher the volume, the less time required before your hearing could be affected.
APPLICATIONS
You may use this product for the following purposes:
- Listening to FM/AM radio, MP3 players, and other audio devices
- Charging USB capable devices
- Streaming audio from BLUETOOTH® enabled devices
INSTALLING/REMOVING AAA BATTERIES

- Screw
- Battery cover
- AAA batteries
- Battery compartment
It is advisable to write down saved channels before replacing the AAA batteries.
There is a 15-second time frame for replacing the AAA batteries. If the batteries are not replaced within 15 seconds, the radio will lose all settings previously stored in memory, and they will require reprogramming.
Always use new alkaline batteries for replacement.
Danger of explosion if battery is incorrectly replaced. Replace only with the same or equivalent type.
- Remove the battery pack, if installed.
- Loosen the screw in the battery door. Remove door and set aside.
- Install two new AAA batteries according to polarity indicators inside the battery compartment.
NOTE: Do not mix old and new batteries. Do not mix alkaline, standard (carbon-zinc), or rechargeable (nickel- cadmium) batteries. - Replace the battery door and tighten screw to secure.
INSTALLING/REMOVING BATTERY PACK

- Battery pack
- Battery port
- Latches
To install battery pack:
- Place the battery pack in the radio, aligning the rib on the battery pack with the groove in the battery port.
- Make sure the latches on the battery pack snap into place and the battery pack is secured to the radio before beginning operation.
- Depress the latches to remove the battery pack.
NOTE: Always remove battery pack from radio when not in use.
For complete charging instructions, see the operator's manuals for your battery pack and charger.
FOLD-DOWN FLEXIBLE A NTENNA
To decrease interference or electrical noise, extend the antenna or move the radio to a higher elevation. The antenna folds down and out of the way when not in use.
LCD DISPLAY
When a battery pack is installed and the radio is in the ON position, the LCD display will show the time, frequency, mode, and settings. When the battery pack is removed and AAA batteries are installed, the LCD display will display the time only.
NOTE: The illustrations of the LCD display shown in this manual are only examples of the frequencies you may see on your radio and are not the exact frequencies that you may choose to listen to.
MENU NAVIGATION BUTTONS

- On/Off button
- Volume buttons
- Mode
- Preset
- Low battery indicator
- Scan button
- Clock/display button
Use the menu navigation buttons to turn the radio on and off, control the volume, change frequencies, toggle between modes and set the time.
TURNING THE RADIO ON AND OFF:
Press the power button to turn the radio ON and OFF.
When the radio is on and a battery pack is installed, the battery symbol will be shown in the LCD display. If the battery charge is low, a flashing low battery indicator will be displayed.
ADJUSTING THE VOLUME:
When the radio is turned ON, the unit will return to the last volume setting used.
- To increase the volume, press the VOL + button.
- To decrease the volume, press the VOL – button.
MODE SELECTION:
Press the MODE button to cycle through available modes. There are four modes to choose from:
- FM mode n AM mode
- AUX mode
- BLUETOOTH® mode
NOTE: When turned on, the radio will return to the last mode that was used if the battery was not disconnected. In the event power is lost to the radio, the display will default to FM mode.
FM/AM TUNING:
The SCAN left and right arrow buttons are used to tune to the desired radio frequency. The selected frequency is displayed on the LCD.
- Press and release the left arrow button to tune to a lower frequency. Press and release the right arrow button to tune to a higher frequency.
- Briefly push either button (not press and hold) to tune one frequency step at a time.
- To decrease interference or electrical noise, adjust the position of the antenna or move the radio to a higher elevation.
STORING A PRESET IN MEMORY:
The memory feature saves up to 20 frequencies as presets in the radio's memory. You can save up to ten (10) frequencies each for FM and AM modes. n Tune to the desired FM or AM frequency.
- Press and hold the PRESET button until the word "MEMORY" and the preset position number flash on the screen.
- Press the SCAN left and right arrow buttons to choose a preset position number.
NOTE: There are ten (10) preset positions for FM and ten (10) for AM. Only one station can be saved in each preset position. - Press the PRESET button again to store the frequency.
TO TUNE TO PRESETS (FM OR AM MODE):
- Press and release the PRESET button to cycle through each preset position number and its associated frequency.
EQUALIZER FUNCTION
To adjust the bass and/or treble settings:
- Press and hold the MODE button until the letter "b" (BASS) is displayed. Press again and the letter "t" (TREBLE) is displayed.
- Press the VOL + or VOL – button until the desired bass or treble level (–5 to 5) is achieved. Press MODE to store your selection.
SETTING THE CLOCK:
NOTE: Install the battery pack or connect the power cord to a power supply before setting the clock. The time appears on the LCD display when the radio is on.
- Press and hold the CLK/DSPY button until the "hour" display blinks.
- Press the VOL + or VOL – button to select the hour.
NOTE: Time is displayed in 12-hour format only. To select an hour that is after noon and before midnight, cycle the hours until "PM" appears in the display. - Press and release the CLK/DSPY button to lock in the hour setting. "Minutes" will begin to blink.
- Press the VOL + or VOL – button to select the desired number.
- Press and release the CLK/DSPY button again to confirm the time.
USING A PHONE/MP3 PLAYER (NOT INCLUDED) WITH THE RADIO

- MP3 player (not included)
- Retainer strap
- Auxiliary cable (not included)
- Press the MODE button until AUX mode is highlighted.
- The retainer strap may be used to secure the device into position.
- Connect auxiliary cable (not included) to the device.
- The phone/MP3 player must be on and in play mode for sound to be heard through the speakers.
- All phone/MP3 player controls can be used normally while connected to radio.
NOTE: Volume for any device connected through the auxiliary cable can be adjusted using the volume control for that device or by using the radio's VOL + or VOL – button. - Turning the radio off will NOT turn the phone/MP3 player off.
- The auxiliary cable DOES NOT provide charging function.
- For complete operating instructions for the connected device, always refer to the manual that was included with your device.
USING A BLUETOOTH® ENABLED DEVICE (NOT INCLUDED) WITH THE RADIO

- Press the MODE button until the BLUETOOTH® mode is highlighted.
- When the radio is switched to BLUETOOTH® mode, the unit will attempt to pair to a BLUETOOTH® enabled device and "bt" will flash in the LCD display.
NOTE: The radio will automatically attempt to connect to the last device it was paired to. If a connection cannot be established within five seconds, the radio will make itself available to other BLUETOOTH® enabled devices. - BLUETOOTH® enabled devices must be within 30 ft. of the radio and set to search/scan in order to pair with the radio.
- Select "RYOBI Radio" from your device's list of available BLUETOOTH® signals to pair the device and the radio. No password or PIN is required for connection.
- When the device has successfully paired with the radio, "bt" will stop flashing.
NOTE: When a device is paired to the radio, information for connecting to the device is saved in the radio's memory. - When streaming audio from a BLUETOOTH® enabled device, press the SCAN left and right arrow buttons to go to the previous or next track. Briefly press and release the PRESET button to cycle between pausing and playing the audio.
NOTE: These controls may not be supported by the BLUETOOTH® device and/or application you are using. - All BLUETOOTH® enabled device controls can be used normally while paired to the radio.
NOTE: Volume for any device paired to the radio can be adjusted using the volume control for that device or by using the radio's VOL + or VOL – button. - To disconnect the BLUETOOTH® enabled device, press and hold the PRESET button. When the device is disconnected, "bt" will begin flashing in the LCD display and the radio will begin searching for another device.
USING THE USB DEDICATED CHARGING PORT
The USB dedicated charging port provides charging power of 5 Volts DC at up to 1 Amp for your cell phone, MP3 player, or other USB devices.
NOTICE:
Attempting to charge devices rated more than 1 Amp, such as a tablet, could damage the USB dedicated charging port and/or the device.
- Connect one end of a USB cable (not provided) to your USB device.
- Connect the other end of the USB cable (not provided) to the USB dedicated charging port to begin charging the device.
NOTE: The USB dedicated charging port provides power only; it does not provide any data communication capabilities.
MAINTENANCE
When servicing, use only identical replacement parts. Use of any other part could create a hazard or cause product damage.
GENERAL MAINTENANCE
Avoid using solvents when cleaning plastic parts. Most plastics are susceptible to damage from various types of commercial solvents and can be damaged by their use. Use clean cloths to remove dirt, dust, oil, grease, etc.
Do not at any time let brake fluids, gasoline, petroleumbased products, penetrating oils, etc., come in contact with plastic parts. Chemicals can damage, weaken or destroy plastic which could result in serious personal injury.
IMPORTANT SAFETY INSTRUCTIONS

Read THESE instructions. Failure to follow all instructions listed below, may result in electric shock, fire and/ or serious personal injury.
KEEP THESE INSTRUCTIONS
HEED ALL WARNINGS
FOLLOW ALL INSTRUCTIONS
- Do not use this apparatus near water.
- Clean only with dry cloth.
- Do not block any ventilation openings. Install in accordance with the manufacturer's instructions.
- Do not install near any heat sources such as radiators, heat registers, stoves, or other apparatus (including amplifiers) that produce heat.
- Only use attachments/accessories specified by the manufacturer.
- Refer all servicing to qualified service personnel. Servicing is required when the apparatus has been damaged in any way, liquid has been spilled or objects have fallen into the apparatus, the apparatus has been exposed to rain or moisture, does not operate normally, or has been dropped.
- When servicing a product, use only identical replacement parts. Follow instructions in the Maintenance section of this manual. Use of unauthorized parts or failure to follow Maintenance instructions may create a risk of shock or injury.
- Know your product. Read operator's manual carefully. Learn its applications and limitations, as well as the specific potential hazards related to this product. Following this rule will reduce the risk of electric shock, fire, or serious injury.
- Do not operate products in explosive atmospheres, such as in the presence of flammable liquids, gases, or dust. Products create sparks which may ignite the dust or fumes.
ELECTRICAL SAFETY
- A battery operated product with integral batteries or a separate battery pack must be recharged only with the specified charger for the battery. A charger that may be suitable for one type of battery may create a risk of fire when used with another battery.
- Use battery operated product only with specifically designated battery pack. Use of any other batteries may create a risk of fire.
- Use this product only with batteries and chargers listed in tool/appliance/battery pack/charger correlation supplement 987000-432.
PERSONAL SAFETY
- Do not use on a ladder or unstable support. Stable footing on a solid surface enables better control of the product in unexpected situations.
- Do not use the radio to listen to music or other audio programs while operating machinery. Doing so may cause distractions that could result in serious personal injury.
- This radio is capable of producing sound levels that can be dangerous to long-term hearing. Listening to music at high volume for any period of time may cause noise-induced hearing loss. The higher the volume, the less time required before your hearing may be affected.
PRODUCT USE AND CARE
- When battery pack is not in use, keep it away from other metal objects like: paper clips, coins, keys, nails, screws, or other small metal objects that can make a connection from one terminal to another. Shorting the battery terminals together may cause sparks, burns, or a fire.
- Keep the radio and its handle dry, clean and free from oil and grease. Always use a clean cloth when cleaning. Never use brake fluids, gasoline, petroleumbased products, or any strong solvents to clean the radio. Following this rule will reduce the risk of loss of control and deterioration of the enclosure plastic.
- Battery products do not have to be plugged into an electrical outlet; therefore, they are always in operating condition. Be aware of possible hazards when not using your battery product or when changing accessories. Following this rule will reduce the risk of electric shock, fire, or serious personal injury.
- Do not place battery products or their batteries near fire or heat. This will reduce the risk of explosion and possibly injury.
- Do not crush, drop or damage battery pack. Do not use a battery pack or charger that has been dropped or received a sharp blow. A damaged battery is subject to explosion. Properly dispose of a dropped or damaged battery immediately.
- Batteries can explode in the presence of a source of ignition, such as a pilot light. To reduce the risk of serious personal injury, never use any cordless product in the presence of open flame. An exploded battery can propel debris and chemicals. If exposed, flush with water immediately.
- Do not charge battery product in a damp or wet location. Following this rule will reduce the risk of electric shock.
- Under extreme usage or temperature conditions, battery leakage may occur. If liquid comes in contact with your skin, wash immediately with soap and water. If liquid gets into your eyes, flush them with clean water for at least 10 minutes, then seek immediate medical attention. Following this rule will reduce the risk of serious personal injury.
- To reduce the risk of personal injury and electric shock, the product should not be played with or placed where small children can reach it.
- Save these instructions. Refer to them frequently and use them to instruct others who may use this product. If you loan someone this product, loan them these instructions also.
REGISTER YOUR TOOLS
http://register.ryobitools.com
1-800-525-2579
Documents / Resources
References
Download manual
Here you can download full pdf version of manual, it may contain additional safety instructions, warranty information, FCC rules, etc.
Advertisement


Need help?
Do you have a question about the P742 and is the answer not in the manual?
Questions and answers