Advertisement
Quick Links
MCSTAR01
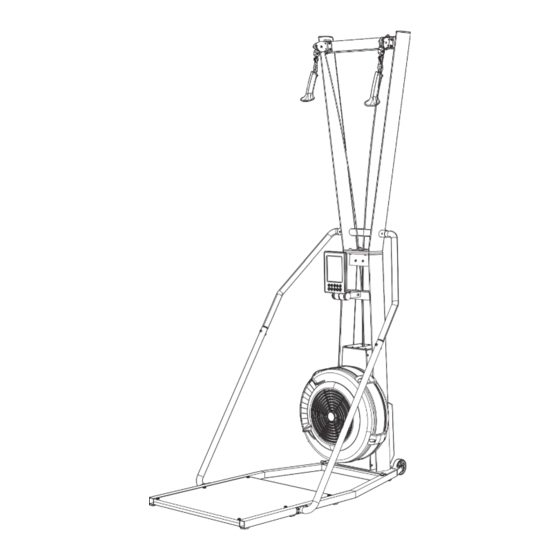
SKI TRAINER PRO
Owner's Manual
ASSEMBLY INSTRUCTIONS / OWNER'S MANUAL
READ ALL ASSEMBLY INSTRUCTIONS AND SAFETY PRECAUTIONS BEFORE USING
IMPORTANT :
THIS PRODUCT.REFERENCE ALL SAFETY GUIDELINES AND WARNING LABELS.
RETAIN PRODUCT LITERATURE FOR FUTURE REFERENCE.
PROPERLY WARM UP AND STRETCH BEFORE EXERCISING.IF YOU FEEL PAIN OR
SAFETY :
DIZZINESS AT ANY TIME WHILE EXERCISING, STOP IMMEDIATELY AND CONSULT
YOUR PHYSICIAN.
1
Advertisement

Related Manuals for MasterKraft SKI TRAINER PRO

Summary of Contents for MasterKraft SKI TRAINER PRO
- Page 1 MCSTAR01 SKI TRAINER PRO Owner’s Manual ASSEMBLY INSTRUCTIONS / OWNER’S MANUAL READ ALL ASSEMBLY INSTRUCTIONS AND SAFETY PRECAUTIONS BEFORE USING IMPORTANT : THIS PRODUCT.REFERENCE ALL SAFETY GUIDELINES AND WARNING LABELS. RETAIN PRODUCT LITERATURE FOR FUTURE REFERENCE. PROPERLY WARM UP AND STRETCH BEFORE EXERCISING.IF YOU FEEL PAIN OR...
- Page 2 MCSTAR01 Assembly Preparation • To ensure ease of product assembly, please take time to verify the size and quantities of all required assembly hard- ware. Use the itemized parts listing and hardware chart for reference. • The product assembly process has been documented in easy to follow steps. Please read all assembly instructions carefully.
- Page 3 MCSTAR01 MCSTAR01 Page 1 MCSTAR01 Page 2...
-
Page 4: Part List
MCSTAR01 PART LIST E01-E E02 x4 B03 x4 D08 x3 F06 x4 M5x 10mm M8X16mm M6X16mm M8X35mm (Pre-installed on E01-HBA ) G03 x2 G04 x2 H03 x8 M6x45mm M6x16mm... - Page 5 MCSTAR01 Follow these steps if you are installing ski trainer to floor stand. Step 1: 1. Remove top cover of carton 2. Remove top half of Styrofoam from ski trainer main frame 3. Remove staples from bottom half of carton and lay flaps of carton flat Step 2: 1.
- Page 6 MCSTAR01 Step 3: 1. Install (F01) Base Frame and secure (F06) Socket Screw 2. Cut bottom 2x white-colored zip-ties near logo shown in picture F06 x2 M8X35mm F06 x2 M8X35mm...
- Page 7 MCSTAR01 Step 4: 1. Upright the (B01) main frame FRONT Step 5: 1. Use 2x (B03) Socket Screw to secure (B01) Support Frame to (A01) main frame B03 X2 M8X16mm...
- Page 8 MCSTAR01 BACK Step 6: 1. Cut the 2x white-colored zip-ties shown in picture 2. Use 2x (B03) Socket Screw to secure (B01) Support Frame to (A01) main frame B03 X2 M8X16mm...
- Page 9 MCSTAR01 Step 7: 1. Secure (H01) L_Lower Handrail Tube and (G01) L_Upper Handrail Tube with (H03) Socket Screw 2. Secure (H02) R_Lower Handrail Tube and (G02) R_Upper Handrail Tube with (H03) Socket Screw 3. Secure R & L_Handrail and (A01) Mainframe with (G03) Socket Screw and (G04) Nylon Nut 4.
- Page 10 MCSTAR01 Step 8: 1. Untangle the Red Plastic Rope Buckle from the rope (Careful not to damage or cut the rope) 2. Secure (D01) Console Holder with (D08) M6X16mm - Socket Screw 3. Install (C01) Handle Bar on (B01) Support Frame D08 x3 M6X16mm...
- Page 11 MCSTAR01 Step 9: Remove the Pre-installed (E02) Truss head Screw from (E01-E) Econ Console , and use them to install (E01-E) Econ Console Smart Connect onto (D01) Console Holder E01-E E02 x4 M5x 10mm Pre-installed on (E01-E) Econ Console...
- Page 12 MCSTAR01 PART LIST E01-E E02 x4 B03 x4 D08 x3 M5x 10mm M8X16mm M6X16mm (Pre-installed on E01-HBA ) J04 x4 K03 x4 M6x16mm M8X35mm...
- Page 13 MCSTAR01 Follow these steps if you are installing ski trainer to wall-mount bracket. Step 1: 1. Remove top cover of carton 2. Remove top half of styrofoam from ski trainer main frame 3. Remove staples from bottom half of carton and lay flaps of carton flat Step 2: 1.
- Page 14 MCSTAR01 Step 3: 1. Secure (K01) L_Bottom Tube and (K02) R_Bottom Tube with (K03) Socket Screw 2. Cut bottom 2x white-colored zip-ties near logo shown in picture K03 x2 K03 x2 M8X35mm M8X35mm...
- Page 15 MCSTAR01 Step 4: 1. Secure (J01) L_Top wall-mount Plate ,(J02) R_Top wall-mount Plate and (J03) Fixed Plate with (J04) Socket Screw J04 x4 M6x16mm...
- Page 16 MCSTAR01 Step 5: 1. Upright the (B01) main frame FRONT Step 6: 1. Use 2x (B03) Socket Screw to secure (B01) Support Frame to (A01) main frame B03 X2 M8X16mm...
- Page 17 MCSTAR01 BACK Step 7: 1. Cut the 2x white-colored zip-ties shown in picture 2. Use 2x (B03) Socket Screw to secure (B01) Support Frame to (A01) main frame B03 X2 M8X16mm...
- Page 18 MCSTAR01 Step 8: 1. Untangle the Red Plastic Rope Buckle from the rope (Careful not to damage or cut the rope) 2. Secure (D01) Console Holder with (D08) M6X16mm - Socket Screw 3. Install (C01) Handle Bar on (B01) Support Frame D08 x3 M6X16mm...
- Page 19 MCSTAR01 Step 9: 1.Remove the Pre-installed (E02) Truss head Screw from (E01-E) Econ Console, and use them to install (E01-E) Econ Console Smart Connect onto (D01) Console Holder E01-E E02 x4 M5x 10mm Pre-installed on (E01-E) Econ Console...
- Page 20 MCSTAR01...
- Page 21 MCSTAR01...
- Page 22 MCSTAR01 Q’TY Q’TY NAME NAME Main Frame M3X8mm - Truss head Self-Tapping Screw L_Cover Plate M3X15mm - Pan Head Screw R_Cover Plate M3 - Hex nut M5X10mm - Button Head Socket Screw Maintenance Hole Cover Rear Housing M5X6mm - Button Head Socket Screw φ7X15.8mm - Pulley Axle Front Cover Rear Cover...
- Page 23 MCSTAR01 Q’TY NAME Parts Of Floor Stand Base Frame Caster Bushing M8X45mm - Truss Head Hex Socket Screw M8 - Hex Nut M8X35mm - Socket Screw 30X30MM - Tube Cap L_Upper Handrail Tube R_Upper Handrail Tube M6X45mm - Socket Screw M6 - Nylon Nut L_Lower Handrail Tube R_Lower Handrail Tube...
Need help?
Do you have a question about the SKI TRAINER PRO and is the answer not in the manual?
Questions and answers