West Bend AFWB12BK13 - DIGITAL AIR FRYER OVEN Manual
- Instruction manual (36 pages)
Advertisement
Intended Use
- This device works with hot air and is not a conventional fryer that is filled with oil or deep-frying fat. It is suitable for frying, baking, grilling, drying, keeping warm or defrosting food. It generally works like a conventional fan oven.
- The appliance is not suitable for preparing or heating liquids such as soups or sauces.
- The appliance is only suitable for private use, not for commercial use or use similar to home, e.g. in hotels, bed and breakfasts, offices, staff kitchens, or similar.
- The appliance should only be used as described in these operating instructions. Any other use is deemed to be improper. Incorrect operation and incorrect handling may cause faults with the appliance and cause injury to the user.
- The following are excluded from the warranty: all defects caused by improper handling, damage, or unauthorized attempts at repair. The same applies to normal wear and tear.


BEFORE USING FOR THE FIRST TIME
Please check all packaging material carefully before discarding. Many accessory parts are contained within the packaging material.
Clean drip tray, rotisserie accessories, and crisping trays in hot, soapy water. Rinse thoroughly and dry. Wipe the inside of the cooking chamber and the outside surfaces of the air fryer with a damp cloth if necessary. Never dip the appliance in water or fill the baking compartment with water! The door cannot be removed for cleaning. Run the air fryer for the first time without any food in it, as it may produce some smoke or odors due to coating residues. Allow the appliance to heat up on the highest temperature setting for approx. 15 minutes without any food in it (see the "Using Your Air Fryer").
We recommend thoroughly reading the "Using Your Electric Air Fryer" and before using for the first time.
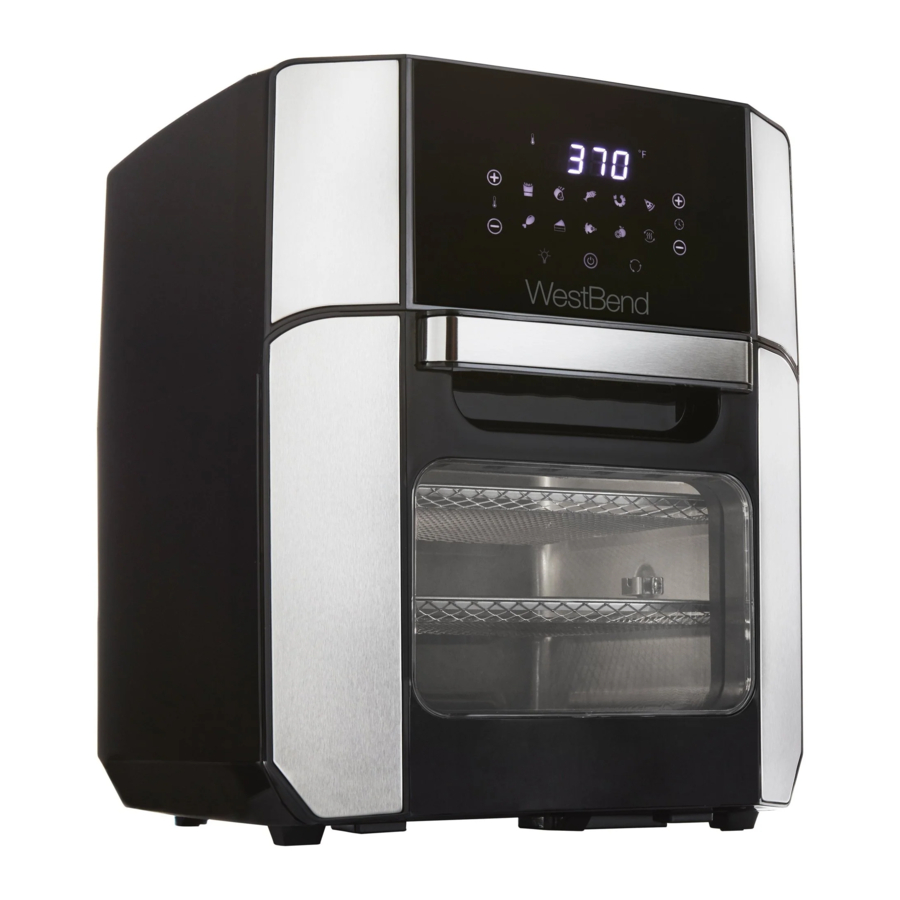
AIR FRYER OVEN ACCESSORIES

Drip Tray
The drip tray should always be inserted so that any dripping fat, crumbs, or other food residue can be collected in it. It slides into the bottom of the cooking chamber.
Crisping Trays
The crisping trays are used for crisping, baking, warming, and drying. They can also be used as a rack for small baking dishes.
The crisping trays slide onto the side rails in the cooking chamber. The heating element is located at the top of the cooking chamber, so the higher a crisping tray is placed, the more intense the heat is from above. On the top rack, the food is cooked faster and crispier. The middle position should be chosen to achieve even heating from all sides. The bottom rails are suitable for less intense cooking.
Rotisserie
The rotisserie consists of the shaft and two rotisserie forks. The rotisserie feature is suitable for cooking large pieces of meat, e.g. chicken or grilled or roast pork. To use the rotisserie function, assemble the rotisserie shaft and forks and insert the rotisserie assembly into the air fryer:
- Slide one of the rotisserie forks onto the shaft and lock it with the locking screw. The shaft contains a small round notch for the tip of the locking screw. In the case of smaller pieces of food, the rotisserie forks can be secured more centered on the shaft.
Note: The shaft contains two small round notches marking the outermost position of the locking screws. These locking screws must not be attached any further than the outer ends of the shaft to ensure that smooth operation is possible. Do not place any foods that are too large onto the rotisserie shaft, so that it can rotate without any interference. - Slide the food to be grilled onto the rotisserie fork. Try to center the food on the shaft. Slide the other rotisserie fork onto the shaft and food and lock it with the locking screw.
- Plug one end of the shaft into the round hub on the left-hand side of the cooking chamber, then hang the other end of the shaft into the support on the right-hand side of the cooking chamber. Ensure that the shaft fits securely. The rotisserie must not be able to rotate about its own axis when the air fryer is switched off. If this is not the case, push the left-hand end of the shaft deeper into the holder.
- After use, remove the hot rotisserie assembly from the cooking space using the removal tool. Always use heat-safe oven gloves to remove the rotisserie forks and take off the grilled foods.
Removal Tool
The hot rotisserie assembly must be taken out of the cooking chamber using the removal tool.
- Place the ends of the removal tool under the shaft. Lift the right-hand side of the shaft and move it forwards slightly until the left end of the shaft is released from the holder.
- Carefully lift the rotisserie assembly out of the cooking chamber and place down on a heat-resistant surface.
USING YOUR AIR FRYER OVEN
- Plug cord into the appliance, then plug the air fryer into a 120 volt, AC outlet ONLY. Place the air fryer on dry, level, heat-resistant surface away from any edge.
Ensure that there is at least 4 inches clearance on the sides and top of the air fryer. - Open the door, then slide the drip tray into the bottom of the cooking chamber.
- Choose the cooking accessory needed for what is being cooked. You can also use a small casserole or baking dish and place it on a crisping tray.
Do not place food packed in plastic wrap or plastic bags in the air fryer. Do not use roasting bags in the air fryer.
Make sure that the food that you would like to prepare does not come into contact with the heating element of the appliance. - Prepare food to be cooked and attach accessory being used as indicated in the "Air Fryer Accessories".
- Close the door. The door must be closed before any cooking selections can be made.

- Press the
![]() On / Off button. The displays on the control panel will illuminate. 370°F and 15 minutes are preset. Choose either a preset setting or adjust the temperature and cooking time.
On / Off button. The displays on the control panel will illuminate. 370°F and 15 minutes are preset. Choose either a preset setting or adjust the temperature and cooking time.
The time and temperature can be manually adjusted with the + / - buttons, then start the cooking process by pressing the![]() On / Off button.
On / Off button.
Choose a program by touching the applicable symbol on the panel. The symbol will flash to indicate it is active, then the cooking cycle will begin when the flashing stops. The program can be adjusted with the +/- time and temperature buttons as long as the setting symbol is flashing. The![]() On / Off button can also be pressed to begin the cooking process immediately when using a preset function.
On / Off button can also be pressed to begin the cooking process immediately when using a preset function.
The symbols represent the following presettings:


The temperatures and cooking times which are pre-set for the programs are merely averages and should be adjusted as necessary. As ingredients can differ due to their origin, size, shape and quality, the actual cooking temperatures and times may vary.
Make sure before serving that meat and poultry are thoroughly cooked.
If needed, change the cooking time or temperature of a selected program with the + / - buttons.
Note: The Reheat setting cannot be adjusted. Reheat can be pressed after selecting the desired cooking setting to add a keep warm cycle after cooking is complete.
- If the rotisserie assembly is used, press the
![]() button to start the rotating function. (Pressing the
button to start the rotating function. (Pressing the ![]() button again will stop the rotating function.) Until you are familiar with the air fryer, the cooking progress of the food should be checked periodically to ensure that it does not burn. To do this, switch on the light using the
button again will stop the rotating function.) Until you are familiar with the air fryer, the cooking progress of the food should be checked periodically to ensure that it does not burn. To do this, switch on the light using the ![]() button or open the door. When the door is opened, the cooking cycle is interrupted automatically and the light switches on. Operation is resumed once the door is closed.
button or open the door. When the door is opened, the cooking cycle is interrupted automatically and the light switches on. Operation is resumed once the door is closed. - Once the cooking time has elapsed, the air fryer switches off automatically and a beep is heard. If the air fryer needs to be stopped early, press the
![]() On / Off button. Note: There is a 30-second cool down cycle after the appliance is turned off. You will hear a fan run for approximately 30 seconds after the
On / Off button. Note: There is a 30-second cool down cycle after the appliance is turned off. You will hear a fan run for approximately 30 seconds after the ![]() On / Off button is pressed or the appliance finishes the cooking cycle.
On / Off button is pressed or the appliance finishes the cooking cycle. - Carefully open the door and take the cooked foods out of the air fryer. Only ever take out the rotisserie assembly using the removal tool.
- Unplug the cord from the electrical outlet. Allow the air fryer and accessories to cool completely before cleaning.
We recommend reviewing the "Helpful Hints" before using.
HELPFUL HINTS
- There is a 30 second cool down cycle after the air fryer oven is turned off. A fan will run after cooking cycle is complete and appliance shuts off.
- Reheat is a 2 hour cycle that cannot be adjusted. Reheat can be selected after choosing the main cooking cycle to add a keep warm cycle after cooking is completed.
- The temperatures and cooking times specified in this manual and included recipes are guideline figures. As ingredients will differ due to their origin, size, shape and quality, the settings actually required may vary. It is important to check how the food is cooking from time to time and adjust the temperature or cooking time.
ALWAYS USE A MEAT THERMOMETER TO ENSURE THAT MEAT, POULTRY AND FISH ARE COOKED THOROUGHLY BEFORE EATING. - Rotate the food around halfway through the cooking time to make sure it is cooked more evenly.
- As a general rule, when air frying, reduce the package's suggested conventional cook time by 20% to 30% depending on the food and amount to be cooked.
- The quantity, density, and weight of foods will alter the total air frying time necessary. Cooking smaller batches will result in shorter cook times and more even cooking.
- It is important to place your food as close to the center of the Air Fryer Oven as possible to ensure even cooking. For best cooking results, it is recommended to use the middle level for cooking foods when 1 layer is being used.
- For crispier results, air fry small batches of freshly breaded foods. Create more surface area by cutting food into smaller pieces. Press breading onto food to help it adhere. Refrigerate breaded foods for at least 30 minutes. Spray with oil before air frying.
- Arrange breaded food on the crisping rack(s) so that food is not touching to allow air flow on all surfaces.
- Do not overfill crisping trays with food.
- Typically no oil is required for preparing food, but you can add oil to your food to enhance the taste. Using spray olive oils or vegetable oils works best as the oil is distributed evenly and less oil is needed overall.
- Generally it is not necessary to preheat the air fryer.
- When preparing rotisserie chicken or game birds, truss the bird into a tight package. Tie both legs together, tie the breast area together with the wings, then wrap more string around the middle.
CLEANING YOUR AIR FRYER OVEN
- Unplug the air fryer and cool completely. Do not clean the air fryer or accessories until they have cooled.
- Wash the accessories using hot, soapy water or on the top rack of the dishwasher. Rinse thoroughly and dry.
- Wipe interior and exterior surfaces of the air fryer with a damp cloth and dry thoroughly. DO NOT immerse the air fryer in water or any other liquid. Do not use any abrasive scrubbers.
This appliance has no user serviceable parts.
TROUBLESHOOTING
| Problem | Possible Cause | Solution |
| The air fryer doesn't work. The displays on the control panel will not turn on. | The door is not closed completely. | Close the door. |
| The cord is not fully inserted into the air fryer socket. | Plug cord completely into the air fryer. | |
| The outlet does not have power. | Try another outlet, preferably with no other appliances plugged in. | |
| The overheating protection has been triggered. | Unplug the appliance, allow to cool completely, then try again. | |
| The air fryer keeps tripping a circuit. | Too many appliances connected to the same circuit. | Unplug other appliances or find another outlet on a different circuit. |
| The food has not been cooked evenly. | Different foods with different cooking times are being cooked at once. | Place foods with longer cook times in the air fryer first and add foods with shorter cook times later. |
| Different foods with different cooking temperatures are being cooked at once. | Prepare items of foods with different cooking temperatures one after the other. | |
| The set cooking time was too short or temperature too low. | Increase the cooking time or temperature as needed. | |
| The crisping tray is overfilled. | Reduce the amount of food. | |
| Food being cooked is piled on the crisping tray. | Spread the food in a single layer and periodically stir it while cooking. | |
| The food is burning. | The selected temperature or baking time is too high. | Reduce the temperature or cooking time. |
| French fries made from fresh potatoes are not crispy. | Fresh potatoes contain too much water. | When cooking fresh potatoes cut them into narrower pieces and pat them dry. Remove excess moisture before attempting to cook. If desired, spray with a little bit of oil before cooking. |
| During use an unpleasant smell or smoke is detected. | The air fryer is dirty. | Follow the cleaning instructions. Ensure that food does not drip onto the heating elements and is not allowed to build up there. Clean spills as soon as it is safe to. |
| The air fryer is being used for the first time. | A small amount of smoke or odor may be noticible when first used. Run at least one cycle at max temperature with no food to burn off manufacturing oils. The smell should disappear once the air fryer has been used several times. | |
| Too much oil or grease in the drip tray. | Clean the drip tray or remove excess oil or grease. | |
| Error Message E1 or E2 | The sensor is defective. | Reach the Customer Care department at the information provided on the warranty page. |
IMPORTANT SAFEGUARDS

To prevent personal injury or property damage, read and follow all instructions and warnings.
When using electrical appliances, basic safety precautions should always be followed including:
Important Safeguards
- Read all instructions.
- Do not touch hot surfaces. Use handles or knobs.
- To protect against fire, electric shock, and injury to persons do not immerse cord, plugs, or other electric parts in water or other liquids.
- Close supervision is necessary when this appliance is used by or near children.
- Always unplug from outlet when not in use and before cleaning. Allow to cool before putting on or taking off parts and before cleaning.
- Do not operate any appliance with a damaged cord or plug, after the appliance malfunctions, or has been damaged in any manner. For service information see warranty page.
- The use of accessory attachments not recommended by West Bend may cause fire, electric shock, or injury.
- Do not use this appliance outdoors.
- Do not let cord hang over the edge of the table or counter, or touch hot surfaces.
- Do not place on or near a hot gas or electric burner, or in a heated oven.
- Do not use appliance for other than intended use.
- Extreme caution must be used when moving an appliance containing hot oil or other hot liquids.
- Do not attempt to repair this appliance yourself.
- Attach plug to appliance first, then plug cord into wall outlet. To disconnect, turn any control to "OFF," then remove plug from wall outlet.
- Extreme caution must be used when removing the drip tray or disposing of hot grease.
- A fire may occur if the appliance is covered or touching flammable material including curtains, draperies, walls and the like, when in operation. Do not store any item on top of appliance when in operation.
- Do not store any materials, other than manufacturers recommended accessories in this oven when not in use.
- Do not place any of the following materials in the oven: plastic, paper, cardboard, and the like.
- Extreme caution should be exercised when using containers constructed of other than metal or glass.
- Do not cover rack, drip tray or any parts of the oven with aluminum foil, as overheating will occur.
- Do not clean with metal scouring pads. Pieces can break off of the pad and touch electrical parts, creating a risk of electrical shock.
- Oversize foods or metal utensils must not be inserted in this appliance as they may create a fire or risk of electric shock.
- Avoid contact with moving parts.
Safety Instructions
![]()
Read all safety notices, instructions, illustrations and technical data provided with this device. Failure to follow the safety notices and instructions may result in electric shock, fire or injuries.- This device may not be used by children aged between 0 and 8. This device may be used by children aged 8 and above if they are constantly supervised.
- This device may be used by people with reduced physical, sensory or mental abilities or a lack of experience and/or knowledge if they are supervised or have received instruction on how to use the appliance safely and have understood the dangers resulting from failure to comply with the relevant safety precautions.
- The appliance and the cord are to be kept away from children younger than 8 years of age.
- The cleaning and maintenance by the user may not be carried out by children.
- Animals must be kept away from the appliance and the cord!
Hot Surfaces!
- The appliance and accessories will become very hot during use. Do not come into contact with heated parts while or after using the appliance! Only touch the handles and control panel while the appliance is in operation or immediately after it has been switched off. Wait until the appliance has cooled down fully before it is transported, cleaned or stored away. Use oven gloves and the removal tool if necessary when handling the hot accessories.
- Never use the open door as a deposit surface, e.g. for the baking trays! Hot accessories could damage the door. In addition, the appliance could tip over and present a risk of injury.
- The appliance is not designed to be operated with an external timer or a separate remote control system.
- Note the cleaning instructions in the "Cleaning"!

Risk of Electric Shock
- Use and store the appliance only in closed rooms. Do not operate the appliance in rooms with high humidity.
- Should the main unit fall into water, cut off the power supply immediately. Do not attempt to pull the appliance out of the water while it is still connected to the mains power! Have the appliance checked in a specialist workshop before using it again.
- Never touch the appliance or the cord with wet hands when the appliance is connected to the mains power.

Danger of Fire
- Do not use the appliance in rooms containing easily ignitable or explosive substances.
- Do not operate the appliance in the vicinity of combustible material. Do not place any combustible materials (e.g. cardboard, paper or plastic) on or in the appliance.
- Do not connect the appliance along with other consumers (with a high wattage) to a multiple outlet in order to prevent overloading and a possible short circuit (fire).
- Do not insert anything into the ventilation openings of the appliance and make sure that these do not become clogged.
- Make sure that foodstuffs containing oil and fats are not overheated. Do not place any vessels filled with oil or other liquids into the appliance.
- Do not cover the appliance during operation in order to prevent it from catching fire.
- In the event of a fire: Do not extinguish with water! Smother the flames with a fire blanket or a suitable fire extinguisher.
Danger of Injury
- Keep children and animals away from plastic bags and films. There is a danger of suffocation.
- Make sure that the cord is always kept out of the reach of small children and animals. There is a danger of strangulation.
- Make sure that the connected cord does not present a trip hazard. The cord must not hang down from the surface on which the appliance is placed in order to prevent the appliance from being pulled down.
- Take care when opening the door! There is a danger of scalding from hot steam.
NOTICE – Risk of Damage to Material and Property
- The appliance should only be connected to a properly installed outlet. The outlet must be readily accessible so that the connection to the mains can quickly be isolated. The mains voltage must match the technical data of the appliance.
- Unwind the cord fully before connecting to the appliance.
- Remove the mains plug if a fault occurs during operation. Otherwise always switch off the appliance first before the mains plug is pulled out of the outlet.
- Always pull the mains plug and never the cord when disconnecting the appliance from the mains power. Do not pull or carry the appliance by the cord.
- Always check the appliance for damage before putting it into operation. The appliance should only be used when it is undamaged, and in working order! Do not use the appliance if it has malfunctioned, fallen or been dropped in water. Have it checked in a specialist workshop before using it again.
- Always place the appliance on a dry, even, firm and heat-resistant surface. Never place the appliance on a soft surface. The ventilation slots on the bottom of the appliance must not be covered. Otherwise it could overheat and be damaged.
- Do not place the appliance on or next to heat sources such as hobs or ovens. Keep open flames, e.g. burning candles, away from the appliance and the cord.
- Do not expose the appliance to extreme temperatures, persistent moisture, direct sunlight or impacts.
- Make sure that the cord is not squashed, bent or laid over sharp edges and does not come into contact with hot surfaces (e.g. of the appliance).
- Never place objects on the appliance or the cord.
- Use only original accessories from the manufacturer in order to guarantee that there is no interference that may prevent the appliance from working and to avoid possible damage.
- This appliance has a polarized plug (one blade is wider than the other). To reduce the risk of electric shock, this plug is intended to fit into a polarized outlet only one way. If the plug does not fit fully into the outlet, reverse the plug. If it still does not fit, contact a qualified electrician. Do not attempt to modify the plug in any way.
- A short power-supply cord is provided to reduce risks resulting from becoming entangled in or tripping over a longer cord.
- Longer extension cords are available, but care must be exercised in their use. While use of an extension cord is not recommended, if you must use one, ensure that the marked electrical rating of the extension cord is equal to or greater than that of the appliance. If the plug is of the grounded type, the extension cord must be a groundingtype 3-wire cord. To avoid pulling, tripping or entanglement, position the extension cord so that it does not hang over the edge of the counter, table or other area where it can be pulled on by children or tripped over.
- Do not use an outlet or extension cord if the plug fits loosely or if the outlet or extension cord feels hot.
- For household use only.
Documents / ResourcesDownload manual
Here you can download full pdf version of manual, it may contain additional safety instructions, warranty information, FCC rules, etc.
Download West Bend AFWB12BK13 - DIGITAL AIR FRYER OVEN Manual
Advertisement


Need help?
Do you have a question about the AFWB12BK13 and is the answer not in the manual?
Questions and answers