Table of Contents
Advertisement
Quick Links
Advertisement
Table of Contents

Related Manuals for JIN F-1S


Summary of Contents for JIN F-1S
- Page 1 F-1S INSTRUCTION MANUAL (Electrical) Original Language:Chinese...
-
Page 2: Table Of Contents
CONTENTS Security instructions ..................1 1. Product specification ................1 1.1 Use environment requirement ................1 1.2 Product specification ....................1 2.lnstallation and debugging ................ 2 2.1 Installation ........................ 2 2.2 Installation notes ...................... 3 3.Function introduction ................3 3.1 Sewing pattern selection ..................4 3.2 Restore factory settings .................. -
Page 3: Security Instructions
Security instructions Security instructions The user should carefully read this operation manual before installing and using this product. This product should be installed or operated by personnel receiving proper training. All power supply should be turned off when installation is implemented and do not operate with electricity. Implement according to the instruction book for all instructions marked with to avoid unnecessary damage. -
Page 4: Lnstallation And Debugging
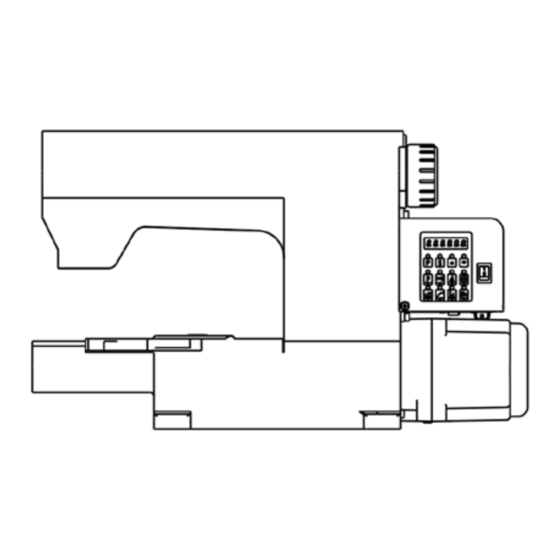
2.lnstallation and debugging 2.lnstallation and debugging 2.1 Installation 2.1 Installation Note: Firstly turn off the power when installing or dismantling any subassembly. First step: The control cabinet has been installed as shown in figure 2-1. 2.1.1 Installation of the control cabinet Figure 2-1 2 2 . -
Page 5: Installation Notes
Note:All power lines,signal lines and grounding lines should not be pressed down by other objects or excessively distort when grounding in order to ensure safety! 2 2 . . 2 2 Installation notes 2.2 Installation notes 2.2.1 When the footplate connecting rod is installed,the end of the connecting rod connecting to the controller is generally fixed on the outside fixed orifice of footplate sensor rocker. -
Page 6: Sewing Pattern Selection
3 3 . . 1 1 Sewing pattern selection 3.1 Sewing pattern selection Function Keypress Sewing operation description USER PARAMETER Users enter the parameters,select the parameters of the SETTING KEY button ENTER PARAMETER After selecting the parameters,enter and determine the key CONFIRMATION KEY to save Add keys... - Page 7 Appendix 1 Appendix 1 Fault phenomenon and processing countermeasures Serial number Fault phenomenon Processing method and steps 1. When the controller fails,first of all,to restore the factory settings Processing before repair 1.Does the trim switch on the operation panel start or not? Please start it if it is off. 2.
- Page 8 1.Rotate the machine head to check whether the motor hand wheel gets stuck or not. If yes, firstly rule out mechanical failure of the machine head. 2.If the rotation is easy, please check whether the motor coding discconnector and motor power connection become flexible.
- Page 9 Appendix 2 Appendix 2 [Parameter pattern A]technician parameter list Parameter Default Content value designation instruction and Content instruction Range code value label 【 【 001. H】 】 Maximum rotate speed (spm) 100~9999 3500 Maximum speed adjustment of sewing A: lightly pedal the footplate forwards, i.e. Pattern selection of starting automatically starting sewing at a low speed.
- Page 10 Cancel lifting presser ON:semi-pedaling cause impossible lifting presser action 【 【 038.HHC】 】 function in the case of ON/OFF OFF:semi-pedaling cause possible lifting presser action semi-pedaling Delay time before trim Interval of starting trimming action after finding up 【 【 040.T1】 】 0~990 action (ms) position...
- Page 11 Response time of lightly It is effective when lightly backward pedaling duration 0~200 【084.PLD】 backward pedaling is more than PLD. Scissors signal test No test when selecting “0” while test when 【085.CKM】 function selection selecting“1” Different types of machines can be appropriate to 【101.
- Page 12 JUKI CORPORATION 2-11-1,TSURUMAKI,TAMA-SHI,TOKYO 206-8551,JAPAN PHONE:(81)42-357-2211 – 10 –...
Need help?
Do you have a question about the F-1S and is the answer not in the manual?
Questions and answers