Table of Contents
Advertisement
Available languages
Available languages
Quick Links
Advertisement
Chapters
Table of Contents

Related Manuals for PROEL LTX10P


Summary of Contents for PROEL LTX10P
- Page 1 USER’S MANUAL ENGLISH ITALIANO 96MAN0181-REV.29/23...
- Page 2 This page is intentionally left blank.
-
Page 3: Table Of Contents
INDEX IMPORTANT SAFETY INSTRUCTIONS ....................4 DECLARATION OF CONFORMITY ....................5 LIMITED WARRANTY ........................5 CONDITIONS OF USE ........................5 INTRODUCTION..........................6 DESCRIPTION ..........................6 OPERATIONS ..........................6 CHOOSE THE AMPLIFIER POWER ....................6 KPTLTP BRACKET ASSEMBLY INSTRUCTIONS .................. 7 KPTLTX10 BRACKET ASSEMBLY INSTRUCTIONS ................ -
Page 4: Important Safety Instructions
IMPORTANT SAFETY INSTRUCTIONS Watch for these symbols: The lightning flash with arrowhead symbol within an equilateral triangle is intended to alert the user to • the presence of uninsulated “dangerous voltage” within the product’s enclosure, that may be of sufficient magnitude to constitute a risk of electric shock to persons. -
Page 5: Declaration Of Conformity
This warranty does not extend to damage resulting from improper installation, misuse, neglect or abuse. Proel S.p.A. will verify damage on returned units, and when the unit has been properly used and warranty is still valid, then the unit will be replaced or repaired. -
Page 6: Introduction
INTRODUCTION Thank you for choosing a PROEL product. Please take some time to read this manual to understand all the features of your system and take advantage of all its performance capabilities. All PROEL products are CE approved and designed for continuous use in professional applications. -
Page 7: Kptltp Bracket Assembly Instructions
KPTLTP BRACKET ASSEMBLY INSTRUCTIONS Mount the KPTLTP on the wall considering the required free space around it for proper aiming of the • speaker as shown in FIG.1. • Fix the wall plate on the wall using a proper fixing plug and screw (not supplied) capable to carry ten times the weight of the speaker and its support. - Page 8 • Reassemble speaker plate and wall plate as shown in FIG.6. • Connect the safety rope to the speaker using the screw on the side of the cabinet as show in FIG.7. FIG.8 and FIG.9 show the possible vertical tilting combinations: FIG.8 is for the speaker mounted •...
-
Page 10: Kptltx10 Bracket Assembly Instructions
KPTLTX10 BRACKET ASSEMBLY INSTRUCTIONS • Remove the feet under the speaker box using a Phillips screwdriver to unscrew the 4 screws (FIG.12). • Put the screws back in their positions (FIG.13). • Remove the two M8 screws on top and bottom of the speaker (FIG.14). •... - Page 11 Fix the speaker to the bracket using the supplied washers and screws at both sides. The rubber • washer (6) must be placed between the bracket leg and the speaker, the metal washer (7) must be placed outside the bracket leg. Use the screws (8) to fix the bracket to the speaker, aim the speaker and tight the screws (FIG.16).
-
Page 12: Connection Example
CONNECTION EXAMPLE... -
Page 13: Optional Accessories
2 wires FR flex-black installation HPC624BK HPC624FRS HPC620BK HPC620FRS HPC610BK HPC610FRS this is a short extraction of the wide assortment of cables available from PROEL, please visit our website at www.proel.com TECHNICAL SPECIFICATIONS LTX10P System type 2-way vented enclosure High Frequency Device 1’’... - Page 14 INDICE ISTRUZIONI DI SICUREZZA IMPORTANTI ..................15 DICHIARAZIONE DI CONFORMITÀ ....................16 GARANZIA LIMITATA ........................16 CONDIZIONI D'USO ........................16 INTRODUZIONE ........................... 17 DESCRIZIONE ..........................17 FUNZIONI............................ 17 SCELTA DELL' AMPLIFICATORE DI POTENZA .................. 17 ISTRUZIONI DI MONTAGGIO DELLA STAFFA KPTLTP ..............18 ISTRUZIONI DI MONTAGGIO DELLA STAFFA KPTLTX10 ..............
-
Page 15: Istruzioni Di Sicurezza Importanti
ISTRUZIONI DI SICUREZZA IMPORTANTI Guarda questi simboli: Il lampo con la freccia all'interno di un triangolo equilatero ha lo scopo di avvisare l'utente della presenza di • "tensione pericolosa" non isolata all'interno della custodia del prodotto, che può essere di ampiezza sufficiente a costituire un rischio di scossa elettrica per le persone. -
Page 16: Dichiarazione Di Conformità
GARANZIA LIMITATA Proel garantisce tutti i materiali, la lavorazione e il corretto funzionamento di questo prodotto per un periodo di due anni dalla data di acquisto originale. I difetti rilevati entro il periodo di garanzia sui prodotti venduti, attribuibili a materiali difettosi o difetti di costruzione, devono essere tempestivamente segnalati al proprio rivenditore o distributore, allegando evidenza scritta della data di acquisto e descrizione del tipo di difetto riscontrato. -
Page 17: Introduzione
CE per un utilizzo continuo in applicazioni professionali. DESCRIZIONE LTX10P di PROEL è un sistema di altoparlanti passivo con cabinet in multistrato che offre il rinomato suono PROEL e prestazioni di alto livello in un prodotto affidabile e conveniente. Per la costruzione del cabinet abbiamo utilizzato il legno multistrato, un materiale molto leggero e resistente che rende la movimentazione e l'installazione di questo diffusore molto semplice e veloce. -
Page 18: Istruzioni Di Montaggio Della Staffa Kptltp
l'amplificatore) raggiunga il suo massimo livello. Un appropriato uso di un sistema audio richiede di essere consapevoli del tipo di segnale audio riprodotto, regolando i livelli di uscita di conseguenza, e agendo in modo che non avvenga nessun clip sul percorso del segnale fra tutti i dispositivi audio coinvolti. ISTRUZIONI DI MONTAGGIO DELLA STAFFA KPTLTP •... - Page 19 • Riassemblare la piastra del diffusore con la piastra a parete come mostrato in FIG.6. • Collegare la fune di sicurezza al diffusore utilizzando la vite sul lato come mostrato in FIG.7. • Le FIG.8 e FIG.9 mostrano le possibili combinazioni per orientare il diffusore sull’asse verticale: la FIG.8 per il diffusore montato verticalmente, la FIG.9 per il diffusore montato orizzontalmente.
-
Page 21: Istruzioni Di Montaggio Della Staffa Kptltx10
ISTRUZIONI DI MONTAGGIO DELLA STAFFA KPTLTX10 Rimuovere i piedini sotto la cassa utilizzando un cacciavite a croce per svitare le 4 viti (FIG.12). • • Riavvitare le viti nelle proprie posizioni (FIG.13). • Rimuovere le due viti M8 sopra e sotto l'altoparlante (FIG.14). •... - Page 22 Fissare l'altoparlante alla staffa utilizzando le rondelle e le viti in dotazione su entrambi i lati. La • rondella in gomma (6) deve essere posizionata tra la gamba della staffa e l'altoparlante, la rondella metallica (7) deve essere posizionata all'esterno della gamba della staffa. Utilizzare le viti (8) per fissare la staffa al diffusore, puntare il diffusore e serrare le viti (FIG.16).
-
Page 23: Esempio Connessioni
ESEMPIO CONNESSIONI... -
Page 24: Accessori Opzionali
2 fili da in- flessibile stallazione HPC624BK HPC624FRS HPC620BK HPC620FRS HPC610BK HPC610FRS questo è un breve estratto del vasto assortimento di cavi disponibile da PROEL, vi preghiamo di visitare il nostro sito web all'indirizzo www.proel.com SPECIFICHE TECNICHE LTX10P Sistema 2-vie bass reflex Altoparlante per Alti Driver 1”... -
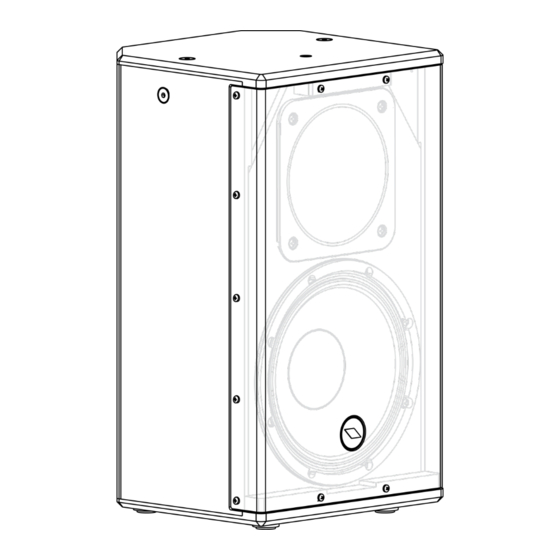
Page 25: Mechanical Drawing
MECHANICAL DRAWING / DISEGNO MECCANICO... - Page 26 This page is intentionally left blank.
- Page 27 PROEL S.p.A. (World Headquarters - Factory) Via alla Ruenia 37/43 64027 Sant’Omero (Te) – Italy Tel: +39 0861 81241 Fax: +39 0861 887862 www.proel.com...
Need help?
Do you have a question about the LTX10P and is the answer not in the manual?
Questions and answers