
Related Manuals for Asus RT-AX52


Summary of Contents for Asus RT-AX52
- Page 1 User Guide RT-AX52 RT-AX52 Wireless-AX Dual Band Wi-Fi 6 Wireless-AX Dual Band Wi-Fi 6 Router Router...
- Page 2 Product warranty or service will not be extended if: (1) the product is repaired, modified or altered, unless such repair, modification of alteration is authorized in writing by ASUS; or (2) the serial number of the product is defaced or missing.
-
Page 3: Table Of Contents
Table of contents Getting to know your wireless router Welcome! ..................6 Package contents .................6 Your wireless router ..............7 Positioning your router ..............9 Setup Requirements ..............10 Router Setup ................11 1.6.1 Wired connection ..............12 1.6.2 Wireless connection .............13 Getting started Logging into the Web GUI ............. - Page 4 Table of contents Guest Network ................27 IPv6 ....................29 LAN ....................30 3.5.1 LAN IP ..................30 3.5.2 DHCP Server ................31 3.5.3 Route ..................33 3.5.4 IPTV ....................34 Network Map ................35 3.6.1 Setting up the wireless security settings ......36 3.6.2 Managing your network clients ........37 Parental Controls ...............
- Page 5 Table of contents 3.12.3 WDS ....................61 3.12.4 Wireless MAC Filter ...............63 3.12.5 RADIUS Setting ..............64 3.12.6 Professional ................65 Utilities Device Discovery ............... 68 Firmware Restoration .............. 69 Troubleshooting Basic Troubleshooting ............. 71 Frequently Asked Questions (FAQs) ........74 Appendices Notices ....................... 84 Safety Notices ..................100 Service and Support ................102...
-
Page 6: Getting To Know Your Wireless Router
Power adapter Quick Start Guide NOTES: • If any of the items are damaged or missing, contact ASUS for technical inquiries and support. Refer to the ASUS Support Hotline list at the back of this user manual. • Keep the original packaging material in case you would need future... -
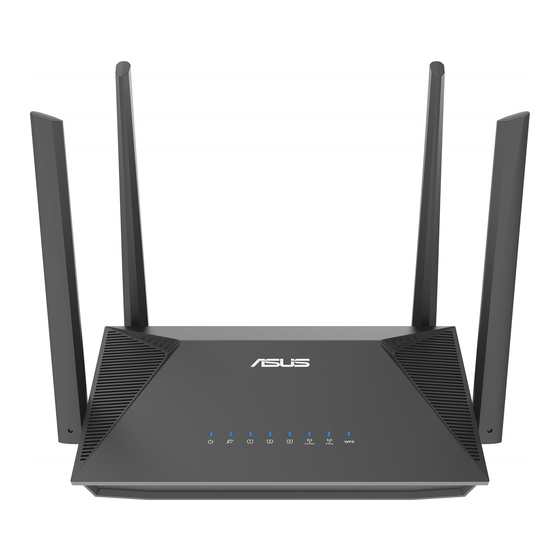
Page 7: Your Wireless Router
1.3 Your wireless router Power LED Off: No power. On: Device is ready. Flashing slow: Rescue mode WAN (Internet) LED Red: No IP or no physical connection. On: Has physical connection to a wide area network (WAN). LAN LEDs Off: No power or no physical connection. On: Has physical connection to a local area network (LAN). - Page 8 LAN 1 ~ 3 ports Connect network cables into these ports to establish LAN connection. WAN (Internet) port Connect a network cable into this port to establish WAN connection. Reset button This button resets or restores the system to its factory default settings. WPS button This button launches the WPS Wizard.
-
Page 9: Positioning Your Router
• Always update to the latest firmware. Visit the ASUS website at http://www.asus.com to get the latest firmware updates. 45°... -
Page 10: Setup Requirements
1.5 Setup Requirements To set up your wireless network, you need a computer that meets the following system requirements: • Ethernet RJ-45 (LAN) port (10Base-T/100Base-TX/1000BaseTX) • IEEE 802.11a/b/g/n/ac/ax wireless capability • An installed TCP/IP service • Web browser such as Internet Explorer, Firefox, Safari, or Google Chrome NOTES: •... -
Page 11: Router Setup
Use a wired connection when setting up your wireless router to avoid possible setup problems. • Before setting up your ASUS wireless router, do the followings: • If you are replacing an existing router, disconnect it from your network. • Disconnect the cables/wires from your existing modem setup. If your modem has a backup battery, remove it as well. -
Page 12: Wired Connection
1.6.1 Wired connection NOTE: You can use either a straight-through cable or a crossover cable for wired connection. RTAX52 Modem LINE RESET Wall Power Outlet Laptop Power To set up your wireless router via wired connection: 1. Insert your wireless router’s AC adapter to the DCIN port and plug it to a power outlet. -
Page 13: Wireless Connection
1.6.2 Wireless connection RTAX52 Smart phone Modem Tablet LINE RESET Wall Power Outlet Power Laptop To set up your wireless router via wireless connection: 1. Insert your wireless router’s AC adapter to the DCIN port and plug it to a power outlet. 2 Using the bundled network cable, connect your modem to your wireless router’s WAN port. -
Page 14: Getting Started
Getting started Getting started 2.1 Logging into the Web GUI Your ASUS Wireless Router comes with an intuitive web graphical user interface (GUI) that allows you to easily configure its various features through a web browser such as Internet Explorer, Firefox, Safari, or Google Chrome. -
Page 15: Quick Internet Setup (Qis) With Auto-Detection
2.2 Quick Internet Setup (QIS) with Auto- detection The Quick Internet Setup (QIS) function guides you in quickly setting up your Internet connection. NOTE: When setting the Internet connection for the first time, press the Reset button on your wireless router to reset it to its factory default settings. - Page 16 2. The wireless router automatically detects if your ISP connection type is Dynamic IP, PPPoE, PPTP, L2TP, and Static IP. Key in the necessary information for your ISP connection type. IMPORTANT! Obtain the necessary information from your ISP about the Internet connection type. for Automatic IP (DHCP) for PPPoE, PPTP, and L2TP...
- Page 17 for Static IP NOTES: • The auto-detection of your ISP connection type takes place when you configure the wireless router for the first time or when your wireless router is reset to its default settings. If QIS failed to detect your Internet connection type, click Skip to •...
- Page 18 4. Your Internet and wireless settings are displayed. Click Next to continue. 5. Read the wireless network connection tutorial. When done, click Finish.
-
Page 19: Connecting To Your Wireless Network
2.3 Connecting to your wireless network After setting up your wireless router via QIS, you can connect your computer or other smart devices to your wireless network. To connect to your network: 1. On your computer, click the network icon in the notification area to display the available wireless networks. -
Page 20: Configuring The General And Advanced Settings
Configuring the General and Configuring the General and Advanced Settings Advanced Settings 3.1 Administration 3.1.1 Operation Mode The Operation Mode page allows you to select the appropriate mode for your network. To set up the operating mode: 1. From the navigation panel, go to Advanced Settings > Administration >... -
Page 21: System
3. Click Save. NOTE: The router will reboot when you change the modes. 3.1.2 System The System page allows you to configure your wireless router settings. To set up the System settings: 1. From the navigation panel, go to Advanced Settings > Administration >... -
Page 22: Firmware Upgrade
3.1.3 Firmware Upgrade NOTE: Download the latest firmware from the ASUS website at http://www.asus.com. To upgrade the firmware: 1. From the navigation panel, go to Advanced Settings > Administration > Firmware Upgrade. 2. In the New Firmware File field, click Browse to locate the downloaded file. -
Page 23: Firewall
3.2 Firewall The wireless router can serve as a hardware firewall for your network. NOTE: The Firewall feature is enabled by default. 3.2.1 General To set up basic Firewall settings: 1. From the navigation panel, go to Advanced Settings > Firewall >... -
Page 24: Keyword Filter
3. Enter a URL and click the button. 4. Click Apply. 3.2.3 Keyword filter Keyword filter blocks access to webpages containing specified keywords. To set up a keyword filter: 1. From the navigation panel, go to Advanced Settings > Firewall > Keyword Filter. 2. -
Page 25: Network Services Filter
3.2.4 Network Services Filter The Network Services Filter blocks LAN to WAN packet exchanges and restricts network clients from accessing specific web services such as Telnet or FTP. To set up a Network Service filter: 1. From the navigation panel, go to Advanced Settings > Firewall >... - Page 26 5. To specify a Network Service to filter, enter the Source IP, Destination IP, Port Range, and Protocol. Click the button. 6. Click Apply.
-
Page 27: Guest Network
The Guest Network provides temporary visitors with Internet connectivity via access to separate SSIDs or networks without providing access to your private network. NOTE: RT-AX52 supports up to six SSIDs (three 2.4GHz and three 5GHz SSIDs). To create a guest network: 1. - Page 28 4. To configure additional options, click Modify. 5. Click Yes on the Enable Guest Network screen. 6. Assign a wireless name for your temporary network on the Network Name (SSID) field. 7. Select an Authentication Method. 8. Select an Encryption method. 9.
-
Page 29: Ipv6
3.4 IPv6 This wireless router supports IPv6 addressing, a system that supports more IP addresses. This standard is not yet widely available. Contact your ISP if your Internet service supports IPv6. To set up IPv6: 1. From the navigation panel, go to Advanced Settings > IPv6. 2. -
Page 30: Lan
3.5 LAN 3.5.1 LAN IP The LAN IP screen allows you to modify the LAN IP settings of your wireless router. NOTE: Any changes to the LAN IP address will be reflected on your DHCP settings. To modify the LAN IP settings: 1. -
Page 31: Dhcp Server
3.5.2 DHCP Server Your wireless router uses DHCP to assign IP addresses automatically on your network. You can specify the IP address range and lease time for the clients on your network. To configure the DHCP server: 1. From the navigation panel, go to Advanced Settings > LAN > DHCP Server. - Page 32 5. In the IP Pool Ending Address field, key in the ending IP address. 6. In the Lease Time field, specify in seconds when an assigned IP address will expire. Once it reaches this time limit, the DHCP server will then assign a new IP address. NOTES: •...
-
Page 33: Route
3.5.3 Route If your network makes use of more than one wireless router, you can configure a routing table to share the same Internet service. NOTE: We recommend that you do not change the default route settings unless you have advanced knowledge of routing tables. To configure the LAN Routing table: 1. -
Page 34: Iptv
3.5.4 IPTV The wireless router supports connection to IPTV services through an ISP or a LAN. The IPTV tab provides the configuration settings needed to set up IPTV, VoIP, multicasting, and UDP for your service. Contact your ISP for specific information regarding your service. -
Page 35: Network Map
3.6 Network Map Network Map allows you to configure your network’s security settings and manage your network clients. -
Page 36: Setting Up The Wireless Security Settings
3.6.1 Setting up the wireless security settings To protect your wireless network from unauthorized access, you need to configure its security settings. To set up the wireless security settings: 1. From the navigation panel, go to General > Network Map. 2. -
Page 37: Managing Your Network Clients
4. From the WEP Encryption dropdown list, select the encryption method for your wireless network. IMPORTANT! The IEEE 802.11n/ac/ax standard prohibits using High Throughput with WEP or WPA-TKIP as the unicast cipher. If you use these encryption methods, your data rate will drop to IEEE 802.11g 54Mbps connection. -
Page 38: Parental Controls
3.7 Parental Controls Parental Controls allows you to control the Internet access time or set the time limit for a client’s network usage. To go to the Parental Controls main page: From the navigation panel, go to General > Parental Controls. - Page 39 Time Scheduling Time Scheduling allows you to set the time limit for a client’s network usage. NOTE: Ensure that your system time is synchronized with the NTP server. To configure Time Scheduling: 1. From the navigation panel, go to General > Parental Controls >...
-
Page 40: System Log
3.8 System Log System Log contains your recorded network activities. NOTE: System log resets when the router is rebooted or powered off. To view your system log: 1. From the navigation panel, go to Advanced Settings > System Log. 2. You can view your network activities in any of these tabs: •... -
Page 41: Traffic Manager
3.9 Traffic Manager 3.9.1 Managing QoS (Quality of Service) Bandwidth Quality of Service (QoS) allows you to set the bandwidth priority and manage network traffic. To set up bandwidth priority: 1. From the navigation panel, go to General > Traffic Manager > QoS. - Page 42 4. On the user-defined QoS rules page, there are four default online service types – web surf, HTTPS and file transfers. Select your preferred service, fill in the Source IP or MAC, Destination Port, Protocol, Transferred and Priority, then click Apply. The information will be configured in the QoS rules screen.
- Page 43 5. On the User-defined Priority page, you can prioritize the network applications or devices into five levels from the user- defined QoS rules’ dropdown list. Based on priority level, you can use the following methods to send data packets: • Change the order of upstream network packets that are sent to the Internet.
-
Page 44: Traffic Monitor
3.10 Traffic Monitor The traffic monitor feature allows you to access the bandwidth usage and speed of your Internet, wired, or wireless networks. It allows you to monitor network traffic in real-time or on a daily basis. It also offers an option to display the network traffic within the last 24 hours. -
Page 45: Wan
3.11 WAN 3.11.1 Internet Connection The Internet Connection screen allows you to configure the settings of various WAN connection types. To configure the WAN connection settings: 1. From the navigation panel, go to Advanced Settings > WAN > Internet Connection. - Page 46 2. Configure the following settings below. When done, click Apply. • WAN Connection Type: Choose your Internet Service Provider type. The choices are Automatic IP, PPPoE, PPTP, L2TP or Static IP. Consult your ISP if the router is unable to obtain a valid IP address or if you are unsure the WAN connection type.
- Page 47 • Contact your ISP and update the MAC address associated with your ISP service. • Clone or change the MAC address of the ASUS wireless router to match the MAC address of the previous networking device recognized by the ISP.
-
Page 48: Port Trigger
3.11.2 Port Trigger Port range triggering opens a predetermined incoming port for a limited period of time whenever a client on the local area network makes an outgoing connection to a specified port. Port triggering is used in the following scenarios: •... - Page 49 • Protocol: Select the protocol, TCP, or UDP. • Incoming Port: Specify an incoming port to receive inbound data from the Internet. • Protocol: Select the protocol, TCP, or UDP. NOTES: • When connecting to an IRC server, a client PC makes an outgoing connection using the trigger port range 66660-7000.
-
Page 50: Virtual Server/Port Forwarding
Forwarding on your router allows PCs outside the network to access specific services provided by a PC in your network. NOTE: When port forwarding is enabled, the ASUS router blocks unsolicited inbound traffic from the Internet and only allows replies from outbound requests from the LAN. - Page 51 • Famous Game List: This item lists ports required for popular online games to work correctly. • FTP Server Port: Avoid assigning the port range 20:21 for your FTP server as this would conflict with the router’s native FTP server assignment. •...
- Page 52 • You will need a client outside your LAN but has Internet access (referred to as “Internet client”). This client should not be connected to the ASUS router. • On the Internet client, use the router’s WAN IP to access the server.
-
Page 53: Dmz
3.11.4 DMZ Virtual DMZ exposes one client to the Internet, allowing this client to receive all inbound packets directed to your Local Area Network. Inbound traffic from the Internet is usually discarded and routed to a specific client only if port forwarding or a port trigger has been configured on the network. -
Page 54: Ddns
DNS name rather than WAN IP address. • Server and Host Name: Choose ASUS DDNS or other DDNS. If you want to use ASUS DDNS, fill in the Host Name in the format of xxx.asuscomm.com (xxx is your host name). -
Page 55: Nat Passthrough
3.11.6 NAT Passthrough NAT Passthrough allows a Virtual Private Network (VPN) connection to pass through the router to the network clients. PPTP Passthrough, L2TP Passthrough, IPsec Passthrough and RTSP Passthrough are enabled by default. To enable / disable the NAT Passthrough settings, go to the Advanced Settings >... -
Page 56: Wireless
3.12 Wireless 3.12.1 General The General tab allows you to configure the basic wireless settings. To configure the basic wireless settings: 1. From the navigation panel, go to Advanced Settings > Wireless > General. 2. Select 2.4GHz or 5GHz as the frequency band for your wireless network. - Page 57 3. Assign a unique name containing up to 32 characters for your SSID (Service Set Identifier) or network name to identify your wireless network. Wi-Fi devices can identify and connect to the wireless network via your assigned SSID. The SSIDs on the information banner are updated once new SSIDs are saved to the settings.
- Page 58 8. Select any of these authentication methods: • Open System: This option provides no security. • WPA/WPA2 Personal/WPA Auto-Personal: This option provides strong security. You can use either WPA (with TKIP), WPA2 (with AES) or WPA3. If you select this option, you must use TKIP + AES encryption and enter the WPA passphrase (network key).
-
Page 59: Wps
3.12.2 WPS WPS (Wi-Fi Protected Setup) is a wireless security standard that allows you to easily connect devices to a wireless network. You can configure the WPS function via the PIN code or WPS button. NOTE: Ensure that the devices support WPS. To enable WPS on your wireless network: 1. - Page 60 4. In the WPS Method field, select Push Button or Client PIN code. If you select Push Button, go to step 5. If you select Client PIN code, go to step 6. 5. To set up WPS using the router’s WPS button, follow these steps: a.
-
Page 61: Wds
ASUS wireless router. It can also be considered as a wireless repeater where your ASUS wireless router communicates with another access point and other wireless devices. - Page 62 • HYBRID: Enables the Wireless Bridge feature and allows other wireless devices/stations to connect to the router. NOTE: In Hybrid mode, wireless devices connected to the ASUS wireless router will only receive half the connection speed of the Access Point.
-
Page 63: Wireless Mac Filter
3.12.4 Wireless MAC Filter Wireless MAC filter provides control over packets transmitted to a specified MAC (Media Access Control) address on your wireless network. To set up the Wireless MAC filter: 1. From the navigation panel, go to Advanced Settings > Wireless >... -
Page 64: Radius Setting
3.12.5 RADIUS Setting RADIUS (Remote Authentication Dial In User Service) Setting provides an extra layer of security when you choose WPA- Enterprise, WPA2-Enterprise or Radius with 802.1x as your Authentication Mode. To set up wireless RADIUS settings: 1. Ensure that the wireless router’s authentication mode is set to WPA-Enterprise, WPA2-Enterprise. -
Page 65: Professional
3.12.6 Professional The Professional screen provides advanced configuration options. NOTE: We recommend that you use the default values on this page. In the Professional Settings screen, you can configure the followings: • Band: Select the frequency band that the professional settings will be applied to. - Page 66 • Enable wireless scheduler: You can choose clock format as 24-hour or 12-hour. The color in the table indicates Allow or Deny. Click each frame to change the settings of the hour of the weekdays and click OK when done. •...
- Page 67 • DTIM Interval: DTIM (Delivery Traffic Indication Message) Interval or Data Beacon Rate is the time interval before a signal is sent to a wireless device in sleep mode indicating that a data packet is awaiting delivery. The default value is three milliseconds.
-
Page 68: Utilities
• The utilities are not supported on MAC OS. 4.1 Device Discovery Device Discovery is an ASUS WLAN utility that detects an ASUS wireless router device, and allows you to configure the wireless networking settings. To launch the Device Discovery utility: •... -
Page 69: Firmware Restoration
4.2 Firmware Restoration Firmware Restoration is used on an ASUS Wireless Router that failed during its firmware upgrading process. It uploads the firmware that you specify. The process takes about three to four minutes. IMPORTANT! Launch the rescue mode on the router before using the Firmware Restoration utility. - Page 70 IP address: 192.168.50.1 Subnet mask: 255.255.255.0 4. From your computer’s desktop, click Start > All Programs > ASUS Utility > Wireless Router > Firmware Restoration. 5. Specify a firmware file, then click Upload. NOTE: This is not a firmware upgrade utility and cannot be used on a working ASUS Wireless Router.
-
Page 71: Troubleshooting
1. Launch the Web GUI. Go to Advanced Settings > Administration > Firmware Upgrade. Click Check to verify if the latest firmware is available. 2. If the latest firmware is available, visit the ASUS global website at https://www.asus.com/networking-iot-servers/wifi-routers/ asus-wifi-routers/rt-ax52/helpdesk_bios?model2Name=RT- AX52 to download the latest firmware. - Page 72 • When you connect your computer to the router wirelessly, ensure that the SSID (wireless network name), encryption method, and password are correct. Check if your network settings are correct. • Each client on the network should have a valid IP address. ASUS...
- Page 73 recommends that you use the wireless router’s DHCP server to assign IP addresses to computers on your network. • Some cable modem service providers require you to use the MAC address of the computer initially registered on the account. You can view the MAC address in the web GUI, Network Map >...
-
Page 74: Frequently Asked Questions (Faqs)
5.2 Frequently Asked Questions (FAQs) I cannot access the router GUI using a web browser • If your computer is wired, check the Ethernet cable connection and LED status as described in the previous section. • Ensure that you are using the correct login information. The default factory login name and password is “admin/admin”. - Page 75 The client cannot establish a wireless connection with the router. NOTE: If you are having issues connecting to 5GHz network, make sure that your wireless device supports 5GHz or features dual band capabilities. • Out of Range: • Move the router closer to the wireless client. •...
- Page 76 • SSID has been hidden. If your device can find SSIDs from other routers but cannot find your router’s SSID, go to Advanced Settings > Wireless > General, select No on Hide SSID, and select Auto on Control Channel. • If you are using a wireless LAN adapter, check if the wireless channel in use conforms to the channels available in your country/area.
- Page 77 • If you still cannot connect to the router wirelessly, you can reset your router to factory default settings. In the router GUI, click Administration > Restore/Save/Upload Setting and click Restore.
- Page 78 Internet is not accessible. • Check if your router can connect to your ISP’s WAN IP address. To do this, launch the web GUI and go to General> Network Map, and check the Internet status. • If your router cannot connect to your ISP’s WAN IP address, try restarting your network as described in the section Restart your network in following sequence under Basic Troubleshooting.
- Page 79 • Check the status indicators on the ADSL modem and the wireless router. If the WAN LED on the wireless router is not ON, check if all cables are plugged properly. You forgot the SSID (network name) or network password •...
- Page 80 Cannot access Web GUI Before configuring your wireless router, do the steps described in this section for your host computer and network clients. Disable the proxy server, if enabled. Windows® 1. Click Start > Internet Explorer to launch the browser. 2.
- Page 81 MAC OS 1. From your Safari browser, click Safari > Preferences > Advanced > Change Settings... 2. From the Network screen, deselect FTP Proxy and Web Proxy (HTTP). 3. Click Apply Now when done. NOTE: Refer to your browser’s help feature for details on disabling the proxy server.
- Page 82 2. Click Properties to display the Ethernet Properties window. 3. Select Internet Protocol Version 4 (TCP/IPv4) or Internet Protocol Version 6 (TCP/IPv6), then click Properties. 4. To obtain the IPv4 IP settings automatically, tick Obtain an IP address automatically. To obtain the IPv6 IP settings automatically, tick Obtain an IPv6 address automatically.
- Page 83 MAC OS 1. Click the Apple icon located on the top left of your screen. 2. Click System Preferences > Network > Configure... 3. From the TCP/IP tab, select Using DHCP in the Configure IPv4 dropdown list. 4. Click Apply Now when done.
-
Page 84: Appendices
We believe in providing solutions for you to be able to responsibly recycle our products, batteries, other components, as well as the packaging materials. Please go to http://csr.asus. com/english/Takeback.htm for the detailed recycling information in different regions. - Page 85 Rules. These limits are designed to provide reasonable protection against harmful interference in a residential installation. This equipment generates, uses and can radiate radio frequency energy and, if not installed and used in accordance with the instructions, may cause harmful interference to radio communications.
- Page 86 Directive 2014/53/EU. Full text of EU declaration of conformity is available at https://www.asus.com/support/. This equipment complies with EU radiation exposure limits set forth for an uncontrolled environment. This equipment should be installed and operated with minimum distance 24 cm between the radiator &...
- Page 87 Radio Frequency (RF) Exposure Information The radiated output power of the ASUS Wireless Device is below the Industry Canada (IC) radio frequency exposure limits. The ASUS Wireless Device should be used in such a manner such that the potential for human contact during normal operation is minimized.
- Page 88 Informations concernant l’exposition aux fréquences radio (RF) La puissance de sortie émise par l’appareil de sans l ASUS est inférieure à la limite d’exposition aux fréquences radio d’Industry Canada (IC). Utilisez l’appareil de sans l ASUS de façon à minimiser les contacts humains lors du fonctionnement normal.
- Page 89 RF au Canada rendezvous sur : http://www.ic.gc.ca/eic/site/smt-gst.nsf/eng/sf08792.html Precautions for the use of the device • Do not use the ASUS product in this situation (Driving, in airports, hospitals, gas stations and professional garages). • Medical device interference: Maintain a minimum distance of...
- Page 90 「產品之限用物質含有情況」 之相關資訊, 請參考下表 : 限用物質及其化學符號 單元 鉛 汞 鎘 六價鉻 多溴聯苯 多溴二苯醚 (Pb) (Hg) (Cd) (PBB) (PBDE) 印刷電路板及 — ○ ○ ○ ○ ○ 電子組件 外殼 ○ ○ ○ ○ ○ ○ 天線 — ○ ○ ○ ○ ○ 其他及其配件 —...
- Page 91 GNU General Public License Licensing information This product includes copyrighted third-party software licensed under the terms of the GNU General Public License. Please see The GNU General Public License for the exact terms and conditions of this license. All future firmware updates will also be accompanied with their respective source code.
- Page 92 can get it if you want it, that you can change the software or use pieces of it in new free programs; and that you know you can do these things. To protect your rights, we need to make restrictions that forbid anyone to deny you these rights or to ask you to surrender the rights.
- Page 93 Terms & conditions for copying, distribution, & modification 0. This License applies to any program or other work which contains a notice placed by the copyright holder saying it may be distributed under the terms of this General Public License. The “Program”, below, refers to any such program or work, and a “work based on the Program”...
- Page 94 2. You may modify your copy or copies of the Program or any portion of it, thus forming a work based on the Program, and copy and distribute such modifications or work under the terms of Section 1 above, provided that you also meet all of these conditions: a) You must cause the modified files to carry prominent notices stating that you changed the files and the date of any...
- Page 95 In addition, mere aggregation of another work not based on the Program with the Program (or with a work based on the Program) on a volume of a storage or distribution medium does not bring the other work under the scope of this License. 3.
- Page 96 If distribution of executable or object code is made by offering access to copy from a designated place, then offering equivalent access to copy the source code from the same place counts as distribution of the source code, even though third parties are not compelled to copy the source along with the object code.
- Page 97 7. If, as a consequence of a court judgment or allegation of patent infringement or for any other reason (not limited to patent issues), conditions are imposed on you (whether by court order, agreement or otherwise) that contradict the conditions of this License, they do not excuse you from the conditions of this License.
- Page 98 9. The Free Software Foundation may publish revised and/or new versions of the General Public License from time to time. Such new versions will be similar in spirit to the present version, but may differ in detail to address new problems or concerns. Each version is given a distinguishing version number.
- Page 99 NO WARRANTY BECAUSE THE PROGRAM IS LICENSED FREE OF CHARGE, THERE IS NO WARRANTY FOR THE PROGRAM, TO THE EXTENT PERMITTED BY APPLICABLE LAW. EXCEPT WHEN OTHERWISE STATED IN WRITING THE COPYRIGHT HOLDERS AND/OR OTHER PARTIES PROVIDE THE PROGRAM “AS IS” WITHOUT WARRANTY OF ANY KIND, EITHER EXPRESSED OR IMPLIED, INCLUDING, BUT NOT LIMITED TO, THE IMPLIED WARRANTIES OF MERCHANTABILITY AND FITNESS FOR A PARTICULAR PURPOSE.
-
Page 100: Safety Notices
15 cm (6 inches) between implanted medical devices and ASUS products to reduce the risk of interference. • Kindly use ASUS products in good reception conditions to minimize the radiation's level. • Keep the device away from pregnant women and the lower abdomen of the teenager. - Page 101 WARNING! • DO NOT place on uneven or unstable work surfaces. • DO NOT place or drop objects on the top of the product. Avoid exposing the product to mechanical shock such as crushing, bending, puncturing or shredding. • DO NOT disassemble, open, microwave, incinerate, paint, or shove any foreign objects into this product.
-
Page 102: Service And Support
Service and Support Visit our multi-language website at https://www.asus.com/support.
Need help?
Do you have a question about the RT-AX52 and is the answer not in the manual?
Questions and answers