
Related Manuals for Kensington MY430


Summary of Contents for Kensington MY430
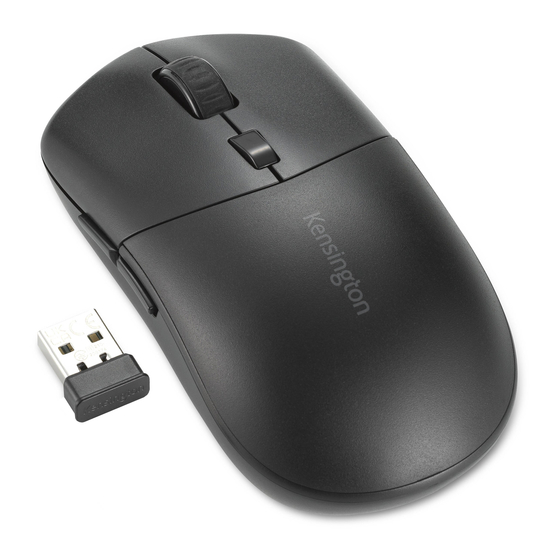
- Page 1 Kensington MY430 Rechargeable Mouse. This box contains the following: One Compliance Card. One Warranty Card. One 2.4GHz USB-A (male) receiver. One USB-A (male) to USB-C (male) charging cable. One MY430 Rechargeable Mouse. Register at kensington.com/register.
- Page 2 1. Button Functionality. Starting at the top of mouse and going clockwise: Scroll Wheel. Power Indicator. Right Click. DPI Switch. Backward. Forward. Left Click.
- Page 3 Functionality on the bottom of the mouse: Channel Indicator: Green light indicates 2.4G, Blue light indicates BT1, White light indicates BT2. On/Off Switch. Channel Selection/Bluetooth Pairing Button. 2. To use the mouse, slide the On/Off Switch on the bottom to the on position.
- Page 4 3. Pairing. To pair using the 2.4GHz receiver, remove the receiver from the botton of the mouse, insert the receiver into a USB-A port on your device, and press the Channel Selection/Bluetooth Pairing Button until the indicator light is green. To pair using Bluetooth, press the Channel Selection/Bluetooth Pairing Button to BT1 (channel indicator blue) or BT2 (channel indicator white).
- Page 5 4. Software. Go to https://www.kensington.com/software/kensingtonworks/ to download the software to enable customization. Follow the onscreen installation instructions to complete installation. Battery. A flashing red light on the Power Indicator indicates low battery (less than 5% remaining). To charge, use the included charging cable.
- Page 6 a. Plug the USB-C end into the USB-C port on the top edge of the mouse. b. Plug the USB-A end into any available USB-A port on your device. c. A solid red light on the Power Indicator indicates that the mouse is charging. The Power Indicator light will go off after the mouse is fully charged.
- Page 7 DPI Setting. Use the DPI Switch on the top of the mouse to transition between 1000, 1600, and 2400 DPI. This allows you to control speed and adjust the mouse sensitivity to your preference.
- Page 12 Maximum RF Output Power less than or equal to 20dBm (EIRP) SAFETY AND USAGE GUIDELINES. 1. In the absence of proper operation and if customer-initiated troubleshooting is unsuccessful, switch off device and contact Kensington technical support: www.kensington.com 2. Do not disassemble product or expose it to liquid, humidity, moisture, or temperatures outside the specified operating ranges of 0 degrees Celsius (32 degrees Faranheit) to 40 degrees Celsius (104 degrees Faranheit).
- Page 13 Disposing of the Lithium-ion Polymar Battery (NMC). a. Turn the mouse over and remove the two bottom padded feet to expose the casing screws. b. Use a screwdriver to remove the casing screws. c. Slide the top casing of the mouse down to remove it. d.
- Page 14 This device is not equipped with a replaceable battery. Attempts to remove or replace the battery will void the warranty and may damage the device. When disposing or recycling this device, the battery should be disposed of in a manner compliant with local battery disposal regulations.
- Page 16 For support, visit www.kensington.com/support.
Need help?
Do you have a question about the MY430 and is the answer not in the manual?
Questions and answers