Table of Contents
Advertisement
Quick Links
Advertisement
Chapters
Table of Contents

Related Manuals for Hologic Genius Digital Diagnostics System


Summary of Contents for Hologic Genius Digital Diagnostics System
- Page 1 Genius™ Digital Imager Operator’s Manual...
- Page 2 Genius™ Digital Imager Operator’s Manual Hologic, Inc. 250 Campus Drive Marlborough, MA 01752 USA Tel: 1-800-442-9892 1-508-263-2900 Fax: 1-508-229-2795 Web: www.hologic.com For Use With Version 1.x.y Software MAN-10430-001...
- Page 3 The Product is not a replacement for professional review. Determination of slide adequacy and patient diagnosis is at the sole discretion of the cytologists and pathologists trained by Hologic to evaluate ThinPrep-prepared slides.
- Page 4 Revision History Revision Date Description AW-30073-001 Rev. 001 11-2023 Initial release AW-30073-001 Rev. 002 2-2024 Describe the Clean System feature, the Network Settings feature, and the amber status light. Change description of the Gather Diagnostics’ log and the About screen. Clarify cable requirements.
- Page 5 This page intentionally left blank.
- Page 7 Genius™ Digital Diagnostics System Instructions for Use Genius™ Digital Diagnostics System AW-30074-001 Rev. 002 1-2024 English for Canada Instructions for Use 1/34...
- Page 8 ThinPrep™ UroCyte™ microscope slides to provide a digital image of the whole cell spot for screening. The Genius Digital Diagnostics System includes the Genius™ Digital Imager, the Genius™ Image Management Server (IMS), and the Genius™ Review Station. The system is for the creation and viewing of digital images of scanned ThinPrep glass slides that would otherwise be appropriate for manual visualization by conventional light microscopy.
- Page 9 If any serious incident occurs related to this device or any components used with this device, report it to Hologic Technical Support and the competent authority local to the user and/or patient.
- Page 10 Genius Digital Diagnostics System. • The Genius Digital Diagnostics System, when used with the Genius Cervical AI algorithm, should be used in accordance with standard laboratory procedures and in conjunction with the complete standard of care, considering factors such as the case review, assessment of available patient history, other risk factors, and professional screening and management guidelines to guide patient care.
- Page 11 • The monitor and graphics card for the Review Station are those supplied by Hologic specifically for the Genius Digital Diagnostics System. They are required for proper performance of the system and cannot be substituted.
-
Page 12: Category # Of Slides
CT reviewed the nine runs of that same case on the Genius Digital Diagnostics System. In each review on the Genius Digital Diagnostics System, the CT recorded what the CT observed in every tile in the gallery for the case on the Review Station. The CT... -
Page 13: Table Of Contents
Category # of slides ASC-H AGUS HSIL CANCER Study Results: Cervical Cytology Diagnostic Categories The highest OOI category for any case across the nine runs of the case on the Genius Digital Diagnostics System was compared to the diagnostic category for the same slide in the TIS- assisted review. - Page 14 Table 5. ECC Detection on Normal Cases: Agreement between TIS-assisted Review and OOI Study Results (89%, 99%) Agreement (5%, 26%) Rates (54%, 72%) Detection (89%, 99%) Rates -30% (-40%, -20%) (Diff) The positive and negative percent agreement (PPA and NPA) were calculated with reference to the TIS-assisted result.
- Page 15 (2.1%, 7.0%) Rates -0.4% (-2.5%, 1.6%) (Diff) The detection rate for Trichomonas for the Genius Digital Diagnostics System was 3.9%, compared to 3.5% for TIS-assisted review. Genius™ Digital Diagnostics System AW-30074-001 Rev. 002 1-2024 English for Canada Instructions for Use...
- Page 16 (5.1%, 11.7%) Rates 0.8% (-1.8%, 3.4%) (Diff) The detection rate for Candida for the Genius Digital Diagnostics System was 7.8%, compared to 8.6% for TIS-assisted review. Genius™ Digital Diagnostics System AW-30074-001 Rev. 002 1-2024 English for Canada Instructions for Use...
- Page 17 The cell counts derived on each Digital Imager by the algorithm in the Genius Digital Diagnostics system were compared to the manual cell count estimate.
- Page 18 A total of 50 specimens, including at least 8 slides with counts near the clinically critical threshold of 5000 cells, were enrolled in the study. The slides covered a range of cellularity typical of a clinical environment. Figure 1 compares the cell counts between the Genius Cervical AI algorithm and a manual cell count method for each specimen.
- Page 19 Each case in the study was screened using standard laboratory cervical cytology practices (manual review), the ThinPrep Imaging System (“TIS” review), pathologist adjudication consensus (“ADJ” review), and finally with the Genius Digital Diagnostics System. A minimum 14- day washout period occurred between each review phase. The slides were randomized prior to case review in each review phase.
-
Page 20: Agus
ThinPrep slides, and were trained in the use of the Genius Digital Diagnostics System. A total of 2020 cases, with 1 slide from each patient (505 cases at each site), were evaluated in this study. -
Page 21: Lsil 5 27 1
The study results are presented in Table 10. In all abnormal categories, the sensitivity and specificity for the Genius Digital Diagnostics System were non-inferior to that of manual review. Superiority for the Genius Digital Diagnostics System as compared to manual review was also evident at the LSIL+, ASC-H+, and HSIL+ diagnostic thresholds for sensitivity. -
Page 22: Asc-H
72.7%, or a false negative rate of 27.3%. The agreement of HSIL+ cases on the Genius Digital Diagnostics System with adjudicated review is 78.4%, or a false negative rate of 21.6%. This represents a 20.9% reduction in false negative diagnoses for HSIL+. - Page 23 (94.0, 95.4) (1.56, 2.79) Table 12 through Table 19 show the performance of Genius Digital Diagnostics System review and manual review for the following major descriptive diagnosis classifications of the Bethesda System: NILM, ASCUS, LSIL, ASC-H, AGUS, HSIL, Cancer, and UNSAT, as determined by the adjudication panel.
-
Page 24: Agus 2 5 1 1
Table 12. “True Negative” (NILM) Contingency Table (for all Sites Combined) Overall Adjudicated NILM Genius Digital Diagnostics System vs. Manual Review Manual UNSAT NILM ASCUS AGUS LSIL ASC-H HSIL Cancer UNSAT NILM 2881 ASCUS AGUS Genius LSIL ASC-H HSIL Cancer Table 13. -
Page 25: Cancer
Table 14. “True AGUS” Contingency Table (for all Sites Combined) Overall Adjudicated AGUS Genius Digital Diagnostics System vs. Manual Review Manual UNSAT NILM ASCUS AGUS LSIL ASC-H HSIL Cancer UNSAT NILM ASCUS AGUS Genius LSIL ASC-H HSIL Cancer Table 15. “True LSIL” Contingency Table (for all Sites Combined) Overall Adjudicated LSIL Genius Digital Diagnostics System vs. - Page 26 Table 16. “True ASC-H” Contingency Table (for all Sites Combined) Overall Adjudicated ASC-H Genius Digital Diagnostics System vs. Manual Review Manual UNSAT NILM ASCUS AGUS LSIL ASC-H HSIL Cancer UNSAT NILM ASCUS AGUS Genius LSIL ASC-H HSIL Cancer Table 17. “True HSIL” Contingency Table (for all Sites Combined) Overall Adjudicated HSIL Genius Digital Diagnostics System vs.
- Page 27 Table 18. “True Cancer” Contingency Table (for all Sites Combined) Overall Adjudicated Cancer Genius Digital Diagnostics System vs. Manual Review Manual UNSAT NILM ASCUS AGUS LSIL ASC-H HSIL Cancer UNSAT NILM ASCUS AGUS Genius LSIL ASC-H HSIL Cancer Table 19. “True UNSAT” Contingency Table (for all Sites Combined) Overall Adjudicated UNSAT Genius Digital Diagnostics System vs.
- Page 28 Table 20 shows the performance of Genius Digital Diagnostics System review and manual review compared to adjudicated diagnostic threshold made by the adjudication panel for the following major descriptive diagnostic thresholds: ASCUS+, LSIL+, ASC-H+, and HSIL+. Table 20. Contingency Table (for all Sites Combined) Overall Adjudicated vs.
- Page 29 0.4% 0.6% The Genius Digital Diagnostics System showed a slightly higher rate of detection of infectious organisms (17.3% vs 12.0%) and other non-neoplastic findings (8.7% vs 7.5%) than Manual review; the differences in the detection of infectious organisms and non-neoplastic findings were statistically significant (P-value <0.001).
- Page 30 ThinPrep systems are non-inferior to the sensitivity and specificity of the manual review of the same slides. The sensitivity of the Genius Digital Diagnostics System is superior to the sensitivity of the manual review for the detection of abnormal cells at the LSIL+, ASC-H+, and HSIL+ diagnostic thresholds.
- Page 31 This study demonstrated that CT review rates of approximately 1 minute per case are achieved when screening with the Genius Digital Diagnostics System and that screening rates did not have any effect on diagnostic accuracy. Results of this study are presented in Table 23 through Table 25.
- Page 32 Table 24. Sensitivity and Specificity Summary for all CTs vs. Clinical Thresholds (internal study) Median Review Sensitivity Specificity Time per Case ASCUS +/- LSIL +/- ASC-H +/- ASCUS +/- LSIL +/- ASC-H +/- (minutes:seconds) CT-1 01:03 77.0% 81.0% 80.1% 92.5% 92.6% 93.2% CT-2...
- Page 33 Figure 2. CT Case Review Time vs. Sensitivity / Specificity (internal study) Figure 3 shows the diagnostic agreement with adjudicated truth at the ASCUS +/- threshold as a function of individual CT case review times across all CTs in this study. Figure 3.
- Page 34 Genius Digital Diagnostics System and adjudicated results. This study showed that the CT review rates for Genius Digital Diagnostics System case image review are higher than rates achieved with other review methods, such as manual review or review using the ThinPrep Imaging System (TIS).
- Page 35 Figure 4. CT Case Review Time vs. Sensitivity (Clinical Study and Internal Study) Figure 5 compares the median CT review rates from both the clinical study and the internal study to the specificity of diagnostic agreement with adjudicated truth at the ASCUS+/- threshold. Genius™...
- Page 36 4.8 minutes/slide in an 8-hour day. In the case review data collected from the studies with the Genius Digital Diagnostics System, the median rate of review for each CT ranged from 28 seconds (0.5 minute) to 1 minute, 59 seconds (2 minutes).
- Page 37 The study compared results from cases reviewed by a CT using the Genius Digital Diagnostics System to the results of CT review of the same case slides on a microscope (manual review).
- Page 38 Genius Digital Diagnostics System. CONCLUSIONS The data from the studies conducted on the Genius Digital Diagnostics System demonstrate that the Genius Digital Diagnostics System, when used with the Genius Cervical AI algorithm, is effective for assisting in cervical cancer screening of ThinPrep™ Pap test slides for the presence...
- Page 39 Network switch *In some configurations of the system, the laboratory may supply the Review Station computer into which Hologic installs a Hologic-supplied graphics card. In some configurations of the system, a laboratory may supply the server hardware. MATERIALS REQUIRED BUT NOT PROVIDED •...
- Page 40 TECHNICAL SERVICE AND PRODUCT INFORMATION For technical service and assistance related to use of the Genius Digital Diagnostics System, contact Hologic: Telephone: 1-800-442-9892 Fax: 1-508-229-2795 For international or toll-free blocked calls, please contact 1-508-263-2900. Email: info@hologic.com REVISION HISTORY Revision Date Description AW-30074-001 Rev.
- Page 42 Chapter One Introduction SECTION A: Overview and Function of the Genius™ Digital Imager ..............1.1 SECTION B: The Genius Digital Diagnostics System Process for Cervical Cancer Screening ........1.5 SECTION C: The Genius Digital Diagnostics System Process for Non-Gyn and UroCyte Specimens .....1.7 SECTION D: Specimen Preparation and Processing ....1.9...
- Page 43 Chapter Four Operation of the Digital Imager SECTION A: Chapter Overview..........4.1 SECTION B: Applying Power to the Equipment ....4.3 SECTION C: Materials Required prior to Operation ....4.6 SECTION D: Slide Labeling ............4.7 SECTION E: Loading Slide Carriers..........4.9 SECTION F: Load Slide Carrier into the Digital Imager..4.12 SECTION G: Slide Processing...........4.14 SECTION H: Unload Slide Carrier from the Digital Imager 4.24 SECTION I: Using an Error Slide Carrier ......4.25...
- Page 44 SECTION C: Imager Errors ............6.7 SECTION D: Slide Preparation and Quality......6.16 SECTION E: Imager Error Codes..........6.17 Chapter Seven Definitions and Abbreviations ..............7.1 Chapter Eight Service Information..................8.1 Chapter Nine Ordering Information ................9.1 Title Label Specifications for Use with the ThinPrep Imaging System Genius™...
- Page 45 This page intentionally left blank. Genius™ Digital Imager Operator’s Manual...
-
Page 47: Imager
NTRODUCTION C h a p t e r O n e Introduction SECTION OVERVIEW AND FUNCTION OF THE GENIUS™ DIGITAL IMAGER The Digital Imager is one component of the Genius™ Digital Diagnostics System. The Digital Imager is a system for imaging ThinPrep™ cytology sample slides. Slides that have been processed on a ThinPrep processor are then stained and coverslipped. - Page 48 Digital Imager Computer Indication for Use The Digital Imager is one component of the Genius Digital Diagnostics System. The Genius Digital Diagnostics System, when used with the Genius™ Cervical AI algorithm, is ™ indicated for assisting in cervical cancer screening of ThinPrep...
- Page 49 NTRODUCTION Genius Digital Diagnostics System: Laboratory Flow for Cervical Cancer Screening Patient Name ID# 0001234 Patient Name A unique accession number is assigned and attached to each item. A request form and a ThinPrep vial containing cervical specimen collected ThinPrep processor from the patient arrive at the laboratory.
- Page 50 NTRODUCTION Genius Digital Diagnostics System: Laboratory Flow, Non-Gyn and UroCyte Specimens Patient Patient Name Name 0001234 A unique accession number is assigned and attached to each item. A non-gyn or urine specimen is collected and prepared for processing. A request form and a ThinPrep vial...
-
Page 51: Cervical Cancer Screening
Image Management Server, and the slide is returned to its slide carrier. ™ Genius Digital Diagnostics System is a version of ThinPrep Imaging System. The Image Management Server acts as the central data manager for the Genius Digital Diagnostics System. - Page 52 The case is available to subsequent reviewers at the Review Station. Figure 1-4 Genius Digital Diagnostics System Process, Gyn Cases with Genius Cervical AI Genius™ Digital Imager Operator’s Manual...
-
Page 53: Non-Gyn And Urocyte Specimens
NTRODUCTION SECTION THE GENIUS DIGITAL DIAGNOSTICS SYSTEM PROCESS FOR NON-GYN AND UROCYTE SPECIMENS Slides that have been prepared for screening are loaded into slide carriers which are placed into the Digital Imager. The operator uses a touch screen on the Digital Imager to interact with the instrument via a graphic, menu-driven interface. - Page 54 NTRODUCTION Genius Digital Diagnostics System Process, Non-Gyn or UroCyte Sample Prepared ThinPrep slides are loaded into a slide carrier, which is loaded into the Digital Imager. The cell spot is The Digital Imager scans the entire cell spot. imaged. Case data and images are stored on the Image Management Server.
-
Page 55: Section D: Specimen Preparation And Processing
NTRODUCTION SECTION SPECIMEN PREPARATION AND PROCESSING Gyn Samples ™ Specimens for the ThinPrep Pap test are collected by a clinician, then immersed and rinsed in a ™ PreservCyt Solution sample vial. The vial is then capped, labeled, and sent to a laboratory equipped ™... -
Page 56: Section Eprinciples Of Operation
ThinPrep Pap tests. Samples are prepared on ThinPrep Imaging System microscope slides and imaged on the Genius Digital Diagnostics System for the presence of atypical cells, cervical neoplasia, including its precursor lesions (Low Grade Squamous Intraepithelial Lesions, High Grade Squamous Intraepithelial Lesions), and carcinoma as well as all other 1.10... -
Page 57: Section F: Digital Imager Technical Specifications
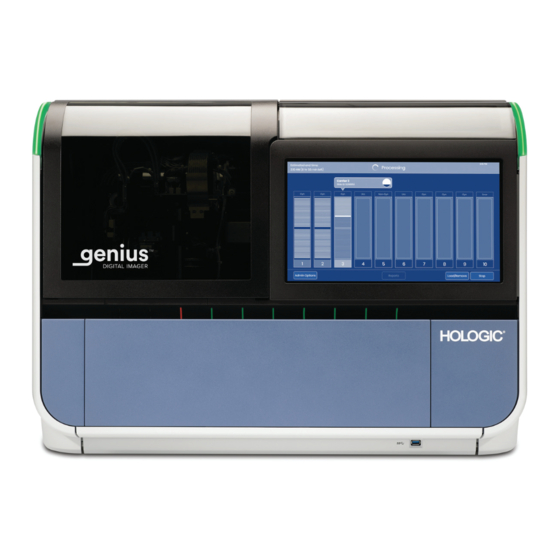
NTRODUCTION cytological criteria, including adenocarcinoma, as defined by The Bethesda System for Reporting Cervical Cytology: Definitions, Criteria, and Explanatory Notes SECTION DIGITAL IMAGER TECHNICAL SPECIFICATIONS Overview of Components See Figure 1-6 through Figure 1-15 for information regarding components and specifications. 1. - Page 58 NTRODUCTION Window, opens to the slide Touch screen handling area System status light System status light Indicator lights for slide carrier inventory, representing lanes 1 through 10 USB port Door, opens to slide carrier loading bay Figure 1-6 Front View, Digital Imager 1.12 Genius™...
- Page 59 USB cable connection to the connections to the Digital Imager Digital Imager computer* computer* Digital Imager USB port for computer* service personnel * Cables and cords supplied by Hologic Figure 1-7 Rear View, Digital Imager Genius™ Digital Imager Operator’s Manual 1.13...
- Page 60 Image Management connection* † Server Front View Rear View *Cables and cords supplied by Hologic † The connection from the Digital Imager computer to the Image Management Server uses a minimum of Cat 6 cabling Figure 1-8 Digital Imager Computer 1.14...
- Page 61 NTRODUCTION ThinPrep microscope slides with patient sample, stained, coverslipped and completely Slide staining rack. Either Sakura part number 4768 (Hologic part number 51873-001) or Leica 14 0474 33463. Slide carrier Slide carriers, loaded by the operator Figure 1-9 Slide Carriers in the Digital Imager (Digital Imager Door Open) Genius™...
- Page 62 NTRODUCTION Slide handling arm Slide grippers Macro station Imaging station Queue station Interior of the Digital Imager - covers removed to show detail Figure 1-10 Slide Handling in the Digital Imager 1.16 Genius™ Digital Imager Operator’s Manual...
- Page 63 NTRODUCTION Slide accession ID Slide accession ID Slide accession ID (OCR format shown) (1-D format shown) (2-D format shown) Frosted region of each slide 01234567890 Fiducial mark UroCyte™ Cell spot - contains patient cells ThinPrep Imaging System ThinPrep Non-Gyn ThinPrep UroCyte microscope slide, for Gyn microscope slide microscope slide...
- Page 64 NTRODUCTION Digital Imager Dimensions 25.5” (65 cm) 28” 31.5” (71.1 cm) (80 cm) Approximate weight: 242 lbs. (110 kg) Figure 1-12 Digital Imager Dimensions Recommended clearances: 3” (76.2 mm) on all sides. Make sure there is sufficient clearance to disconnect the power cord. The depth of the Digital Imager with the door open is 34” (86.4 cm). The height with the window open is 28”...
- Page 65 NTRODUCTION Slide Carrier Dimensions 3” (76.2 mm) 5.5” (139.7 mm) 10” (254 mm) Empty slide carrier 8.9” (226 mm) 1.8” (46 mm) Optional slide carrier cover on slide carrier Figure 1-13 Slide Carrier Dimensions Genius™ Digital Imager Operator’s Manual 1.19...
- Page 66 Refer to the documents which come with the equipment for technical specifications. Other Components The other components that complete the Genius Digital Diagnostics System network will be unpacked and installed by Hologic personnel. Please refer to the instructions supplied with the other components or specifications, operation, safety and maintenance. Note: If a component within the Genius Digital Diagnostics System network requires maintenance, contact Hologic Technical Support or your local distributor.
- Page 67 NTRODUCTION Pollution degree: II, in accordance with IEC 61010-1. Category II, the Genius Digital Diagnostics System is for indoor use only in an office or a clean lab- oratory environment. Sound levels This equipment does not create sound levels above 80 dBA.
- Page 68 NTRODUCTION This equipment meets the emission and immunity requirements of IEC 61326-2-6 and IEC 60601-1-2. This equipment has been designed and tested to CISPR 11 Class A. In a domestic environment it may cause radio interference, in which case, you may need to take measures to mitigate the interference. The electromagnetic environment should be evaluated prior to operation of the equipment.
- Page 69 NTRODUCTION Table 2. Guidance and manufacturer’s declaration—electromagnetic immunity Guidance and manufacturer’s declaration—electromagnetic immunity The Digital Imager is intended for use in the electromagnetic environment specified below. The customer or the user of the Digital Imager should assure that it is used in such an environment. Electromagnetic Immunity test IEC 60601-1-2 test level...
-
Page 70: Section G: Internal Quality Control
The operator is alerted to any malfunction via a message on the user interface. If the system does not function or there are persistent errors, contact Hologic Technical Support. Refer to Chapter 8, Service Information. 1.24... -
Page 71: Section H: Digital Imager Hazards
If any serious incident occurs related to this device or any components used with this device, report it to Hologic Technical Support and the competent authority local to the user and/or patient. Warnings, Cautions And Notes... - Page 72 Protective Conductor Terminal (internal use only, not accessible to operators). Power Switch On Power Switch Off Fuse Waste Electrical and Electronic Equipment. Contact Hologic for disposal of the instrument. Serial number Date of manufacture Manufacturer Authorized Representative in the European Community Catalogue number 1.26...
- Page 73 NTRODUCTION USB 3 port In Vitro diagnostic medical device China RoHs usable life Made in USA For instruments used in the USA and Canada, compliance information. Product meets the requirements for CE marking in accordance with EU-IVD Regulation 2017/746 with a notified body of BSI (The Netherlands) 2797 Caution: Federal (USA) law restricts this device sale by or on the order of a physician, or any other practitioner licensed by the law of the State in which the...
- Page 74 Fuses are to be replaced by trained Hologic personnel only. WARNING Only use cables and support equipment specified by Hologic with the Digital Imager. Do not connect items that have not been specified as compatible with the Digital Imager to the Digital Imager.
-
Page 75: Section I: Disposal
Do not dispose in municipal waste. Please contact Hologic Technical Support. Hologic will provide for the collection and proper reclamation of electrical devices we provide to our customers. Hologic strives to reuse Hologic devices, subassemblies, and components whenever possible. When reuse is not appropriate, Hologic will ensure the waste material is properly disposed Genius™... - Page 76 NTRODUCTION Hologic, Inc. 250 Campus Drive Marlborough, MA 01752 USA Tel: 1-800-442-9892 1-508-263-2900 Fax: 1-508-229-2795 Web: www.hologic.com 1.30 Genius™ Digital Imager Operator’s Manual...
-
Page 78: Chapter Two
SECTION GENERAL The Digital Imager and Digital Imager computer must be installed by Hologic service personnel. The complete Genius Digital Diagnostics System must be installed by Hologic service personnel. When installation is complete, the service personnel trains the operator(s), using the operator’s manual as the training guide. -
Page 79: Section C: Preparation Prior To Installation
The cables connecting the Genius Digital Imager and the Genius Digital Imager computer must be the cables supplied by Hologic. The cables cannot be substituted with other cabling. The Digital Imager and Digital Imager computer must be located in the same area, so that interconnection cables easily reach each component (within 2 meters [6.6 feet] of each other). - Page 80 IGITAL MAGER NSTALLATION Switch Digital Imager Image Management Server Table, desk or lab bench Monitor (One or more Digital Imagers depending on site Keyboard configuration) Mouse Review Station Mouse Keyboard Table, desk or lab bench (One or more Review Stations depending on site configuration) P = Power cord, requires an outlet *May go on the floor, provided there is no dust accumulation on or around it.
- Page 81 Hologic recommends that the Digital Imager should be located in an area that is only accessible to trusted users as the customer sees fit. In the event of a non-functioning system, contact Hologic Technical Support as detailed in Chapter 8, Service Information.
-
Page 82: Section D: Storage And Handling - Post Installation
IGITAL MAGER NSTALLATION SECTION STORAGE AND HANDLING - POST INSTALLATION Environmental Considerations • The Digital Imager is sensitive to sudden thermal or humidity changes. Do not locate it next to windows, heaters, air conditioners, HVAC vents or doors that are frequently opened and shut. - Page 83 IGITAL MAGER NSTALLATION This page intentionally left blank. Genius™ Digital Imager Operator’s Manual...
-
Page 85: Chapter Three
NTERFACE C h a p t e r T h r e e User Interface This chapter provides detailed information on the user interface screens and how to use them to operate, troubleshoot and maintain the Digital Imager. The content found in this chapter: Main Screen, Digital Imager Idle, Ready to Process •... - Page 86 NTERFACE • About button 3.40 • Power button 3.42 Reports 3.42 • Slide Lookup 3.44 • Slide Event Log 3.45 • Imager Error Log 3.48 • Imaging Report 3.50 • Error Carrier Report 3.56 Genius™ Digital Imager Operator’s Manual...
-
Page 87: Section A: Main Screen, Digital Imager Idle, Ready To Process
NTERFACE SECTION MAIN SCREEN, DIGITAL IMAGER IDLE, READY TO PROCESS When the Genius Digital Imager is powered on and ready for use, the main screen will be displayed. Ten positions for slide carriers Touch to change the specimen type for a slide carrier position. Admin Options button Reports button Start button... -
Page 88: Section B: Status Indicators
NTERFACE SECTION STATUS INDICATORS Lights LED lights indicate the overall system status, the slide carrier whose slides are being processed, and the positions where slide carriers can be loaded or reloaded into the Digital Imager. System status lights Slide carrier indicator Red slide carrier lights, marking indicator light... - Page 89 NTERFACE Exterior LED lights Not illuminated The Digital Imager is not turned on, or it does not have power. Slide carrier Green A slide carrier can be loaded or removed in this position. indicator light Slides from this slide carrier are not actively in process on the Digital Imager.
-
Page 90: Slide Carrier Inventory
NTERFACE Slide Carrier Inventory The touch screen display indicates where slide carriers are loaded, and where slides are loaded into the staining racks in those slide carriers. During processing, the appearance of the touch screen display changes as imaging progresses through each of the slides in each of the slide carriers. Figure 3-3 Screen Display Indicates Slide Carrier Position Key to Figure 3-3 Highlighted number... - Page 91 NTERFACE Key to Figure 3-3 Red stripe Slide event The Digital Imager attempted to image the slide in this slot of the staining rack, and a slide imaging event occurred. The Digital Imager returned the slide to the staining rack in the slide carrier.
-
Page 92: During Processing
NTERFACE During Processing During processing, the Digital Imager touch screen displays information about the progress of the batch. Detailed information about each slide is also available. Figure 3-4 Screen Display During Processing Key to Figure 3-4 Slides in carrier 1 are being processed. To open the detailed display of this slide carrier’s slides, touch anywhere in the illustration of carrier 1 on the touch screen. - Page 93 NTERFACE Key to Figure 3-4 Estimated end time During slide processing, the Digital Imager estimates the end time for imaging all of the slides in all of the slide carriers. At the beginning of slide processing, the estimated end time is based on the number of slide carriers loaded into the instrument. As processing progresses, the instrument conducts an inventory of each slide carrier.
-
Page 94: Slide Data Transmission Status
NTERFACE Slide data transmission status The circle icon depicts the progress of the scanner within the Digital Imager. The light grey stripe indicates the completion of the data transfer from the Digital Imager to the Image Management Server. The Digital Imager has read the slide ID at the macro station, and the Digital Imager is starting to image this slide. -
Page 95: Slide Carrier Details
NTERFACE Slide carrier details Touch the rectangle representing the slide carrier on the touch screen during processing to show details about the slides in that carrier. 3 4 5 Figure 3-6 Slide Carrier Details Screen (Carrier 1, Example) Key to Figure 3-6 The date and time that processing started for all of the slide carriers loaded in the instrument and the estimated time that all of the slide carriers loaded in the instrument will finish processing... - Page 96 The total number of slides from the current carrier that have been successfully imaged. The total number of slides from the current carrier that have been previously scanned by the Genius Digital Diagnostics System. A slide ID already successfully imaged cannot be imaged again.
-
Page 97: Section C: Sample Type Options
NTERFACE After a slide carrier has been removed or reloaded in a slide carrier position, the information that was in the slide carrier details screen is available as the Imaging Report on the Digital Imager. SECTION SAMPLE TYPE OPTIONS Select Sample Type for a Slide Carrier Prior to processing slides, the sample type for each lane in the slide carrier can be changed. -
Page 98: Section D: Administrative Options
NTERFACE SECTION ADMINISTRATIVE OPTIONS The system has options for configuring certain features of the Digital Imager. Figure 3-8 Administrative Options Screen The serial number for the Digital Imager (Imager ID) and the serial number for the Digital Imager computer (Workstation ID) appear near the top of the Administrative Options screen. The current settings for the Administrative Options are displayed. - Page 99 NTERFACE To enter or edit a name for the Digital Imager press the Imager Name button. Touch the edit button to open the keyboard on the touch screen. Press the letter buttons to enter a name, up to 20 characters long. See Figure 3-10. To create a capital letter, press the Shift button and then press the letter.
-
Page 100: Language
NTERFACE Language The screen shows the current setting. Figure 3-11 Language Button Press the Language button to select the language that is displayed on the user interface and in the reports. Figure 3-12 Select Language Screen The current selection displays at the top of the screen. Touch the name of the language to select it. The green check mark marks the selection. -
Page 101: Report Length Limit
NTERFACE Select the time format. To change the time format used on the touch screen display and in reports, touch the arrow to the right of the current time format to see the available options. Touch a time format to select it. The preview of the time format shows the current time in the selected format. Note: In the 12-hour time formats, the “A”... -
Page 102: Set Volume
NTERFACE Set Volume The screen shows the current setting. Figure 3-14 Sound Volume Audible alert tones can be set for the completion of slide processing and for an error condition. The volume of the audible alert tones may be increased or decreased using the Volume setting. Use the plus sign to increase the volume or the minus sign to lower the volume. -
Page 103: Error Tone
NTERFACE Error Tone The screen shows the current setting. Figure 3-16 Error Tone The error tone is an audible alarm that sounds during an error condition. Four sounds are offered. To play the current tone, touch the speaker icon To change the error tone, touch the down arrow to open the list. Figure 3-17 Select Error Tone (Optional) Touch one of the four entries to select it. -
Page 104: Clean System
NTERFACE When an error condition occurs, the error tone will sound and then repeat every few seconds. The error message window will have a Silence Alarm button that can be pressed to turn the alarm off. (Figure 3-18.) Press the Silence Alarm button to turn off the alarm but keep the error message on the touch screen display Figure 3-18 Silence Alarm Button Clean System... -
Page 105: Gather Diagnostics
NTERFACE A Service Mode button is available for Hologic service personnel usage, and it is password- protected. Gather Diagnostics Figure 3-20 Gather Diagnostics Button Gather Diagnostics is a function intended for instrument troubleshooting by Hologic Technical Support. It gathers and zips the error history logs and other instrument operating information. The zip file contents are password-protected. -
Page 106: Network Settings
USB device. The file name starts with “DCDiagnostics” and includes the Digital Imager’s serial number, the date and the time. The files in the folder are password-protected. The zip file can be emailed to Hologic Technical Support for diagnostic troubleshooting. - Page 107 The Network Settings show information about the Genius Image Management Server connected to this Digital Imager in the Genius Digital Diagnostics System. The Network Settings provide an option to change the connection if more than one Image Managment Server is configured and available in your lab.
- Page 108 Management Server is displayed. To change the port setting, touch the edit button and type in the new port number. Hologic recommends that configuration of the port number is performed by Hologic service personnel. Test Connection Touch the Test Connection button to test if the Digital Imager can successfully communicate with the Image Management Server.
-
Page 109: Configure Barcodes
NTERFACE Key to Figure 3-25 Estimated Free Space on Server This is the approximate free space that the Image Management Server has available for storing images and data generated by the Digital Imager, shown as a percentage. The exclamation point displays when the free space is at or below 10% (or the Image Management Server's storage capacity is 90% full). - Page 110 NTERFACE 1. Touch the ID type to select it: 1-D Barcode, 2-D Barcode, or OCR To close the Configure barcodes screen The current selection To apply the selected type, without making any changes, touch the is marked with a touch the Apply button. Close button.
- Page 111 NTERFACE 3. For 1-D barcodes and 2-D barcodes, specify the 1-D slide ID type(s) and/or the 2-D slide ID type(s). Touch the name of the barcode type to select it. Since the OCR type is always 7-over-7, there are no options to select for OCR. To close the Configure barcodes screen To apply the selected type, touch the and discard any changes, touch the...
-
Page 112: Configure Slide Id
NTERFACE 5. For Interleaved 2 of 5 and for Code 39, specify whether your laboratory uses a check digit in the barcode. Touch “Yes” or “No” Figure 3-29 Configure Barcodes: Choose Check Digit Use for Interleaved 2 of 5 and for Code 39 6. - Page 113 NTERFACE accession number used by the Genius Digital Diagnostics System is derived from the slide ID printed on the slide label itself. For Gyn slides, the options in the Configure Slide ID feature are to use the entire printed slide ID or to use a portion of the printed slide ID.
-
Page 114: Configure Slide Id - Gyn Slides
If Gyn slides arrive in your laboratory with characters in the slide ID that you want to exclude from the accession ID used by the Genius Digital Diagnostics System, the Digital Imager can be configured to exclude those characters. The data transferred to the Image Management Server, available at the Review Station, and displayed on the Digital Imager will use the slide ID or accession ID as it appears after the Configure Slide ID settings are applied to it. - Page 115 Note: The start of the segment is treated like a boundary, and this character is not included in the Genius Digital Diagnostics System slide ID. The accession ID will start after the character entered. Note: If the “Start at”...
- Page 116 • If the end of the segment to use in the slide ID for the Genius Digital Diagnostics System is the end of the printed slide ID, leave the “Length” field blank. 6. Use the keyboard on the touch screen to indicate the length or ending character for the segment.
-
Page 117: Configure Slide Id - Non-Gyn Slides
NTERFACE 7. Press the Apply button to save and return to the Configure Slide ID summary screen. To return to the Configure Slide ID summary screen without applying the settings, touch the Close button. Configure a slide ID segment as an Administrative Option for your lab. - Page 118 Secondary ID. The Primary ID is the portion of the Genius Digital Diagnostics System slide ID that is used for all of the slides in the patient case. The Primary ID is the portion of the slide ID that slides in the group have in common.
- Page 119 Note: The start of the segment is treated like a boundary, and this character is not included in the Genius Digital Diagnostics System slide ID. The accession ID will start after the character entered. 5. For the Primary ID, indicate where, in the printed slide ID, the segment that is used in the Genius Digital Diagnostics System slide ID ends.
- Page 120 If the ending point is always a certain character, such as the hyphen, use the Character setting • If the end of the segment to use in the slide ID for the Genius Digital Diagnostics System is the end of the printed slide ID, leave the “Length” field blank.
- Page 121 NTERFACE 11. For the Secondary ID, use the keyboard on the touch screen to indicate the length or ending character for the segment. For example, touch the 8 to indicate that the segment ends 8 characters after it starts, or touch the hyphen to indicate that the segment ends at the hyphen. Note: The end point of a segment is treated like a boundary, and this character is not included in the Secondary ID.
- Page 122 NTERFACE Example: Example slide IDs for Non-Gyn Digital Imager configured with: multiple slides per vial: Primary ID: Position 1 to - (hyphen) ABC-0001 Secondary ID: Start after - (hyphen) to End ABC-0002 ABC123-0001 ABC123-0002 Image the slides on the Digital Imager. At the Review Station, images for each slide with the same Primary ID are grouped...
-
Page 123: Configure Slide Id - Urocyte Slides
NTERFACE Configure Slide ID - UroCyte slides If UroCyte slides arrive in your laboratory with characters in the slide ID that are not used in your facility, the Digital Imager can be configured to exclude those characters. The data transferred to the Image Management Server, available at the Review Station, and displayed on the Digital Imager will use the slide ID as it appears after the Configure Slide ID settings are applied to it. -
Page 124: About Button
• If the end of the segment to use in the slide ID for the Genius Digital Diagnostics System is the end of the printed slide ID, leave the “Length” field blank. 6. Use the keyboard on the touch screen to indicate the length or ending character for the segment. - Page 125 The screen also shows the Imager name, the serial number for the Digital Imager (Imager ID), the serial number for the Digital Imager computer (Workstation ID), the software version, the sample type(s) that can be imaged, and the date of the most recent color-calibration performed by Hologic service personnel.
-
Page 126: Section Ereports
NTERFACE Power button The power button on the touch screen is on the Administrative Options screen. For complete instructions refer to “Shutting Down the Digital Imager” on page 4.35. Power button Figure 3-40 Power Button SECTION REPORTS The Reports screen allows the operator to generate reports of activity on the Genius Digital Diagnostics System. - Page 127 NTERFACE Figure 3-41 Reports Screen Touch the name of a report to run the report. Genius™ Digital Imager Operator’s Manual 3.43...
-
Page 128: Slide Lookup
NTERFACE Slide Lookup Use the Slide Lookup report to determine if a particular slide was already processed. The Slide Lookup Report queries data from all the Digital Imagers connected to the same Image Management Server. Figure 3-42 Slide Lookup: Type the Slide ID with the Keyboard 1. -
Page 129: Slide Event Log
NTERFACE 4. The search results are displayed on the touch screen. Figure 3-43 Slide Lookup Report The heading of the report lists the date that the report was run, the lab name, and the number of slides that match the search criteria. The number of slides that match the search criteria is also displayed in the upper left of the touch screen. - Page 130 NTERFACE 1. Touch the Slide Event Log button to select it. Buttons to set the date range appear. 2. Select the time period. • To generate a log of all the slide events ever generated by the Digital Imager, select All dates. If the report yields more results than allowed by the report length limit, a message will display at the top of the report.
- Page 131 NTERFACE 4. The results are displayed on the touch screen. Figure 3-45 Slide Event Log The heading of the report lists the date that the report was run, the lab name, the Digital Imager name, the Imager ID (Digital Imager serial number), the Workstation ID (Digital Computer serial number), and the number of slide events that match the search criteria.
-
Page 132: Imager Error Log
NTERFACE Imager Error Log This report displays errors encountered by the Digital Imager. 1. Touch the Imager Error Log button to select it. Buttons to set the date range appear. 2. Select the time period. • To generate a log of all the Imager errors ever generated by the Digital Imager, select All dates. - Page 133 NTERFACE 4. The results are displayed on the touch screen. Figure 3-47 Imager Error Log The heading of the report lists the date that the report was run, the lab name, the Digital Imager name, the Imager ID (Digital Imager serial number), the Workstation ID (Digital Computer serial number), and the number of slide events that match the search criteria.
- Page 134 NTERFACE Imaging Report The Imaging Report lists the results from processed slide carriers. The Imaging Report describes each slide in each slide carrier. The Imaging Report considers the position that the slide carrier was in and the date that the slide carrier was processed. The report can be run for slide carriers run in the past 24 hours, 48 hours, or from a custom date range.
- Page 135 NTERFACE subsequent run. For example, two carriers could have been run in Position 5 in the past 24 hours. Use the date and time stamp to distinguish them. 3. Touch Next to generate the report. 4. The results are displayed on the touch screen. Refer to “Imaging Report” on page 3.53. Advanced settings for an Imaging Report 1.
- Page 136 NTERFACE B. Touch the Set end date button. A calendar for the current month appears. Use the arrows to the left and right of the name of the month to change the month for the ending date. Touch a date on the calendar to select the day which will be the end date for the report. If a start date is set without and end date, the report will run from the start date to the current day (today).
- Page 137 NTERFACE 8. The results are displayed on the touch screen. Figure 3-51 Imaging Report Key to Figure 3-51 The number of records found is the total number of slides run, with and without errors, for the slide carriers and time period selected for the report. The heading of the report lists the date that the report was run, the lab name, the Digital Imager name, the Imager ID (Digital Imager serial number), and the Workstation ID (Digital Computer serial number).
- Page 138 NTERFACE Key to Figure 3-51 An Imaging Summary section lists: First slide imaged: the date and time for the first slide imaged in the carriers selected for the report Last slide imaged: the date and time for the last slide imaged in the carriers selected Carriers: the quantity of slide carriers selected for the report Slides imaged: the quantity of slides imaged successfully in the group of slides in the slide carriers selected for the report...
-
Page 139: Imaging Report
NTERFACE Page 1 of 1 Imaging Report Report Date: 3/17/2020 3:52:34 PM Lab Name: Hologic Lab Imager Name: Imager 3 Imager ID: 123456789 Workstation ID: 987654321 Imaging Summary Carriers: First Slide Imaged: 3/17/2020 3:00:25 PM Slides Imaged: Last Slide Imaged:... -
Page 140: Error Carrier Report
NTERFACE Key to Figure 3-52 Carrier: in this example, the slide carrier in position 1 was selected by the operator for inclusion in the report. Slot: in this example, the first slide (lowest slot number) in the slide carrier in position 1 was in slot 4. - Page 141 NTERFACE 4. Touch the check box to select the slide carrier(s) to include in the report Figure 3-53 Error Carrier Report: Select Error Carrier from the List 5. Touch Next to generate the report. Genius™ Digital Imager Operator’s Manual 3.57...
- Page 142 NTERFACE 6. The results are displayed on the touch screen. Figure 3-54 Error Carrier Report The heading of the report lists the date that the report was run, the lab name, the Digital Imager name, the Imager ID (Digital Imager serial number), and the Workstation ID (Digital Computer serial number).
-
Page 144: Chapter Four
SECTION CHAPTER OVERVIEW Proper operation of the Genius Digital Diagnostics System requires the Digital Imager, the Image Management Server and the Review Station to be connected, and it requires a connection between the Image Management Server and a laboratory archiving system. The instructions in this operator’s manual describe the operation of the Digital Imager portion of the overall system. - Page 145 PERATION OF THE IGITAL MAGER Power on (Doors lock while warming up) Doors unlock Load slide carrier Start Close door. Press (Slide carrier locked) Send data to Image Interrupt/ Interrupt/ Image Management Server for Reload/ Cancel each each slide Resume slide View/save reports Batch complete...
-
Page 146: Section B: Applying Power To The Equipment
PERATION OF THE IGITAL MAGER SECTION APPLYING POWER TO THE EQUIPMENT WARNING: Grounded Outlet. Instrument Fusing. Do not power on or operate if equipment has been damaged. Apply power to the server, the Digital Imager and the Digital Imager computer according to the following procedure. - Page 147 PERATION OF THE IGITAL MAGER Power on indicator (System status lights) Power switch Front Rear Figure 4-2 Digital Imager Power Switch 2. Press the rocker switch on the rear of the Digital Imager to ON (l). (See Figure 4-2.) Power on indicator power switch Figure 4-3 Power On the Digital Imager Computer 3.
- Page 148 PERATION OF THE IGITAL MAGER 4. The touch screen displays the status as the system checks various subsystems while the system boots. The touch screen displays the progress of the Power On Self-Test with a bar and the percentage. The slide handling mechanisms move through the slide handling path. Figure 4-4 Warm-up in Progress If a slide is detected in the instrument during the Power on Self-Test, follow the instructions on the touch screen to remove the slide and close the window.
-
Page 149: Section C: Materials Required Prior To Operation
The Image Management Server stores the slide-related data and controls communication of all system services to the other devices in the Genius Digital Diagnostics System. It is the master controller when more than one Digital Imager is connected to the server. -
Page 150: Section D: Slide Labeling
PERATION OF THE IGITAL MAGER SECTION SLIDE LABELING The camera that scans the slide label accession ID recognizes barcodes (1-dimensional or 2- dimensional) or OCR (optical character recognition) format. It cannot read both at the same time. As part of the initial set-up of the Digital Imager or when your laboratory changes slide label types, select the label format via the user interface. - Page 151 PERATION OF THE IGITAL MAGER Table 4.1 Slide Restrictions Based on Barcode Symbology Used 2-D Data Matrix All printable ASCII 128 characters are supported.* A maximum of 16 characters is supported. *Barcodes for slide IDs cannot typically use characters prohibited in Windows file names (\, /, :, <, >, *, ?, “, and |). 1-Dimensional barcode examples 2-D barcode example...
-
Page 152: Section Eloading Slide Carriers
PERATION OF THE IGITAL MAGER SECTION LOADING SLIDE CARRIERS WARNING: Glass. Sharp Edges. All of the slides in the same slide carrier must be the same type of slides (all Gyn slides, all Non-Gyn slides or all UroCyte slides). Refer to “Select Sample Type for a Slide Carrier” on page 3.13 for information on designating slide types. - Page 153 PERATION OF THE IGITAL MAGER The slide carrier has two openings. Each opening holds one rack of microscope slides. Gently lower the slides in the slide staining rack into the slide carrier. If the staining rack is facing the wrong way in the slide carrier, the slides will not sit flat, the paddle on the side of the slide carrier will bump out, and red tabs will show.
- Page 154 PERATION OF THE IGITAL MAGER • The coverslip media is dry (wet media could cause equipment malfunction). This is especially important for slides using glass coverslips. • The slides are clean (no fingerprints, dust, debris, bubbles). Handle the slides by the edges. Chipped or damaged slides might not be imaged.
-
Page 155: Section F: Load Slide Carrier Into The Digital Imager
PERATION OF THE IGITAL MAGER SECTION LOAD SLIDE CARRIER INTO THE DIGITAL IMAGER 1. Open the door to access the slide carrier deck. The lanes or positions on the slide carrier deck are marked 1-10, with position 1 furthest on the left. 2. - Page 156 PERATION OF THE IGITAL MAGER 3. Holding a loaded slide carrier by its handle, place the slide carrier on an empty position on the open door. The light above an inactive slide carrier position is green. 4. Push the slide carrier forward. The groove in the bottom of the slide carrier fits onto the rail in the slide carrier bay.
-
Page 157: Section G: Slide Processing
PERATION OF THE IGITAL MAGER Note: There are ten slide carrier lanes. Load as many slide carriers as necessary. Each slide carrier can hold 40 slides for a total batch size of 400 slides. At least one slide carrier containing at least one slide must be present to begin slide imaging. - Page 158 PERATION OF THE IGITAL MAGER Table 4.2 Sequence of Events in Imaging Slides Start button is pressed. The door locks and remains locked until slide processing finishes or is paused by the operator. Check for the presence of slides in one slide carrier. The slide carrier indicator light for that slide carrier turns red.
- Page 159 PERATION OF THE IGITAL MAGER Table 4.2 Sequence of Events in Imaging Slides Move the slide to the macro station. Scan the slide with the macro scanner to capture the slide ID on the slide label. Use the Configure slide ID - Gyn slides settings to record the accession ID based on the slide ID on the slide label.
- Page 160 PERATION OF THE IGITAL MAGER Table 4.2 Sequence of Events in Imaging Slides Return the slide to its slide carrier. Note: Typically, the slide is returned to the starting carrier. In cases where the operator has designated position 10 as an error carrier, a slide with a slide event is returned to the error carrier in position 10.
- Page 161 PERATION OF THE IGITAL MAGER 3. When the green light indicates that all of the slides in a slide carrier have been processed, the slide carrier may be removed from the Digital Imager. During Slide Processing As slides are processed, the touch screen display changes to represent how much progress has been made.
- Page 162 PERATION OF THE IGITAL MAGER Key to Figure 4-12 Slide carriers are loaded in positions 2-5 in this example. While imaging slides from the slide carrier in position 1, the Digital Imager conducted an inventory for the presence or absence of slides in slide carriers in positions 2, 3, 4, and 5. When all the slides in the first slide carrier are processed, the Digital Imager will start to process slides in the next slide carrier, which is in position 2 in this example.
- Page 163 PERATION OF THE IGITAL MAGER There is no action for the operator to take. Once the check is complete, the Digital Imager resumes what it was doing before it stopped to check. Figure 4-13 Periodic Check 4.20 Genius™ Digital Imager Operator’s Manual...
- Page 164 PERATION OF THE IGITAL MAGER Processing complete When all of the slides in all of the carriers are processed, the touch screen displays the number of slides processed and the number of slide events during processing. Figure 4-14 Processing Complete Touch the Close button to return to the main screen with “Processing Complete”...
- Page 165 PERATION OF THE IGITAL MAGER While slide processing is in progress, touch the rectangle representing a slide carrier on the touch screen to show details about the slides in that carrier. Figure 4-15 Slide Event During Processing Key to Figure 4-15 The red stripe represents a slide with an error.
- Page 166 PERATION OF THE IGITAL MAGER • Slide was not completely dry when loaded into the slide carrier • Mounting media was on the frosted portion of the slide • Slide contains bubbles • Slide coverslip protrudes over the edge & causes interference •...
-
Page 167: Section H: Unload Slide Carrier From The Digital Imager
PERATION OF THE IGITAL MAGER SECTION UNLOAD SLIDE CARRIER FROM THE DIGITAL IMAGER 1. When the instrument is idle (not processing slides), open the door to access the slide carrier deck. The lanes or positions on the slide carrier deck are marked 1-10, with position 1 furthest on the left. -
Page 168: Section I: Using An Error Slide Carrier
PERATION OF THE IGITAL MAGER SECTION USING AN ERROR SLIDE CARRIER The Digital Imager can be set up to return slides that have slide events to one of two places: • Return the slide to the same slide carrier that it started in. •... - Page 169 PERATION OF THE IGITAL MAGER Description of the Slides in the Error Slide Carrier To see descriptions of the slide event for each of the slides in the error carrier, touch the graphic representing the error carrier. The touch screen display shows the slot number, slide ID, type, date and time, status, and description.
- Page 170 PERATION OF THE IGITAL MAGER Key to Figure 4-17 The slide ID is shown (for slides with a successful barcode scan) Sample type: Gyn, UroCyte, or Non-Gyn The quantity of slides in the error carrier Date and time that the error occurred Error code and its description Close Touch...
-
Page 171: Section Jpause And Resume A Batch
PERATION OF THE IGITAL MAGER SECTION PAUSE AND RESUME A BATCH Interrupt Slide Processing Slide processing may be interrupted and resumed or interrupted and canceled via the user interface. Slide processing might be interrupted for reasons below: CAUTION: The Digital Imager is designed to make sure all of the slides from a slide carrier are returned to a slide carrier before the instrument stops processing. - Page 172 PERATION OF THE IGITAL MAGER Load/Remove button Figure 4-18 Slide Processing: Load/Remove Button Genius™ Digital Imager Operator’s Manual 4.29...
- Page 173 PERATION OF THE IGITAL MAGER 2. The Digital Imager finishes processing the slide or slides removed from a slide carrier within 60 seconds. The touch screen shows a Processing Paused status. The active slide carrier, marked by a red light above the door, cannot be removed or replaced. Figure 4-19 Slide Processing Paused Key to Figure 4-19 Orange heading indicates that processing is paused...
- Page 174 PERATION OF THE IGITAL MAGER Key to Figure 4-19 Resume button 3. Open the door. 4. Remove any slide carrier from a position with a green light, and/or load a slide carrier with slides into a position with a green light. A.
- Page 175 PERATION OF THE IGITAL MAGER 2. The Digital Imager finishes processing the slide or slides removed from a slide carrier. The touch screen shows a Processing Paused status. The active slide carrier, marked by a red light above the door, cannot be removed or replaced 3.
- Page 176 PERATION OF THE IGITAL MAGER Close button returns to the Remove STAT button Ready to Image screen Figure 4-21 Stat Interruption Confirmation Message 7. Touch Close to exit this screen and proceed with the stat slide(s). Or, touch Remove STAT to continue processing slides from the slide carrier with unprocessed slides in lowest numbered position towards the slide carrier with the highest numbered position (from left to right).
-
Page 177: Section Kcancel Processing
PERATION OF THE IGITAL MAGER SECTION CANCEL PROCESSING Use the Stop button to cancel processing. The Stop button is available while the Digital Imager is processing slides. And, the Stop button is also available when processing has been interrupted with the Load/Remove button. -
Page 178: Section Lshutting Down The Digital Imager
PERATION OF THE IGITAL MAGER SECTION SHUTTING DOWN THE DIGITAL IMAGER WARNING: Never turn off power to the equipment without shutting down the system via the user interface! The Digital Imager is intended to be left on. In the event that the Digital Imager needs to be powered down, follow these instructions. - Page 179 PERATION OF THE IGITAL MAGER 3. On the Administrative Options screen, touch the power button. Power button to turn off the Digital Imager computer Figure 4-24 Power Button on the Touch Screen 4. Select Power Off on the confirmation screen to continue with shutdown. (See Figure 4-25). Figure 4-25 Confirm Shutdown 5.
-
Page 180: Section M: Rebooting The System
Refer to “Applying Power to the Equipment” on page 4.3. Taking the Instrument Out of Service (Extended Shutdown) In the event the equipment must be moved after installation, contact Hologic Technical Support. Refer to Chapter 8, Service Information. - Page 181 PERATION OF THE IGITAL MAGER This page intentionally left blank. 4.38 Genius™ Digital Imager Operator’s Manual...
-
Page 183: Chapter Five
The system must be maintained regularly in order to ensure reliable performance. Perform maintenance on the system as described in this section. The system requires supplemental preventive maintenance annually by Hologic service personnel. Weekly, or Clean the Queue Station and Slide Grippers... - Page 184 IGITAL MAGER AINTENANCE Clean System When a component on the interior of the Digital Imager needs to be cleaned, use the Clean System mode. The Clean System mode de-energizes the slide handling arm, allowing the operator to gently move the arm for better access to the interior of the instrument. 1.
- Page 185 IGITAL MAGER AINTENANCE Caution: In the interior of the Digital Imager, only touch the components described in these maintenance instructions. Other, delicate components must be in the correct position and undamaged for proper performance of the Digital Imager. Slide handling Macro hood Slide holder at...
-
Page 186: Section A: Weekly
IGITAL MAGER AINTENANCE 4. When cleaning is complete, close the door and window. Both the door and window must be closed before the OK button is available on the touch screen. Touch OK to reset the Digital Imager and return to the Administrative Options screen. Figure 5-4 Reset System When Cleaning is Complete SECTION WEEKLY... - Page 187 IGITAL MAGER AINTENANCE 3. Then, wipe the queue station and the slide grippers with a lint-free wipe, moistened with 70% alcohol. Allow the queue station and slide grippers to dry before using the processor. WARNING: Sharp edges The slide gripper fingers have sharp edges. Use caution when cleaning the slide gripper fingers. Slide handling arm Slide grippers Imaging station...
- Page 188 IGITAL MAGER AINTENANCE CAUTION: Do not use propellant, such as canned air, because the components around the macro station could be damaged. WARNING: Glass The instrument uses microscope slides, which have sharp edges. In addition, the slides may be broken in their storage packaging or on the instrument. Use caution when handling glass slides and cleaning the instrument.
- Page 189 IGITAL MAGER AINTENANCE Clean Slide Carriers Clean an empty slide carrier, without any slides or staining racks in it, with soap and water. The optional cover for a slide carrier can also be cleaned with soap and water. Allow the slide carrier and cover to dry completely before using them. Clean the slide carriers when they are not loaded into the Digital Imager.
-
Page 190: Section B: As Needed
IGITAL MAGER AINTENANCE SECTION AS NEEDED Clean the Verification Chip The imaging stage is delicate. It must be in the same position and free of scratches for proper performance of the Digital Imager. The verification chip or “V-chip” is a small piece of slide glass permanently attached to the imaging stage. - Page 191 IGITAL MAGER AINTENANCE Clean the Imaging Station Slide Holder The imaging stage is delicate. It must be in the same position and free of scratches for proper performance of the Digital Imager. The imaging station slide holder is the “C”-shaped gripper near the imaging stage.
- Page 192 IGITAL MAGER AINTENANCE 1. From the main screen, select Admin Options. Then, select Clean Screen. Figure 5-9 Clean Screen Button 2. On the confirmation screen, touch OK to lock the touch screen so that the touch screen can be cleaned. To cancel and return to the Administrative Options screen, touch Cancel. Figure 5-10 Confirm That the Touch Screen Will Be Disabled for Cleaning 3.
- Page 193 IGITAL MAGER AINTENANCE Figure 5-11 Clean Screen Counts Down 30 Seconds Caution: Do not put the door or the touch screen on the Digital Imager in contact with strong solvents such as xylene, which may damage the surface of the door or the touch screen. Clean the Exterior of the Imager To clean the window, it is best to use a commercially available glass cleaner.
-
Page 194: Section C: Moving The Imager
Hologic Technical Support or your local Hologic distributor. A service visit is required. Unit Shipped to New Location: If the Digital Imager is to be shipped to a new location, please contact Hologic Technical Support or your local Hologic distributor. Refer to Chapter 8, Service Information. - Page 195 Genius Digital Imager Routine Maintenance for the month of: Weekly As Needed Clean Queue Clean Macro Clean Slide Clean Slide Clean the Clean Slide Clean Touch Clean Station and Station Carrier Deck Carriers Verification Holder Screen Exterior of Date Slide Chip Digital Grippers...
- Page 196 IGITAL MAGER AINTENANCE This page intentionally left blank. 5.14 Genius™ Digital Imager Operator’s Manual...
-
Page 198: Chapter Six
ROUBLESHOOTING C h a p t e r S i x Troubleshooting SECTION THE IMAGE MANAGEMENT SERVER IS UNAVAILABLE The Digital Imager must have an active connection to the Image Management Server in order to image slides or display data describing slides. The Image Management Server must have sufficient storage capacity available in order for the Digital Imager to transmit data to the Image Management Server. - Page 199 ROUBLESHOOTING Check that the cable to the Image Management Server is properly connected to the Digital Imager computer. Check that the Image Management Server is up and running. Check that network settings for the Image Management Server are correct. This may require assistance from your facility’s network administrator.
-
Page 200: Section B: Slide Events
ROUBLESHOOTING up at installation and adjusted when there is a change in the volume of slides processed in your lab, before the Genius Image Management Server storage approaches full capacity. After sufficient storage capacity is available on the Image Management Server, the Digital Imager system indicator lights illuminate green, and slides can be imaged. - Page 201 ROUBLESHOOTING Table 6.1 Slide Event Messages Event Event description Possible cause Corrective action code E0002 Slide barcode could not Wrong kind of slide or slide Confirm that a ThinPrep microscope slide is being be read label. used. Check that the Digital Imager is configured to read the barcode format or OCR format used in your lab.
- Page 202 ROUBLESHOOTING Table 6.1 Slide Event Messages Event Event description Possible cause Corrective action code E0010 Slide imaging failed due The stage moved or was During operation, the Digital Imager is sensitive to to an imaging stage disturbed during imaging. vibrations. It should be placed on a sturdy flat surface disturbance away from centrifuges, vortexors or any equipment that may cause vibrations.
- Page 203 ROUBLESHOOTING Table 6.1 Slide Event Messages Event Event description Possible cause Corrective action code E0016 Slide imaging failed due Sample collection or slide Make sure the proper specimen collection procedures to cell focus error preparation issue causing and slide preparation procedures are followed. Refer the cell spot to be blank or to the instructions in the ThinPrep processor very faint.
-
Page 204: Section C: Imager Errors
ROUBLESHOOTING SECTION IMAGER ERRORS There are three types of Digital Imager errors: system self-recoverable errors, user-correctable errors and unrecoverable errors. All Digital Imager errors are logged to a file, which may be accessed via the user interface. Refer to “Imager Error Log” on page 3.48. System Self-recoverable Errors These automatically recoverable errors are Digital Imager errors that do not require user or service personnel intervention to recover from the error. - Page 205 ROUBLESHOOTING User-correctable Errors For user-correctable errors, the Digital Imager needs assistance from the user to recover from the error. When the Digital Imager encounters a user-correctable error condition during processing, it has a sequence of steps to perform to recover from the condition. One or more steps requires an action from the operator, typically assisting in moving a slide.
- Page 206 POST test. For other errors, the Digital Imager must be restarted. In some cases, the Imager may require a Hologic service visit. When an unrecoverable error condition is encountered, slide processing is interrupted.
- Page 207 ROUBLESHOOTING Figure 6-5 Unrecoverable Imager Error, Restart Required The window displays the error number, a brief description of the error and a power button. Key to Figure 6-5 The touch screen display says it has an unrecoverable error in a red banner at the top. The error code is displayed.
- Page 208 Key to Figure 6-5 With unrecoverable errors, a Service Mode button is available on the error notification. The service mode is for Hologic service personnel and is password-protected. With unrecoverable errors, the power button is available on the error notification. To attempt error recovery with a restart or to shut down the instrument, press the power button.
- Page 209 ROUBLESHOOTING If the Digital Imager detects a slide that it can move to a slide carrier, but no slide carrier is loaded, the touch screen displays instructions to load an empty slide carrier into the Digital Imager. Figure 6-6 User-assisted Error Recovery: Load an Empty Slide Carrier Load an empty slide carrier in position 1 and close the door.
- Page 210 ROUBLESHOOTING If the Digital Imager detects a slide that it cannot move to a slide carrier, the touch screen displays instructions to open the window. Figure 6-7 User-assisted Error Recovery: Open Window to Remove Slide • Open the window. • Position a gloved hand below the slide gripper.
- Page 211 ROUBLESHOOTING Figure 6-8 Ready to Press Open Gripper • With one hand ready to receive the slide, touch the Open Gripper button. The slide gripper opens to release the slide. Interior of the Digital Imager - covers removed to show detail Figure 6-9 Ready to Press Open Gripper •...
- Page 212 When the cleaning is finished, close the window and the door (if open). Touch the Continue button to continue the POST test. C. And, in other cases, the restart will not clear the error. Contact Hologic Technical Support or your local distributor for assistance. A service visit may be required.
-
Page 213: Section D: Slide Preparation And Quality
ROUBLESHOOTING SECTION SLIDE PREPARATION AND QUALITY Careful preparation of the microscope slides can prevent many types of slide events or system errors. When a slide event or system error occurs, inspect the slide that generated the event. Correct Slide ™ When the Gyn sequence is used, only stained, coverslipped ThinPrep Imaging System microscope slides may be used. -
Page 214: Section E: Imager Error Codes
ROUBLESHOOTING Ensure that the coverslip is present and undamaged. Note : If Sakura Tissue-Tek SCA coverslipping film is used, slides must be cleared with xylene. Slide Label Format and Placement The slide label must have the correct accession ID format for the Digital Imager to successfully scan and read the ID. - Page 215 ROUBLESHOOTING Table 6.2 Digital Imager Error Codes E0516 The error carrier is full. Error carrier contains Replace the full slide carrier in position 10 with an 40 slides. empty slide carrier. E0517 Error during light Unable to focus on the v- Clean the verification chip.
- Page 216 ROUBLESHOOTING Table 6.2 Digital Imager Error Codes E1204 Debris found in the A slide has been left on the Clean the macro station. Refer to “Clean the Macro macro slide path. macro station or the macro Station” on page 5.5. station is dirty.
- Page 217 ROUBLESHOOTING Table 6.2 Digital Imager Error Codes E4003 The slide handler failed Motor move error caused by Power cycle the system. If the error persists, contact to home. mechanical obstruction. Technical Support. When the instrument is powered down, remove any obstruction. E4004 A move to a carrier Mechanical interference with...
- Page 218 ROUBLESHOOTING Table 6.2 Digital Imager Error Codes E4016 Placing a slide in a The value for the place A recovery dialog is displayed. carrier failed. location in the carrier was incorrectly calculated. E4017 Placing a slide in the One or more axis movements A recovery dialog is displayed.
- Page 219 ROUBLESHOOTING Table 6.2 Digital Imager Error Codes E5001, Error with one of the system Imager error Power cycle the system. If the error persists, contact E5004, components. Technical Support. E5005, E5007 through E6001 E5006 A motor move failed to Mechanical error with a A recovery dialog is displayed.
-
Page 221: Chapter Seven
Image Management Server The Image Management Server is the computer server that controls communication between the Genius Digital Diagnostics System components. The server also stores the slide images and slide data record. Optical Character Recognition. The Digital Imager contains a scanner with Optical Character Recognition. - Page 222 EFINITIONS AND BBREVIATIONS Object of Interest. A cell or cluster on a slide preparation that most likely contains clinically relevant information for diagnostic purposes. For cervical cancer screening of Gyn samples, OOIs are identified and selected by the Genius Cervical AI algorithm. Power Cycle Turning the Imaging System off and then on again, usually to clear an error condition.
- Page 223 EFINITIONS AND BBREVIATIONS 1-D barcode One-dimensional or linear barcode. The Digital Imager contains a scanner that can be configured to read slide IDs in a certain 1-D barcode formats. Refer to “Configure Barcodes” on page 3.25 for the available types. 2-D barcode Two-dimensional barcode.
- Page 224 EFINITIONS AND BBREVIATIONS This page intentionally left blank. Genius™ Digital Imager Operator’s Manual...
-
Page 226: Chapter Eight
Hologic, Inc., P.O. Box 3009, Boston, MA 02241-3009 USA Business Hours Hologic’s business hours are 8:30 a.m. to 5:30 p.m. EST Monday through Friday excluding holidays. Customer Service To order products, and place or amend standing orders, call Customer Service at 1-800-442-9892 or 1-508-263-2900 during business hours or fax your order to the attention of Customer Service at 1-508-229-2795. - Page 227 ERVICE NFORMATION This page intentionally left blank. Genius™ Digital Imager Operator’s Manual...
-
Page 229: Chapter Nine
Hologic, Inc., P.O. Box 3009, Boston, MA 02241-3009 USA Business Hours Hologic’s business hours are 8:30 a.m. to 5:30 p.m. EST Monday through Friday excluding holidays. Ordering Information To order products, and place or amend standing orders, call Customer Service at 1-800-442-9892 or 1-508-263-2900 during business hours or fax your order to the attention of Customer Service at 1-508-229-2795. - Page 230 For returns, please call Customer Service at 1-800-442-9892 or 1-508-263-2900 to obtain a Return Goods Authorization number. Hologic will not accept any returned items without this number. For returns related to warranty issues, please contact Technical Support at 1-800-442-9892 or 1-508- 263-2900 and for questions regarding any other type of return, please contact Customer Service.
- Page 232 NDEX Index 1-D barcode 2-D barcode Accessories, ordering 3.14 Admin Options alert tones 3.18 completion tone 3.19 error tone barcode format 3.25 Barcode symbologies 4.31 Cancel Carrier 4.18 status Carriers 4.14 locations Clean 5.11 door queue station and slide grippers slide carrier deck slide carriers touch screen...
- Page 233 NDEX 3.30 Gyn slides 3.33 Non-Gyn slides 3.39 UroCyte slides 6.16 Correct Slide cybersecurity Digital Imager computer 1.18 Dimensions processor Digital Imager computer 1.20 Dimensions 1.21 Dimensions 1.12 Door 5.11 cleaning During Slide Processing 4.18 imaging status 1.20 Environmental specifications Error 6.16 recovering from...
- Page 234 NDEX 3.21 Gather Diagnostics Gyn slides 3.30 configure slide ID 3.13 slide carrier Image Management Server Image Processing items required 6.17 Imager Error Codes Indication for Use Installation Intended Purpose Intended Use 4.28 Interrupt Slide Processing inventory Items Required For Slide Image Processing 3.16 language selection Lights...
- Page 235 NDEX network Non-Gyn slides 3.33 configure slide ID 3.13 slide carrier definition Ordering Information 4.37 Power cycle the system Power on equipment 1.21 Power Specifications Processing 4.31 Cancel after interrupting process diagram 4.14 start Processor, Digital Imager queue station, cleaning 4.37 Rebooting the System 3.17...
- Page 236 NDEX Security Server Service Information 3.20 Service Mode Shutdown 4.35 Digital Imager computer 4.35 Shutting Down the Digital Imager 3.20 silence alarm Slide 4.14 carrier 4.18 Carrier Imaging Status 4.18 carrier status Events grippers 4.28 interrupt processing labeling 6.16 preparation 4.14 Processing 6.16...
- Page 237 NDEX 3.18 sound volume Specifications 1.21 Dimensions and weight 1.20 environmental 1.21 power Specimen preparation 4.31 stat slides Status indicator lights Storage and Handling System 3.14 Administrative Options Auto-Recovery Errors Errors warmup System error, self-recoverable System error, user-recoverable 1.12 System status light 1.12 Touch screen cleaning...
- Page 238 NDEX Verification chip 3.18 volume 1.12 Window Genius™ Digital Imager Operator’s Manual Index.7...
- Page 239 NDEX This page intentionally left blank. Index.8 Genius Digital Imager Operator’s Manual ™...
- Page 240 ID correctly. (Refer to Figure 1.) Reserved Numbers A range of numbers has been reserved for use by Hologic personnel. Do not use slide IDs within this reserved range at risk of losing patient data during a service visit.
- Page 241 The patient slide will be printed in the correct format. Reserved Numbers Accession ID numbers with ‘9999’ in the position just before the CRC are reserved for Hologic personnel and will be removed from the patient database at the time of a service visit.
- Page 243 Hologic, Inc. 250 Campus Drive Marlborough, MA 01752 USA +1-508-263-2900 www.hologic.com MAN-10430-001 Rev. 002...
Need help?
Do you have a question about the Genius Digital Diagnostics System and is the answer not in the manual?
Questions and answers