Advertisement
Package Content

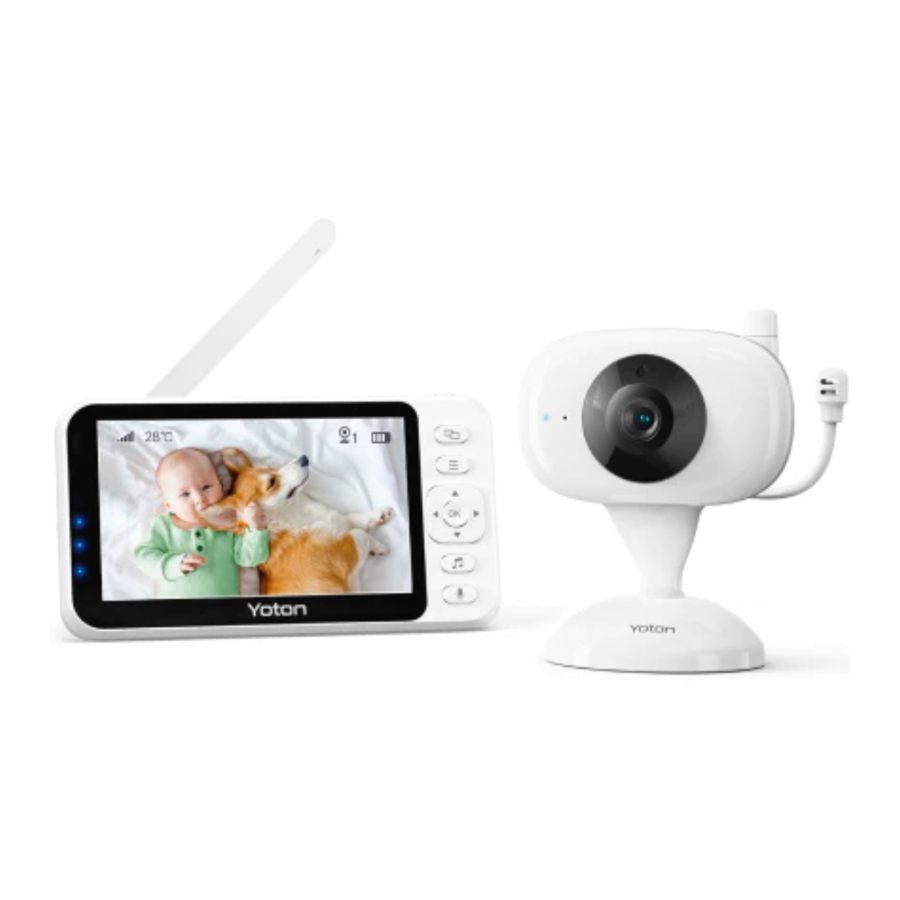
Product Introduction
Overview of your Parent Unit

- Power indicator and running light
- Camera switching keys
- Menu key
- Up, down, left and right buttons
- Confirmation key
- Music key
- Intercom key
- Display
- DC power supply connector
- Switch on key
- Stand
- Speaker
- Reset key
Overview of your Baby Unit

- Power indicator
- Micro hole
- Light sensor
- Lens
- IR light
- Foot pads
- Antenna
- Code key
- DC power connector
- Speaker
- Temperature sensor
- Bracket position
Installation Introduction
Baby unit installation and connect
- Connect baby unit with parent unit:

![]()
- Mount the baby unit on the wall
Use the template below to mark the wall at the correct location to drill holes for the wall mounting screws (not provided). The two grooves at the bottom of the baby end and the screws that have been fixed on the wall are used for hanging and fixing, a baby monitor stand can also be used, with the stand bit included at the bottom of the machine's camera.


A NOTE:
Do not place the infant unit within the reach of infants! If the picture or sound is disturbed, try moving the device to a different location and make sure they are not close to other electronic devices.
Charging and Power On/Off
- Baby unit power supply
Use Baby unit end with the power supply continuously powered on.
Parent unit power supply
When the parent unit is fully charged, it can be unplugged and used. - Power On/Off
Press and hold the power button at least 3 seconds to turn on the parent unit, then two units will be connected automatically.
Product function introduction
LCD display icon introduction
![]()
- Signal strength indication
- Temperature measured by camera
- Currently monitored camera icon (press toggle key to switch. 1 means the 1st camera, 2 means the 2nd camera)
- Battery level icon
Menu Option

Press Menu/Return to bring up the menu, which contains 8 items:
 |
|  |
|
 |
|  |
|
 |
|  |
|
 |
|  |
|
You can press  or
or  to move the cursor to select the item, press
  or
or  to select, and press OK to confirm.
Press  /Return to exit the setup menu.
Camera setting

Inside the camera settings, there are four secondary menus, press the up and down keys to select the menu, press OK to confirm that you can enter the three sub-menus, as Figure.
 | Indicates that the cameracycles through the display |
 | View Camera, enter the sub-menu and you can select the paired camera to view. |
 | Add camera, enter the submenu, press OK button to enter pairing mode, press and hold the camera's pairing code button for 3 seconds at the same time to pair, if pairing fails, there will be a long beeping sound to indicate that, reopen the pairing can be operated. If the pairing fails, there will be a long beep sound, just reopen the pairing operation. |
 | Delete the camera, enter the sub-menu, select the camera that needs to be unpaired, and press OK to unpair it. |
Screen hibernation settings

Screen hibernation menu, there are 3 hibernation times for selection, 1 minute, 3 minutes, 5 minutes, press up and down to select the corresponding time, press OK to confirm. Default is Off
Split screen display settings

Press the up and down keys to select the icon to turn on and off, and press OK to confirm; (Pairing 1 camera, this menu does not take effect, pairing 2 cameras, automatically enters 2-split screen mode, pairing 3 and above cameras, automatically enters 4-split screen mode)
FAQ
- Why does the appliance produce a high-pitched noise? The units may be too close to each other.
Make sure the parent unit and the baby unit are at least 3.5 feet/1 meter away from each other. The volume of the parent unit may be set too high. Decrease the volume of the parent unit. - Why don't I hear a sound/Why can't I hear my baby cry?
- The volume of the parent unit may be set too low or may be switched off. Increase the volume of the parent unit.
- The microphone sensitivity level of the baby unit may be set too low. Set the microphone sensitivity level to a higher level in the menu of the parent unit.
- The baby unit and parent unit may be out of range of each other. Reduce the distance between the units.
- Why does the charging time of the parent unit exceed 4 hours?
The parent unit may be switched on during charging. Switch off the parent unit during charging. - The specified operating range of the baby monitor is 1000 feet/300 meters. Why does my baby monitor manage a much smaller distance than that?
The specified range is only valid outdoors in open air. Inside your house, the operating range is limited by the number and type of walls and/or ceilings in between. Inside the house, the operating range is up to 150 feet/50 meters. - Why is the connection lost every now and then? Why are there sound interruptions?
- The baby unit and the parent unit are probably close to the outer limits of the operating range. Try a different location or decrease the distance between the units. Please note that it takes about 30 seconds each time before a connection between the units is established.
- You may have placed the parent unit next to a transmitter or other appliance, such as other wireless telephone or 2.4GHz baby monitor.
Move the parent unit away from the other appliances until the connection is re-established.
Attention
Thank you for purchasing YOTON Video Baby Monitor YB06.
Before you use the device, please read this User Manual carefully.
- This product should be assembled by adults.
- Keep small parts away from children when assembling.
- This product is not a toy, do not allow children to play with it as a toy. This baby monitor is not a substitute for responsible adult supervision.
- Do not place the baby monitor cables in the cot or with the baby arm's reach (at least 1 meter away).
- Do not use the baby monitor near water or a heat source.
- Do not touch the power plug with sharp or metal objects.
Warranty
If you have any questions or confusions about our product or warranty, please feel free to contact us.
YOTON Customer Care Service Mailbox:
bm.support@yoton.co
Documents / ResourcesDownload manual
Here you can download full pdf version of manual, it may contain additional safety instructions, warranty information, FCC rules, etc.
Advertisement


Need help?
Do you have a question about the YB06 and is the answer not in the manual?
Questions and answers