Table of Contents
Advertisement
Technical Support and E-Warranty Certificate www.vevor.com/support
UNDER SINK WATER HEATER
SERIES: DX-14VA(M,S)
(Tips:X is 10/15/30)
We continue to be committed to provide you tools with competitive price.
"Save Half", "Half Price" or any other similar expressions used by us only represents an
estimate of savings you might benefit from buying certain tools with us compared to the major
top brands and doses not necessarily mean to cover all categories of tools offered by us. You
are kindly reminded to verify carefully when you are placing an order with us if you are
actually saving half in comparison with the top major brands.
Advertisement
Table of Contents

Related Manuals for VEVOR D-14VA Series


Summary of Contents for VEVOR D-14VA Series
- Page 1 Technical Support and E-Warranty Certificate www.vevor.com/support UNDER SINK WATER HEATER SERIES: DX-14VA(M,S) (Tips:X is 10/15/30) We continue to be committed to provide you tools with competitive price. "Save Half", "Half Price" or any other similar expressions used by us only represents an estimate of savings you might benefit from buying certain tools with us compared to the major top brands and doses not necessarily mean to cover all categories of tools offered by us.
- Page 3 CustomerService@vevor.com This is the original instruction, please read all manual instructions carefully before operating. VEVOR reserves a clear interpretation of our user manual. The appearance of the product shall be subject to the product you received. Please forgive us that we won't inform you again if there are any technology or software updates on our product.
- Page 4 Warning-To reduce the risk of injury, users must read instructions manual carefully. FCC statement: This device complies with Part 15 of the FCC Rules. Operation is subject to the following two conditions:(1)This device may not cause harmful interference, and (2)this device must accept any interference received, including interference that may cause undesired operation.
-
Page 5: Product Specifications
Caution Please confirm the water temperature before use to avoid too low or too high. Turn the thermostat to the lowest temperature before unplugging the power plug. Periodically pull the T/P valve handle to check whether the relief valve drain is unblocked. -
Page 6: Installation Precautions
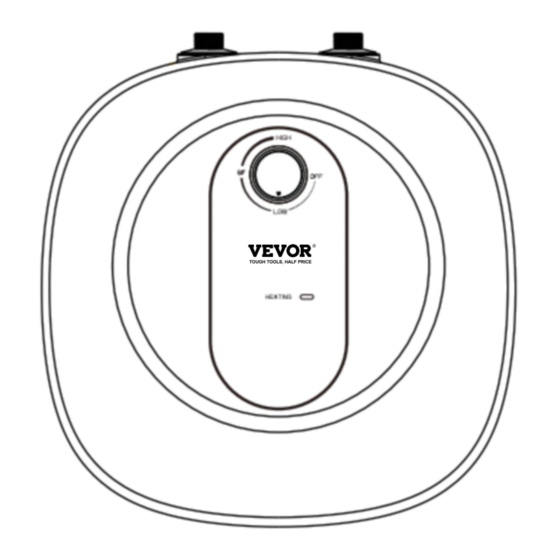
NAME OF EACH PART OF UNDER SINK WATER HEATER INSTALLATION PRECAUTIONS The wall for mounting the appliance shall withstand at least fourfold of the total mass of the appliance when filled with water. Take reliable reinforcement measures when necessary. Appliances should be installed near frequent water points to reduce pipeline heat loss. -
Page 7: Packing List
It must be installed indoors and where the temperature of the link is above 32 ℉, so as not to cause ice to break the water pipe of the tank. There should be no flammable or explosive objects around the installation appliance. -
Page 8: Methods Of Installation
METHODS OF INSTALLATION Equipment Installation ① After the installation position of the appliance is determined, drill two holes with a spacing of 2.44 inch and a diameter of φ0.394 inch in the horizontal direction of the wall according to the size as shown in the following figure, and the hole depth shall not be less than 2.76 inch. - Page 9 Multiple Outlet Connection If the user wants to implement a multi-pipe supply system, please refer to the method shown on the drawing for connection. Notice 1. The rated pressure of T/P valve is 150 psi. Therefore, when the pressure of the pipeline system exceeds its rated pressure, T/P valve will automatically drain and relieve pressure, and water flow out of the outlet is normal.
-
Page 10: Method Of Usage
valve and check whether the water discharge of the T/P valve is smooth (continuous water outlet means normal). ③ After confirming normal operation, switch on the power and run the appliance according to the operation method section. Power off and disconnect when all is well. - Page 11 preservation state. When the water temperature falls for some period, the water heater automatically again, and the heating indicator lights up. When set to "OFF", water heater will not work. IDENTIFY AND DEAL WITH COMMON FAULTS If water heater broke down during normal use, please immediately cut off the power, check according to the following content.
-
Page 12: Wiring Diagram
Flowing water comes External water pressure is Waiting for water pressure go out hot and cold. unstable. normal. Water drips from T/P Normal Connect drain pipe and lead to valve outlet. safe drain. Water continuously Water pressure is too high. Install a pressure limiting drips from T/P valve valve on the water inlet pipe. - Page 13 heater, close the inlet valve, separate the connection between the inlet and outlet, and empty the inner tank water. After descaling, reinstall the internal tank connection between the inlet and the outlet. Draining With long-term outage or maintenance, first cut off the power supply, turn off the inlet water valve, separate the connection between the inlet and outlet water pipe, empty it upside down, and reinstall the connection between the inner tank and the connection between the inlet and outlet water pipe.
-
Page 14: Product Dimensions
PRODUCT DIMENSIONS Unit :Inch - 12 -... - Page 16 Technical Support and E-Warranty Certificate www.vevor.com/support...
Need help?
Do you have a question about the D-14VA Series and is the answer not in the manual?
Questions and answers