
Related Manuals for Orivision EH901


Summary of Contents for Orivision EH901
- Page 1 2023 H.265&H.264 HDMI/VGA/SDI Video Encoder User Manual Model: ◼ EH901 ◼ ES901 ◼ EV901 ◼ EH1201 ◼ EH1301 ◼ EHV101 ◼ 1U Rack with video encoder ◼ 3U Rack with video encoder...
-
Page 2: Table Of Contents
Technical Support: support@orivision.cn Contents Overview ....................................3 1.1 product description ..............................3 1.2 product picture ................................3 1.3 1RU/3RU Rackmount ..............................5 Initial installation connection ............................7 2.1 Connect power ................................7 2.2 Connect the encoder to user’s computer directly ....................7 2.3 Log in the control web with 192.168.0.31 ......................8 Introduction to the control page of the encoder .................... - Page 3 Technical Support: support@orivision.cn How to set the SRT protocol in the encoder ......................41 6.1 Listener mode ................................41 6.2 Caller mode .................................. 44 How to Upgrade the new firmware ..........................46 How to Reset/Reboot the encoder..........................47 Go Back Contents...
-
Page 4: Overview
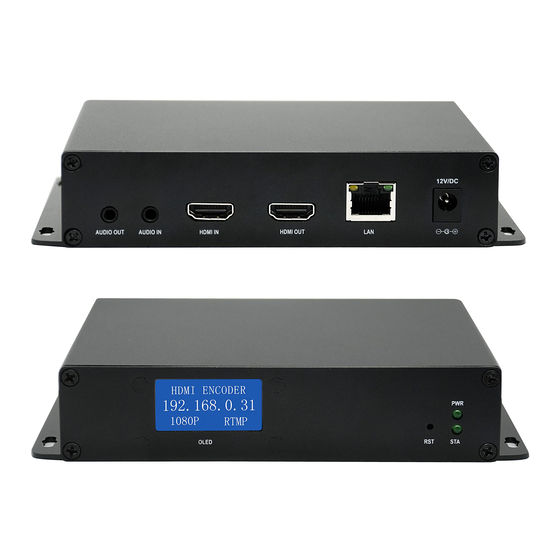
IPTV system, live streaming broadcast, streaming media server etc. Also, the encoder works with the online live broadcast platform, such as YouTube, Ustream, Twitter, WOWZA, Facebook Live, etc. 1.2 product picture ▲ZY-EH901 ▲ZY-ES901 Go Back Contents 3 / 48... - Page 5 Technical Support: support@orivision.cn ▲ZY-EV901 ▲ZY-EHV101 ▲ZY-EH1201 Go Back Contents 4 / 48...
-
Page 6: 1Ru/3Ru Rackmount
▲ZY-EH1301 1.3 1RU/3RU Rackmount ORIVISION rackmount series include 1RU or 3RU rack-mounted frame, freely mixed with 4 channels (1RU),16 channels channels (3RU) HDMI/SDI/VGA/CVBS encoder modules. It comes with redundant power modules, centralized heat dissipation, ensuring longtime stable operation, and benefits your IP video deployments of any size and complexity. - Page 7 Technical Support: support@orivision.cn ▲1U Rackmount-Size ▲3U Rackmount ▲3U Rackmount-Size Go Back Contents 6 / 48...
-
Page 8: Initial Installation Connection
Technical Support: support@orivision.cn 2) Initial installation connection 2.1 Connect power Use the standard power adaptor (DC12V/1A) connected to the device. The power light will be always on after the device is powered on. Note Please use the standard power adaptor provided. Using other unqualified power supplies may damage the device. -
Page 9: Log In The Control Web With 192.168.0.31
Technical Support: support@orivision.cn 2.3 Log in the control web with 192.168.0.31 According to the above steps, after connecting the encoder to the computer with a network cable. ▼ Setp1: find the "Network & Internet Settings" ▼ Step2: "change adapter options"——"Local Area Connection”... - Page 10 Technical Support: support@orivision.cn ▼ Step3: “Properties”——“Internet Protocol Version (TCP/IPv4)” Go Back Contents 9 / 48...
- Page 11 Technical Support: support@orivision.cn ▼ Step4: change the IP to 192.168.0.XXX—— “OK” Go Back Contents 10 / 48...
-
Page 12: Introduction To The Control Page Of The Encoder
Technical Support: support@orivision.cn ▼ Step5: Open the WEB browser, and enter the IP address of the decoder directly (the default is 192.168.0.31) to open the login interface of the decoder. The default username and password of the decoder is admin/admin and then click "Login". -
Page 13: Encoder Settings
Technical Support: support@orivision.cn 3.2 ENCODER Settings 3.2.1 Streams setting ▼ The left-hand column shows the settings for the 4 stream outputs and audio, as well as the setting functions for the input signals Note: EH1201 only supports 2-channel stream output settings... - Page 14 Technical Support: support@orivision.cn Mode: Disable | Enable | Video only| Audio only “Enable“ is the default encoding for video and audio “Video only” is for video-only encoding “Audio only” is for audio-only encoding Encoder type: H264/H265/MJPEG Profile: baseline profile / main profile / high profile ( Note: H.265 version choose main profile) Color range: PC/TV Video size for Stream1&Stream2:...
- Page 15 Technical Support: support@orivision.cn MinQp: 1-51 MaxQp: MinQp-51 MinIQp: [MinQp-MaxQp] Max bitrate(K): [16-200000] Logo mode: Disable | No input | Always This function can be enabled when the user needs to display a specified image on the decoder side When “No input” is selected, the decoder or VLC player output will display the image uploaded by the user when there is no signal input from the encoder.
-
Page 16: Server Setting (Http/Rtsp/Hls Protocols)
Technical Support: support@orivision.cn 3.2.2 Server Setting (HTTP/RTSP/HLS Protocols) Go Back Contents 15 / 48... - Page 17 Technical Support: support@orivision.cn HTTP Server: Disable/Enable (TS)/ Enable (FLV) HTTP port: 1-65535 optional; default is 8000 HTTP path: Modifiable RTSP server: Disable/Enable (TS)/Enable (ES) RTSP port: 1-65535 optional; default is 554 RTSP path: Modifiable HLS server: Disable/Enable HLS path: Customization...
-
Page 18: Cliet Setting/ Pushflow Settings (Multicast /Rtmp/Rtmps)
Technical Support: support@orivision.cn 3.2.3 Cliet Setting/ Pushflow settings (Multicast /RTMP/RTMPS) When users need to use multicast or RTMP protocols, they can set them on this page. Multicast: Disable/UDP/RTP optional Server addr: Fill in the multicast address Server port: 1-65535 optional... -
Page 19: Text Setting: Supports Two Groups Of Text Input Settings
Technical Support: support@orivision.cn 3.2.4 Text Setting: Supports two groups of text input settings Mode1: Static/ slide to right/ Slide to left Text X1: 0-width is optional, display the left and right position of the text Text Y1: 0-height is optional, display the up and down position of the text... -
Page 20: Osd Setting
Technical Support: support@orivision.cn 3.2.5 OSD Setting User can upload the station logo, picture, etc. through the OSD, and it supports the JPG format. Note Each stream has two groups of OSD can be set. Group1: Disable/ Enable Bmp X1: 4-Width; display the left and right position of the picture Bmp Y1: 4-Height;... - Page 21 Technical Support: support@orivision.cn Bmp name1: display the name of the Group1 Bmp file1: choose to upload the image, support bmp format of the picture less than 1M Set a partial mosaic on the video screen Mosaic 1: Disable/ Enable Mosaic X1: 0-Width; display the left and right position of the mosaic Mosaic Y1: 0-Height;...
-
Page 22: Audio Setting
Technical Support: support@orivision.cn 3.3 Audio Setting Encoder type: AACLC/EAAC/EAACPLUS Bitrate: 48000/64000/96000/128000/160000/192000/256000 optional ES type: AAC/G711/G711U optional Digital gain: X1/X2/X4/X8 3.4 Input Setting Go Back Contents 21 / 48... -
Page 23: Edid Function
Technical Support: support@orivision.cn Input Size: If “auto” is selected, the encoder automatically recognises the resolution of the input signal Mirror: Screen mirroring settings for the input signal source Mirror is Left and right mirroring Flip is Top and bottom mirroring... -
Page 24: Loopback: Video Settings For Local Loop-Out
Technical Support: support@orivision.cn 3.4.2 Loopback: Video settings for local loop-out Go Back Contents 23 / 48... -
Page 25: Protocol Setting: Srt/Onvif Protocols
Technical Support: support@orivision.cn 3.5 Protocol Setting: SRT/ONVIF protocols Go Back Contents 24 / 48... -
Page 26: Listener Model Of Srt Protocol
Technical Support: support@orivision.cn 3.5.1 Listener model of SRT protocol When SRT is selected as Listener mode, Status: Display the status of the SRT Stream: choose stream1~4 Port: [1 - 65535], 7130 is default; It is recommended to set the port larger than 1024 if the user want to... -
Page 27: Caller Model Of Srt Protocol
Technical Support: support@orivision.cn 3.5.2 Caller model of SRT protocol When SRT is selected as Caller mode, Status: Display the status of the SRT Stream: choose stream1~4 Server addr: Enter the IP address of the decoder Port: [1 - 65535], 7130 is default; It is recommended to set the port larger than 1024 if the user want to... -
Page 28: Onvif Setting
Technical Support: support@orivision.cn 3.5.3 ONVIF setting 3.5.4 Advance setting Encryption settings for HTTP and RTSP protocols Go Back Contents 27 / 48... -
Page 29: System Setting
Technical Support: support@orivision.cn 3.6 System Setting 3.6.1 Network Setting When DHCP is enabled, the encoder IP address is assigned by the switch and the OLED display of the encoder shows the IP address assigned to the encoder. When DHCP is disabled, the user can manually change the IP address of the encoder. Modify DNS when changing IP. - Page 30 Technical Support: support@orivision.cn Go Back Contents 29 / 48...
- Page 31 Technical Support: support@orivision.cn Note After changing the above parameters the encoder needs to be rebooted. Go Back Contents 30 / 48...
-
Page 32: System Setting
Technical Support: support@orivision.cn 3.6.2 System Setting ▼Time display settings One-click “Sync” synchronisation of the time on the user's computer When NTP is enabled, it can synchronize the user-specified time zone time ▼Automatic/timed reboot settings Go Back Contents 31 / 48... - Page 33 Technical Support: support@orivision.cn ▼Modify login username and password settings Note After changing the above parameters the encoder needs to be rebooted. Go Back Contents 32 / 48...
-
Page 34: Upgrade Setting
Technical Support: support@orivision.cn 3.6.3 Upgrade Setting ▼ Upgrade Setting Display of existing firmware version number information If the user need to upgrade to a new firmware, you can contact us for the latest version of firmware. Once you have received the new firmware, please do not unzip the file and upload it directly When the system prompts that the upgrade is successful, Pls reboot your encoder to finish installing updates. - Page 35 Technical Support: support@orivision.cn ▼ backup Setting Click the “Bakup” button to save the encoded settings to a file on your local computer with one click Settings can also be restored with one click by uploading a file “Default” button is restored to factory settings ▼...
-
Page 36: How To Connect The Encoder To The Internet
Technical Support: support@orivision.cn 4) How to connect the Encoder to the internet Step1: Connect the encoder to the PC directly. Login the control web with the default IP: 192.168.0.31 Step2: Check the IP of the router connected to the Network. - Page 37 Technical Support: support@orivision.cn Step4: Connect the encoder directly to the router with a network cable. At the same time, connect the computer to the same network Step5: Open the browser and enter the new IP :192.168.10.XXX Go Back Contents 36 / 48...
-
Page 38: How To Streaming To Youtube/Facebook Via Rtmp/Rtmps
Technical Support: support@orivision.cn Note: If user can’t log in by new IP, Pls check the DNS of the router. Then reset the encoder and re-login to the web according to the above steps, modify the IP, gateway, and DNS. 5) How to streaming to YouTube/Facebook via RTMP/RTMPS Step1: Before making live broadcast, you will need to check the following. - Page 39 Technical Support: support@orivision.cn Go Back Contents 38 / 48...
- Page 40 Technical Support: support@orivision.cn Step3: Log in the control web of the video encoder. Find the “Stream”—“Client”—“Rtmp(s)” Page, enable the RTMP protocol as bellow. Enter the address and secret key of the RTMP server into the corresponding boxes Step4: After set the RTMP,pls press the “Apply” button on the bottom of the page. Then press “REBOOT”...
- Page 41 Technical Support: support@orivision.cn Go Back Contents 40 / 48...
-
Page 42: How To Set The Srt Protocol In The Encoder
Technical Support: support@orivision.cn 6) How to set the SRT protocol in the encoder There are two modes are available: caller and Listener 6.1 Listener mode 1. SRT Port: 7130 is default. But customers can modify it and suggest to set it more than 1024. - Page 43 Technical Support: support@orivision.cn Users can fill in the SRT address directly into the decoder or play it through the VLC player srt://192.168.10.38:7120 If the user wants to encrypt the SRT Then the encrypt SRT address format: srt://ip:port?passphrase=passwords E.g: srt://192.168.10.38:7130?passphrase=1234567890 Go Back Contents...
- Page 44 Technical Support: support@orivision.cn srt://192.168.10.38:7120?passphrase=1234567890 Go Back Contents 43 / 48...
-
Page 45: Caller Mode
Technical Support: support@orivision.cn 6.2 Caller mode SRT Port: 7130 is default. But customers can modify it and suggest to set it more than 1024. SRT delay: 120 is default. SRT Key: set a password of at least 10 digits if the user need Press the “Apply”... - Page 46 Technical Support: support@orivision.cn If the user wants to encrypt the SRT Then the encrypt SRT address format: Srt://@port?mode=listenser&passphrase=passwords E.g srt://@:7130?mode=listener&passphrase=1234567890 IP of the decoder Description of decoder stream address: Video Encoder choose “listener” mode, the SRT address format in Video Decoder:...
-
Page 47: How To Upgrade The New Firmware
Technical Support: support@orivision.cn 7) How to Upgrade the new firmware Once the user has obtained the firmware, do not unzip it and upload it directly During the upgrade process, don’t refresh or close the webpage and don’t turn off the encoder. -
Page 48: How To Reset/Reboot The Encoder
Technical Support: support@orivision.cn 8) How to Reset/Reboot the encoder There are two ways to reset the factory settings: Find the “backup” button in the system settings of the encoder and click on the "default" button to restore the factory settings There is an RST hole on the front of the unit, Then get a sharp needle and insert it into the SRT hole and hold it for about 10 seconds. - Page 49 Technical Support: support@orivision.cn Go Back Contents 48 / 48...
Need help?
Do you have a question about the EH901 and is the answer not in the manual?
Questions and answers