Table of Contents
Advertisement
Advertisement
Table of Contents

Related Manuals for Orivision EH404


Summary of Contents for Orivision EH404
- Page 1 2022 EH404&EH408...
-
Page 2: Table Of Contents
Technical Support: support@orivision.cn Contents Overview ....................................2 1.1 product description ................................2 1.2 product picture ...................................2 1.3 Product’s Parameter .................................3 Initial installation connection ............................4 2.1 Connect power ...................................4 2.2 Connect displayer ................................4 2.3 Connect the encoder to user’s computer ........................5 2.4 Log in the control web with 192.168.0.31 .........................5 Introduction to the control page of the encoder ......................8... -
Page 3: Overview
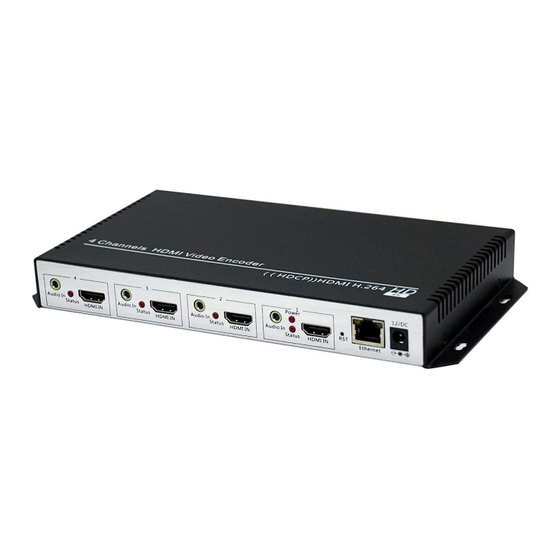
Technical Support: support@orivision.cn 1. Overview 1.1 product description EH404 is a professional hardware video and audio encoder. Which designed to meet the 4CH 4K@30HZ HDMI Video transmission applications. It supports H.264 high-performance encoding. Also, it supports the most protocols including HTTP/RTMP/RTMPS/HLS/UDP/RTSP/Onvif, etc. -
Page 4: Product's Parameter
Video Encoding H.264/Baseline Profile/Main profile/High Profile Max bitrate 16kbps-12Mbps Rate control CBR/VBR Audio Input Interface EH404: 4X External audio and HDMI built-in Audio EH408: 8X External audio and HDMI built-in Audio Audio encoding ACC,G711 Audio Encoder type LCAAC,EAAC,EAACPLUS Bit-rate 48k,64k,96k,128k,160k,192k,256k... -
Page 5: Initial Installation Connection
Technical Support: support@orivision.cn 2. Initial installation connection 2.1 Connect power Use the standard power adaptor (DC12V/2A) connected to the device(EH404). The power light will be always on after the device is powered on. EH408 using 220V Power. Note Please use the standard power adaptor provided. Using other unqualified power supplies may damage the device. -
Page 6: Connect The Encoder To User's Computer
Technical Support: support@orivision.cn 2.3 Connect the encoder to user’s computer Connect the decoder and the computer directly through the network cable. 2.4 Log in the control web with 192.168.0.31 According to the above steps, after connecting the decoder to the computer with a network cable. - Page 7 Technical Support: support@orivision.cn ▼ Step2: "change adapter options"——"Local Area Connection” ▼ Step3: “Properties”——“Internet Protocol Version (TCP/IPv4)” Go Back Contents 6 / 25...
- Page 8 Technical Support: support@orivision.cn ▼ Step4: change the IP to 192.168.0.XXX—— “OK” ▼ Step5: Open the WEB browser, and enter the IP address of the decoder directly (the default is 192.168.0.31) to open the login interface of the decoder. The default username and password of the decoder is admin/admin and then click "Login".
-
Page 9: Introduction To The Control Page Of The Encoder
Technical Support: support@orivision.cn 3. Introduction to the control page of the encoder 3.1 Status ▼ Status:Showing the status information of input and output from Group1~8. Go Back Contents 8 / 25... - Page 10 Technical Support: support@orivision.cn Each group displays two output status information, and the resolution of the input signal is automatically recognized and displayed. Go Back Contents 9 / 25...
-
Page 11: Network
Technical Support: support@orivision.cn 3.2 Network ▼ Network: Users can modify the network IP and DNS here DHCP:When the DHCP function is enabled, you also need to access the switch that automatically assigns an IP address. While the encoder IP address is dynamically assigned by the switch. You need to view the encoder IP from the switch. If you cannot view it, you can contact the manufacturer to provide IP inquiry software. -
Page 12: Media Setting
Technical Support: support@orivision.cn 3.3 Media Setting ▼ Channels Setting Set 1~4 channels input signals by switching the Group 1~4; Group 1 represent input interface 1;Group 2 represent input interface 2; Group 3 represent input interface 3;Group 4 represent input interface 4;... - Page 13 Technical Support: support@orivision.cn The higher the bit rate, the larger the data transmitted Fluctuate: recommend auto Note: Modifying the above parameters does not need to reboot the encoder ▼ Audio Setting Audio input mode: Analog- External audio; Digital- HDMI built-in audio...
-
Page 14: Protocol Setting
Technical Support: support@orivision.cn 3.4 Protocol Setting HTTP Protocol RTSP Protocol RTSP Push Multicast Protocol HLS Protocol RTMP Protocol Go Back Contents 13 / 25... -
Page 15: Osd
Technical Support: support@orivision.cn SRT Protocol 3.5 OSD ▼ OSD: User can upload the station logo, picture, etc. through the OSD, and it supports the JPG format. Note: Insert two groups of text and two pictures at the same time for each group... - Page 16 Technical Support: support@orivision.cn Tex1 Color: choose the color you want to display Tex1 Bg Color: choose background color of the text on the video Content1: input the content of the text you want TEX2 is the same as TEX1 Pictures Setting...
-
Page 17: System Setting
Technical Support: support@orivision.cn 3.6 System Setting ▼ Change password: It’s used for modifying the login password of WEB ▼ System information: used to check the serial number of device, software version number, and hardware version number; ▼ Auto reboot: It can be set to restart after a few hours, if you don't need it, you can choose to disable it. - Page 18 This function allows the user to save the setup parameters locally; Or restore the parameter settings by uploading the parameter file. ▼ Firmware upgrade Contact us (support@orivision.com) to get the newest firmware. After getting the file, pls don’t decompress it, upload it directly. Reboot the decoder after uploaded successfully. Go Back Contents...
- Page 19 Technical Support: support@orivision.cn ▼ System settings: Reset button is used for initialization operation of the system. Reboot button is used for remote restarting of the decoder. Go Back Contents 18 / 25...
-
Page 20: How To Connect The Encoder To The Internet
Technical Support: support@orivision.cn 4. How to connect the Encoder to the internet Step1: Check the IP of the signal source connected to the Network or router. For example: the router's network IP is 192.168.10.128 Step2: Change the default IP of the decoder 192.168.0.31 to 192.168.10.XXX; The user needs to confirm that the decoder and encoder or network signal source (Such as IP camera) are in the same network segment. -
Page 21: How To Streaming To Youtube/Facebook Via Rtmp/Rtmps
Technical Support: support@orivision.cn 5. How to streaming to YouTube/Facebook via RTMP/RTMPS Step1: Before making live broadcast, you will need to check the following. • Play the stream address in the encoder with the VLC player and confirm that it can play normally. - Page 22 Technical Support: support@orivision.cn Step3: Log in the control web of the video encoder. Find the “Media” Page, enable the RTMP protocol as bellow: For Example of Youtube: YouTube Server URL is “rtmp://a.rtmp.youtube.com/live2” YouTube stream Key is “9qdu-5qvv-3zfq-33hh” RTMP/RTMPS of Encoder could be set as bellow: RTMP Mode: rtmp RTMP server Ip: a.rtmp.youtube.com...
- Page 23 Technical Support: support@orivision.cn Step4: After set the RTMP,pls press the “SET UP” button on the bottom of the page. Then press “REBOOT” button in the system page. Note: If you streaming failed on Facebook and Youtube. >> Pls check your DNS setting. The value of DNS0 and DNS1 is the DNS of the router.
-
Page 24: How To Set The Srt Protocol In The Encoder
Technical Support: support@orivision.cn 6. How to set the SRT protocol in the encoder There are two modes are available: caller and Listenner 6.1 Listenser mode 1. SRT Port: 7120 is default. But customers can modify it and suggest to set it more than 1024. - Page 25 Technical Support: support@orivision.cn Then the encrypt SRT address format: srt://ip:port?passphrase=passwords E.g: srt://192.168.8.31:7120?passphrase=1234567890 srt://192.168.8.31:7120?passphrase=1234567890 6.2 Caller mode 1. SRT Port: 7120 is default. But customers can modify it and suggest to set it more than 1024. 2. SRT delay: 120 is default.
- Page 26 Technical Support: support@orivision.cn If the user wants to encrypt the SRT Then the encrypt SRT address format: Srt://@port?mode=listenser&passphrase=passwords E.g srt://@:7120?mode=listener&passphrase=1234567890 Description of decoder stream address: 1. Video Encoder choose “listener” mode, the SRT address format in Video Decoder: srt://ip:port srt://ip:port?passphrase=passwords 2.
Need help?
Do you have a question about the EH404 and is the answer not in the manual?
Questions and answers