Table of Contents
Advertisement
Quick Links
Advertisement
Table of Contents

Related Manuals for Camouflage EZ2


Summary of Contents for Camouflage EZ2
- Page 1 Digital Wildlife Camera...
-
Page 2: Table Of Contents
Contents Introduction ..................3 Features: ..................4 Applications: ..................Camera overview ................6 Simple to use this camera ..............7 Before Operation ................. 8 Power supply ..................Batteries installation ..............8 Using an external power source ..........8 Inserting the SD card ..............9 Camera Operation ................ - Page 3 Language ..................15 Time & date ................15 Photo stamp ................15 Password protection ..............15 Format memory card ..............16 Serial NO ..................16 Reset setting ................16 Aligning the camera ..............17 Align the camera as follows: ............17 The camera is ready to use .............. 18 CAMERA IS READY TO USE - Switch to ON .......
-
Page 4: Introduction
For rechargeable batteries............30 For non-rechargeable batteries..........31 Introduction Thank you for purchasing the EZ2 Camouflage Digital Wildlife Camera. This product is a digital camera for recording and observing wildlife. With its highly sensitive 120° Passive Infrared (PIR) Sensor, the camera detects the sudden change in ambient temperature caused by a... -
Page 5: Features
Features: Programmable 5, 8, 12, 16, 20, or 32 Megapixel high-quality resolution. Infrared night vision LEDs for flash range as far as 20 meters. In “Photo+ Video” mode, the camera takes both pictures and video at every trigger event. ... -
Page 6: Applications
The date, time, temperature, and moon phase can be stamped in the pictures. Backpack-looking tree grabber makes mounting and aiming a snap. Perform in the most extreme temperatures from -20°C to +60°C. Compact size (142 x109x74mm). Well designed to deploy covertly. ... -
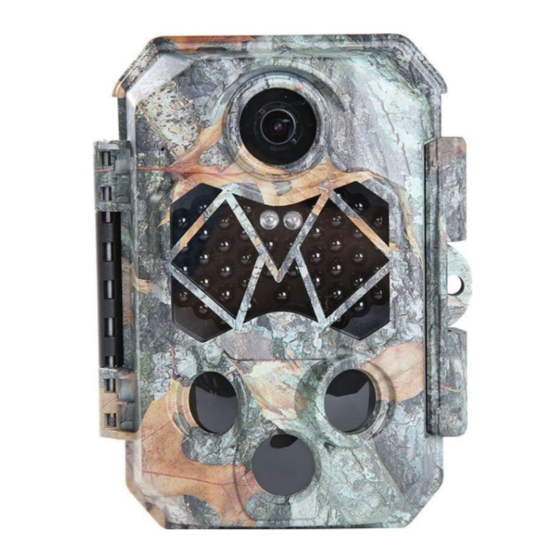
Page 7: Camera Overview
Camera overview 1. Up button 2. Right button 3. Shot button 4. OK button 5. Left button 6. Menu button 7. Replay button 8. Down button 9. SD slot 10. USB jack 11. OFF 12. Test 13. ON 14. Infrared LEDs 15. -
Page 8: Simple To Use This Camera
Simple to use this camera Install SD card. Switch to TEST. Install batteries Press Menu to Format memory Reset to factory setting card setting Set the Date & Time Switch to ON to use. -
Page 9: Before Operation
Before Operation Power supply Batteries installation Open the camera by unlocking the latch firstly. The battery compartment is the right part of the camera. Open the protective cover of the battery compartment and insert 4 x 1.5 V LR6/AA batteries into the battery slots. Make sure to insert each battery with the correct polarity (+ and - end against the long spring of each battery slot).To increase the operating time, you can use 8 x 1.5 V LR6/AA batteries. -
Page 10: Inserting The Sd Card
Inserting the SD card The camera uses an SD (Secure Digital) memory card to save photos (in .jpeg format) and/or videos (in .AVI format). SD cards up to a maximum of 512GB capacity are supported. Insert the SD card (with the camera’s power switch in the OFF position) before beginning to operate the camera. -
Page 11: Camera Operation
Camera Operation Mode Switch There are three basic operational modes: OFF mode: Power switch in the OFF position. ON mode: Power switch in the ON position (LCD screen is off.) TEST mode: Power switch at TEST position (LCD screen is on). OFF Mode The OFF mode is the “safe”... -
Page 12: Mode Change Setting In Test Mode
Mode Change Setting in TEST Mode The main purpose of the TEST mode is to allow you to change the settings of the camera’s parameters so your EZ2 Camouflage Trail Camera operates exactly the way you want it to. Slide the mode switch to the TEST position to start the test mode. -
Page 13: Photo Resolution
Photo resolution Set resolution for still photos. We recommend the resolution 5M. Options: 5 MP (preset), 8 MP, 12 MP, 16 MP, 20 MP, 32 MP. Photo series Selects how many photos are taken in sequence per trigger. In addition to single shot mode (1 photo), you can take “2 photos in series”... -
Page 14: Audio Recording
Audio recording Opening this function, you can record sound while recording video. SHOT lag Set the time period that the camera should wait before reacting to subsequent activation of the main sensor after the initial recording. During the selected interval, the camera will not record any images or videos. -
Page 15: Target Recording Time
Target recording time Select “On” if the camera should only be active during a certain time period. In the screen menu that subsequently appears, you can then set the start and end times for the active phase. The settings made here apply every day. The camera will not record any images outside of the active phase. -
Page 16: Language
Language Here you can set English, German, Finnish, Swedish, Danish, French, Italian, Dutch, Spanish, or Portuguese as the menu language. Time & date Here you can set the date format (YYYY/MM/DD, DD/MM/YYYY or MM/DDNYYY), the time format (12/24 hrs.), and the time and date. Use the LEFT and RIGHT keys to move to the next field. -
Page 17: Format Memory Card
Format memory card Deletes (erases) all files stored on a card to prepare it for reuse. Always format a card that has been previously used in other devices Caution! Make sure you have downloaded and backed up any files you want to preserve first! Press OK to execute, and press MENU to exit without formatting. -
Page 18: Aligning The Camera
Aligning the camera In test mode, you can work out the optimum exposure angle and the range of the motion sensors. During alignment, consider whether the use of the side motion sensors may be useful for attaining the desired observation results. You can activate/deactivate the side motion sensors using the above-described menu. -
Page 19: The Camera Is Ready To Use
The camera is ready to use CAMERA IS READY TO USE - Switch to ON AFTER CHANGING TO DESIRED SETTING and SIMPLY SLIDING SWITCHES TO ON POSITION, the camera is in active standby mode and will record media according to the switch settings. Firstly, the motion indicator LED will blink red for about 5 seconds. -
Page 20: Viewing/Deleting The Photos/Videos
Viewing/deleting the photos/videos Reviewing Images on the Camera LCD Put the power switch in the TEST position. Press the Replay key to enter image review mode. Use the UP/DOWN keys to scroll through your photos or videos. A zoom feature is available for still photos: Use the OK/SHOT keys to zoom in or out. -
Page 21: Write Protection
Write Protection This function can be used to protect individual recordings or all saved recordings from accidental deletion. Select “Write-protect current file “to protect currently selected recording from accidental deletion. Select “Write-protect all files” to protect all saved recordings from accidental deletion. -
Page 22: Reviewing Images Directly From The Sd Card
Reviewing Images Directly from the SD Card This is the most popular method of viewing images. Remove the SD card and take it to your home or campsite to view the images by using an SD card ”reader” connected to your computer (some computers and TVs have a built-in SD card slot). -
Page 23: Troubleshooting/Faq
Troubleshooting/FAQ a) Photos Do Not Capture Subject of Interest These are the result of placing the camera in an environment where there is motion associated with tree branches creating motion or an area where there is high heat in the foreground and any motion from wind. Setting a camera up over water is also a potential cause of foreground and any motion from wind. - Page 24 4. If the SD card has its write protect switch in the lock position, the camera will not take images. 5. If you have used an SD card on another device before, you might want to try formatting the card. - 23 -...
-
Page 25: D)The Camera Won't Power Up
d)The camera won’t power up 1. Make sure that you have installed at least a full set of 4 batteries in the correct position. 2. Make sure that the batteries are installed correctly, observing proper polarity. 3. After moving the switch from OFF to TEST or ON, make sure that the switch is correctly positioned to ensure the proper mode. -
Page 26: F) Date/Time Stamp Not Appearing On Images
4. Daytime photos or videos appear too bright Make sure that the camera is not aimed at the sun or other light sources during the day. 5. Photos with streaked subject a) In some cases with low lighting conditions and fast-moving subjects, the 8MP or 12MP resolution settings may not perform as well as the 5MP setting. -
Page 27: H)The Camera Won't Retain The Settings
h)The camera won’t retain the settings Make sure that you have been saving the changes to any parameter settings that you made while in Setup mode, by pressing OK after changing the setting. i) Moisture or Ants inside the Camera 1. -
Page 28: Camera Specifications
Camera specifications 32MP; 20M; 16MP; 12MP; 8MP; Photo resolution Video resolution 4K; 2,7K; 1080P; 72OP; VGA File format JPEG/AVI f = 4; F / NO = 2,0; FOV = 110 °; Lens Auto IR-filter Display 2.4" TFT LCD External memory SD card up to 512GB Internal memory Stack 256Mb DDR... - Page 29 On/Off; Include serial No., Time Stamp temperature and moon phase Time Lapse On/Off; Time Lapse Programmable Target recording time 00:00 to 23:59 programmable Password 4-Digit Numbers Build-In Microphone Build in Speaker Color images in daytime/black & Auto-distinguish images white night images Auto power off in 2 minutes while no Auto Power Off keypad controlling...
-
Page 30: Customer Service & Warranty
Customer service & Warranty Warranty Up to 2-YEAR LIMITED WARRANTY FCC statement This equipment has been tested and found to comply with the limits for a Class B digital device, pursuant to part 15 of the FCC Rules. These limits are designed to provide reasonable protection against harmful interference in a residential installation. -
Page 31: Electrical Safety Instructions
Electrical safety instructions To prevent personal injury or property damage, read and follow all electrical safety instructions before using the product. Safety of the batteries Keep all batteries out of the reach of children. For rechargeable batteries (not recommended) 1. Rechargeable batteries should only be charged under the supervision of adults 2. -
Page 32: For Non-Rechargeable Batteries
For non-rechargeable batteries 1. Make sure the + and - poles are properly plugged in when you insert the batteries 2. Do not short the positive (+) and negative (-) poles 3. Do not charge disposable batteries 4. Do not mix the old ones with new batteries or different types of batteries 5.
Need help?
Do you have a question about the EZ2 and is the answer not in the manual?
Questions and answers