Table of Contents
Advertisement
Quick Links
Advertisement
Table of Contents

Related Manuals for Camouflage EZ-Solar


Summary of Contents for Camouflage EZ-Solar
- Page 1 Digital Wildlife Camera EZ-Solar...
-
Page 2: Table Of Contents
TABLE OF CONTENTS PREFACE..................... 2 1. GENERAL INFORMATION ............3 Introduction .................... 3 Contents of the box ................3 2. HAZARD, SAFETY, AND WARNING NOTICES ......4 3. CAMERA OVERVIEW ..............7 Front view ....................7 Inside view....................8 4. PREPARING THE CAMERA ............9 Opening and closing the camera ............ -
Page 3: Preface
PREFACE Thank you for purchasing the EZ-Solar Camouflage Digital Wildlife Camera. This product is a digital camera for wildlife recording and observation. To make our product easy to use and have a general understanding, we have created this guide specifically for you. This manual explains how to use this camera systematically. -
Page 4: General Information
1. GENERAL INFORMATION 1.1 Introduction The Wildlife Camera (also called Scouting/Hunting Camera) is a reconnaissance device that can be activated by a sudden change in ambient temperature caused by any movement of human (or animal) in a particular Region Of Interest (ROI), which is detected by a highly sensitive passive infrared (PIR) sensor and then automatically records high-quality photos or HD video clips. -
Page 5: Hazard, Safety, And Warning Notices
2. HAZARD, SAFETY, AND WARNING NOTICES Incorrect use of the camera and accessories can be dangerous for you and others and can damage or destroy the camera. We, therefore, ask you to read and strictly observe the following Hazard, safety, and warning notices. - Page 6 Only use a power adaptor (not supplied) with the mains voltage specified on the rating plate (5V). Otherwise danger of fire or electrocution. Disconnect the power by pulling the power adaptor out of the socket. A plugged-in power adaptor (not supplied) can continue to use power and therefore represents a hazard source.
- Page 7 Do not place any open ignition sources, such as lit candles onto or close to the device. Do not subject the LCD monitor to impact or pressure. This could damage the glass of the monitor or the liquid could leak from the inside. ─...
-
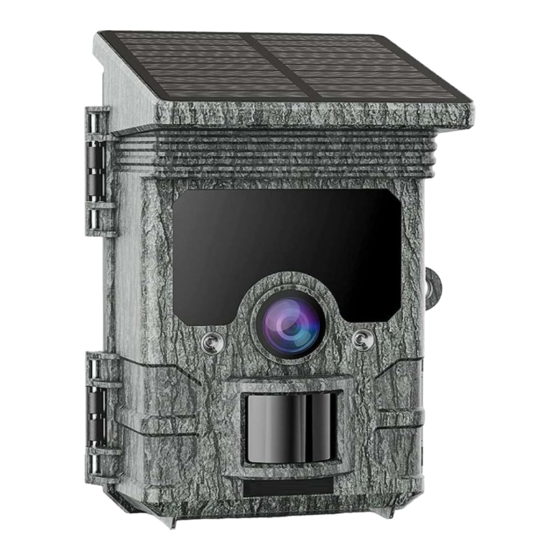
Page 8: Camera Overview
3. CAMERA OVERVIEW 3.1 Front view Locking Bracket Solar charging panel IR LEDs Motion Lens indicator red Light sensor PIR sensor Microphone Locking bracket - 7 -... -
Page 9: Inside View
3.2 Inside view Battery compartment Speaker Menu/Replay Mode switch button (OFF/SETUP/ON) WIFI/Up button Screen Video mode Down button OK button Mini USB connector/Charging port Memory card slot Reset Charging indicator light (red when charging and off when fully charged) - 8 -... -
Page 10: Preparing The Camera
The monitor is only switched on in the SETUP mode for changing menu settings or viewing existing photos. A TF memory card must have been inserted into the memory card slot to save photos. Using the mini USB connection (USB 2.0), the camera can be connected to a computer. -
Page 11: Inserting The Batteries
4.2 Inserting the batteries Open the camera as described in section 4.1 to insert the batteries. The battery compartment is housed in the upper of the screen. Now open the protective cover of the battery compartment by pulling the clamping closure at the top slightly inwards before lifting off the cover. -
Page 12: Inserting The Memory Card
4.3 Inserting the memory card A memory card must have been inserted to save photos and videos. Insert a TF memory card in the memory card compartment before switching on the camera. Switch off the camera and open it as described in section 5.1. Insert the memory card as shown in the adjacent illustration. -
Page 13: External Power Supply
4.4 External power supply The camera can be operated using power from an external power supply. A 5V power supply with at least 1.0 A is required. 4.5 Assembly with strap Use the securing strap supplied to attach the Trail Camera to a tree or another object. -
Page 14: Graphic Expression Operation
4.6 Graphic expression Operation Open the locking brackets and the protective cover of the battery compartment - insert batteries - insert memory card - switch to SETUP - enter system menu by pressing the MENU button - choose to reset to factory. -
Page 15: Using The Camera
Default Date/Time Format setting Press enter the system Return menu All data will setting to be deleted defaults 5. USING THE CAMERA Before setting up the camera for surveillance, it must be set up for the respective purpose. For this purpose, there is a setup mode available. In addition to changing settings, photos and videos can be taken and existing photos can be viewed in this mode. -
Page 16: Operating Buttons
SETUP mode: Mode switch at SETUP position (LCD screen is on). 5.2 Operating buttons In the SETUP mode, you can check and change the settings of the Trail Camera with the help of its built-in LCD. These settings, found in the SETUP Menu, let you change the photo or video resolution, the interval between photos, switch the time imprint on, etc. -
Page 17: Functions Of Operating Buttons In Standby Mode
5.2.1 Functions of operating buttons in standby mode Below, the operating buttons are described in the recording mode with a non-activated menu. : Press this button twice to open the Settings menu. : Press this button once to start the replay mode. ... -
Page 18: Functions Of Operating Buttons In Menu Setting
: Skip back to the video. : Start and pause the replay of videos. 5.2.3 Functions of operating buttons in MENU setting Below, the operating buttons are described in the replay mode with an activated menu. (Recording and Replay mode). ... - Page 19 Mode: Photo, Video, Photo + Video Selects the format your camera will record in. Photo: For photos only. Video: For videos only. Photo+Video: A photo (multiple photos, if NUM PICS is set >1) followed by a video clip will be captured for each PIR trigger event. ...
- Page 20 As soon as the "On" setting has been confirmed by pressing the OK button, you can enter the interval time after which photos/ videos are to be taken. Note: ─ In this mode, the PIR function would stop working, and the camera would take photos/ videos in the setting interval time.
- Page 21 Image size 30M: (7392x4160); 24M: (6544x3680); 20M: (5888x3312); 16M: (5376x3024); 12M: (4608x2592); (3840x2160); 4M: (2560x1440); 2M: (1920x1088) Select the desired resolution for photos. We recommend the resolution A higher resolution produces a somewhat better photo quality but results in larger files requiring more space on the memory card. 30M, 24M, 20M, 16M, and 12M resolutions are generated by interpolation which can also affect quality.
- Page 22 Language: Select the desired menu language The following languages are available: English, German, French, Spanish, Chinese, etc. Default setting (Reset to factory): Cancel / OK Press “OK” to reset the camera settings to the default values and confirm the selection by pressing the OK button. ...
- Page 23 Camera name: 4K WIFI CAM You can use a combination of 10 digits and 26 letters to document the location of the photos and videos. When using several cameras this makes it easier to identify the location when viewing photos and videos. ...
- Page 24 Backlight: 1Minute, 3Minutes, 5Minutes, Off The LCD monitor would automatically turn off after the set time. Version: You can check the software version. Mcu FW Update - 23 -...
-
Page 25: Wi-Fi Connection
5.4 Wi-Fi connection Download APP: Before using the Wi-Fi function, please refer to the label details on the battery compartment for the APP name or QR code. And then download the APP from the APP store, Android play, or Amazon market accordingly to your smartphone system. -
Page 26: Mounting And Positioning The Trail Camera Mounting
The live screen of the APP: The live screen of the APP shows the current live image from the trail camera and also offers the following options: A. Exit the APP B. Live image C. Video mode D. Review picture or video E. -
Page 27: Sensing Angle And Distance Test
placed at a height of 1.5-2m. Also, keep in mind that you will get the best results at night when the subject is within the ideal flash range, no farther than 20m and no closer than 3m from the camera. Scan the QR code for a wifi instruction video youtube.com/watch?v=mnGqVif-VpY 5.6 Sensing Angle and Distance Test... -
Page 28: Switching On The Camera
5.7 Switching ON the camera Once you switch to the ON mode, the motion indicator LED (red) will blink for about 5 seconds. This gives you time to close and lock the front cover of the trail camera and then walk away. During this time, the motion indicator LED will blink red continuously. -
Page 29: Technical Specifications
1. Connect the camera to your computer using cable. 2. The camera switches on automatically in the USB mode, irrespective of the selection on the mode switch. 3. The camera installs itself on the computer as an additional drive under the name "Removable storage device". - Page 30 Screen 2.0" IPS 320x 240(RGB) DOT TFT-LCD Display Lens F=4.3; F/NO=2.0; FOV=80°; Auto IR filter Triggering approx. 0.3 second time 4K(3840 x 2160 30fps); 2K(2560 x 1440 30fps); 1296P(2304 x 1296 30fps); 1080P(1920 x 1080 Video 30fps); resolutions 720P(1280 x 720 30ps); 480P(848 x 480 30fps); 360P(640 x 368 30fps) Daytime: 1 m ~ infinitive;...
- Page 31 Waterproof IP66 Solar panel (4400mAh Li-battery); Power supply 4X batteries type LR6 (AA) Uninterruptible power Supply outdoor Standby time approx. 18 months indoor Operating -20 ~ 60°C (Storage temperature: -30 ~ 70°C) temperature Operating -5% ~ 90% Humidity Connection mini USB 2.0 Dimensions approx.
-
Page 32: Troubleshooting Tips
8. TROUBLESHOOTING TIPS The camera won’t power on. Possible Cause Batteries not fully installed, or not installed correctly. Recommended Solution(s) Install new AA alkaline batteries. Make sure the positive (+) and negative (-) poles are lined up properly in each compartment, with the (-) pole making contact with the spring. - Page 33 Possible Cause Battery life will vary with operating temperature and the number of images taken over time. Typically, you will be able to capture several thousand images before the batteries die. Recommended Solution(s) Make sure you install all new alkaline AA batteries. ...
- Page 34 The videos are too short, not recording to the length set. Possible Cause Batteries are low, SD card is full, or settings need adjustment. Recommended Solution(s) Check battery power. Check the SD card. Replace or erase if full. ...
-
Page 35: System Information, Maintenance, And Disposal
9. SYSTEM INFORMATION, MAINTENANCE, AND DISPOSAL Microsoft® and Windows® are trademarks of Microsoft Corporation registered in the US. Pentium® is a registered trademark of Intel Corporation. Macintosh is a trademark of Apple Computer Inc. SDTM is a trademark. 9.1 Care Do not use any corrosive cleaners, such as methylated spirits, thinners, etc. - Page 36 - 35 -...
Need help?
Do you have a question about the EZ-Solar and is the answer not in the manual?
Questions and answers