WAGAN Tech iOnBoost V8 Air, 7526 - LITHIUM JUMP STARTER & INFLATOR Manual
- User manual (32 pages)
Advertisement
IMPORTANT INFORMATION
![burn hazard]()
![shock hazard]()
Before using this unit, read and understand all instructions included in this manual as well as those published by your vehicle's battery manufacturer or any other device intended to be used with this unit. Failure to follow all listed instructions may result in electric shock, fire, and/or serious personal injury.- Make sure the iOnBoost is fully charged before first use.


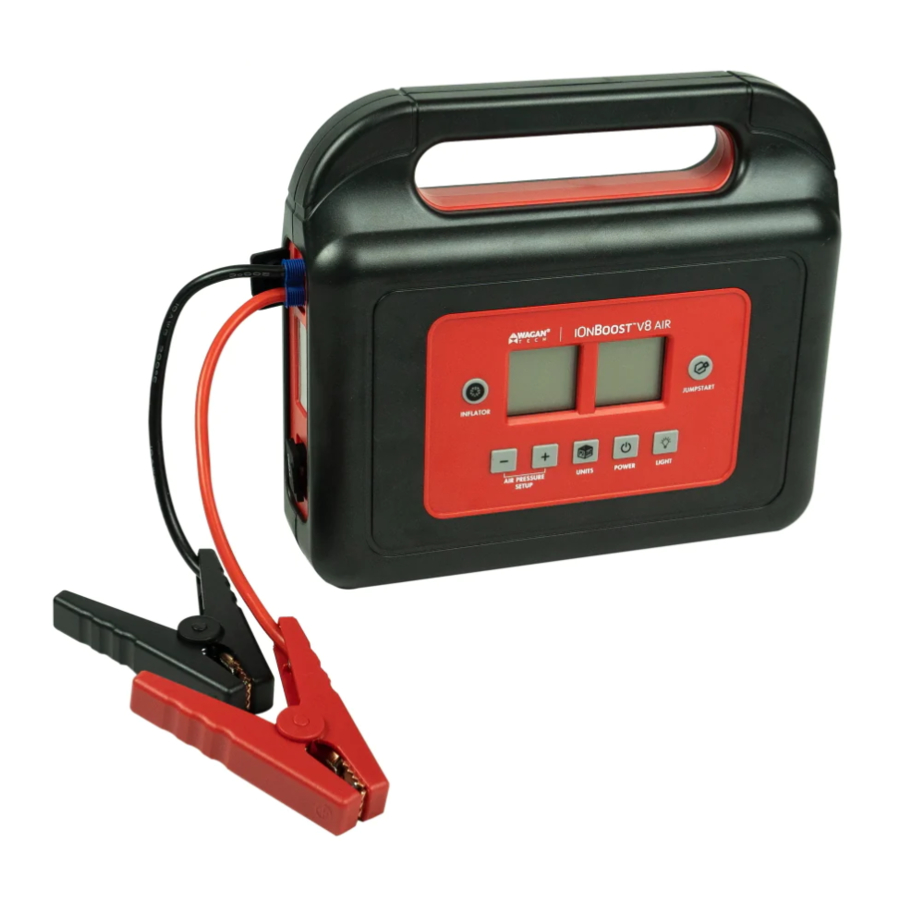
FEATURES
Jump Starter
- 600 peak Amps auto jump starter—ideal for cars, vans, SUVs, trucks, and more
- Powerful, rechargeable, 30.0 Wh Lithium-ion battery
- Pure copper booster clamps
Inflator
- High-pressure air compressor for inflating tires and sports equipment with digital pressure gauge.
USB Power Source
- USB port featuring Qualcomm Quick Charge 3.0 technology
Safety Features
- Connection protection
- Short Circuit protection
- Reverse Polarity protection
- High / Low voltage protection
- High / Low temp protection
Other Features
- LCD display featuring battery status, air pressure, warning lights, and more.
- LED flashlight: solid, strobe, and SOS
SPECIFICATIONS
| Battery type | Lithium-ion |
| Battery capacity (watt-hours) | 30.0 Wh |
| Peak amps | 600 A |
| Cranking amps | 300 A |
| Jumper cables | 10 AWG |
| Inflator | 120 psi |
| USB Output | Qualcomm Quick Charge 3.0 (1) 5V/3A, 9V/2A, 12V/1.5A |
| Flashlight | LED with 3 lighting modes |
| Operating temperatures | 32°F–113°F |
| Storage temperatures | -22°F–140°F |
| Input | 5V, 2.0A |
| Recharging time | 5 hours |
CARE & MAINTENANCE
This unit may be stored in any position. Make sure the clamps are secure inside the booster cable storage covers and store at room temperature. If the iOnBoost is not used for a prolonged period of time, recharge every 6 months.
PRODUCT DIAGRAM

CHARGING THE DEVICE
This product may arrive partially charged from the manufacturer It is recommended to fully charge the unit immediately after purchase and before using for the first time Prior to charging the unit, read and understand all instructions in this manual
In order to prolong the life of the iOnBoost, be sure to fully recharge the unit after each use and every 6 months even if the iOnBoost has not been used.
- Insert USB-C end of the cable into the USB-C input charge port in the jumpstarter.
- Insert the USB end of the cable into a USB charger.
- The Recharge Indicator icon on the LCD display will blink when the power is connected.
- Jumpstarter is fully charged when the Recharge Indicator icon stops blinking.
Jumpstarter or inflator will not function when the unit is charging.
 Do not charge in temperatures below 32°F.
JUMPSTARTER
Read the instructions before using the iOnBoost!
JUMPSTART WARNINGS
Failure to follow these instructions may cause damage or explosion
NOTE: Cranking an engine produces an accumulation of explosive gas above and near the vehicle battery. Before any attempt to jumpstart a vehicle battery, make sure explosive gas is dispelled from the area. Use a cardboard or newspaper fan to wave the gases away from the battery for a few minutes. Do not use a plastic or metal sheet—they can produce sparks and ignite the gas.
- Jumpstart cables connected to iOnBoost are live when the Jumpstart Connection button is activated. Never allow the clamps to touch together or contact the same piece of metal.
- Do not attempt to jumpstart your vehicle when iOnBoost is below 50% charge (observe the Battery Percentage on the LCD display).
- Only use this jumpstarter with 12 Volt negative–grounded systems. Most US vehicles have negative (−) battery terminals connected to the vehicle frame. (Negative – Ground). Check the negative battery terminal connecting wire to make sure it also connects to the frame.
- Make sure the jumpstarter clamps get connected to correct polarity (red to positive battery terminal, black to vehicle frame for negative ground systems when jumpstarting).
- Use safety glasses to protect eyes while jumpstarting a battery.
- If the engine fails to start after two 3-second cranking attempts, discontinue jumpstart procedure. Excessive engine cranking can damage the vehicle's starter motor. Look for other problems that may need to be corrected or call for professional service.
- Disconnecting cable clamps is always done in reverse order from connection sequence (see Jumpstart Procedure below).
- Vehicles equipped with on-board computers may be affected if the engine battery is jumpstarted. Read your vehicle owner's manual before attempting to start the vehicle to determine if external starting assistance can be used.
Jumpstart Procedure

- Turn off the vehicle ignition and all accessories (radios, lights, air conditioners), and disconnect electronic devices.
- Set the emergency brake and put vehicles with automatic transmission in park position.
- Determine the polarity of the vehicle's battery terminals. The positive (POS, P, +) battery terminal usually is red and the negative (NEG, N, −) terminal is usually black. If you are unsure, first refer to the vehicle owner's manual. Make sure the negative battery terminal is also connected to the vehicle frame.
- Press and hold the Power Button for 3 seconds to turn on the jumpstarter.
- Make sure the battery level is over 50% on the iOnBoost.
- Press the Jumpstart button on the iOnBoost. The Connect Clamps indicator will flash indicating it is okay to connect the clamps to the iOnBoost.
- Insert the blue plug of the jumper cables into the Jumpstarter Cable port.
![warning]() Be sure the plug is fully inserted Use only the jumpstarting clamps provided in this package. Unauthorized parts may cause serious damage or injury
Be sure the plug is fully inserted Use only the jumpstarting clamps provided in this package. Unauthorized parts may cause serious damage or injury - Securely connect the positive (+) red clamp to the positive (POS, P, +) terminal of the vehicle battery or the remote positive (+) terminal if equipped.
- Securely connect the negative (−) black clamp to a non-moving, metal part of the engine or frame as far away from the vehicle battery as possible.
- After the clamps are correctly connected, the Ready Indicator will appear on the LCD display.
- Place unit on a secure surface away from moving parts.
- Start vehicle engine. Stop if the vehicle does not start after 3 to 4 seconds of engine cranking. Wait 3 to 4 minutes, then try again. If engine does not start after second attempt, discontinue cranking and consult a professional.
- When finished, disconnect the clamps in reverse sequence of connecting procedure— first disconnect negative (black), then positive (red) clamps. Do not let the clamps touch each other.
- Disconnect the jumper cable assembly from the unit.
- When convenient, completely charge the iOnBoost battery.
- Store the unit and charge adapters in a cool, dry environment, away from flammable materials. Remember to fully charge the unit every 6 months.
Brief Recap of Sequences for Connection and Disconnection
ORDER OF CONNECTION
- Connect cables to iOnBoost.
![]()
- Connect positive (red) clamp to positive battery terminal.
![]()
- Connect negative (black) clamp to solid metal ground on engine or frame, away from battery).
![]()


ORDER OF DISCONNECTION
- Disconnect negative (black) clamp from frame.
![]()
- Disconnect positive (red) clamp from positive battery terminal.
![]()
- Disconnect cables from iOnBoost.
![]()


TROUBLESHOOTING
| Code | Cause | Solution |
F1 | Internal Failure | Do not use |
F2 | Internal Failure | Do not use |
F3 | Temperature to low to charge | Charge unit in warmer place |
F4 | Internal Failure | Check that adapter is >5V 1A. If not, use a different charge adapter. If the adapter is already >5V 1A, do not use. |
INFLATOR

- Connect the valve connector to the valve stem of the tire.
- Press and hold the Power Button for 3 seconds.
- Press the Air Pressure Unit Button to toggle between Bar, KG/cm2 and PSI.
- If desired, set the pre-set tire pressure function with the "+" and "-" Air Pressure Setup Buttons.
- Press the Inflator button to start air flow.
- If not using the pre-set tire pressure function, press the Inflator Button a second time to turn the inflator off once the desired pressure is reached.
- If using the pre-set tire pressure function, the inflator will stop automatically once the set pressure is reached.
- Remove valve connector from valve stem.
Allow the unit to cool for 15 minutes after each 10 minutes of use.
USING THE USB PORT
- Press and hold the Power Button for 3 seconds.
- Connect the device to be charged to the USB output port.
- Output charge will automatically shut off after charging is complete.
LED FLASHLIGHT
- Press and hold the Power Button for 3 seconds.
- Click the Flashlight button for the following modes:
1 click: Steady light
2 clicks: Flashing light
3 clicks: SOS pattern
4 clicks: OFF
GENERAL WARNINGS
- This appliance is NOT intended for use by persons with reduced physical, sensory, or mental capabilities.
- Children or persons lacking in experience and knowledge also should NOT operate this appliance unless he/she has been given supervision or instruction concerning the proper usage and warnings of the appliance by a person responsible for their safety.
- For proper and safe operation of any accessory outlet, do not place anything in it except the plug of the accessory to be used.
- Use only the charging adapters and jumpstarting clamps provided in this package. Unauthorized parts may cause serious damage or injury.
- Wear complete eye and clothing protection when jumpstarting a vehicle. Do not touch eyes while working with battery.
![]()
Remove metal jewelry, such as rings, bracelets, necklaces, and watches while working with a vehicle battery. These items can produce a short-circuit that may cause severe burns.- Do not operate this unit in or around water. Exposure to excessive moisture will damage the unit.
![burn hazard]()
![shock hazard]()
Dropping, hitting, or otherwise applying excessive amounts of force to the iOnBoost may damage the unit. This could result in loss of operation, electrical fire, or other undesired outcome.


Documents / Resources
References
Download manual
Here you can download full pdf version of manual, it may contain additional safety instructions, warranty information, FCC rules, etc.
Download WAGAN Tech iOnBoost V8 Air, 7526 - LITHIUM JUMP STARTER & INFLATOR Manual
Advertisement


Need help?
Do you have a question about the iOnBoost V8 Air and is the answer not in the manual?
Questions and answers