WAGAN Tech iOnBoost V10, 7506 - LITHIUM JUMP STARTER & POWER BANK Manual
- User manual (36 pages)
Advertisement
IMPORTANT INFORMATION
![shock hazard]()
![burn hazard]()
Before using this unit, read and understand all instructions included in this manual also those published by your vehicle's battery manufacturer and the manual of any other device intended to be used with this unit. Failure to follow all listed instructions may result in electric shock, fire, and/or serious personal injury.- Make sure the iOnBoost is fully charged before first use.


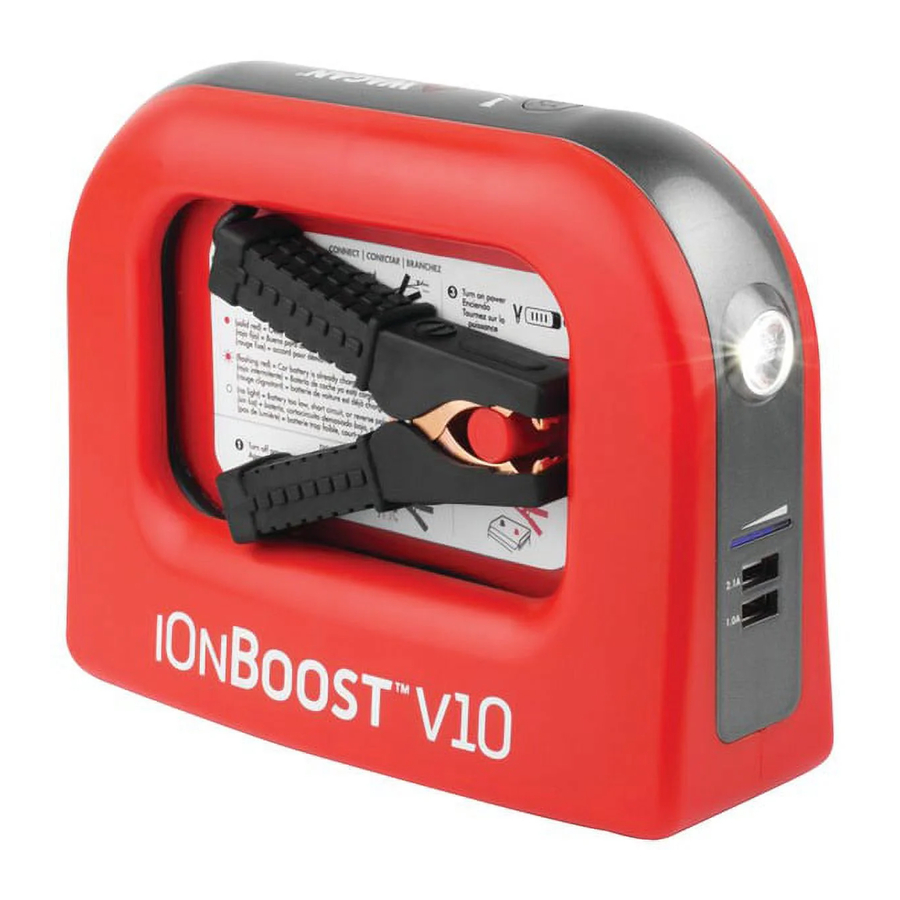
FEATURES
Jump Starter
- 700 peak Amps auto jump starter—ideal for cars, vans, SUVs, trucks, and more
- Powerful, rechargeable, 50.0 Wh Lithium-ion Polymer battery
- Heavy duty booster clamps
USB Power Source
- Two USB power ports with 2.1 Amp shared output to power and recharge most USB devices such as tablets/e-readers, mobile phones, and more
DC Power Source
- 12V DC power socket for automotive and travel accessories
Safety Features
- Reverse polarity protection
- Short-circuit protection
- Over-discharging protection
- Reverse charging protection
- Overload protection
Other Features
- LED flashlight: solid, SOS (Morse code), and flashing
- Battery status indicators
SPECIFICATIONS
| Battery type | Lithium-ion Polymer |
| Battery capacity (watt-hours) | 50.0 Wh |
| Peak amps | 700 A |
| Cranking amps | 400 A |
| Jumper cables | 8 AWG, 16-inch |
| DC Socket | 12V |
| USB power ports | 5V, (1 @ 2.1A and 1 @ 1.0A) |
| Flashlight | LED with 3 lighting modes |
| Operating temperatures | 32°F–140°F |
| Storage temperatures | 0°F–185°F |
| Input | 14V, 1.0A |
| Recharging time (AC) | 3–5 hours |
| Recharging time (DC—with engine running) | 5–6 hours |
CARE & MAINTENANCE
This unit may be stored in any position. Make sure the clamps are securely connected to the booster cable storage posts. Store at room temperature. If the iOnBoost is not used for a prolonged period of time, recharge every 3 months.
PRODUCT DIAGRAM


- Battery status (
![]() )/LED flashlight (
)/LED flashlight ( ![]() ) button
) button - LED flashlight
- iOnBoost battery status indicator
- USB ports
- Jumpstarter status light
- Jumpstarter reset button
- Jumpstarter power switch
- Charging adapter input port
- 12V DC socket
 )/LED flashlight (
  ) button
CHARGING THE DEVICE
This product may arrive partially charged from the manufacturer It is recommended to fully charge the unit immediately after purchase and before using for the first time Prior to charging the unit, read and understand all instructions in this manual
In order to prolong the life of the iOnBoost, be sure to fully recharge the unit after each use and every 3 months even if the iOnBoost has not been used.
Warning
- Only use the charging adapters supplied with this unit!
![shock hazard]() Do not charge the unit on a boat, boat ramp, or dock since the electrical cords and outlets used for charging could cause severe electrical shock if they get wet.
Do not charge the unit on a boat, boat ramp, or dock since the electrical cords and outlets used for charging could cause severe electrical shock if they get wet.
AC Charging
- Make sure jumpstarter power switch is in the "
![]() " position.
" position. - Insert AC charging adapter into charge adapter input port.
- Plug the other end of AC charging adapter into a wall socket. The blue battery status indicator lights will be illuminated while the unit is charging.
- Fully charge the unit (average 3-5 hours continuously between uses). Charging is complete when all battery status indicator lights illuminate solid.
- When charging is complete, unplug the AC charging adapter from the wall socket first, then from the charging port on the unit.
- The battery status can be checked by tapping on the
![]() button once.
button once. - Store the unit and charging adapters in a cool, dry environment, away from flammable materials. Remember to fully charge the unit every 3 months.
DC Charging in Your Vehicle
Engine must be operating while charging the iOnBoost
- Make sure jumpstarter power switch is in the "
![]() " position.
" position. - Turn the vehicle engine on.
- Insert the DC charging adapter into the charging port of the unit.
- Plug the other end of DC charging adapter into vehicle's cigarette lighter (DC) or accessory socket. The blue battery status indicator lights will be illuminated while the unit is charging.
- Fully charge the unit (around 5-6 hours continuous). Engine must be operating during entire charge. Charging is complete when all battery status indicator lights illuminate solid.
- When charging is completed, unplug the DC charging adapter from the vehicle first, then from the charging port on the unit.
- The battery status can be checked by tapping on the
![]() button once.
button once. - Store the unit and charging adapters in a cool, dry environment, away from flammable materials. Remember to fully charge the unit every 3 months.
JUMPSTARTER
Jumpstart Warnings
Failure to follow these instructions may cause damage or explosion
NOTE: Cranking an engine produces an accumulation of explosive gas above and near the vehicle battery. Before any attempt to jumpstart a vehicle battery, make sure explosive gas is dispelled from the area. Use a cardboard or newspaper fan to wave the gases away from the battery for a few minutes. Do not use plastic or metal sheet—they can produce sparks and ignite the gas.
- Wear complete eye and clothing protection when jumpstarting a vehicle. Do not touch eyes while working with battery.
![]()
Remove metal, personal jewelry, such as rings, bracelets, necklaces, and watches while working with a vehicle battery. These items can produce a short-circuit that may cause severe burns. Never allow the clamps to touch together or contact the same piece of metal.- Use only the charging adapters and jumpstarting clamps provided in this package. Unauthorized parts may cause serious damage or injury.
- Only use this jumpstarter with 12 Volt negative – grounded systems. Most US vehicles have negative (–) battery terminals connected to the vehicle frame. (Negative – Ground). Check the negative battery terminal connecting wire to make sure it also connects to the frame.
- Vehicles equipped with on-board computers may be affected if the engine battery is jumpstarted. Read your vehicle owner's manual before attempting to start the vehicle to determine if external starting assistance can be used.
- Do not attempt to jumpstart your vehicle when iOnBoost is below 20% charge (observe battery status indicator lights on the unit).
- Make sure the jumpstarter clamps get connected to correct polarity (red to positive battery terminal, black to vehicle frame for negative ground systems) when jumpstarting.
- If the engine fails to start after two 3-second cranking attempts, discontinue jumpstart procedure. Excessive engine cranking can damage the vehicle's starter motor. Look for other problems that may need to be corrected or call for professional service.
- If the iOnBoost is overloaded while in the jumpstart mode, quickly disconnect the negative then positive clamps. All functions on the iOnBoost will not operate if the unit was overloaded. To recover from overload, let the unit rest for 10 minutes then press the
![]() button to reset the unit. All functions on the iOnBoost will not operate until this is done.
button to reset the unit. All functions on the iOnBoost will not operate until this is done. - Disconnecting cable clamps is always done in reverse order from connection sequence (see Jumpstart Procedure below).
Brief Recap of Sequences for Connection and Disconnection
ORDER OF CONNECTION
- Connect positive (red) clamp to positive battery terminal.
![]()
- Connect negative (black) clamp to solid metal ground on engine or frame, away from battery).
![]()


ORDER OF DISCONNECTION
- Disconnect negative (black) clamp from frame.
![]()
- Disconnect positive (red) clamp from positive battery terminal.
![]()


READ THE REMAINDER OF THE INSTRUCTIONS BEFORE USING THE IONBOOST!
Jumpstart Procedure
- Make sure iOnBoost is fully charged.
- Turn off the vehicle ignition and all accessories (radios, lights, air conditioners), and disconnect electronic devices.
- Set the emergency brake and put vehicles with automatic transmission in park position.
- Determine the polarity of the vehicle's battery terminals. The positive (POS, P, +) battery terminal usually is red and larger in diameter than the negative (NEG, N, −) terminal. If you are unsure, first refer to the vehicle owner's manual. Make sure the negative battery terminal is also connected to the vehicle frame.
- If engine was recently cranked, use a non-conductive material (cardboard or a folded newspaper) to wave away (dispel) explosive gases. Do this for a few minutes before any vehicle connections.
- Remove the jumpstarter clamps from the storage posts.
![shock hazard]() Never allow clamps (positive & negative terminals) to touch together or contact the same piece of metal to prevent short-circuits and arcing
Never allow clamps (positive & negative terminals) to touch together or contact the same piece of metal to prevent short-circuits and arcing - Securely connect the positive (+) red clamp to the positive (POS, P, +) terminal of the vehicle battery or the remote positive (+) terminal if equipped.
- Securely connect the negative (−) black clamp to a non-moving, metal part of the engine or frame as far away from the vehicle battery as possible.
- Turn jumpstarter power switch to the
![]() position.
position. - When the clamps are properly connected to the battery, the status light will illuminate a steady red. It may take a few seconds after connection for the red light to illuminate. When the light illuminates steady red, it is safe to proceed in these instructions. If the status light fails to illuminate steady red, consult the troubleshooting section of this manual.
- Place unit on a secure surface away from moving parts.
- Start vehicle engine. Stop if the vehicle does not start after 3 to 4 seconds of engine cranking. Wait 3 to 4 minutes, then try again. If engine does not start after second attempt, discontinue cranking and consult a professional.
- The internal safety timer will automatically disconnect the circuit after 1 minute to prevent the vehicle battery from reverse charging the unit. If your vehicle still has not started, disconnect the cables and try the procedure again.
- When finished, switch the jumpstart power switch to the "
![]() " position. Disconnect the clamps in reverse sequence of connecting procedure—first disconnect negative (black), then positive (red) clamps. Do not let the clamps touch each other.
" position. Disconnect the clamps in reverse sequence of connecting procedure—first disconnect negative (black), then positive (red) clamps. Do not let the clamps touch each other. - When convenient, using either AC or DC charging adapter, completely charge the iOnBoost battery.
- Store the unit and charge adapters in a cool, dry environment, away from flammable materials. Remember to fully charge the unit every three months.
Bypass Mode
It is possible to override the safety circuit in the iOnBoost V10 if your battery voltage is over 11V or below 2V.

Extreme caution should be taken when using this mode. Bypassing the safety circuit exposes the user and the unit to potentially hazardous conditions that could result in sparks, fire or even bodily harm if proper precautions aren't taken.
- Disconnect cables
- Turn on the jumpstart switch
- Press and hold the override button above the switch. Hold for about 3 seconds and then you will hear a click and see the light come on.
- Connect the cables taking extra caution to connect the cables with the right polarity
- Start the car. The internal safety timer will automatically disconnect the circuit after 1 minute. If your vehicle still has not started, disconnect the cables and try the procedure again.
TROUBLESHOOTING
Jumpstart Warning Lights
The iOnBoost is ready to jumpstart when the jumpstart power switch is on and a steady red status light illuminates. The following chart displays the combinations of warning lights that occur when the iOnBoost fails to display the ready light:
| Warning lights | Type of warning | Solution |
Flashing red light | Car battery is already charged | Call mechanic. Dead battery is not the reason your car won't start. |
No light | Battery too low, short-circuit, or reverse-polarity | Disconnect iOnBoost immediately. Press  button and follow connection procedure again. button and follow connection procedure again. |
USING THE DC POWER SOCKET
For proper and safe operation of the DC power socket, do not place anything into it except the plug of the accessory to be used.
Overloading the port may result in "tripping" a self-resetting circuit breaker. Removing the overload automatically restores power to the DC socket.
- Insert DC plug of the accessory you wish to use. Power will be automatically supplied.
- Do not use jumpstart feature while DC socket is in use.
- Recharge the iOnBoost as soon as convenient.
USING THE USB SOCKETS
If the charge in the iOnBoost is low, the USB ports will shut off to prevent damage to the iOnBoost.
- Insert USB plug of the device you wish to charge.
- Tap the
![]() button.
button. - Do not use jumpstart feature while either USB socket is in use.
- Recharge the iOnBoost as soon as convenient.
LED FLASHLIGHT
The light will automatically shut off before the iOnBoost runs out of power.
- Hold down the
![]() button until the flashlight turns on (~3 seconds).
button until the flashlight turns on (~3 seconds). - Press once to switch lighting modes: steady – flashing – SOS – off.
- Recharge battery as soon as convenient.
GENERAL WARNINGS
- This appliance is NOT intended for use by persons with reduced physical, sensory, or mental capabilities.
- Children or persons lacking in experience and knowledge also should NOT operate this appliance unless he/she has been given supervision or instruction concerning the proper usage and warnings of the appliance by a person responsible for their safety.
- For proper and safe operation of any accessory outlet, do not place anything in it except the plug of the accessory to be used.
- Do not operate this unit in or around water. Exposure to excessive moisture will damage the unit.
![burn hazard]()
![shock hazard]()
Dropping, hitting, or otherwise applying excessive amounts of force to the iOnBoost may damage the unit. This could result in loss of operation, electrical fire, or other undesired outcome.

Documents / Resources
References
Download manual
Here you can download full pdf version of manual, it may contain additional safety instructions, warranty information, FCC rules, etc.
Download WAGAN Tech iOnBoost V10, 7506 - LITHIUM JUMP STARTER & POWER BANK Manual
Advertisement


Need help?
Do you have a question about the iOnBoost V10 and is the answer not in the manual?
Questions and answers