Woods 59018, 59028 - 7 Day Digital Timer Manual
- Instruction manual (2 pages) ,
- Installation instructions (2 pages) ,
- Instruction manual (2 pages)
Advertisement

INSTALLATION SHOULD BE MADE BY A LICENSED ELECTRICIAN.
Installation Procedure

- Turn the power OFF at the circuit breaker or remove the fuse.
- Remove existing wall plate and switch if applicable.
- Ensure NEUTRAL (WHITE) wire is present in the junction box. If this wire is not present, additional wiring will be necessary before installation can be completed.
- Strip 3/8" insulation from each wire, which is required for installation.
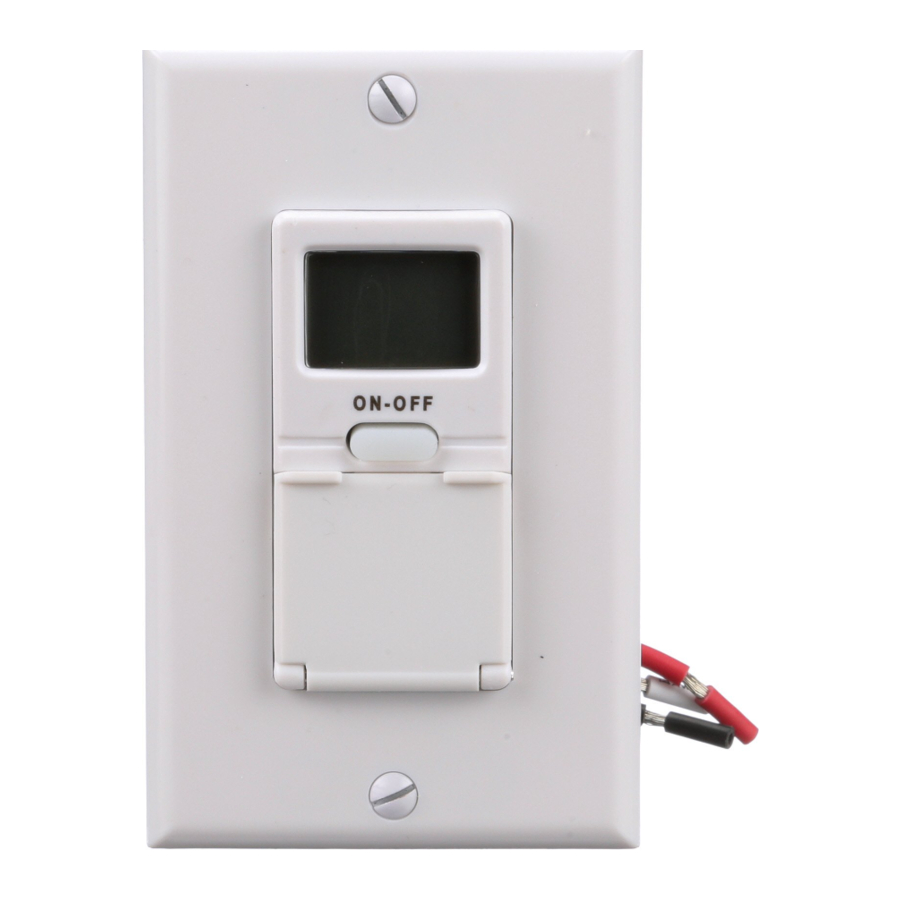
- Connect the WHITE wire from the TIMER to the WHITE wire(s) in the junction box. Secure connection using the wire connector (splice wire if necessary) included in the package.
- Connect the BLACK wire from the TIMER to the BLACK (HOT) wire (previously connected to the switch) and connect the RED wire from the TIMER to the second BLACK wire (previously connected to the switch).
NOTE: If not sure which BLACK wire is (HOT), connect as described in step six. If the screen is blank after the power is turned on, reverse the BLACK wires. - Connect GROUND (GREEN) wire to grounding screw in the box. If using a plastic box, cap-off wire with wire connector.
- Carefully shift all wires to provide room for TIMER in the junction box.
- Secure TIMER to box with screws included and install cover plate.
- Reconnect your electrical power.
Power-up Sequence
- Open the TIMER door on the front
- Press the "RESET"button using a toothpick.
- The display should flash 12:00 AM on Monday.
In the event that the screen is blank, check the following
- Check the 120VAC power source.
- Check the red, black, and white wires on the TIMER to make sure they are connected properly to the red, black, and white wires coming out of the electrical box.
- Check the red wire or LOAD wire connection to the TIMER.
Manual Override
Pressing the TIMER will alternate the ON or OFF.
Initial Startup
When you initially program the unit, it may be necessary to press the "MANUAL OVERRIDE" key as the unit will not look back to determine if it should be ON. For example, if the current time is 2:00 PM and you just programmed the unit to turn ON at 1 PM, you will need to press the "MANUAL OVERRIDE" key to turn it ON. Thereafter, the unit will resume normal operation (automatic).
Memory Backup
The TIMER is equipped with a rechargeable Ni-Mh battery which will protect your programs during power failure for up to 30 days. No need to replace battery.
NOTE that the screen blanks during a power failure.
Operating Procedure
Setting Current Time
- Press and HOLD the "CLOCK" key during this entire procedure.
- Press the "HOUR" key to advance the hours.
- Press the "MIN" key to advance the minutes.
- Press the "DAY" key to advance the day.
- If any keys are pressed for a prolonged period, the display will advance rapidly.
- Release the "CLOCK" key once the time and day have been entered. Now the timer is in operation and ready to be programmed. The colon ":" after the hours will continuously flash indicating that the time is advancing.
Programming ON/OFF Events
- Press the "PROG" key once. TIMER 1 ON - -: - - appears.
- Using the "HOUR" and "MIN" keys enter the desired ON time. By default all days are indicated. When complete press the "PROG" key once.
- Timer OFF - -: - - will be displayed. Using the "HOUR" and "MIN" keys enter the desired OFF time. By default all days are indicated. When complete press the "PROG" key once.
- If complete press the "CLOCK" key to return to current time and day.
- Note that a total of 7-ON and 7-OFF events can be programmed.
Block Programming
- When programming ON/OFF events, all days are indicated by default. To change the day selection simply keep pressing the "DAY" key and the display will change as follows:
- Individual Day (MON, TUE, etc.)
- MON-FRI; SAT-SUN; MON-SAT; MON-SUN
- MON-WED-FRI; TUE-THU-SAT
- MON-WED; THU-SAT
- Follow the steps above to complete programming.
Review Programs
- To review the programs that have been entered simply press and release the "PROG" key. Each time you do this you will be able to scroll thru the programs.
- Any program can be edited simply by pressing the "HOUR", "MIN" and "DAY" keys. Then press "PROG" key in order to accept the changes.
- When complete, press the "CLOCK" key to return to current time and day.
Deleting Programs
- To delete a particular program simply press the "PROG" key until the desired program is displayed.
- Then press and hold the "MODE" button. Then press the "PROG" key in order to delete this particular program.
- When complete, press the "CLOCK"key to return to current time and day.
Operating the Time Switch
- Press the "MODE" button repeatedly to set the timer to Automatic, Random or Manual mode.
Note: For the time switch to run programmed events, it must be set to "AUTO" mode.- AUTO - runs all events automatically, according to the schedule you have set. The word "AUTO" appears in the display.
- RND (RANDOM) - runs all events in a RANDOM mode. This is a security feature in which ON and OFF times randomly differ +/- 15 minutes from the programmed times, creating a more "lived-in" look. The "RDM" appears in the display.
Note: DO NOT set the ON/OFF events within 30 minutes of less from one another if you are going to use this timer in RANDOM MODE. The RANDOM MODE is +/- 15 minutes of programmed times and may overlap one another, causing the timer to possibly not work as desired. - MANUAL - turns ON and OFF only when the user presses the "ON" or "OFF" button. The display is blank, showing neither "RDM" or "AUTO".
Electrical Ratings
125V / 601-lz
15A / 1875W Resistive (general purpose)
8A / 1000W Tungsten (lighting)
8A Standard Ballast Load
1/4 HP

Documents / ResourcesDownload manual
Here you can download full pdf version of manual, it may contain additional safety instructions, warranty information, FCC rules, etc.
Advertisement


Need help?
Do you have a question about the 59018 and is the answer not in the manual?
Questions and answers