
Related Manuals for FRP DB003


Summary of Contents for FRP DB003
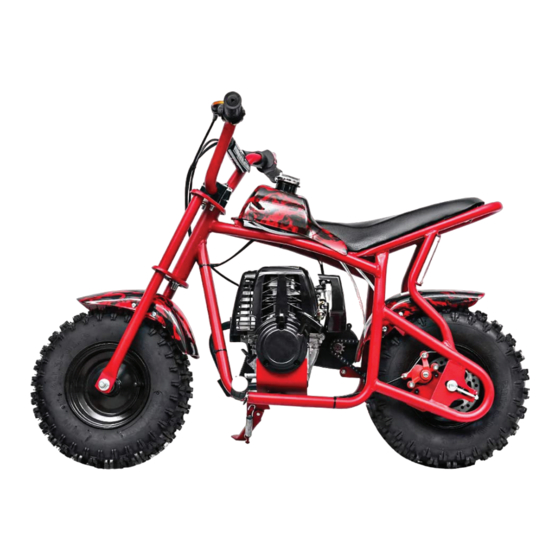
- Page 1 DB003 Off Road Dirt Bike User Manual Digital User Manual www.frptoys.com csr@frptoys.com 833-970-3777 (Toll Free) M-F 8am-5pm PST...
- Page 3 CAUTION SAFE FOR USE Δ This mark notices a very important item for safety. Be sure to observe the notice. 1. Engine oil: Gasoline (1:50) is mixed in the oil tank. More than 92 gasoline or gasoline with 10% ethanol are applicable on this vehicle.
- Page 4 CAUTION PROHIBITED ITEMS Δ Do not allow anyone who does not Δ Do not aimlessly adjust the revolution understand this instruction manual to speed setting of the engine. operate the bike. Δ Do not check any spark while keeping Δ Racing should use a mixture of the spark plug removed.
- Page 5 IMPORTANT Please read before using this product. READ THIS FIRST! WARNING SAFETY This product does not conform Persons without excellent vision, to Federal Motor Vehicle balance, coordination, reflexes, Standards and is not intended muscle and bone strength, and for operation on public streets, good decision-making capabilities should not use this roads, or highways.
- Page 6 QUICK REFERENCE SAFETY GUIDE Fuel Safety Transportation and Storage Mix and pour fuel outdoors away from Carry your motorcycle by the handlebar sparks or flames. tube with the engine off and the muffler away from your body. Only use a container approved for fuel. Allow the engine to cool, empty the fuel Do not smoke or allow smoking near the tank, and fold the motorcycle before...
-
Page 7: Table Of Contents
TABLE OF CONTENTS 1 VEHICLE INTRODUCTION 1.1 Technical Specification 1.2 Mini Parts Description 2 BEFORE STARTING 3 FAST INSTALLATION 3.1 Install Front Tire 3.1 Install Front Fender 3.2 Install Handlebar 4 PREPARING FOR USE 4.1 Before Start-up 4.2 Before Riding 4.3 Starting the Dirt Bike 5 OPERATION 5.1 Operation and Running... -
Page 8: Vehicle Introduction
VEHICLE INTRODUCTION 1.1 Technical Specification Engine type: 49.4cc 2-stroke/EPA Approved Fuel: Unleaded petrol & 2-cycle engine oil mixing Oil Mixing Ration: 50:1 Start Mode: Hand Pull Start Brake: Rear disk brake Tire: 4.10-6, off-road tire Max Load: 160 lbs(72.5kgs) Net Weight: 50 lbs(22.7kgs) Fuel Capacity: 0.26gal(1L) Driving Method: T8F Chain Packing: Carton... -
Page 9: Mini Parts Description
VEHICLE INTRODUCTION 1.1 Mini Parts Description Speed control handle Gas tank cover Kill switch Throttle cable Gasoline tank Brake bar Pull start Front fender Rear tyre Chain adjuster Engine Kickstand Caliper Front tyre... -
Page 10: Before Starting
BEFORE STARTING Please unpack the contents of the box. Remove the foam separators that are intended to safeguard the components during transportation. Thoroughly examine the contents of the box for any signs of paint scratches, dents, or cables that may have been bent during shipping. It is important to note that since the Dirt Bike is 90 percent assembled and carefully packaged at the factory, minor blemishes or dents on the box should not pose any... -
Page 11: Fast Installation
FAST INSTALLATION Install Front Wheel loosen the spacer and nut on the bearing using a 14mm and 19mm wrench. 2. Place the spacer on the inner side of the front fork, and thread the bearing through the spacer and the tire. Place the other spacer on the opposite side of the tire, and thread the bearing through it. -
Page 12: Install Handlebar
FAST INSTALLATION Install Handlebar loosen the screws on the handlebar presses, then separate the upper handlebar press from the lower handlebar press. 2. Place the lower pressure block beneath the handlebar, then insert the screws of the upper handlebar press into the screw holes of the lower handlebar press. -
Page 13: Preparing For Use
PREPARING FOR USE Before Start-up 1. Inspect equipment Check all bolts & nuts, brakes, engine, etc. 2. Refuel Use the mixture of the gasoline and the two-stroke engine oil. The volume ratio is 50:1. Use a clean and special fuel glass and grasp cap to shake for more than 30 seconds. -
Page 14: Before Riding
PREPARING FOR USE Before Riding 1. Ensure all the exposed bolts and screws are tightened. 2. Raise the kickstand to its upright position. 3. When riding for the first time, wait 3-5 minutes after pulling the pull start to allow the engine to fully warm up before riding. -
Page 15: Starting The Dirt Bike
PREPARING FOR USE Starting the Dirt Bike 1. Before starting, make sure to fill the fuel tank with the recommended fuel grade, maintaining a minimum fuel level of at least two-thirds of the tank's total capacity. 2. Depress the vent valve to release any residual air from the fuel line until no air bubbles are visible in the fuel line. -
Page 16: Operation
OPERATION Operation and Running The bike is packed in a cardboard carton. After unpacking. Very smooth and perfect function of the Bowden cable throttle and both brakes. Fill the fuel tank with fuel. (Gas-oil mix 50:1). Failure to use the proper oil mix ratio will result in Engine damage which you will be responsible for. -
Page 17: Controls
CONTROLS Braking 1. To brake, release the hand throttle and depress the hand brake levers (on the left and right side of the handlebars). 2. Gradually decrease the engine speed to idle and turn off the kill switch on the handlebar. This will turn the engine OFF. Braking System The motorcycle uses a disc/caliper braking system activated by a hand brake lever on the left and right side of the handlebar. -
Page 18: Adjustment
ADJUSTMENT Carburetor Adjustment Never start the engine without the complete clutch cover assembled! Otherwise, the clutch can come loose and cause injuries. When the engine is tested at the factory, the Carburetor is basically adjusted. Further adjustment may be required occasionally, depending on climate and altitude. -
Page 19: Chain Adjustment
ADJUSTMENT Chain Adjustment The chains will come adjusted from the factory. However, it may be necessary to adjust the sprockets from time to time. The chain must be well aligned with the sprockets otherwise they may start to rub and chafe. Which will result in a shortened chain life. How tight should the chain be? If the chain is skipping or jumping on the pulley teeth, it is too loose and may be... -
Page 20: Maintenance And Storage
MAINTENANCE AND STORAGE Maintenance Schedule Proper care of your motorcycle will ensure optimal performance and a longer life span. The following are a few maintenance suggestions that will keep your motorcycle running in top condition: Daily Maintenance: Perform each time you ride your motorcycle. Clean fuel leakage or air leakage. -
Page 21: Trouble Shooting
TROUBLE SHOOTING 1. Fail to start. 4. The gasoline engine stops suddenly when running. 1) . Gasoline mixed with water, please replace it. 1) Run out of gasoline. 2) . The spark plug has 2) The high-voltage wire drops. accumulated carbon or has been 3) The spark plug has broken through. - Page 24 Warranty BKAA GROUP CORPORATION– EMISSION CONTROL SYSTEM WARRANTY YOUR WARRANTY RIGHTS AND OBLIGATIONS The emission control system warranty period for this vehicle begins on the date the vehicle is delivered to the ultimate purchaser and each subsequent purchaser other than an authorized dealer, or the date it is first used as a demonstrator, lease, or company vehicle, whichever comes first and continues for 5,000 km or 30 months, whichever comes first, provided there has been no abuse, neglect or improper maintenance of your vehicle.
- Page 25 LIST OF EMISSION RELATED PARTS EXCLUSIONS AND LIMITATIONS This warranty does not cover the following: Failures or malfunctions of the emission control systems caused by abuse, alteration, accident, misuse, the use of leaded gasoline. Replacement of expendable maintenance items unless they are original equipment defective in material or workmanship under normal use, and the first required replacement interval for the item has not been reached.
Need help?
Do you have a question about the DB003 and is the answer not in the manual?
Questions and answers