
Related Manuals for TQC Sheen DC9000


Summary of Contents for TQC Sheen DC9000
- Page 1 Hull Roughness Gauge DC9000 IMPORTANT! Before taking this instrument in use we Operating Instructions (V4.0 1123) strongly advise you to read this manual carefully.
-
Page 3: Table Of Contents
CONTENT General Menu display information and operation 12 Importance of operating manual Main menu User-responsibility Instrument setup Responsibility of personnel 7.2.1 Setup time and Date Dangers 7.2.2 Setup acoustics Designated purpose 7.2.3 Setup display Copyright 7.2.4 HRG - Adjustable Rt() Manufacturer’s/Supplier’s address (spring 2014 models only) Memory... - Page 4 WARRANTY Industrial Physics will grant a warranty for a period of 12 months for the TQC Sheen Hull Roughness Gauge and 12 months for all related equipment from the date of delivery in respect of any evidence of faulty workmanship and materials. Should a...
-
Page 5: General
Other applications constitute manual prior to first operation of the Automatic Film improper use. TQC Sheen will not be held liable for Applicator Compact. damage resulting from improper use. -
Page 6: Safety Instructions
2 SAFETY INSTRUCTIONS 2.1 Meaning of Symbols The following symbols for dangers are used in this instruction manual. Possible immediate danger to If this guideline is not noted it can lead to severe the life or health of personnel. danger to health, up to fatal injury. Danger A dangerous situation could be Non observance of this guideline can lead to injury... -
Page 7: Transport And Storage
3 TRANSPORT AND STORAGE 3.1 Packaging • Please take note of pictorial symbols on the packaging. 3.2 User: Check on Receipt • Check Packaging for damage • After unpacking check complete supply. 3.3 Reporting Transport Damage and Documentation • Any damage should be documented as accurately as possible (possibly photographed) and reported to the relevant insurers or, in the case of sales “delivered to customers works”, to the supplier. -
Page 8: Instrument Data
4 INSTRUMENT DATA 4.1 Name / Article DC9000 TQC Sheen Hull Roughness Gauge. 4.2 Scope of Supply • TQC Sheen Hull Roughness Control unit with neck-strap • TQC Sheen Hull Roughness Sensor • TQC Sheen Hull Roughness Sensor Cable • DC9015 Calibration plate •... -
Page 9: Instrument Controls And Functions
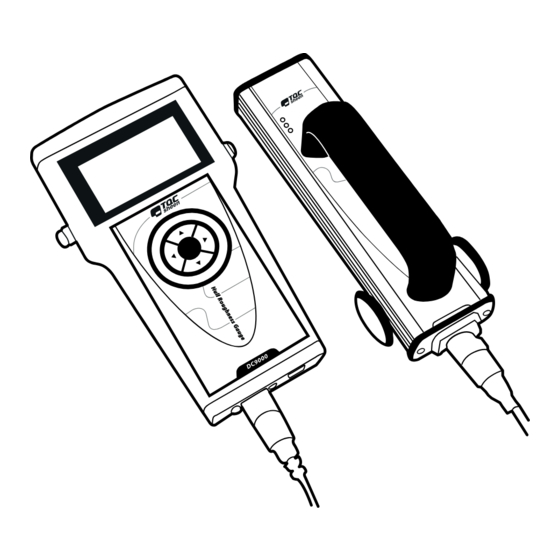
5 INSTRUMENT CONTROLS AND FUNCTIONS Hull Roughness sensor Sensor cable attachment Soft rubber non-slip wheels Status indication / warning lights Neck-strap to securely carry your gauge Hull Roughness Control unit Hull Roughness Sensor cable Illuminated LCD 4-way directional push button 10. -
Page 10: Installation And Preparations
6 INSTALLATION AND PREPARATIONS 6.2 Connect your equipment Carefully unpack the apparatus and the accessories and check complete supply. Connect the sensor and control unit with the sup- Please assemble your equipment before plied sensor cable. The direction of the cable is not Danger climbing upon scaffolds or platforms. -
Page 11: Protect Yourself And Your Equipment
6.4 Switching on your gauge A single press on the 4-way directional push button will present you with the start-up screen. You are welcomed by our TQC Sheen logo and the current firmware version is displayed. 11 |... -
Page 12: Menu Display Information And Operation
7 MENU DISPLAY INFORMATION AND OPERATION 7.1 Main menu MAIN The TQC Sheen Hull Roughness Gauge has an ad- Measure vanced menu structure. The Main Menu allows the Memory user to access all the features available. Use arrow Instrument setup... -
Page 13: Setup Acoustics
Note Your time and date settings are AutoSaved. 7.2.2 Setup acoustics SETUP-ACOUSTICS The sound level can be adjusted to your needs. Set the gauge to either: Signals off / Low volume and [ ] Signals off High volume. [ ] Low volume [√] High volume Use up- and down buttons to select the desired BACK... -
Page 14: Memory
MAIN 7.3 Memory Measure INSTRUMENT SETUP Measurements can be stored in different batches. Memory Calibrate MEMORY The Hull Roughness Gauge can store up to 8 Instrument setup Time/Date setup [ ] RENE batches that can be named individually. Power off Acoustics [√] DONALD Display... - Page 15 7.3.1.3 Send data to PC MEMORY BATCH 1 In order to process your measured data it is essential Rename to send your data to a Microsoft Windows PC with Clear Microsoft Excel installed. Before sending the data Send data to PC following precautionary measures need to be taken: BACK Connect your gauge to the PC...
-
Page 16: Accept Series
7.4.1 Accept series BATCH: BATCH1 MEASURE After each measurement the Mean Hull Roughness (MHR) of the last series and the Average Hull Rough- AHR serie: 31 ness (AHR) of all series is displayed. AHR: 31 If there are measurement errors or a need to ACCEPT BACK measure the last Hull section once again, simply... -
Page 17: Calibration
8 CALIBRATION To ensure proper measurements it is required to MAIN regularly calibrate your gauge. Measure INSTRUMENT SETUP Memory Calibrate Note For best calibration results allow your Instrument setup Time/Date setup equipment to adjust to ambient Power off Language temperature for about ten minutes. Acoustics Display BACK... -
Page 18: Calibrate Gauge
8.2 Calibrate gauge Select from menu: 1. Instrument setup 2. Calibrate 3. Calibrate gauge Position the sensor unit as displayed in the image below: 8.3 Procedure Please note that the calibration plate has 3 reference (Move the sensor unit back and points: 500 μm, 1500 μm and 2500 μm. -
Page 19: Setting Com Ports
9 SETTING COM PORTS The computer system will automatically assign a COM port number to the gauge. Please check Windows ‘Device Manager’ to learn the assigned COM port. Unfold ‘Ports (COM & LPT)’ . The gauge is recognized as: ‘USB Serial Port (COM…)’ If Windows failed to recognize the Hull Roughness Gauge and it’s not visible in Windows Device Manager disconnect and reconnect the gauge and... -
Page 20: If Com Ports 1-4 Are Currently Not Occupied
Set current COM (1-4) to 5 or higher. Subsequently repeat previous steps to move the gauge to either COM ports 1,2,3 or 4. 9.2.2 If COM ports 1-4 are currently not occupied If COM ports 1-4 are currently not in use but the Hull Roughness Gauge has an assigned COM port number of 5 or higher: - Select the Hull Roughness Gauge in ‘Device... -
Page 21: Hrg Windows Application
10 HRG WINDOWS APPLICATION 10.1 Installation The HRG application supplied on the USB thumb drive does not require any installation. Double click the HRG V1.01 file to launch the application. Your Windows installation might prompt you with a “The publisher could not be verified”... -
Page 22: Care And Maintenance
• Do not use compressed air to clean the instrument. • Generally the TQC Sheen Hull Roughness Gauge does not require any maintenance. Make sure that no paint or other liquids are spilled on the electronics or left in Warning the holes. -
Page 23: Disclaimer
12 DISCLAIMER The right of technical modifications is reserved. The information given in this manual is not intended to be exhaustive and any person using the product for any purpose other than that specifically recom- mended in this manual without first obtaining written confirmation from us as to the suitability of the product for the intended purpose does so at his own risk. - Page 24 www.industrialphysics.com | 24...
Need help?
Do you have a question about the DC9000 and is the answer not in the manual?
Questions and answers