Advertisement
Available languages
Available languages
Quick Links
INCLUDES: Wet/Dry Vac, Foam Barrier, Flexible Hose, Crevice Tool,
Cloth Filter, Operator's Manual
INCLUT : Aspirateur sec / humide, barrière en mousse, tuyau flexible,
suceur plat, filtre en tissu, manuel d'utilisation
INCLUYE: Aspiradora en seco o húmedo, barrera de espuma, manguera
flexible, boquilla rinconera, filtro de tela, manual del operador
THIS INSTRUCTION BOOKLET CONTAINS
IMPORTANT SAFETY INFORMATION. PLEASE
READ AND KEEP FOR FUTURE REFERENCE.
WARNING:
To reduce the risk of
injury, the user must read and understand the
operator's manual before using this product.
CE LIVRET D'INSTRUCTIONS CONTIENT DES
CONSIGNES DE SÉCURITÉ IMPORTANTES.
VEUILLEZ LE LIRE ET LE CONSERVER POUR
TOUTE RÉFÉRENCE FUTURE.
AVERTISSEMENT :
réduire les risques de blessures, l'utilisateur
doit lire et veiller à bien comprendre le manuel
d'utilisation avant d'employer ce produit.
HPWD33 20V
Wet/Dry Vac
Aspirateur sec / humide eau
Aspiradora en húmedo/seco
OPERATOR'S MANUAL
Important Safety Instructions
MANUEL D'UTILISATION
Instructions importantes concernment
Commande de pièces et dépannage
MANUAL DEL OPERADOR
Importantes Instrucciones
Pedidos de piezas y servicio
ESTE FOLLETO DE INSTRUCCIONES CONTIENE
INFORMACIÓN DE SEGURIDAD IMPORTANTE.
LÉALO Y CONSÉRVELO PARA REFERENCIA
FUTURA.
ADVERTENCIA:
Pour
el riesgo de lesiones, el usuario debe leer y
comprender el manual del operador antes de
usar este producto.
2-3
Symbols
4
Assembly 5
Operation 6-7
Maintenance 7-8
Illustrations
9-11
Parts/Service
Back page
2-3
la securite
Symboles
4
Assemblage 5
Utilisation 6-7
Entretien 7-8
Illustrations
9-11
Page arrière
2-3
de seguridad
Símbolos
4
Armado 5
Funcionamiento 6-7
Mantenimiento 7-8
Illustraciones
9-11
Pág. posterior
Para reducir
Advertisement

Subscribe to Our Youtube Channel
Related Manuals for HART HPWD33


Summary of Contents for HART HPWD33
- Page 1 HPWD33 20V Wet/Dry Vac Aspirateur sec / humide eau Aspiradora en húmedo/seco OPERATOR’S MANUAL Important Safety Instructions Symbols Assembly 5 Operation 6-7 Maintenance 7-8 Illustrations 9-11 Parts/Service Back page MANUEL D’UTILISATION Instructions importantes concernment la securite Symboles Assemblage 5 Utilisation 6-7...
- Page 2 IMPORTANT SAFETY INSTRUCTIONS SAVE THESE INSTRUCTIONS When using an electrical appliance, basic precautions should always be followed, including the following: Do not put any objects in ventilation openings. Do not WARNING! use with any opening blocked. Keep openings free of dust, lint, hair, and anything that may reduce air flow. READ AND UNDERSTAND ALL INSTRUCTIONS. NEVER vacuum materials that are burning or smoking, Failure to follow all instructions listed below, may result such as hot coals, cigarette butts, matches, burning or in electric shock, fire and/or serious personal injury. smoking ashes, etc. READ ALL INSTRUCTIONS BEFORE USING DO NOT use to pick up flammable or combustible liquids, such as gasoline, or use in areas where they may be THIS APPLIANCE present.
- Page 3 IMPORTANT SAFETY INSTRUCTIONS Always remove battery pack from your the appliance Check for misalignment or binding of moving parts, when you are assembling parts, making adjustments, breakage of parts, and any other condition that may cleaning, or when not in use. Removing battery pack affect the wet/dry vac’s operation.
- Page 4 SYMBOLS The following signal words and meanings are intended to explain the levels of risk associated with this product. SYMBOL SIGNAL MEANING DANGER: Indicates a hazardous situation, which, if not avoided, will result in death or serious injury. WARNING: Indicates a hazardous situation, which, if not avoided, could result in death or serious injury. CAUTION: Indicates a hazardous situation, that, if not avoided, may result in minor or moderate injury. (Without Safety Alert Symbol) Indicates information considered important, but not related NOTICE: to a potential injury (e.g. messages relating to property damage). Some of the following symbols may be used on this product. Please study them and learn their meaning. Proper interpretation of these symbols will allow you to operate the product better and safer.
- Page 5 ASSEMBLY UNPACKING WET/DRY VAC ASSEMBLY See Figures 1 - 3, page 9. This product requires assembly. Place the vacuum on a flat surface in the upright position. Carefully remove the appliance and any accessories from Unlock the locking latches and remove the lid. the box. All items listed in the Includes section must be included at the time of purchase. Remove the foam barrier, cloth filter, retention band, flexible hose, and crevice tool from the container. WARNING: To assemble the product for dry vacuuming: Items in this Assembly section are not assembled to Turn the lid on its side.
- Page 6 OPERATION STARTING/STOPPING THE WET/DRY VAC WARNING: See Figure 6, page 10. Do not allow familiarity with this product to make you careless. Remember that a careless fraction of a second WARNING: is sufficient to inflict serious injury. To reduce the risk of fire or explosion, do not leave the WARNING: product running while unattended. Immediately stop the unit if it shows signs of abnormal operation such as Always remove battery pack from the tool when you loss of suction, liquid or debris in the exhaust, or any are assembling parts, making adjustments, cleaning, abnormal motor noises.
- Page 7 OPERATION Turn off the wet/dry vac and remove the battery pack. float is designed to shut off the suction when the collection container reaches full wet capacity. When the collection Remove the hose from the vacuum port. container is full, turn the wet/dry vac OFF and empty the Remove any nozzles from the hose if attached. collection container as shown in Maintenance. Push the tapered end of the flexible hose into the blower port to use as a blower. WARNING: To remove the flexible hose, pull the tapered end of the When vacuuming liquid, make sure the canister vac does flexible hose from the blower port. not get submerged or doused in liquid, which could To keep from scattering debris, blow around the outer edges cause shock, vacuum failure, or personal injury.
- Page 8 MAINTENANCE Liquid waste: CAUTION: Remove the battery pack. Do not turn unit upside down, as liquid may enter the Unlock the locking latches and remove the lid. motor unit. Remove the retention band and foam barrier. STORAGE Inspect, clean, or replace items as needed. Clean all foreign material from the wet/dry vac. Empty the collection container; wash out if necessary. Clean the outside of the collection container with warm Before replacing the lid, make sure all pieces are water and mild soap. completely dry. Empty and clean the collection container, flexible hose, Replace lid and lock securely. nozzles, and attachments with warm water and mild soap and allow to completely dry before storage.
- Page 9 INSTRUCTIONS IMPORTANTES CONCERNANT LA SÉCURITÉ CONSERVER CES INSTRUCTIONS L’utilisation d’un appareil électrique demande d’observer en tout temps des précautions élémentaires, dont celles-ci : AVERTISSEMENT ! que les ouvertures ne soient jamais obstruées par de la poussière, de la peluche, des cheveux ou quoi que ce soit risquant de réduire le flux d’air.
- Page 10 AVERTISSEMENTS DE SÉCURITÉ GÉNÉRALES RELATIVES AUX OUTILS ÉLECTRIQUES Toujours retirer le bloc-piles de l‘appareil électrique Vérifier qu’aucune pièce mobile n’est mal alignée ou au moment d’assembler des pièces, d’effectuer des bloquée, qu’aucune pièce n’est brisée et s’assurer réglages et de procéder au nettoyage, ou lorsque qu’aucun autre problème ne risque d’affecter le bon l’outil n’est pas utilisé.
- Page 11 SYMBOLES Les termes de mise en garde suivants et leur signification ont pour but d’expliquer le degré de risques associé à l’utilisation de ce produit. SYMBOLE SIGNAL MEANING Indique une situation dangereuse qui, si elle n’est pas évitée, aura pour conséquences DANGER : des blessures graves ou mortelles.
- Page 12 ASSEMBLAGE DÉBALLAGE ASSEMBLAGE DE L’ASPIRATEUR SEC /HUMIDE Voir les figures 1 à 3, page 9. Ce produit nécessite un assemblage. Placer l’aspirateur debout sur une surface plate. Avec précaution, sortir l’appareil et les accessoires de la boîte. Tous les articles énumérés sous Inclut doivent se ...
- Page 13 UTILISATION INSTALLATION/RETRAIT DU BLOC-PILES AVERTISSEMENT : Voir la figure 5, page 10. Ne pas laisser la familiarité avec l’outil faire oublier la Positionnez le commutateur MARCHE/ARRÊT en position prudence. Ne pas oublier qu’une fraction de seconde ARRÊT. d’inattention peut entraîner des blessures graves. ...
- Page 14 UTILISATION UTILISER L’ASPIRATEUR SEC/HUMIDE ATTENTION : COMME SOUFFLEUR Dans des conditions d’humidité relativement faibles, Voir les figures 10 et 11, page 9. l’aspiration de débris très fins peut causer une charge En tout temps, l’aspirateur sec/humide souffle de l’air par statique entraînant une décharge statique.
- Page 15 ENTRETIEN RANGEMENT Avant de remettre le couvercle, assurez-vous que toutes les pièces sont complètement sèches. Nettoyez l’aspirateur sec/humide de tous les corps Remettez le couvercle et verrouillez-le bien. étrangers. Les déchets liquides : Nettoyez l’extérieur du récipient de collecte avec de l’eau tiède et un savon doux.
- Page 16 IMPORTANTES INSTRUCCIONES DE SEGURIDAD GUARDE ESTAS INSTRUCCIONES Al utilizar un aparato eléctrico, deben seguirse ciertas precauciones básicas, como las siguientes: ¡ADVERTENCIA! No ponga ningún objeto en las aberturas de ventilación. No use la unidad con ninguna abertura bloqueada. Mantenga las aberturas libres de polvo, pelusa, pelo y LEA Y COMPRENDA TODAS LAS INSTRUCCIONES.
- Page 17 IMPORTANTES INSTRUCCIONES DE SEGURIDAD Siempre retire el paquete de baterías de la aparato Revise para ver si hay desalineación o atoramiento eléctrico cuando esté ensamblando partes, realizando de piezas móviles, ruptura de piezas o toda otra ajustes, limpiando o cuando ésta no esté en uso. condición que pueda afectar el funcionamiento de el Si retira el paquete de baterías, evitará...
- Page 18 SÍMBOLOS Las siguientes palabras de señalización y sus significados tienen el objeto de explicar los niveles de riesgo relacionados con este producto. SÍMBOLO SEÑAL SIGNIFICADO PELIGRO: Indica una situación peligrosa, la cual, si no se evita, causará la muerte o lesiones serias. Indica una situación peligrosa, la cual, si no se evita, podría causar la muerte o lesiones ADVERTENCIA: serias.
- Page 19 ARMADO DESEMPAQUETADO MONTAJE DE LA ASPIRADORA EN SECO O HÚMEDO Vea las figuras 1 a 3, página 9. Este producto requiere armarse. Coloque la aspiradora sobre una superficie plana en Extraiga cuidadosamente de la caja el aparato y los posición vertical.
- Page 20 FUNCIONAMIENTO Asegúrese de que el pestillo del paquete de bateríass ADVERTENCIA: entre a presión en su lugar, y de que el paquete quede No permita que su familarización con las herramientas lo bien asegurado en el taladro antes de empezar a utilizar vuelva descuidado.
- Page 21 FUNCIONAMIENTO CÓMO USAR LA ASPIRADORA EN SECO/ PRECAUCIÓN: HÚMEDO COMO SOPLADOR En condiciones de humedad relativa baja, el aspirado Vea las figuras 10 y 11, página 10. de polvo fino con la aspiradora en seco o húmedo puede causar una carga estática, que resultará en una En todo momento, la aspiradora en seco/húmedo sopla descarga estática.
- Page 22 MANTENIMIENTO Vacíe el contenedor de recolección; lávelo de ser PRECAUCIÓN: necesario. No invierta la unidad, ya que puede ingresar líquido en Vuelva a colocar la barrera de espuma, el anillo de la unidad del motor. retención, y el filtro de tela. ALMACENAMIENTO Antes de volver a colocar la tapa, asegúrese de que todas las piezas estén completamente secas.
- Page 23 NOTES / NOTAS...
- Page 24 NOTES / NOTAS...
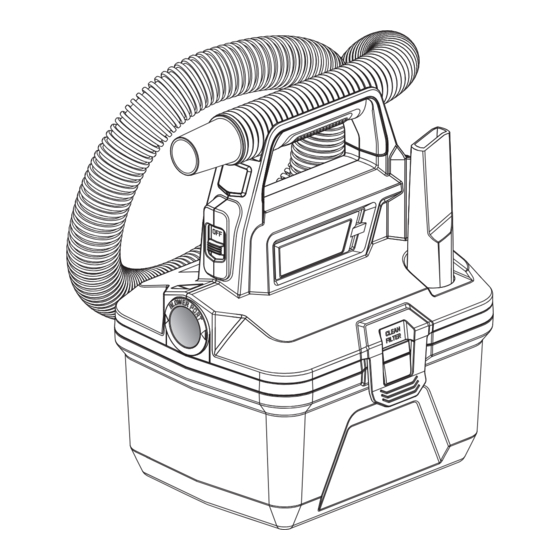
- Page 25 HPWD33 A - Lid (couvercle, tapa) F - Flexible hose (tuyau flexible, manguera J - Vacuum port (orifice d’aspiration, abertura flexible) para aspiración) B - Collection container (récipient de collecte, contenedor de recolección) G - Foam barrier (barrière en mousse, barrera...
- Page 26 FIG. 4 FIG. 7 FIG. 10 A - Flexible hose (tuyau flexible, manguera flexible) B - Vacuum port (orifice d’aspiration, abertura A - Flexible hose (tuyau flexible, manguera para aspiración) flexible) A - Flexible hose (tuyau flexible, manguera B - Crevice tool (suceur plat, boquilla rinconera) flexible) FIG.
- Page 27 FIG. 12 FIG. 13 A - Lid (couvercle, tapa) A - Retention band (bande de fixation, anillo de retención) B - Wet waste (déchet humide, residuos húmedos) B - Cloth filter (filtre en tissu, filtro de tela) C - Collection container (récipient de collecte, contenedor de recolección) C - Lid (couvercle, tapa) D - Float (raclette, mortero) D - Collection container (récipient de collecte, contenedor de recolección)
- Page 28 Les détails de la garantie sont disponibles sur www.HARTtools.com Une preuve d’achat est requise pour valider la garantie limitée de 3 ans. HART, le logo HART et le logo H sont des marques de commerce de Techtronic Cordless GP. Servicio/Piezas de repuesto Atención al cliente/Soporte técnico...
Need help?
Do you have a question about the HPWD33 and is the answer not in the manual?
Questions and answers