Table of Contents
Advertisement
Quick Links
Advertisement
Table of Contents

Related Manuals for EPH R17 V2


Summary of Contents for EPH R17 V2
- Page 1 1 Zone Timeswitch Installation and Operating Guide...
-
Page 2: Table Of Contents
Table of contents Installation Instructions Factory Default Settings Specifications LCD Display Button Description Wiring Diagram Mounting & Installation Operating Instructions Quick Introduction to your R17 Timeswitch Mode Selection Programming Modes Factory Program Settings Adjust the Program Setting in 5/2 Day Mode Reviewing the Program Settings Boost Function Advance Function... - Page 3 Operating Instructions Continued Menu Function P01 Setting the Date, Time and the Programming Mode P02 Holiday Mode P03 Frost Protection P04 Zone Title P05 PIN Copy Function Backlight Mode Selection Locking the Keypad Resetting the Timeswitch Master Reset Service Interval...
-
Page 4: Installation Instructions
1 Zone Timeswitch Installation Instructions... -
Page 5: Factory Default Settings
2000V; as per Dimensions: 161 x 100 x 31 mm EN60730) Contact Rating: 3(1)A Software Class: Class A Program Memory 5 Years Temperature Sensor: NTC 100K Backlight: White IP Rating: IP20 Battery: 3VDC Lithium LIR2032 & CR2032 EPH Controls Ltd. -
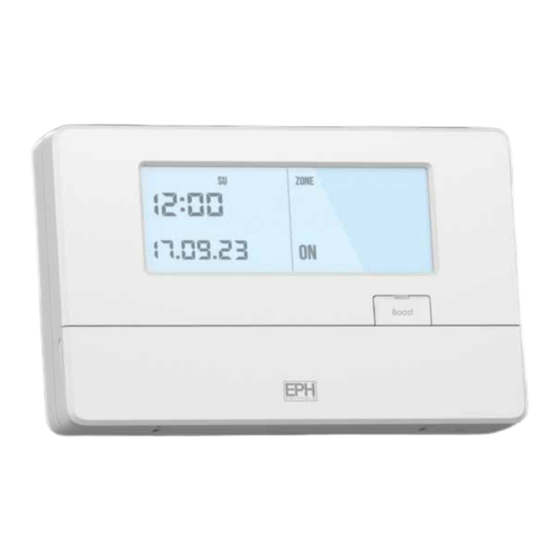
Page 6: Lcd Display
LCD Display Displays current time. Displays current day of the week. Displays zone title. Displays current mode. Displays when keypad is locked. Displays when frost protection is activated. Displays current date. -
Page 7: Button Description
Button Description Boost Button Boost Zone Select Button Select Master Reset Menu Button OK Button Program Advance Plus Minus MENU Button Button Button Button PROG EPH Controls Ltd. -
Page 8: Wiring Diagram
Wiring Diagram 200-240V~ 50/60Hz Terminal Connections Switching Options Earth Mains Switching Neutral - Link L to 1. Live Low Voltage Switching COM - Common Connection - Remove the external controls link from the boiler PCB. OFF - N/C Normally Closed Connection - Connect 1 and 4 to these terminals. -
Page 9: Mounting & Installation
Mounting & Installation EPH Controls Ltd. - Page 10 Mounting & Installation continued Caution! Installation and connection should only be carried out by a qualified person. ƒ Only qualified electricians or authorised service staff are permitted to open the timeswitch. ƒ If the timeswitch is used in a way not specified by the manufacturer, its safety may be impaired. ƒ...
-
Page 11: Operating Instructions
1 Zone Timeswitch Operating Instructions... -
Page 12: Quick Introduction To Your R17
Quick introduction to your R17 Timeswitch: The R17 timeswitch has up to three daily heating programs called P1, P2 and P3. See Page 13 for instructions on how to adjust the program settings. Within these sections you can see what mode the timeswitch is currently in. When in the AUTO mode, it will show when the timeswitch is next programmed to be switched ON or OFF. -
Page 13: Mode Selection
The timeswitch is permanently ON. The timeswitch is permanently OFF. Press to change between AUTO, ALL DAY, ON & OFF. Select The current mode will be shown on the screen. is found under the front cover. Select EPH Controls Ltd. -
Page 14: Programming Modes
Programming Modes This timeswitch has the following programming modes. 5/2 Day mode Programming Monday to Friday as one block and Saturday and Sunday as a 2nd block. 7 Day mode Programming all 7 days individually. 24 Hour mode Programming all 7 days as one block. Factory Program Setting 5/2d 5/2 Day... -
Page 15: Adjust The Program Setting In 5/2 Day Mode
2. If you don’t wish to use one or more of the daily programs then simply set the start time and end time to be identical. For example, if P2 is set to start at 12:00 and end at 12:00 the timeswitch will simply ignore this program and proceed to the next switching time. EPH Controls Ltd. -
Page 16: Reviewing The Program Settings
Reviewing the Program Settings Press PROG Press to scroll through the periods for the individual day (block of days). Press to jump to the next day (block of days). Select Press to return to normal operation. MENU Boost Function The timeswitch can be boosted for 30 minutes, 1, 2 or 3 hours while it is in the AUTO, ALL DAY & OFF mode. -
Page 17: Advance Function
The timeswitch will display ‘ADVANCE ON’ or ‘ADVANCE OFF’ until the end of the next switching time. To cancel an ADVANCE, press again. When an ADVANCE period has ended or has been cancelled, the timeswitch will return to the mode that was previously active prior to the ADVANCE. EPH Controls Ltd. - Page 18 Menu Function This menu allows the user to adjust additional functions. To access the menu, press MENU P01 Setting the Date, Time and the Programming Mode DST ON Press , ‘P01 tInE’ will appear on the screen. MENU Press , the year will begin to flash. Press to adjust the year.
- Page 19 Press The timeswitch will now be switched off during this selected period. To cancel the HOLIDAY, press The timeswitch will return to the normal operation when a holiday has finished or been cancelled. EPH Controls Ltd.
- Page 20 Menu Function continued P03 Frost Protection This menu allows the user to activate the frost protection between a range of 5°C and 20°C. Frost protection is default set to OFF. Press , ‘P01’ will appear on the screen. MENU Press until ‘P03 FrOST’...
- Page 21 MENU Press until ‘P04’ appears on the screen. Press , ‘ZONE’ will flash on the screen. Press to change from ‘ZONE’ to ‘HEATING’ or ‘HOT WATER’ . Press and the timeswitch will return to normal operation. MENU EPH Controls Ltd.
- Page 22 Menu Function continued P05 PIN This menu allows the user to put a PIN lock on the timeswitch. The PIN lock will reduce the functionality of the timeswitch. Set up the PIN Press , ‘P01’ will appear on the screen. MENU Press until ‘P05 PIn’...
- Page 23 , ‘ON’ will appear on the screen. Press to select ‘OFF’ . Press ‘0000’ will flash on the screen. Enter the PIN. Press The PIN is now disabled. Press to return to normal operation or it will automatically exit after 20 seconds. MENU EPH Controls Ltd.
- Page 24 Copy Function Copy function can only be used when the 7d mode is selected. (See page 16 to select 7d mode) Press to program the ON and OFF periods for the day for the week you want to copy. PROG Do not press OK on the P3 OFF time, leave this period flashing.
- Page 25 Backlight is permanently Off. To adjust the backlight press and hold for 10 seconds. ‘Auto’ appears on the screen. Press to change the mode between Auto, On and Off. Press to confirm selection and to return to normal operation. EPH Controls Ltd.
- Page 26 Locking the Keypad To lock the timeswitch, press and hold together for 10 seconds. will appear on the screen. The buttons are now disabled. To unlock the timeswitch, press and hold for 10 seconds. will disappear from the screen. The buttons are now enabled. Resetting the Timeswitch To reset the timeswitch to factory settings: Press...
- Page 27 When the Service Interval is activated ‘SErv’ will appear on the screen which will alert the user that their annual boiler service is due. For details on how to enable or disable the Service Interval, please contact customer service. EPH Controls Ltd.
- Page 28 EPH Controls IE technical@ephcontrols.com www.ephcontrols.com/contact-us T +353 21 471 8440 EPH Controls UK technical@ephcontrols.co.uk www.ephcontrols.co.uk/contact-us T +44 1933 322 072...
Need help?
Do you have a question about the R17 V2 and is the answer not in the manual?
Questions and answers