SAJ CHS2 Series Manual
C&i energy storage system
Hide thumbs
Also See for CHS2 Series:
- Manual (51 pages) ,
- User manual (44 pages) ,
- Quick installation manual (13 pages)
Table of Contents
Advertisement
CHS2 Series
CHS2
Series
C&I ENERGY STORAGE SYSTEM
CHS2-(29.9K-63K)-(T4,T5,T6)-X
Tel: (86)20 66608588
Fax: (86)20 66608589
Web: www.saj-electric.com
GUANGZHOU SANJING ELECTRIC CO.,LTD
Add: SAJ Innovation Park,No.9, Lizhishan Road,Science City, Guangzhou High-tech Zone , Guangdong, P.R.China
(
X=204.8V/280Ah/51.5kWh,256.0V/280Ah/64.4kWh,307.2V/280Ah/77.3kWh,358.4V/280Ah/90.2kWh)
V0.0
Advertisement
Table of Contents

Related Manuals for SAJ CHS2 Series


Summary of Contents for SAJ CHS2 Series
- Page 1 CHS2 Series CHS2 Series C&I ENERGY STORAGE SYSTEM CHS2-(29.9K-63K)-(T4,T5,T6)-X Tel: (86)20 66608588 Fax: (86)20 66608589 Web: www.saj-electric.com GUANGZHOU SANJING ELECTRIC CO.,LTD Add: SAJ Innovation Park,No.9, Lizhishan Road,Science City, Guangzhou High-tech Zone , Guangdong, P.R.China X=204.8V/280Ah/51.5kWh,256.0V/280Ah/64.4kWh,307.2V/280Ah/77.3kWh,358.4V/280Ah/90.2kWh) V0.0...
- Page 2 CHS2 Series Preface Thank you for choosing SAJ product. We are pleased to provide you first-class products and exceptional service. This manual includes information for installation, operation, maintenance, trouble shooting and safety. Please follow the instructions of this manual so that we can ensure delivery of our professional guidance and wholehearted service.
-
Page 3: Table Of Contents
CHS2 Series TABLE OF 4.1.1 Checking the Package ........................ 18 4.1.2 Scope of Delivery ......................... 18 4.2 Installation Method and Position........................19 CONTENTS 4.2.1 Installation Position and Clearance ..................19 4.2.2 Mounting Method ........................20 4.3 Mounting Procedure ............................. 21 4.3.1 Installation Tools .......................... - Page 4 CHS2 Series 6. COMMISSIONING ...........................45 6.1 Start Up and Shut Down the Energy Storage System ................46 6.1.1 Start Up ............................46 6.1.2 Shut Down ............................ 46 6.2 Introduction of Human-computer Interface ....................47 6.3 Installing the eSAJ Home App ........................... 49 6.4 Logging In to the App and Performing the Initialization Settings ............
- Page 5 CHS2 Series 1.1 Scope of Application This User Manual describes instructions and detailed procedures for installing, operating, maintaining, and troubleshooting of the following SAJ products: CHS2-29.9K-T4-X; CHS2-30K-T4-X; CHS2-40K-T5-X; CHS2-50K-T6-X; CHS2-63K-T6-X; 1.2 Safety Instructions DANGER · DANGER indicates a hazardous situation which, if not avoided, will result in death or serious injury.
- Page 6 PREPARATION ·SAJ electric shall not be liable for any loss or warranty claims arising from any unauthorized change of product which may cause fatal injury to the operator, third party or equipment performance. ·For personal and property safety, do not short-circuit the positive (+) and negative (-) electrode terminals.
- Page 7 This device is directly connected to public grid, thus all work to the battery shall only be carried out by qualified personnel. Operate and use the battery properly according to user manual, any attempt to modify battery without the permission from SAJ will void the limit No open flames warranty for the battery.
- Page 8 CHS2 Series WARNING ·If a fire has just occurred, try to disconnect the battery circuit breaker and cut off the power supply first, but only if you can do so without endangering yourself. ·If the battery is on fire, do not attempt to extinguish the fire but evacuate the crowd immediately.
- Page 9 CHS2 Series 3.1 Application Scope of Products The product is C&I energy storage system with battery and it is suitable for large residential or small industrial and commercial scenarios. The energy storage system is able to store the energy for future use. It is built internally with a battery management system (BMS), which is used to ensure efficiency of the battery and protect the battery from operating outside its specified limitations.
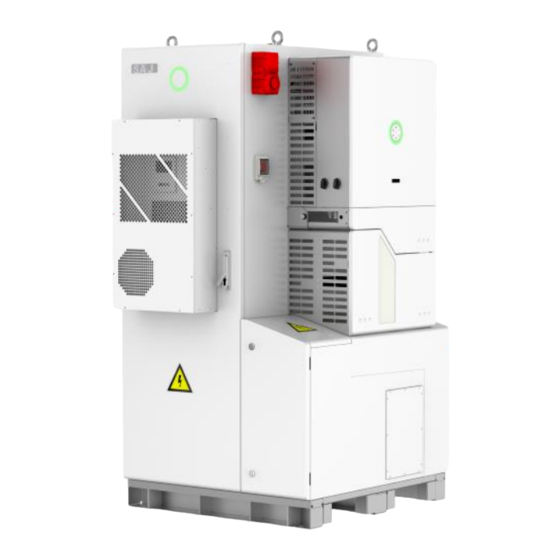
- Page 10 CHS2 Series 3.3 Overview of Products Figure 3.2 Dimensions of inverter 3.4 Terminals Description Figure 3.4 Battery control unit interface 220V input from CH2 High voltage box and CH2 power line CAN communication with CH2 and parallel machine Parallel 220V AC output Parallel DC positive input Figure 3.3...
- Page 11 CHS2 Series 3.5 Datasheet Inverter Model CHS2-29.9K-T4-X CHS2-30K-T4-X CHS2-40K-T5-X CHS2-50K-T6-X CHS2-63K-T6-X DC Input Max. PV Array Power [Wp]@STC 59998 60000 80000 100000 126000 Max. DC Voltage [V] 1000 MPPT Voltage Range [V] 180~850 Rated DC Voltage [V] Start Voltage [V] Max.
- Page 12 CHS2 Series Battery CHS2-29.9K-T4-X CHS2-30K-T4-X CHS2-40K-T5-X CHS2-50K-T6-X CHS2-63K-T6-X Model Max. Apparent Power [VA] 29999 33000 44000 55000 63000 Model CB2-57.3-HV5 CB2-71.6-HV5 CB2-85.9-HV5 CB2-100.3-HV5 Peak Output Apparent Power [VA] 29999 45000,5s 60000,5s 75000,5s 75000,5s Rated Energy [kWh] 57.3 71.6 85.9 100.3...
-
Page 13: Checking The Package
4.1 Unpacking and Inspection 4.1.1 Checking the Package Although SAJ’s product have thoroughly tested and checked before delivery, it is uncertain that the product may suffer damages during transportation. Please check the package for any obvious signs of damage, and if such evidence is present, do not open the package and contact your dealer as soon as possible 4.1.2 Scope of Delivery... -
Page 14: Installation Method And Position
CHS2 Series 4.2 Installation Method and Position 4.2.2 Mounting Method 4.2.1 Installation Position and Clearance This device is cooled by natural convention and suggested an indoor installation or an installation under a sheltered place to prevent the product from exposure to direct sunlight, rain and snow erosion. -
Page 15: Mounting Procedure
CHS2 Series 4.3.2 Mounting Procedures bedroom, lounge, living room, study, toilet, bathroom, theater and attic. • When installing the device at the garage, please keep it away from drive way. Ground Mounting The ground should be flat and no inclination. - Page 16 CHS2 Series Forklift transportation: Step 3: Use the wrench to secure the bottom with the expansion bolts (M12*80). Move the cabinet and place it over the drilled holes. Adjust the width of the forklift legs so that the center of gravity is in the center of the forklift legs.
-
Page 17: Electrical Connection
CHS2 Series 5.1 Additional Grounding Cable Electrical connection must only be operated by professional technicians. Before connection, necessary protective equipment must be employed by technicians, including insulating gloves, insulating shoes and safety helmet. WARNING · Connect this additional grounding cable before other electrical connection. -
Page 18: Preparation Before Installation
CHS2 Series Remove the screw of grounding terminal and secure the additional grounding cable by insert a screw into the screw hole in the OT/DT terminal. Connect the grounding cables as the following diagram. Note: A 6 mm conductor cross-sectional area of cable is recommended for additional grounding cable. -
Page 19: Communication Connection
CHS2 Series 5.3 Communication Connection 5.3.2 Dry Contact Connection Reserved output dry contact AC Breaker D RY.DO1 D RY.DO2 NC COM NO N O COM NC Figure 5.5 Ports definition 5.3.1 Export Limit Setting Inverter The meter communication cable can be connected to the Meter_485 of the Phoenix terminal of the inverter and the METER interface of the RJ45. -
Page 20: Rcr Connection
CHS2 Series 5.3.3 RCR Connection 5.3.5 Emergency Stop Dry Contact RCR provides RCR signal control ports to meet the power grid dispatching requirements in Germany and When + contact and - contact are shorted by external controlled switch, the inverter will stop immediately. -
Page 21: Connecting The Ac Cable
CHS2 Series Cable cross-sectional area(mm²) RS485_PAR1/RS485_PAR2 METER Type Conductor material RS485-B Range Recommend RS485-A CHS2-29.9~63K-T4/T5/T6-X 16~25 Copper Grounding cable cross-sectional area (mm²): 25 RS485-B RS485-A Table 5.2 Recommended specifications of GEN and Back-up cables RS485-A RS485-A RS485-A Procedure: RS485-B RS485-B RS485-B Step 1: Pass the cables to be connected through the corresponding waterproof holes. -
Page 22: Earth Fault Alarm
CHS2 Series Step 3: Secure all parts of the grid and backup connector tightly. The inverter does not require an external residual current device, as it has integrated with a RCMU. If local regulations require the application of external residual current device, either type A or type B RCD is compatible with the inverter. - Page 23 CHS2 Series DC connector is made up of positive connector and the negative connector 4. Insert the positive and negative cable into positive and negative connector. Gently pull the cables backward to ensure firm connection. Figure 5.16 Positive connector & Negative connector NOTICE ·...
-
Page 24: Communication Module Installation
CHS2 Series 7.Connect the positive and negative connectors into positive and negative DC input terminals of the inverter, 5.6 Communication Module Installation a “click” should be heard or felt when the contact cable assembly is seated correctly. Plug in the communication module to 4G/WIFI port and secure the module by rotating the nut. -
Page 25: Install Decorative Panels
CHS2 Series 5.7 Install Decorative Panels 5.8 System Connection The system connection in Australia and New Zealand is as below, the neutral cable of AC and backup side must be connected together for the safety reason. Reinstall the removed decorative panel onto the machine. -
Page 26: System Connection Diagram
CHS2 Series 5.9 System Connection Diagram The system connection for grid system without special requirements is as below. Note:The backup PE line and earthing bar must be grounded properly. Otherwise, backup function may be inactive during blackout. 5.10 AFCI The inverter is equipped with arc-fault circuit interrupter (AFCI). With AFCI protection, when there is an arc signal on the DC side due to aging of the cable or loose contact, inverter can quickly detect and cut off the power to prevent fire, making the PV system run more safely. -
Page 27: Commissioning
CHS2 Series 6.1 Start Up and Shut Down the Energy Storage System 6.1.1 Start Up Step 1: Turn ON the DC switch on the inverter. Step 2: Turn on the AC Circuit Breaker. Step 3: Rotate the Main Switch to ON position. -
Page 28: Introduction Of Human-Computer Interface
CHS2 Series 6.2 Introduction of Human-computer Interface Solid Importing electricity from grid System commissioning On 1s, off 1s Exporting electricity to grid After the wiring is completed, please refer to the inverter manual for system commission and operation. On 1s, off 3s... -
Page 29: Installing The Esaj Home App
CHS2 Series 6.3 Installing the eSAJ Home App The eSAJ Home App can be sued for both nearby and remote monitoring. It supports Bluetooth/4G or Bluetooth/Wi-Fi to communicate with the device. On your mobile phone, search for “eSAJ Home” in the App store and download the App. - Page 30 CHS2 Series...
-
Page 31: Inverter Setting Review
CHS2 Series 6.5 Inverter Setting Review 6.7 Working Modes 6.7.1 Selecting Working Modes Procedures After commissioning, the device info including device basic info, running info and event info can be viewed. Country and grid code can be viewed from initial setting. -
Page 32: Export Limit Setting
CHS2 Series 6.8 Export Limit Setting 6.8.1 APP Setting There are two methods to control the export limit, the two methods are alternative to each other. Method 1: Export limitation setting is to control the export electricity to the grid. -
Page 33: Self-Test (For Italy)
Italian Standard CEI0-21 requires a self-test function for all inverter that connected to utility grid. During failed, please contact with SAJ or your inverter supplier. the self-testing time, inverter will check the reaction time for over frequency, under frequency, overvoltage and undervoltage. -
Page 34: Setting Reactive Power Control (For Australia)
CHS2 Series 6.10 Setting Reactive Power Control Fixed Reactive Power Mode (For Australia) 6.10.1 Setup Fixed Power Factor Mode & Fixed Reactive Power Mode Fixed Power Factor Mode Step 1: Select Inductive Adjustment Var or Capacitive Var according to your local grid regulation. The power range is from -60%Pn ~ 60%Pn. - Page 35 Note: Setting procedure: With regard to the Power rate limit mode, SAJ sets the product WGra to 16.67%Pn by default in the 1. AS4777 grid compliance has been set during production, please select corresponding grid compliance following cases according to the requirements of 3.3.5.2 as 4777.2: 2020.
-
Page 36: Maintenance
The battery cannot be disposed of as household refuse. When the service life of the battery reaches to the limit, it is not required to return it to the dealer or SAJ, but it must be recycled to the special waste lithium... - Page 37 CHS2 Series Troubleshooting Code Fault Information Code Fault Information Master Islanding Error Master Relay Error Master HW Bus Voltage High Master EEPROM Error Master HW PV Current High Master Temperature High Error Master Self-Test Failed Master Temperature Low Error Master HW Inv Current High Lost Communication M<->S...
- Page 38 Master Arc Device Error Voltage difference is too wide (Class I) Master PV Mode Error BMS over temperature protect Authority expires Please go to SAJ website for warranty conditions and terms Short circuit protect https://www.saj-electric.com/ DRM0 Error Total voltage match failed...
Need help?
Do you have a question about the CHS2 Series and is the answer not in the manual?
Questions and answers