
Related Manuals for MiniFinder Nano


Summary of Contents for MiniFinder Nano
- Page 1 MiniFinder Nano ® User guide Updated: 2023/10/11 © 2023 MiniFinder® All rights reserved...
-
Page 2: Package Contents
We believe you made the right choice. ® MiniFinder Nano is full of smart features that help you monitor, protect and locate your ® loved ones remotely. Before you start using your Nano, please read this manual in its entirety. - Page 3 E. TURN OFF the device by pressing and holding the ON/OFF button for 12-13 seconds. Place the magnetic charging cable to the charging pins to charge. See the picture below. Magnetic Charging pins charging cable Speaker Speaker On/Off button On/Off button www.minifinder.com 2 av 23...
- Page 4 Steady light = No or faulty SIM card BLUE Slow blink = Searching for GPS signal 1 sec Single blink = Connected to satellite 3 sec Steady light = Charging No light = Sleep mode or fully charged www.minifinder.com 3 av 23...
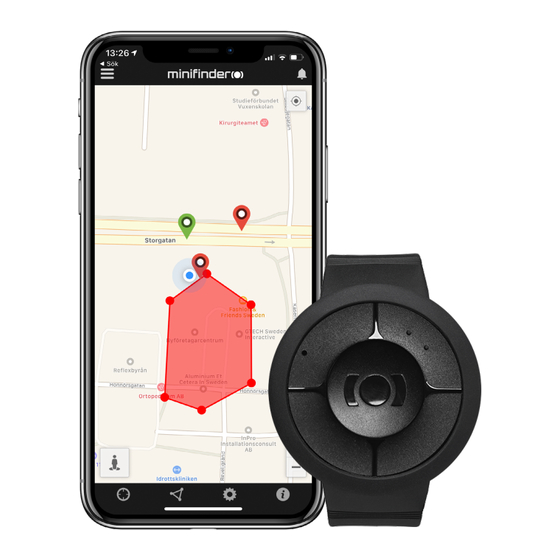
- Page 5 Download the MiniFinder GO app Download the MiniFinder GO app To set up and track your MiniFinder® Nano, you need to download MiniFinder GO Tracking System APP. If you read the documentation on your mobile phone, please click on the link below to download the APP.
-
Page 6: App Overview
App overview App overview After logging in the MiniFinder GO APP, you will see the view as shown below. This consists of 10 different parts: 1. Menu (Device list) 2. Alarm notification 3. Create / Edit Geofence 4. Applications settings 5. -
Page 7: Device Status
Alarm notification Alarm notification MiniFinder GO APP supports various types of alarms: Geofence alarm, Fall alarm, SOS / Panic alarm, Low battery alarm and speeding alarm. All alarms send an alarm notification to the phone’s or tablet’s screen. Audio alert, vibration and flashing alarm can be activated when opening the APP. -
Page 8: Action Menu
Action menu Action menu At the far right of the row of units is an Action Menu (three vertical points). Nano In the Action Menu you can see history (History), call (Call), activate live tracking (Live tracking) and change settings (Setup). -
Page 9: Live Tracking
Live tracking Live tracking allows users to track their MiniFinder Nano in real time in a quick and easy way over a short period of time. By clicking on Action Menu (1) and then Live Tracking (2), the position update intervals change to 10 seconds for 10 minutes. - Page 10 To enable the device to make emergency calls (using the SOS button), one or more numbers need to be authorized with the device. - Open the MiniFinder GO app, click on the action menu (1), and then click on “Setup” (2). NOTE! MiniFinder contains a roaming-free SIM card with an Estonian phone number. This is because your MiniFinder needs to connect to all Swedish networks and can therefore choose the mobile network with the best coverage in the area where the device is located.
-
Page 11: Low Battery Alarm
An accidental fall can cause devastating consequences. When an accidental fall occurs, the MiniFinder remote sensor sends an alarm to the APP in the form of an alarm notification on the mobile device’s screen and an alarm bell in the APP. -
Page 12: Panic Alarm
Panic alarm Panic alarm After SOS function is activated, an alarm notification is sent to the MiniFinder GO APP if the SOS / panic alarm is activated on the device. The alarm is followed up with telephone calls to authorized tele- phone numbers or a local alarm center. -
Page 13: Speeding Alarm
- Enable Power Save by clicking on the Action Menu and then selecting “Setup”. - Turn on “Power save” and then click “Apply” to save the settings. www.minifinder.com 12 av 23... - Page 14 Comments Comments In the comment section, you can add additional information about your MiniFinder. - Click on the action menu and then click on comments. - Enter your comment in “write a comment” and then click “Save”. Xtreme www.minifinder.com...
- Page 15 “Enter” or “Leave” or both to create an alarm. Then click “Create” to finish the process. If you are not satisfied with the location of a point, click “Back” to delete or hold to delete all and start over. www.minifinder.com 14 av 23...
- Page 16 A) Click the pushpin (or on the device in the menu) to bring up the properties box. B) Unit name C) Location D) Speed E) Altitude F) Battery level G) Distance between you and the selected device www.minifinder.com 15 av 23...
- Page 17 Tag function (Mark places) Tag function (Mark places) On the map in the MiniFinder GO APP, you can mark places with particular information. - Long press on the place where you want to mark on the map. (1) - You can give a name (2), a description (3), an icon (4) on the map and even attach an image (5).
-
Page 18: App Settings
App settings App settings - Click on the gear symbol to make settings in the MiniFinder GO APP. Settings menu Settings menu 1. Number of licenses and your username. 2. Change your password. 3. Map selector (Classic, Hybrid, Terrain and Satellite) 4. - Page 19 User manuals User manuals - Click on the “i” symbol to read more information about MiniFinder GO and get access to the user manuals for all our products. - Press on “MiniFinder GO Documentation” (1). - Press on “Select Device” (2) and select which device’s user manual (3) you would like to read.
-
Page 20: Memory Function
Öppna ej enheten. Ämnen i denna produkt och/eller batteriet kan skada miljön. och/eller människors hälsa om den hanteras på felaktigt sätt. • Mixtra inte med din MiniFinder ® • Använd inte slipande rengöringsmedel för att rengöra din MiniFinder ® • Placera inte MiniFinder i en diskmaskin, tvättmaskin eller torktumlare. ®... -
Page 21: Technical Specifications
WiFi MT5931 2.4GHZ 802.11 b/g/n Bluetooth BLE4.0 BR/EDR Humidity 5% to 95% Non-condensing GPS chip MT3333 (GNSS, Support EPO) Standby 32h with a update interval of 5 seconds Memory 16Mb flash IP class IPX7 Notes Notes www.minifinder.com 20 av 23... - Page 22 21 av 23...
Need help?
Do you have a question about the Nano and is the answer not in the manual?
Questions and answers