Table of Contents
Advertisement
Quick Links
2229 S Wright St.
Santa Ana, CA 92705 USA
www.perraroelectricbike.com
+1 949 414 8003
www.perraroelectricbike.com
info@perraroelectricbike.com
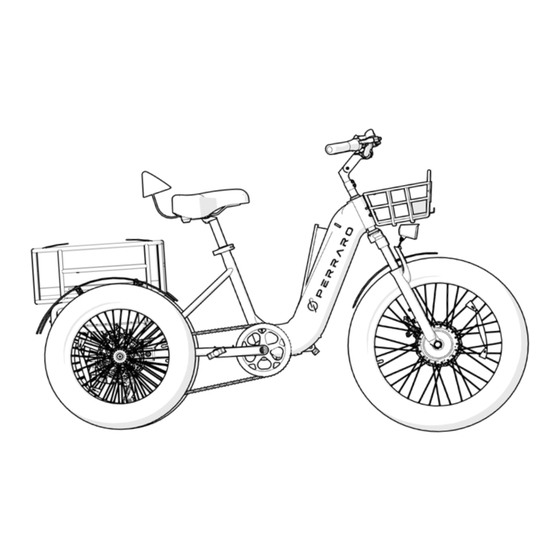
POLAR ELECTRIC TRIKE
To prevent PROPERTY DAMAGE, SERIOUS INJURY, or DEATH,
you should read, understand, and follow the warnings and in-
structions in this manual. Keep for future reference
Page : : 1
USER
MANUAL
V1.1 2024
+1 949-414-8003
Advertisement
Table of Contents

Related Manuals for PERRARO POLAR

Summary of Contents for PERRARO POLAR
- Page 1 2229 S Wright St. www.perraroelectricbike.com +1 949 414 8003 Santa Ana, CA 92705 USA info@perraroelectricbike.com POLAR ELECTRIC TRIKE USER MANUAL V1.1 2024 To prevent PROPERTY DAMAGE, SERIOUS INJURY, or DEATH, you should read, understand, and follow the warnings and in- structions in this manual.
- Page 3 Please read this Owner’s Manual carefully before setting up your website: www.perraroelectricbike.com eTrike and riding. You should become thoroughly familiar with the proper operation of your Polar Electric Trike, its features, capabilities, perraro Help Center: support@perraroelectricbike.com and limitations. To ensure a long, trouble-free life for your Perraro Electric Trike, provide it with the proper care and maintenance as described in this manual.
-
Page 4: Table Of Contents
Page : : 4 CONTENTS. 01. IMPORTANT SAFETY INFORMATION 02. INTRODUCTION 03. ASSEMBLY 04. FEATURES 05. LCD DISPLAY 06. YOUR FIRST RIDE 07. BATTERY INFORMATION 08. MOVING AND STORING YOUR ETRIKE 09. TROUBLESHOOTING 10. MAINTENANCE 11. LEGAL +1 949-414-8003 www.perraroelectricbike.com... - Page 5 Page : : 5 This page is intended to be left blank. +1 949-414-8003 www.perraroelectricbike.com...
-
Page 6: Important Safety Information
Understanding Your Legal Responsibilities as a Rider Stay informed Ensure that the brakes, tires, and electric components are and safe! Riding your Perraro Electric Bike is not only about enjoyment; functioning properly. it also involves being aware of and complying with the rules. - Page 7 Safety Messages Understanding the Intended Use of Your Perraro Electric Bike Purpose and Safety First Your Perraro Electric Bike is a great mode of To ensure your well-being and prevent serious injury or even death, transport and leisure but remember, it’s essential to use it the way it’s important to adhere to the following safety guidelines:...
- Page 8 Page : : 8 IMPORTANT SAFETY INFORMATION Helmet Use • Ride defensively, keeping an eye out for potential hazards that could cause sudden swerves or loss of control. Be cautious when • Wearing a helmet is crucial. Choose a helmet that meets or braking and steering simultaneously.
- Page 9 Page : : 9 PRE-RIDE SAFETY CHECKLIST It’s crucial to go through a pre-ride safety checklist before and after each ride. Ensuring that all components of your trike are in good working order is key to a safe and enjoyable ride. This checklist is not a substitute for a detailed service manual. Always refer to your owner’s manual before riding or repairing your trike.
- Page 10 What is in the box Congratulations on Your New Perraro Electric Trike! We are thrilled that you have chosen a Perraro Electric Trike for your cycling adventures. Inside your box, you will find your trike along with various related accessories. To ensure a smooth start, follow these initial steps: •...
- Page 11 Page : : 11 What is in the box 1 x Cooler Bag 1 x Rear Basket 3 x Fender 2 x Fender Holder 1 x Battery 2 x Pedal 1 x Charger 1 x Toolbox +1 949-414-8003 www.perraroelectricbike.com...
-
Page 12: Introduction
Page : : 12 INTRODUCTION +1 949-414-8003 www.perraroelectricbike.com... - Page 13 Page : : 13 TIGHTENING TORQUE 2.1 FRAME NUMBER Part Tool Torque The frame number for your trike Axle Collars 5mm hex wrench 8 Nm can be found engraved either on Bottom Bracket BBT-22 35 Nm the head tube or at the bottom of the bottom bracket of the trike, Brake Caliper Mounting Bolts 5mm hex wrench 6 Nm...
-
Page 14: Assembly
We are excited for you to begin the journey with your new Unfolding Trike Perraro Electric Trike. As you gear up to complete the assembly Frame: of your vehicle, we want to provide you with essential information to facilitate a smooth and safe setup process. - Page 15 Page : : 15 3.3 Handlebar Installation • First, remove the retaining cap located on top of the head tube. Note: while the cap will not be used, please retain the screw • Slide the bottom of the stem into the top of the head tube. •...
- Page 16 Page : : 16 ASSEMBLY 3.4 Front Wheel Installation • Take off all nuts and washers from the axle. • Attach the non-turn washer, teeth facing outward. • Slot the wheel into the fork, ensuring the rotor enters the brake caliper and centers. •...
- Page 17 Page : : 17 3.5 Headlight and Front Fender Put a washer on the cap screw. • Position the headlight on its bracket. • Feed the screw through the headlight and fender bracket. • Add the second washer behind the bracket. •...
- Page 18 Page : : 18 ASSEMBLY 3.6 Front Basket • Align the mounting bracket with the trike’s frame and attach with provided bolts, leaving them slightly loose for now. • Place the basket onto the bracket, lining up the holes. • Insert and hand-tighten the bolts to connect the basket to the bracket.
- Page 19 Page : : 19 3.7 Pedal Set Installation Guide Identifying Pedals First, identify the side markings on each pedal: “L” for Left and “R” for Right. Ensure the pedal marked “R” aligns with the right-hand crank arm, and the pedal marked “L” with the left-hand crank arm.
- Page 20 Page : : 20 ASSEMBLY 3.8 Rear Fender Assembly Fender to Bracket Connection Position the fender so that its holes line up with the fender bracket protruding from the rear of the trike’s frame. Insert bolts through each matching set of holes. Bracket to Basket Connection Locate the points where the fender bracket meets the trike’s rear basket.
- Page 21 Page : : 21 3.9 Rear Basket Assembly • Align the rear basket’s mounting points with the corresponding points on the trike’s frame. Ensure that the basket is centered and level. • Insert and tighten the bolts through the rear basket and into the frame’s mounting points. Use a suitable tool to tighten the bolts, ensuring the basket is firmly attached to the frame.
- Page 22 Page : : 22 ASSEMBLY 3.10 Seat Post Installation • Position the quick-release lever to the open setting. • Insert the seat post into the frame’s seat tube to your desired height. • Ensure the ‘min insert’ line on the seat post remains inside the tube.
- Page 23 Page : : 23 This page is intended to be left blank. +1 949-414-8003 www.perraroelectricbike.com...
-
Page 24: Features
Perraro Electric Trike PAS system (e.g. chainring, chainring receptacle, pedals) must only be replaced with identical components or components that have been specifically approved by Perraro Electric Trike. This should help protect the motor from overloading. • Always remove the battery pack from your Perraro Electric Trike before beginning work (e.g. - Page 25 Disc Brakes Throttle Your Perraro Polar Trike is equipped with disc brakes.To prevent The right handlebar features a half-twist throttle. serious injury or death:...
- Page 26 PAS automatically becomes available again. Cockpit Instruments You can also use your Perraro Electric Trike as a normal bicycle without assistance at any time, either by switching the Cockpit System power button OFF, or by setting PAS to 0. If the battery needs to be charged, PAS will not function.
- Page 27 Page : : 27 To prevent serious injury or death: • Do not allow yourself to be distracted by the display. If you do not concentrate on the traffic around you, you risk being involved in a crash. If you want to change any settings other than the PAS level, always stop before changing the settings or display.
-
Page 28: Lcd Display
10-segment indicator to reflect motor power levels. With intuitive controls and a wealth of features, the Perraro • Ride Timer: Displays the duration of your trip in hours Electric Trike LCD Display is more than just a screen;... - Page 29 Page : : 29 PLUS (+) To activate the LCD display of your trike, press and hold the Power button for 2 seconds. To turn the display off, press and hold the Power button again for 2 seconds, and the display will power MENU down.
- Page 30 Page : : 30 LCD DISPLAY Walk Assist Mode Operation Pedal Assist (PAS) Level Selection To adjust the pedal assist level on your electric trike, press the “+” To activate the walk assist mode on your electric trike, press or “-” buttons. The PAS has five levels, with “1” being the lowest and hold the “-”...
- Page 31 Page : : 31 Understanding the Power Meter on the Display Battery Indicator and Voltage/Percentage Display The power meter on the display of your trike shows real-time • The battery indicator on your trike’s display, located on the left motor power output through a vertical bar on the right side. side, not only shows the battery’s charge level through a scale of This bar moves up and down, reflecting the current power level.
- Page 32 Page : : 32 LCD DISPLAY Options Available in Settings: Setting Instructions for Your Electric Trike’s Display To customize the settings on your electric trike’s display, follow Background Color: Choose between black and white for the these steps: display background. Accessing Settings Turn on the display.
- Page 33 Understanding the Fault Interface on Your Perraro Electric Trike LCD Display The LCD display on your Perraro Electric Trike is equipped to alert you to potential issues with the trike. When the system detects a fault, the display will show a specific fault code, with each code corresponding to a different type of issue.
-
Page 34: Your First Ride
• Hold down the power button located on the left handlebar (PAS 1) and become familiar with the operation of your Perraro until the display comes on. Electric Trike by practicing starting, stopping, cornering, and navigating obstacles in a safe environment away from other •... - Page 35 Page : : 35 How to End Your Ride: When the bicycle is at a complete stop, press and hold the button to turn the display OFF. This ensures the motor will not activate until the display is turned ON again and you are ready to ride.
-
Page 36: Battery Information
Only use original Perraro Electric Trike batteries for your Electric Trike. cases and under unfavorable conditions, lithium-ion batteries Using other batteries can lead to injuries and pose a fire hazard. Perraro can catch fire. Electric Trike accepts no liability or warranty claims if other batteries are used. - Page 37 If battery liquid comes etc.) on your Perraro Electric Trike, moving it via car or airplane, in contact with skin, wash quickly with soap and water. If the or storing it.
- Page 38 Do not connect the battery pack to the charger until it has This prevents both unauthorized use of the powered features reached an allowable charging temperature. of your Perraro Electric Trike and removal of the battery by • Do not charge the battery with chargers other than the unauthorized persons when your Perraro Electric Trike is not charger provided by Perraro Electric Trike.
- Page 39 The battery may give off fumes if it becomes damaged or • To reduce risk of injury, charge only batteries of your Perraro Electric is used incorrectly. Ensure the area is well ventilated and Trike. Other types of batteries may burst, causing personal injury seek medical attention should you experience any adverse and damage.
- Page 40 Store any damaged battery or charger in a safe location and, as soon as possible, recycle or otherwise dispose of it according to local rules. Contact Perraro Electric To reduce the risk of fire, connect only to Trike if you have any questions or to purchase a compatible a circuit provided with 10 amperes maximum branch circuit replacement battery or charger.
- Page 41 Note: The charging process is only possible when the the battery, particularly when the trike is new or after long periods temperature of your Perraro Electric Trike battery is within the of storage. permitted charging temperature range.
-
Page 42: Moving And Storing Your Etrike
Protect it from moisture and water. and may reduce the battery capacity. Always store your Perraro Electric Trike battery pack in a location that: For optimum service life for your battery pack, charge the •... - Page 43 Electric Trike on a bicycle rack mounted on your vehicle. Perraro Electric Trike. Do • Always use a bicycle rack that is compatible with your Perraro not attempt to repair cord or Electric Trike. Check your bicycle rack manual to be sure your rack charger.
-
Page 44: Troubleshooting
If you have any questions at all regarding the basic 3. To test if the throttle is working, do not pedal. troubleshooting below, reach out to Perraro Electric Trike 4. Check all quick plugs. customer support by email at support@perraroelectricbike. - Page 45 Page : : 45 This page is intended to be left blank. +1 949-414-8003 www.perraroelectricbike.com...
-
Page 46: Maintenance
Inflate tires to pressure within the recommended range bicycle to a bicycle repair shop for service. printed on tire sidewalls. • Do not paint any components of your Perraro Electric Trike as they • Lubricate chain. may cause premature failure of the component. - Page 47 Perraro Electric Trike authorized replacements for repair and replacement. Cleaning Do not submerge your Perraro Electric Trike or its components in water, or use a pressure washer to clean. Clean your Perraro Electric Trike carefully with a soft, damp cloth (using only mild soap and water).
-
Page 48: Legal
This warranty gives you specific rights and purchasers Perraro Electric Trike will replace any parts deemed to have been may also have other rights, which may vary from state to state. - Page 49 Once in possession of the trike, Perraro Perraro Electric Trike reserves the right to change its warranty Electric Trike strongly encourages and recommends that all at any time and without notice.
- Page 50 WARNING - When using this product, basic precautions should operation. Perraro Electric Trike makes no claims or guarantees always be followed, including the following: that the brakes, battery, frame, motor, motor controller, display, 1.
- Page 52 USER MANUAL ASSEMBLY VIDEO REVIEW US V1.1 2024 Latest Version on Google THE LATEST VERSION OF YOUR MANUAL WE’D LOVE YOUR FEEDBACK! SCAN THE QR THE LATEST VERSION OF YOUR IS AVAILABLE AT PERRAROELECTRICBIKE. CODE ABOVE TO LEAVE A GOOGLE REVIEW. ASSEMBLY VIDEO IS AVAILABLE AT COM/PAGES/USER-MANUALS YOUR THOUGHTS HELP US IMPROVE AND...
Need help?
Do you have a question about the POLAR and is the answer not in the manual?
Questions and answers