
Subscribe to Our Youtube Channel
Related Manuals for Minebea Intec Ex Indicator Midrics 1


Summary of Contents for Minebea Intec Ex Indicator Midrics 1
- Page 1 Operating instructions Ex Indicator Midrics 1 (MIXS1) 98628-000-11 01/24/2024 Minebea Intec Bovenden GmbH & Co. KG, Leinetal 2, 37120 Bovenden, Germany Phone: +49.551.309.83.0 Fax: +49.551.309.83.190...
- Page 2 Any information in this document is subject to change without notice and does not represent a commitment on the part of Minebea Intec unless legally prescribed. This product should only be operated/installed by trained and qualified personnel. In correspondence concerning this product, the type, name, and release number/serial number as well as all license numbers relating to the product have to be cited.
-
Page 3: Table Of Contents
Ex Indicator Midrics 1 (MIXS1) Table of contents Table of contents Introduction............................5 Read the manual................................. 5 This is what operating instructions look like ......................5 This is what lists look like............................5 This is what menu items and softkeys look like..................... 5 This is what the safety instructions look like...................... - Page 4 Ex Indicator Midrics 1 (MIXS1) Table of contents 4.2.7 Connecting the weighing platform ......................19 4.2.8 Connection to strain gauge and RS-232/422 interfaces .................22 4.2.9 Closing the MIXS1 indicator..........................25 4.2.10 Note on replacing the battery........................25 4.2.11 Establishing a power connection.........................26 Accessories ................................26...
- Page 5 Ex Indicator Midrics 1 (MIXS1) Table of contents 6.4.2 TERM................................61 6.4.3 WP-1 ................................. 61 6.4.4 FLEX.INF ................................62 6.4.5 LEGAL.ST .................................62 LANG...................................62 ADC-CON ...................................62 6.6.1 STAND................................62 6.6.2 VERIF................................63 Operating ............................65 Weighing ..................................65 7.1.1 Automatic tare..............................65 7.1.2 Minimum load for automatic tare and for automatic printout...............65 7.1.3...
- Page 6 Ex Indicator Midrics 1 (MIXS1) Table of contents Cleaning ..................................86 9.3.1 Cleaning the indicator ...........................86 9.3.2 Cleaning stainless steel surfaces .........................87 Safety check................................87 Disposal .............................88 Error messages ..........................89 Technical data ............................ 91 12.1 General technical data ............................. 91 Appendix ............................92 13.1...
-
Page 7: Introduction
1 Introduction Ex Indicator Midrics 1 (MIXS1) Introduction Read the manual Please read this manual carefully and completely before using the product. This manual is part of the product. Keep it in a safe and easily accessible location. This is what operating instructions look like 1. -
Page 8: Hotline
Ex Indicator Midrics 1 (MIXS1) 1 Introduction NOTICE Warning of damage to property and/or the environment. NOTICE indicates that damage to property and/or the environment may occur if appropriate safety measures are not observed. Take the corresponding safety precautions. Note: User tips, useful information, and notes. -
Page 9: Safety Instructions
Check the contents of the consignment for completeness. Check the contents visually to determine whether any damage has occurred during transport. If there are grounds for rejection of the goods, a claim must be filed with the carrier immediately. A Minebea Intec sales or service organization must also be notified. -
Page 10: Installation
Minebea Intec devices. Therefore, check the connection diagrams before connecting and disconnect any cables that have different assignments. Accessories and options from Minebea Intec are designed for optimum compatibility with the device. Therefore, do not use your own solutions. Modification of the device and connection of foreign cables or devices is the responsibility of the operator and must be tested by them accordingly. -
Page 11: Protective Ground Connection
Ex Indicator Midrics 1 (MIXS1) Before connecting or disconnecting additional devices from the data outputs, the indicator must first be disconnected from the mains. The indicator may only be opened by trained technicians according to Minebea Intec specifications. 2.4.4 Protective ground connection The protective ground conductor must never be disconnected. -
Page 12: Device Description
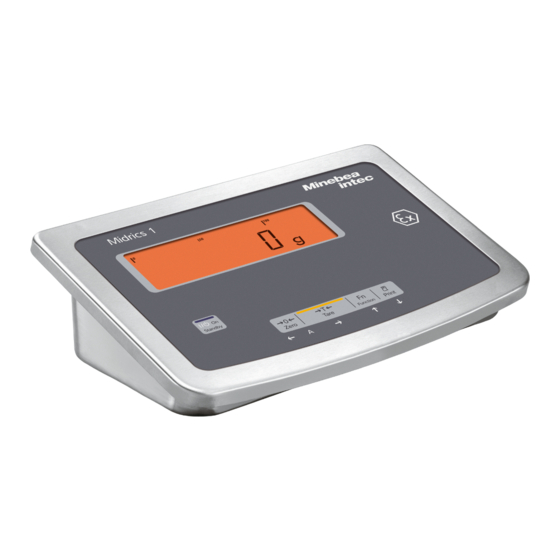
Automatic taring under load Automatic printout when loaded Configurable printout Different interface protocols RS232 or RS422 interface (selectable) Internal Alibi memory for up to 523,700 data logs Second display for other Minebea Intec ex-protected indicator 3.1.1 Device display Front side EN-10 Minebea Intec... - Page 13 3 Device description Ex Indicator Midrics 1 (MIXS1) Legend Pos. Description On/standby switch Display (for detailed illustration, see Chapter Display and operating ele- ments) Zeroing key Tare key Function key: Switch (depending on the setup setting) between the first and se-...
-
Page 14: Housing
Ex Indicator Midrics 1 (MIXS1) 3 Device description Housing 3.2.1 Indicator (scale diagrams) Dimensions in millimeters. 26.5 EN-12 Minebea Intec... -
Page 15: Display And Operating Elements
3 Device description Ex Indicator Midrics 1 (MIXS1) Display and operating elements 3.3.1 General information There are two possible displays: Display for measuring mode (see Chapter 3.3.3.2.1) Display in the "menu mode" (see Chapter 3.3.3.2.2) 3.3.2 Overview Legend Pos. Description... -
Page 16: Display
Ex Indicator Midrics 1 (MIXS1) 3 Device description Pos. Description Display (for detailed illustration, see Chapter 3.3.3.2) Function keys: Zeroing, taring, switching (depending on the Setup menu set- ting) between the first and second weighing units, calibration/adjustment, gross and net readouts or normal and 10x resolution, print/data output (see Chapter 3.3.3.1) - Page 17 3 Device description Ex Indicator Midrics 1 (MIXS1) 3.3.3.2.1 View in the measurement mode Legend Pos. Description Bar graph with 10% marks Displays the percentage at which the weighing range is uti- lized to capacity by the applied gross weight (0% = lower load...
- Page 18 Ex Indicator Midrics 1 (MIXS1) 3 Device description Legend Pos. Description Selected menu item (e.g. printer for setting up the connected printer) Menu history (reference to the top menu level in the setup menu) Note that other sub-menus are available Legend Pos.
- Page 19 3 Device description Ex Indicator Midrics 1 (MIXS1) Description Printout of the menu settings from the current position/printout of the info da- 3.3.3.4 Entering numbers and letters Description Press key for less than 2 seconds: Activate character to the left of the cur-...
-
Page 20: Device Installation
Ex Indicator Midrics 1 (MIXS1) 4 Device installation 4 Device installation General information If the MIXS1 indicator has been ordered with special equipment, it will be delivered with the selected options already installed. Mechanical preparation Connect weighing platform to the analysis device MIXS1. -
Page 21: Leveling The Weighing Platform
4 Device installation Ex Indicator Midrics 1 (MIXS1) 4.2.5 Leveling the weighing platform To achieve reproducible weighing results at all times, the weighing platform must be set up to be precisely horizontal. Therefore the weighing platform must be re-leveled every time it is moved to a different location. - Page 22 Ex Indicator Midrics 1 (MIXS1) 4 Device installation Set up the weighing platform (see the operating instructions for the weighing platform). Route the cable from the weighing platform to the indicator. Open the Midrics 1 (MIXS1) indicator: Place the indicator on a soft surface with the display facing downwards.
- Page 23 4 Device installation Ex Indicator Midrics 1 (MIXS1) 4.2.7.2 Assembling connection and interface cables The cable screw connection (IP66 protection) is pre-assembled on the indicator. NOTICE Risk of property damage Carefully perform all work on the screw connection. Be sure to use a torque wrench. The torque of this cable screw connection is 5 Nm.
-
Page 24: Connection To Strain Gauge And Rs-232/422 Interfaces
Any unused cables must be properly insulated. 4.2.7.4 Connecting the IS platform An Minebea Intec IS platform can also be connected via the serial interface. For this purpose, the indicator must be configured to the interface in the menu: [SETUP]-[COM-1]-[RS-232]-[XBPI.232] Only one scale can be operated on the indicator at any one time. - Page 25 4 Device installation Ex Indicator Midrics 1 (MIXS1) Pos. Description Connection strip for RS232 Connection strip for RS422 Switching the interfaces Connection strip for strain gauge Description Description EXC+ OUT- SENSE+ SENSE- OUT+ EXC- When connecting a load receptor using the 4-cable method (weighing platform cable to be connected has only 4 wires), connect terminal pairs 1 and 2 (EXC+ and SENSE+) and 5 and 6 (SENSE- and EXC-) using a wire jumper.
- Page 26 Ex Indicator Midrics 1 (MIXS1) 4 Device installation Connection strip for RS232 Description Description Connection strip for RS422 Description Description DTR_N - - - TxD_N - - - TxD_P CTS_N DTR_P CTS_P RxD_N RxD_P Switching the interfaces RS232 switch left...
-
Page 27: Closing The Mixs1 Indicator
4 Device installation Ex Indicator Midrics 1 (MIXS1) 4.2.9 Closing the MIXS1 indicator Put the front panel in place and fasten it with the 4 cap nuts (1 Nm). 4.2.10 Note on replacing the battery WARNING Danger of explosion Never replace the battery in an explosive atmosphere! Use only approved battery: PANASONIC CR2032. -
Page 28: Establishing A Power Connection
Should any deviations caused by transport damage become evident during commissioning, disconnect the system from the power supply and inform the Minebea Intec Service Center (no display, no backlighting despite weight value display, no reproducibility of the weight value, no standstill in display, etc.). - Page 29 4 Device installation Ex Indicator Midrics 1 (MIXS1) Item Order no. Adapter cable for 2nd display option, RS-232 interface, length YCC03-XR14M6 6 m, 14-pin male connector Adapter cable for YDI05-Z, RS-232 interface, length 0,2 m, 14-pin YCC03-XR14F02 female connector Adapter cable for YDI05-Z, RS-422 interface, length 0,2 m, 14-pin...
-
Page 30: Getting Started
Ex Indicator Midrics 1 (MIXS1) 5 Getting started Getting started Switching on the device To switch on the scale, press the key Whenever it is switched on, the device performs a self-test. This will display all display segments for a few seconds. -
Page 31: Saving Menu Settings
5 Getting started Ex Indicator Midrics 1 (MIXS1) 2. During the display test, briefly press the key The menu is opened. The top level is always displayed ([APPL], factory setting is English . 5.3.2 Saving menu settings All parameter settings are stored in the non-volatile memory. -
Page 32: Setting Up Password Protection
Ex Indicator Midrics 1 (MIXS1) 5 Getting started 2. During the display test, briefly press the key The menu is opened. The top level is displayed. 3. Press key until the menu item [LANG.] for the language setting is displayed. - Page 33 5 Getting started Ex Indicator Midrics 1 (MIXS1) 2. During the display test, briefly press the key The menu is opened. The top level is displayed. 3. Press key until the menu item [SETUP] is displayed. 4. Press key to access the sub-menu [SETUP].
-
Page 34: Modify Or Delete Password Protection
Ex Indicator Midrics 1 (MIXS1) 5 Getting started 8. Press the key to adopt a character. 9. Enter all other characters of the password as described. 10. Press and hold key to save the password. 11. Use key to exit the menu level in order to make further settings if necessary Press key for more than 2 seconds in order to exit the menu. -
Page 35: Activating The Service Mode
5 Getting started Ex Indicator Midrics 1 (MIXS1) Additions to the weighing parameters: e.g. linearization [CLR.LEG.S] Deleting the internal Alibi memory 5.5.2 Activating the service mode Menu: [SETUP]- [U-CODE]. Switch to the menu mode (see Chapter 5.3). 2. Open the menu [SETUP] with key 3. - Page 36 Ex Indicator Midrics 1 (MIXS1) 5 Getting started Setup information The ADC configuration is only possible when the locking switch is open. Close the locking switch after the ADC configuration, otherwise the "overload" ("H") and "underload" ("L") conditions will not be displayed.
- Page 37 5 Getting started Ex Indicator Midrics 1 (MIXS1) The entire weighing range is divided into verification intervals according to the smallest display increment d and the maximum weight. The readability corresponds to the display increment d. Multi-interval scale [MULT.INT.]: The "multi-interval scale" function divides the weighing range into up to 3 ranges with different readabilities.
- Page 38 Ex Indicator Midrics 1 (MIXS1) 5 Getting started — SAVE Save settings 5.5.3.2 Configuring the ADC converter Open the locking switch Remove the cover cap from the back of the housing on the indicator 2. Push the switch to the right ("open position") Set service mode (see Chapter 5.3).
- Page 39 5 Getting started Ex Indicator Midrics 1 (MIXS1) 5. Press key until the menu item [ADC-CON] is displayed. 6. Press key to save the selection. 7. Select whether a standard configuration [STAND.] or a verification configuration [VERIF.] is to be carried out (e.g. standard configuration in this example). For details on the procedure see Chapter 5.5.3.3...
- Page 40 Ex Indicator Midrics 1 (MIXS1) 5 Getting started 2. Select the [STAND.] menu with key and confirm with key (if necessary, press the key several times until the [STAND.] menu appears). Range selection 3. Select the [RANGES] menu with key...
- Page 41 5 Getting started Ex Indicator Midrics 1 (MIXS1) 8. Select the [MAX.] menu with key and confirm with key (if necessary, press the key several times until the [MAX.] menu appears). 9. Enter the value (e.g. 30 kg) with the keys usable weight units 10.
- Page 42 Ex Indicator Midrics 1 (MIXS1) 5 Getting started 2. Select the [STAND.] menu with key and confirm with key (if necessary, press the keys until the [STAND.] menu appears). Range selection 3. Select the [RANGES] menu with key and confirm with key Multi-interval scale 4.
-
Page 43: Entering Geographical Data For Legal Metrology
5 Getting started Ex Indicator Midrics 1 (MIXS1) 8. Select the [RANGE 1] menu with key and enter values (e.g. 6 kg). also enter values for range limit 2 (e.g. 15 kg) and maximum load (e.g. 30 kg) continue as in example 1 after entering the maximum load. - Page 44 Ex Indicator Midrics 1 (MIXS1) 5 Getting started Either the value pair "latitude in degrees" (menu item 1.20.1) and "altitude in m above sea level" (menu item 1.20.2) or the value of the gravitational acceleration (menu item 1.20.3) can be entered. Here, the gravitational acceleration has priority over latitude and altitude: If it is entered, 99999.99 is displayed for the latitude and 9999999 for...
-
Page 45: Entering Calibration And Linearization Weights
5 Getting started Ex Indicator Midrics 1 (MIXS1) 5.5.4.1 Displaying the geographical values during the calibration procedure Note: The set geographic values are displayed during the calibration procedure if the display of this data is activated in the setup menu at [UTILIT]. -
Page 46: Quick Adc Configuration
Ex Indicator Midrics 1 (MIXS1) 5 Getting started 4. Enter external linearization weights (menu items 1.18.2 … 1.18.5). 5.5.6 Quick ADC configuration Pull the power plug out of the indicator. 2. Push the menu switch to the "Open" position. 3. Connect the power supply unit and press the key during the "88888888"... -
Page 47: External Linearization
5 Getting started Ex Indicator Midrics 1 (MIXS1) Set preload (menu item 1.9.8) (only possible when calibration is not mandatory) Delete preload (menu item 1.9.9) (only possible when calibration is not mandatory) Lock key (menu item 1.9.10) ‑ ‑ (press and hold) Menu tree for assigning functions to the key —... -
Page 48: Set Preload
Ex Indicator Midrics 1 (MIXS1) 5 Getting started After approx. 2 seconds, the prompt appears to place the first linearization weight on the scale. 4. Place the required weight on the scale. After a short time, the difference between the measured value and the true weight is displayed. -
Page 49: Delete Preload
5 Getting started Ex Indicator Midrics 1 (MIXS1) The key (press and hold) must be assigned the function "Set preload" (menu item 1.9.8) (see Chapter 6.3.1.1 menu item 1.9). Note: After deleting the preload, reassign the key (press and hold) to its original function (e.g.external calibration/adjustment with user-defined weights) under menu item 1.9... - Page 50 Ex Indicator Midrics 1 (MIXS1) 5 Getting started Note: The entered data is saved by selecting the menu item 1.19.8. Once it has been saved, the data can no longer be read out. Menu tree for calibration without weight Menu: [SETUP]- [WP-1]- [INTERN]- [1.19] (see also Chapter 6.3.1.1).
-
Page 51: Menu Structure
6 Menu structure Ex Indicator Midrics 1 (MIXS1) Menu structure The <keyword keyref="device-name"/>s can be adjusted to the user’s requirements in the menu. User data can be entered and stipulated parameters can be selected. The menu is a mix of various textual levels and a number menu. -
Page 52: Setup
Ex Indicator Midrics 1 (MIXS1) 6 Menu structure FN-KEY — OFF * not assigned — GRO NET Gross/net switch — 2. UNIT Display of the 2nd unit — RES 10 10-times higher resolution * Factory setting SETUP Adjust device settings to user requirements. If a password is active, there will be a password request. - Page 53 6 Menu structure Ex Indicator Midrics 1 (MIXS1) — 1.1.3 Unsteady environment — 1.1.4 Very unsteady environment — 1.2 Application filter — 1.2.1 * Weighing out — 1.2.2 Batching — 1.2.3 Low filtering — 1.2.4 Without filtering — 1.3 Standstill range —...
- Page 54 Ex Indicator Midrics 1 (MIXS1) 6 Menu structure — 1.7.22 Pound:ounce/lb:oz — 1.8 Display accuracy 1 — 1.8.1 * All characters on — 1.8.2 Reduced by one character on load change — 1.8.14 10-times higher resolution — 1.8.15 Increase resolution by 2 verification intervals (e.g.
- Page 55 6 Menu structure Ex Indicator Midrics 1 (MIXS1) — 1.18.5 Enter lin. weight 4 — 1.19 Calibration without weight — 1.19.1 Maximum capacity — 1.19.3 Sensitivity 1 — 1.19.4 Sensitivity 2 — 1.19.5 Sensitivity 3 — 1.19.6 Sensitivity 4 — 1.19.7 Zero point —...
- Page 56 Ex Indicator Midrics 1 (MIXS1) 6 Menu structure Increase resolution by 1 verification interval (e.g.from 2 g to 1 g or 10 g to 5 g) — 3.3 Weight unit 3 (depending on weighing platform type) (for parameters see 3.1 "Weight unit 2") —...
- Page 57 6 Menu structure Ex Indicator Midrics 1 (MIXS1) DATPROT — SBI SBI standard version (see Chapter 6.3.2.1.1) — XBPI.232 xBPI.232 — SMA Interface function SMA (see Chapter 6.3.2.1.1) 6.3.2.1.1 SETUP — COM-1 Adjustment of the RS-232/422 interface — DATPROT Data protocols —...
- Page 58 Ex Indicator Midrics 1 (MIXS1) 6 Menu structure — 7.2 Data output: Line format — 7.2.1 For raw data: 16 characters — 7.2.2 * For other applications: 22 characters — 9 Factory settings for COM1 — 9.1 Factory settings of the number menu for COM1: —...
- Page 59 6 Menu structure Ex Indicator Midrics 1 (MIXS1) 6.3.2.2 PRINTER SETUP — COM-1 Adjustment of the RS-232/422 interface — PRINTER Configure printer PRINTER — YDP20 Printer YDP20 (see Chapter 6.3.2.2.1) — YDP14IS Printer YDP14IS — LINE * Line printing — LABEL Label printing —...
-
Page 60: Ctrl Io
Ex Indicator Midrics 1 (MIXS1) 6 Menu structure 6.3.2.2.2 UNI-PRI SETUP — COM-1 Adjustment of the RS-232/422 interface — PRINTER Data protocols — UNI-PRI Universal printer UNI-PRI — 5 Menu level: 5 — 5.1 Baud rate — 5.1.1 150 baud —... -
Page 61: Prtprot
6 Menu structure Ex Indicator Midrics 1 (MIXS1) — 8.4.2 Activate and hold key — 8.4.3 Activate key — 8.4.4 Activate and hold key — 8.4.5 Activate key — 8.4.7 Activate key — 8.4.8 Zero/tare combi-function — 8.4.9 Activate key —... -
Page 62: Utilit
Ex Indicator Midrics 1 (MIXS1) 6 Menu structure — 7.18.1 * Printout selection — 7.18.1.1 All data logs — 7.18.1.2 Preset number of data logs under 7.18.2 (default) — 7.18.2 Number to be printed Enter quantity (1–255, default is 1) —... -
Page 63: Info
6 Menu structure Ex Indicator Midrics 1 (MIXS1) — 9 Menu level: 9 — 9.1 Factory settings for the "Operation" number menu — 9.1.1 — 9.1.2 * Warning: Symbols 12 flashes (all at the same time) * Factory setting INFO... -
Page 64: Flex.inf
Ex Indicator Midrics 1 (MIXS1) 6 Menu structure 6.4.4 FLEX.INF INFO — FLEX.INF FlexPrint settings FLEX.INF — APPLSET File name — ID 123 — V 123 Version The three parameters are displayed for each loaded file. 6.4.5 LEGAL.ST INFO — LEGAL.ST Alibi memory data LEGAL.ST... -
Page 65: Verif
6 Menu structure Ex Indicator Midrics 1 (MIXS1) — MAX Max. load (enter value) — MULT.INT Multi-interval scale — D Increment (enter value) — RANGE 1 Range limit 1 (enter value) — RANGE 2 Range limit 2 (enter value) — RANGE 3 Range limit 3 (enter value) —... - Page 66 Ex Indicator Midrics 1 (MIXS1) 6 Menu structure — MIN Min. load (enter value) — MAX Max. load (enter value) — MULT.INT Multi-interval scale — E Calibration value e (enter value) — MIN Min. load (enter value) — RANGE 1 Range limit 1 (enter value) —...
-
Page 67: Operating
7 Operating Ex Indicator Midrics 1 (MIXS1) Operating Weighing This application is always available in operation. Characteristics: Zero with key Adopt tare weight from the scale with key Tare container weight automatically, menu item 3.7.2 Use key to switch the display between: Gross value and net value 10-times higher resolution (display: max. -
Page 68: Automatic Printout
Ex Indicator Midrics 1 (MIXS1) 7 Operating 1 display increment (no minimum load) up to 1000 display increments. Example: For d = 1 g, one partial increment is 1 g. With the setting "1000 display increments", the value is only stored as a "tare" from a placement weight of 1000 g. - Page 69 7 Operating Ex Indicator Midrics 1 (MIXS1) Automatic Switch off according to menu item [8.9] "Timer") * Factory setting 7.1.4.5 Timer Menu: [SETUP]- [BETRIEB]- [8.9] (see also Chapter 6.3.5) The timer for switching off the device and/or display illumination can be set to 2, 4 or 10 minutes in the setup menu under (8.9).
- Page 70 Ex Indicator Midrics 1 (MIXS1) 7 Operating 4. Press the key to tare the scale. The display for tared scale with container appears. 5. Fill with the sample (here, e.g.120.2 g) The display for tared scale with weighing result appears.
- Page 71 7 Operating Ex Indicator Midrics 1 (MIXS1) Display of weight value with 10x resolution 7. Press the key to switch to the previous display. Display of the net weight value as before switching. EISENSCHMIDT GOETTINGEN 12.08.2021 15:10 -------------------- 170.2 g 50.0 g...
- Page 72 Ex Indicator Midrics 1 (MIXS1) 7 Operating 2. Press the key to zero the scale. The zeroed scale display appears. 3. Place the empty container on the scale. 4. Press the key to tare the scale. If the automatic tare function is active, you do not need to tare the scale by pressing key.
-
Page 73: Calibration, Adjustment
7 Operating Ex Indicator Midrics 1 (MIXS1) 5. Place the sample on the scale. Wait until the weight unit is displayed (stability check). The display for tared scale with weighing result appears. 6. Read off the weight value. Calibration, adjustment During calibration, a possible deviation between the displayed measured value and the true weight of a sample (calibration/adjustment weight) becomes evident. -
Page 74: Set "Mandatory Calibration" Function
Ex Indicator Midrics 1 (MIXS1) 7 Operating 7.2.1 Set "Mandatory calibration" function There is a switch to change over to "Goods weighing in legal metrology" (ADC configuration: [VERIF.] selected for legal metrology). This is located under a cover cap to the rear left of the weighing platform housing. -
Page 75: Example: External Calibration
7 Operating Ex Indicator Midrics 1 (MIXS1) — 1.17.1 Gram — 1.17.2 * Kilogram — 1.17.3 Tonne — 1.17.4 Pound — 1.18 Entering the calibration and linearization weights — 1.18.1 External user calibration weight (service mode not required) (enter, e.g.: 10,000 g) —... - Page 76 Ex Indicator Midrics 1 (MIXS1) 7 Operating 2. Start calibration of the scale by pressing and holding down the key (e.g. the WP symbol flashes after the calibration alert). Display [C.EXT.DEF] appears for two seconds. The prompt appears to place the calibration/adjustment weight onto the scale (here: 10,000 g).
-
Page 77: Configuring Protocol Printing
7 Operating Ex Indicator Midrics 1 (MIXS1) Ext. calibration Soll 10000 g Diff. + 4. Start calibration by pressing . (Cancel calibration/adjustment by pressing Once calibration is complete, the calibration/adjustment weight appears. The GMP protocol is printed out. -------------------- 24.02.2021 10:15 Ser.no. -
Page 78: Adjustable Parameters
Ex Indicator Midrics 1 (MIXS1) 7 Operating YDP05, "Label, form feed manual" setting Check ISO/GMP protocol: The setup setting under ISO/GMP protocol is also active when the protocol is configured. 7.3.1 Adjustable parameters PRTPROT — 7 Menu level: 7 — 7.4 Header entry —... -
Page 79: Data Interfaces
When using third-party or commercially available RS‑232 connection cables: NOTICE The pin assignments are often not compatible with Minebea Intec devices. Non-compliance can lead to errors or to the damage to the indicator and any peripheral devices connected to it. -
Page 80: Configure Data Interface As Communication Interface (Datprot)
Ex Indicator Midrics 1 (MIXS1) 8 Data interfaces Print manually/automatically Manual after standstill Automatic printout time-dependent after 1 display cycle Tare after single print Line format For other App/GLP (22 characters) Configure data interface as communication interface (DATPROT) The interface is set up as a communication interface in the setup menu under COM1 "Data protocols"... -
Page 81: Data Output Format
8 Data interfaces Ex Indicator Midrics 1 (MIXS1) Command Meaning Lock keyboard Send display value to the data interface Output acoustic signal Release keyboard Tare and zero (tare combi-function) ESC a4xx_ Read the Alibi memory for transaction number specified with xx... -
Page 82: Output Format With 16 Characters (Without Header)
Ex Indicator Midrics 1 (MIXS1) 8 Data interfaces that the print line consists of 16 characters (14 printable characters plus two control characters). Example: Output without marking 253 pcs 16 characters are displayed Example: Output with marking 253 pcs 22 characters are displayed Characters that are not visible in the display are displayed as blank spaces. -
Page 83: Output Format With 22 Characters
8 Data interfaces Ex Indicator Midrics 1 (MIXS1) Error message Position 10 11 12 13 14 15 16 CR LF CR LF *: Blank space #: Number (2‑ or 3‑figure error number) Example: Output of the weight value +1255.7 g... -
Page 84: Automatic Data Output (Sbi)
Ex Indicator Midrics 1 (MIXS1) 8 Data interfaces Position 1 2 3 4 5 6 7 8 9 10 11 12 13 14 15 16 17 18 19 20 21 22 * * * * * * * * * L L * * * * * CR LF... -
Page 85: Configure Data Interface As Printer Interface (Printer)
8 Data interfaces Ex Indicator Midrics 1 (MIXS1) Configure Midrics 1 (MIXS1) on the COM1 interface according to the parameters of the main scale or indicator, e.g.: [SETUP]- [WP-1]- [COM-1]- [RS-232]- [XBPI.232] (ADC-232) or [SETUP]- [WP-1]- [COM-1]- [RS-2323]- [SBI-STD] (SBI-APP). -
Page 86: Gmp Protocol
Ex Indicator Midrics 1 (MIXS1) 8 Data interfaces Separation block Dotted line, blank line This block cannot be deactivated; it is printed automatically before the subsequent information blocks are printed. GMP protocol This function adds a GMP header and a GMP footer to the print protocol (GMP: Good Manufacturing Practice). - Page 87 8 Data interfaces Ex Indicator Midrics 1 (MIXS1) KOPFZEILE1 KOPFZEILE2 14.01.2021 09:43 –------------------ 1.402 kg 0.200 kg 1.202 kg –------------------ Display with identification of the weighing platform –------------------ Ser.no. 80705337 1.402 kg 0.200 kg 1.202 kg –------------------ Print menu parameters:...
-
Page 88: Maintenance/Repairs/Cleaning
9 Maintenance/repairs/cleaning Maintenance/repairs/cleaning Maintenance Regular maintenance preformed on your device by an employee of Minebea Intec Customer Service will ensure continued measurement accuracy. Minebea Intec can provide you with maintenance contracts with cycles from one month up to two years. The frequency of the maintenance intervals depends on the operating conditions and the tolerance requirements of the operator. -
Page 89: Cleaning Stainless Steel Surfaces
9 Maintenance/repairs/cleaning Ex Indicator Midrics 1 (MIXS1) NOTICE Improper cleaning can cause significant damage to property. No moisture should be allowed to enter the indicator. Do not use aggressive cleaning agents (solvents or similar). Do not spray the device with water or clean it using compressed air. -
Page 90: 10 Disposal
Minebea Intec at a charge. This option of returning the product is intended to provide proper recycling or reuse in a manner that is collected separately from municipal waste. -
Page 91: 11 Error Messages
11 Error messages Ex Indicator Midrics 1 (MIXS1) 11 Error messages A differentiation is made between the following errors: Dynamic errors are displayed with an error code (e.g. INF 01) for the duration of the error. Temporary errors are displayed for 2 seconds (e.g. INF 07) Fatal errors are displayed permanently (e.g. - Page 92 Ex Indicator Midrics 1 (MIXS1) 11 Error messages Display Cause Remedy INF 72 Not possible to adopt the measured value (e.g. None maximum for item counter reached) INF 73 Data cannot be written or read consult Minebea Intec customer service INF 74 Function is locked (e.g.
-
Page 93: 12 Technical Data
Maximum relative humidity 80%, decreasing linearly to 50% relati- ve humidity at 40°C Mains supply only by suitable and, if necessary, country-specific ex-protected power supply unit from Minebea Intec, model YPS08-Y. / YPS08-Z.. 100-240 VAC (± 10 %), 50-60 Hz Required diameter of cables for insertion through the cable gland (M16 x 1.5):... -
Page 94: 13 Appendix
Ex Safety Instructions 67002-751-17 Control Drawing 67002-751-07 13.2 Plates and markings Identification plate: Minebea Intec Bovenden GmbH & Co. KG Canada: USA: Zone 1, Ex ib IIC T4 Gb IS CL I, II, III, Div 1, Leinetal 2, 37120 Bovenden, Germany Zone 21, Ex ib IIIC T80°C Db... -
Page 95: 13.3 Fcc Note
13 Appendix Ex Indicator Midrics 1 (MIXS1) 13.3 FCC note Note: USA: This equipment has been tested and found to comply with the limits for a Class A digital device, pursuant to part 15 of the FCC Rules. These limits are designed to provide reasonable protection against harmful interference when the equipment is operated in a commercialenvironment. - Page 96 Ex Indicator Midrics 1 (MIXS1) 13 Appendix The first position in the display flashes. Select characters using the keys Numbers in ascending order (0–9) displays: then the characters . and – then letters alphabetically in descending order (from _Z–A) Letters in alphabetical order a–Z displays: then the characters –...
- Page 100 български (bg) čeština (cs) dansk (da) Декларация за съответствие Prohlášení o shodě Overensstemmelseserklæring 1. Модел на продукта / Номер на продукта: 1. Model výrobku / číslo výrobku: 1. Produktmodel/produktnummer: 2. Наименование и адрес на производителя 2. Jméno a adresa výrobce (2.1) a jeho 2.
- Page 101 eesti keel (et) français (fr) hrvatski (hr) Vastavusdeklaratsioon Déclaration de conformité Izjava o sukladnosti 1. Tootemudel/tootenumber: Modèle/numéro de produit : 1. Model proizvoda / broj proizvoda: 2. Naziv i adresa proizvođača (2.1) i njegovog 2. Tootja nimi ja aadress (2.1) ning tema volitatud 2.
- Page 102 latviešu valoda (lv) malti (mt) nederlands (nl) Atbilstības deklarācija Dikjarazzjoni ta’ konformità Conformiteitsverklaring 1. Produkta modelis / produkta numurs: 1. Mudell tal-prodott / numru tal-prodott: 1. Productmodel/productnummer: 2. Ražotāja (2.1.) un tā pilnvarotā pārstāvja (2.2.) 2. L-isem u l-indirizz tal-manifattur (2.1) u tar- 2.
- Page 103 slovenščina (sl) slovenčina (sk) suomi (fi) Vyhlásenie o zhode Izjava o skladnosti Vaatimustenmukaisuusvakuutus 1. Model výrobku/číslo výrobku: 1. Model proizvoda/serijska številka proizvoda: 1. Tuotemalli/tuotenumero: 2. Meno/názov a adresa výrobcu (2.1) a jeho 2. Ime in naslov proizvajalca (2.1) ter njegovega 2.
- Page 104 Status: Current Issue No: 3 Issue 1 (2022-07-14) Issue 0 (2021-12-23) Date of Issue: 2023-06-04 Applicant: Minebea Intec Bovenden GmbH & Co. KG Leinetal 2 37120 Bovenden Germany Equipment: Model MIXS1 Weighing Indicator Optional accessory: Type of Protection: Intrinsic Safety 'ib' Marking: Ex ib IIC T4 Gb;...
- Page 105 Conformity Certificate No.: IECEx FMG 20.0032X Page 2 of 4 Date of issue: 2023-06-04 Issue No: 3 Manufacturer: Minebea Intec Bovenden GmbH & Co. KG Leinetal 2 37120 Bovenden Germany Manufacturing Sartorius Lab Instruments GmbH & locations: Co. KG...
- Page 106 IECEx Certificate of Conformity Certificate No.: IECEx FMG 20.0032X Page 3 of 4 Date of issue: 2023-06-04 Issue No: 3 EQUIPMENT: Equipment and systems covered by this Certificate are as follows: See Annex for Description SPECIFIC CONDITIONS OF USE: YES as shown below: 1.
- Page 107 IECEx Certificate of Conformity Certificate No.: IECEx FMG 20.0032X Page 4 of 4 Date of issue: 2023-06-04 Issue No: 3 DETAILS OF CERTIFICATE CHANGES (for issues 1 and above) Minor drawing updates Annex: Annex to IECEx FMG 20.0032X Issue 3.pdf...
- Page 108 Minebea Intec Bovenden GmbH & Co. KG IECEx FMG 20.0032X Issue 3 Annex Page: 1 DESCRIPTION General The Model MIXS1 is a weighing indicator for use with Intrinsically Safe scale platforms. The weighing indicator has a display and also has RS232 and RS422 data signals for delivering the information to the control room.
- Page 109 Richard A Zammitt Ireland 12.1.0 07th June 2023...
- Page 112 29th 07th June 2023 04th June 2023...
- Page 119 Any tampering with the equipment by anyone, other than repair work done by authorized Minebea Intec service technicians, will result in the loss of EX conformity and in the forfeiture of all claims under the manufacturer's warranty. Only authorized specialists may open the equipment.
- Page 120 Hazardous s Location n Class s I, , II, , III, , Div v 1, , GP P A,B,C,D,E,F,G Class s I, , Zone e 1, , Grp. . IIC Class s II, , Zone e 21 Class s III -10°C C (+14°F) ) <...
- Page 121 Note: No revision to drawing without prior FM Approval. The Associated Apparatus shall be FM Approved for installations in the U.S. The Associated Apparatus shall be Canadian Approved for Installations in Canada. The Associated Apparatus shall be ATEX Certified for Installations in Europe. The Associated Apparatus shall be IECEx Certified for IECEx installations.
- Page 122 Note: [18] Cable of the power supply up to 50m (165 ft). [19] Option: separable connection RS232 (external separable connection - Indicator): N: DTR 14-pin female connector RS232 (external separable connection 2nd display mode): N: CTS [20] 14-pin male connector RS232 (internal terminal J800): Only one of the two interfaces - RS232 or RS422 - can be used at the same time.
- Page 123 Note: UNI-IN (internal terminal J400): UNI-IN [23] Only passive devices (e.g. switch) might be connected to this terminal. Supply (external separable connection): VIN_1 VIN_2 4-pin male connector Supply (internal terminals J100, J101): [24] J100 J101 J101 J100 VIN_1 VIN_2 Both terminals - J100 and J101 - must be connected to the power supply for proper operation. [25] YPS08-Y...
- Page 124 Published by Minebea Intec Bovenden GmbH & Co. KG | Leinetal 2 | 37120 Bovenden, Germany Phone: +49.551.309.83.0 | Email: info@minebea-intec.com www.minebea-intec.com...
Need help?
Do you have a question about the Ex Indicator Midrics 1 and is the answer not in the manual?
Questions and answers