Table of Contents
Advertisement
Advertisement
Table of Contents

Related Manuals for MSI Claw


Summary of Contents for MSI Claw
- Page 2 USER GUIDE MSI Claw, the handheld PC...
-
Page 3: Table Of Contents
Top and Bottom Side Views ..................2-3 Upper and Lower Side Views ..................2-5 Specifications .......................2-7 How to Get Started ..............3-1 Begin to Use MSI Claw ....................3-2 How to Manage Power Supply ..................3-3 PD Adapter ......................3-3 Battery ........................3-3 How to Set Up a Power Plan in Windows OS ..............3-5 Choose or Customize a Power Plan ...............3-5... - Page 4 How to Connect the Internet in Windows OS .............3-15 Wireless LAN......................3-15 How to Set Up Bluetooth Connection in Windows OS ..........3-17 Activating Bluetooth Connection ................3-17 About M.2 SSD Slot ....................3-20 How to Connect External Devices ................3-20 About MSI Center M ....................3-21 About Quick Settings ....................3-22...
-
Page 5: Copyright And Trademarks Notice
Copyright and Trademarks Notice Copyright © Micro-Star Int’l Co., Ltd. All rights reserved. The MSI logo used is a registered trademark of Micro-Star Int’l Co., Ltd. All other marks and names mentioned may be trademarks of their respective owners. No warranty as to accuracy or completeness is expressed or implied. -
Page 6: Fcc-B Radio Frequency Interference Statement
FCC-B Radio Frequency Interference Statement This equipment has been tested and found to comply with the limits for a Class B digital device, pursuant to part 15 of the FCC rules. These limits are designed to provide reasonable protection against harmful interference in a residential installation. -
Page 7: Ce Conformity
CE Conformity This device is in compliance with the essential safety requirements and other relevant provisions set out in the European Directive. Battery Regulations European Union: Batteries, battery packs, and accumulators should not be disposed of as unsorted household waste. Please use the public collection system to return, recycle, or treat them in compliance with the local regulations. -
Page 8: Rohs Statement
Vietnam RoHS As from December 1, 2012, all products manufactured by MSI comply with Circular 30/2011/TT-BCT temporarily regulating the permitted limits for a number of hazardous substances in electronic and electric products. -
Page 9: Safety Instructions
• Always use the power adapter and power cord approved by MSI, or a compatible one purchased from MSI. • Place the power cord in a way that people are unlikely to step on it. - Page 10 • Users should contact the local authorized point of collection for recycling and disposing of their end-of-life products. • Visit the MSI website and locate a nearby distributor for further recycling information. • Users may also reach us at gpcontdev@msi.com for information regarding proper disposal, take-back, recycling, and disassembly of MSI products.
-
Page 11: Introductions
Introductions... -
Page 12: Unpacking
Congratulations on becoming the owner of this handheld device, the finely designed MSI Claw. You will have a delightful and professional experience in using this exquisite handheld device. We are proud to tell users that this device is thoroughly tested and certified by our reputation for unsurpassed dependability and customer satisfaction. -
Page 13: Product Overview
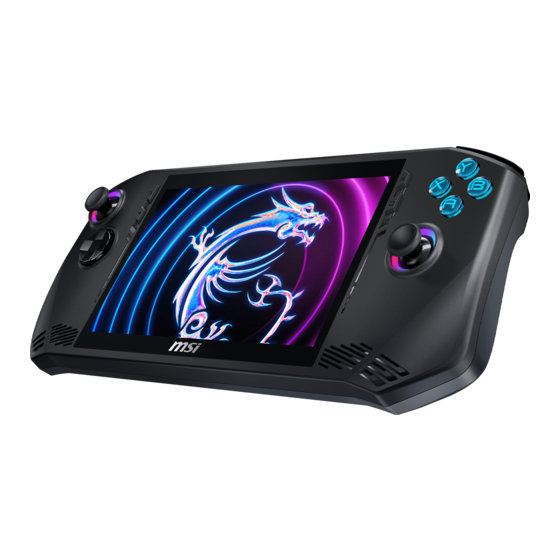
Product Overview This section provides the description of basic aspects of the device. It will help you to know more about the appearance of this device before using it. Please be aware that the figures shown here are for reference only. Top and Bottom Side Views... - Page 14 Use this button to access Quick Settings. Touch Screen Monitor This device is equipped with a multi-touch screen monitor which allows users to interact with MSI Claw by using fingers or stylus. View Button This button works differently depending on the app or game.
-
Page 15: Upper And Lower Side Views
Upper and Lower Side Views RB Button Control button for game playing. RT Button Control button for game playing. Volume Buttons Use both buttons to increase or decrease the built-in speaker’s volume. Ventilator The ventilator is designed to cool the system. DO NOT block the ventilator for air circulation. - Page 16 Introductions Power Button/ Status LED/ Fingerprint Sensor Power Button • Press this button to power on the device. • While the device is powered on, press this button to force it into sleep state. Press again to wake up the system from sleep state.
-
Page 17: Specifications
Specifications The specifications listed here is reference only, and may vary and change without notice. Visit MSI official website at www.msi.com, or contact the local retailers to learn about the details of the product you purchased. It is always recommended to use an authorized power adapter and a power cord to supply power to the device while performing multiple tasks. - Page 18 Introductions I/O Port 1 x USB4 USB-C • PCIe, HDMI™, DisplayPort connection may be optionally supported • 8K display monitor output • Up to 40Gbps transfer rate Thunderbolt • Power Delivery function may be optionally supported. Choose either way to use Power Delivery function to supply power for the device: (1) connect a 20V, 65~100W USB-C PD adapter.
-
Page 19: How To Get Started
How to Get Started... -
Page 20: Begin To Use Msi Claw
How to Get Started Begin to Use MSI Claw For a new user of MSI Claw, we would like to suggest you follow the illustrations below to begin to use the handheld device. -
Page 21: How To Manage Power Supply
Below are some Dos and Don'ts of an PD adapter. ▶ Dos • Use the adapter that shipped with MSI Claw only. • Always be aware of heat coming from the in use PD adapter. • Unplug the AC power cord before disassembly the device. - Page 22 How to Get Started ▶ Battery type • This device may be equipped with a high-capacity Li-ion or Li-polymer battery pack depending on the model you have. • The rechargeable battery is an internal power source of the device. ▶ Battery charging behavior To optimize battery life and avoid a sudden power loss, read the tips below: •...
-
Page 23: How To Set Up A Power Plan In Windows Os
How to Set Up a Power Plan in Windows OS A power plan is a collection of hardware and system settings that manages how your device uses and conserves power. Power plans can save energy, maximize system performance, or balance energy conservation with performance. The default power plans —... - Page 24 How to Get Started...
-
Page 26: Create Your Own Power Plan
How to Get Started Create Your Own Power Plan You are allowed to create your own Power Plan and customize it to meet personal requirements. Click [Create a power plan] in [Power Options]. Start with an existing plan and give the new power plan a name. Click [Next] to continue. -
Page 27: How To Set Up Windows Hello
How to Set Up Windows Hello Windows Hello is a more secure, personal way to get an instant access to your Windows operating system using fingerprint or facial recognition. The feature requires fingerprint reader or a infrared camera that supports it. Once you’re set up, you’ll be able to sign in with a quick swipe or glance. - Page 28 How to Get Started 3-10...
-
Page 29: Setting Up Windows Hello Pin
Setting up Windows Hello PIN A Windows Hello PIN is a fast, secure way to sign in to your device, apps and services. The figures shown here are for reference only, they may be varied from the actual ones. Select [PIN (Windows Hello)], and then click [Set up] to continue. Verify your account's password first. - Page 30 How to Get Started 3-12...
-
Page 31: Setting Up Windows Hello Fingerprint
Setting up Windows Hello Fingerprint * For selected models only Time to say goodbye to entering complex passwords and start using your fingerprint to unlock your device and verity your identity. Select [Fingerprint Recognition (Windows Hello)], click [Set up] to open up the Windows Hello setup wizard, and then click [Get Started] to continue. - Page 32 How to Get Started 3-14...
-
Page 33: How To Connect The Internet In Windows Os
How to Connect the Internet in Windows OS The figures shown here are for reference only, they may be varied depending on the different version of Windows operating system installed. Wireless LAN Wireless LAN is a wireless broadband connection that allows you to connect to the Internet without using any cables. - Page 34 How to Get Started 3-16...
-
Page 35: How To Set Up Bluetooth Connection In Windows Os
How to Set Up Bluetooth Connection in Windows Bluetooth pairing is a process in which two Bluetooth devices communicate with each other through an established connection. The figures shown here are for reference only, they may be vary depending on the different version of Windows operating system installed. - Page 36 How to Get Started 3-18...
- Page 37 3-19...
-
Page 38: About M.2 Ssd Slot
To connect these peripheral devices, refer to the instruction manuals of each device first, and then connect the device to MSI Claw. MSI Claw is capable to auto detect the connected devices, and if there is no detection of the devices, please manually enable the devices by going to [Start Menu/ Windows System/ Control Panel/ Hardware and Sound/ Add a device] to add the new devices. -
Page 39: About Msi Center M
About MSI Center M MSI Claw is equipped with an exclusive application, MSI Center M, created only for MSI’s products, delivering optimized performance, and efficiency to gamers and diverse users. Use MSI Button to access MSI Center M application. Please set MSI Center M as the default startup screen for using Quick settings and customized features. -
Page 40: About Quick Settings
Users are allowed to get instant options in game playing in accordance with users’ needs through Quick Settings, such as adding a Bluetooth device or modify User Scenarios. Use Quick Settings Button to access Quick Settings. Visit MSI official website at www.msi.com to learn further information. - Page 41 3-23...
Need help?
Do you have a question about the Claw and is the answer not in the manual?
Questions and answers