Table of Contents
Advertisement
Quick Links
Advertisement
Table of Contents

Related Manuals for SnoMaster SM-26


Summary of Contents for SnoMaster SM-26
- Page 1 USER MANUAL AND PRODUCT SPECIFICATIONS SM-26 (BLACK) ICE-MAKER...
-
Page 3: Table Of Contents
CONTENTS WARRANTY, SERVICE AND SUPPORT Warranty Registration Service and Support IMPORTANT SAFETY INFORMATION Before Using Your Appliance Critical Safety Information For Your Safety PRODUCT FEATURES INSTALLATION INSTRUCTIONS Accessories Included Structure Operation Procedure Control Panel MAINTENANCE Cleaning the Interior Cleaning the Exterior ENERGY SAVING TIPS TROUBLESHOOTING... -
Page 4: Warranty, Service And Support
WARRANTY WARRANTY ON COMPRESSOR ON THE UNIT THAN YOU FOR PURCHASING THE SM-26 (BLACK), 26KG PLUMBED-IN ICE-MAKER WARRANTY, SERVICE AND SUPPORT This product is warranted for 5 years on the compressor, 3 years on the unit and 1 year on all parts not listed from the date of purchase. -
Page 5: Important Safety Information
This manual contains important information including safety, installation, maintenance and warranty instructions of the SnoMaster SM-26 (BLACK), 26Kg Plumbed-In Ice-Maker. Please read this manual carefully before use and follow all safety information and instructions. It is recommended to keep this manual for easy reference so that you are familiar with the operation and maintenance of your appliance. -
Page 6: Before Using Your Appliance
• If the appliance power supply cord is damaged, it must be replaced by SnoMaster, its approved agent, or a similarly qualified person to prevent any hazard. • It is recommended that the circuit breaker size should be no more than 20 amps. -
Page 7: Product Features
This appliance contains R600a refrigerant, which is FLAMMABLE and may cause a fire or an explosion. WHEN DISPOSING THE APPLIANCE Please observe the following instructions: • Always ensure the appliance is out of reach of children. Before disposing of it, damage the body to prevent children from climbing inside, ensuring their safety. -
Page 8: Installation Instructions
WATER INLET ~ WATER FILLING ~ ICE MAKING ~ WATER RELEASING ~ ICE DROPPING All these processes are automatically controlled for continuous ice-making. Should the water supply deplete or the ice storage bin reach capacity, the operational panel's indicator light will activate, and the ice-maker will cease operation automatically. -
Page 9: Accessories Included
ACCESSORIES INCLUDED Please Check If All The Accessories Shown Below Are Included: 2 x O RINGS TO 1 x ICE SCOOP 1 X FILTER HOUSING 4 x SCREWS FOR SEAL THE WATER BRACKET FILTER CASING INLET/ OUTLET BRACKET PIPES 1 x FILTER CARTRIDGE 1 x FILTER CARTRIDGE 2 x WATER INLET / HOUSING... -
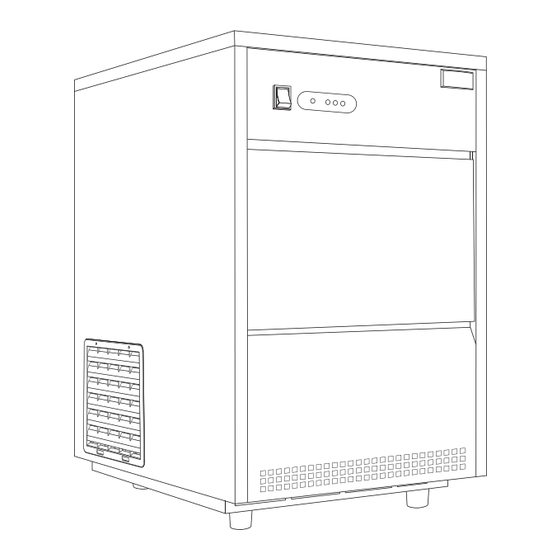
Page 10: Structure
STRUCTURE 7 Ice Full Sensor 1 Power Switch 8 Power Cord 2 Display Panel 9 Water Inlet Valve 3 Front Panel 10 Drainage Outlet 4 Door 11 Leveling Feet 5 Ice Grid 6 Ice Storage Bin INSTALL THE WATER INLET SYSTEM AS FOLLOWS: 1 Tap 2 Water Filter Inlet Pipe... -
Page 11: Operation Procedure
SURGE PROTECTOR PLUG To protect the appliance from electrical surges, it is advised to use a surge protector plug. (Please note that this must be purchased separately and is not supplied with the appliance.) OPERATION PROCEDURE Installation of this appliance by a certified plumber is recommended •... - Page 12 • Remove the protective plastic film from the filter cartridge prior to installation. Carefully align the cartridge within the filter housing, ensuring it is seated evenly within the designated grooves. Secure the housing lid by screwing it on gently to avoid compromising the integrity of the filter.
-
Page 13: Control Panel
CONTROL PANEL FAULT WATER FULL • Use the On/Off switch to power the appliance on or off. The On/Off switch light will indicate the appliance is on. • Let the appliance run a few cycles so that it can fully calibrate. •... -
Page 14: Energy Saving Tips
• Wipe the interior dry and use a damp cloth with warm water and a mild detergent. Avoid using any abrasive chemicals. • Replace the filter cartridge periodically, depending on usage and water quality. • Clean the ice full sensor regularly. •... -
Page 15: Troubleshooting
TROUBLESHOOTING Should you experience any issues with your appliance and the below troubleshooting tips do not resolve the fault experienced, kindly contact SnoMaster Service Department or your nearest accredited Service Agent: PROBLEM PROBLEM POSSIBLE CAUSE / MEASURE The ice-maker does •... - Page 16 SM-26 (BLACK) LIST OF PARTS Ventilation Grid Top Panel Water Inlet Valve Right Panel Water Shower Cover Process Tube Ventilation Panel Water Temperature Sensor Ice Water Drainage Pipe Door Water Shower Compressor Operation Panel Cover Elbow Of Water Inlet Feet...
- Page 17 CAPE TOWN LIFESTYLE CENTRE CENTRE & SERVICE CENTRE & SERVICE CENTRE 49 Koornhof Road 31 Stella Road Meadowdale Montague Gardens Germiston, 1614 Cape Town, 7441 011 392 5315 / 3147 021 100 5695 info@snomaster.co.za info@snomaster.co.za snomaster.co.za @SnoMasterSA SnoMaster SA snomaster_south_africa @SnoMaster...
Need help?
Do you have a question about the SM-26 and is the answer not in the manual?
Questions and answers