Table of Contents
Advertisement
Quick Links
Advertisement
Table of Contents

Related Manuals for Wellue Checkme Pro Health Monitor


Summary of Contents for Wellue Checkme Pro Health Monitor
- Page 1 制作工艺: 封面:157g铜版纸,过哑胶,彩色; 内页: 80g书写纸,黑白 胶装 尺寸:110*165mm 此页不印刷...
- Page 2 Checkme Pro Health Monitor User Manual...
- Page 3 Contents User Manual ............. English 1-28 Benutzerhandbuch ..........Deutsch 29-58 Manuale d'uso ............Italiano 59-87 Manual de usuario ..........Español 88-116 Manuel de l'utilisateur ........Français 117-145...
-
Page 4: Table Of Contents
Contents 1. Introduction ................... 2 2. Using Checkme ..................7 3. Settings ....................17 4. Review ....................20 5. Maintenance ..................20 6. Accessories ...................22 7. Specifications ..................22 8. Electromagnetic Compatibility .............24 9. FCC Statement ..................28... -
Page 5: Introduction
Introduction 1.1 Safety Warnings and Cautionary Advice We recommend not to use this device if you have a pacemaker or other implanted devices. Follow the advice given by your doctor, if applicable. Do not use this device with a defibrillator. ... - Page 6 1.2 Intended Use The Checkme Pro health monitor is intended to be used for measuring, displaying, reviewing and storing of multiple physiological parameters including ECG, pulse oxygen saturation (SpO ), pulse rate, and temperature in home or healthcare facilities environment.
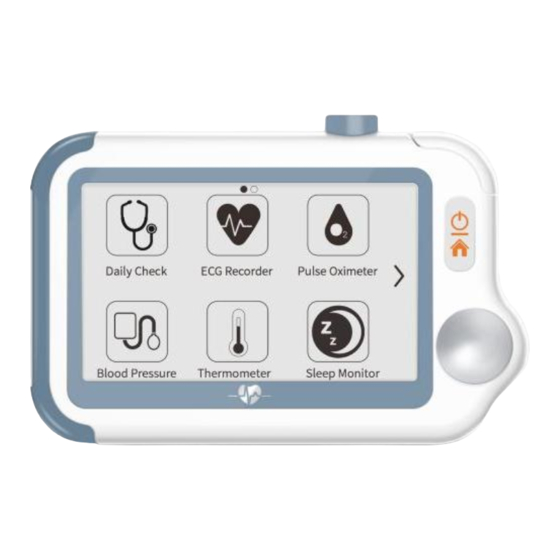
- Page 7 ECG right electrode Use right thumb to press on it. Speaker ECG left electrode Put it to your left palm, left abdomen or left knee. Neck stripe hole ECG back electrode Use right forefinger or middle finger to press on it. 1.4 Main Screen The Main Screen is shown as below.
- Page 8 Current time Current date When a reminder event happens, this area displays the event name, e.g. “Daily Check”. You are allowed to change the current time and date when the device is powered on at the first time. Or you can also go to the Setting menu to change it. This arrow indicates users to press the Home button to exit the Calendar Screen / Standby Mode.
- Page 9 Buttons Select button to start a measurement again. Select button to review previous results. Press button to open the help information. 1.7 Symbols Symbol Description Manufacturer Date of manufacture Serial number Indicates a medical device that is not to be disposed of as unsorted municipal waste.
-
Page 10: Using Checkme
Our products and packaging can be recycled, don't throw them away! Find where to drop them off on the www.quefairedemesdechets.fr site (Only applicable for French market). This product complies with verpackG. Using Checkme Prior to Use Charge the Battery To charge the battery, Connect the smaller end of the USB charging cable to the multi-functional connector Connect the other end of the USB charging cable to the USB charging port. - Page 11 Choose the right user. Hold the device according to the instruction, keep the device at the same level as your heart, and keep stable posture and stay calm. Don’t exert too much pressure on the ECG electrode, which may result in EMG (electromyograph) interference. Just hold gently and ensure good contact with the ECG electrode.
- Page 12 As shown above, from left to right, there are: Method A: Lead I, right hand to left hand Method B: Lead II, right hand to left abdomen Method C: Lead I, left wrist to right wrist Method D: Lead II,upper right chest to left lower abdomen ...
- Page 13 Measuring with Cable To start an ECG Recorder measurement with cable, Choose the method C or D. Follow the instructions to connect the ECG cable and place the ECG electrodes. Sit down or stand, stay calm; For method C, palms facing up, place an electrode in the middle of right ...
- Page 14 2.4 Temperature About thermometer Warnings and Cautionary Advice The thermometer is only designed for the measuring area on the human body stated in this manual. The device needs to be in the room which the measurement is taken for at least ...
- Page 15 Press the Home button once, you will hear “Bi-Bi” beep, which indicates the measurement starts. Then move the thermometer around the temple for around 3 seconds until you hear a long “Bi” beep, which indicates the measurement is finished. Take down the device, and the screen shows the measurement result. In the Settings menu, tap the <Thermometer>...
- Page 16 measurement result. Measuring with Cable Connect the external SpO sensor to the multi-functional connector. Put your index finger or middle finger into the external SpO sensor. Make sure the cable is positioned along the top of the hand, and the finger nail is in the position as shown below.
- Page 17 To start a sleep monitor measurement, Tie the wristband on one of your left hand. Insert the SpO cable into the multi-functional connector. Put one of your finger into the sensor. Forefinger or middle finger is suggested. If needed, remove the colored nail polish from the finger.
- Page 18 Choose the desired user on the screen, then Checkme will start to search AirBP. Choose your AirBP ''BP XXXX" on the screen, then Checkme will start to connect with AirBP. Sit correctly. Place the cuff on the left upper arm. Press the <start>. Following the instruction on Checkme, pump to the target pressure then keep still until the results.
- Page 19 2.10 ECG Holter (optional) 2.10.1 Choose Holter Lead Choose the proper ECG lead in the setting menu. There are 4 options: LEAD II; CC5; CM5; User defined. 2.10.2 Measurement In the Main screen, tap the ECG Holter icon. Choose the right user, enter the guidance screen. Plug ECG cable and place electrodes on the right positions as guided.
-
Page 20: Settings
Tap the button to set your target, if needed. Tap the button to start calculating steps. Place the device into your pocket. When you finished calculating steps, press the Home button to stop the pedometer. Press Home button again to exit pedometer function. Settings 3.1 Reminder Up to 6 reminder events can be set by user. - Page 21 measurement is used by more than one user, then each user must create his/her own account. To create a user account: In the Settings menu, choose <User Management>. Tap a “+” button to open the menu below. Tap each button to edit corresponding information. to return the <...
- Page 22 3.6 Choosing Language In the Settings menu, choose <Language>. Choose the language from the list. 3.7 Changing Temperature In the Settings menu, tap the <Temperature> area to change between Celsius degree (°C) and Fahrenheit degree (°F). 3.8 Softeare update Tap the<Software Update>to enter the software upgrade mode. 3.9 Changing ECG waveform length To change the length of ECG waveform saved for each ECG Recorder measurement: In the Settings menu, choose<ECG Length>.
-
Page 23: Review
Review 4.1 Reviewing Daily Check To review Daily Check records, In the <Review> menu, select <DailyCheck>. Choose the right user to open the list as below, then select one record to review more information as below. In this menu, you can: Select to delete this measurement ... - Page 24 5.2 Trouble Shooting Problem Possible Cause Solution 1. Charge the battery and 1. The battery may be low. The device does try again. 2. The device might be not turn on. 2. Please contact with damaged your local distributor. The ECG waveform The lead you choose is not Change another lead and amplitude is small...
-
Page 25: Accessories
Accessories Warnings and Cautionary Advice Use accessories specified in this chapter. Using other accessories may cause damage to the device or not meet the claimed specifications. Depending on the configuration, May not all the accessories are included in your ... - Page 26 Charge time Less than 2 hours to 90% Integrated ECG electrodes Lead type External ECG cable and electrodes Lead set Lead I, lead II Measurement mode Episode, continuous Sampling rate 500 Hz Sampling accuracy 16 bit 1.25 mm/mV, 2.5 mm/mV, 5 mm/mV Display Gain 10 mm/mV, 20 mm/mV Sweep speed...
-
Page 27: Electromagnetic Compatibility
Environment 16.0 to 40.0°C temperature Measurement site Temple Armpit Measurement time Stable value after 2 minutes Measurement range 34.0 to 42.2°C (94.0 to 108.0°F) 30.0 to 45°C (86.0 to 113.0°F) Accuracy ±0.2°C or ±0.4°F ±0.2° Sleep Monitor Monitoring time Up to 10 hours Data storage Store SpO and pulse rate... - Page 28 the equipment. The device or its components should not be used adjacent to or stacked with other equipment. The device needs special precautions regarding EMC and needs to be installed and put into service according to the EMC information provided below. Other devices may interfere with this device even though they meet the ...
- Page 29 Surge ± 1 kV line(s) to line(s) ± 1 kV line(s) to line(s) IEC 61000-4-5 ± 2 kV line(s) to earth ± 2 kV line(s) to earth Voltage dips, short <5 % UT <5 % UT Mains power quality should Interruptions and (>95 % dip in UT) (>95 % dip in UT)
- Page 30 by an electromagnetic site survey , should be less than the compliance level in each frequency range Interference may occur in the vicinity of equipment marked with the following symbol: Note 1: At 80 MHz to 800 MHz, the separation distance for the higher frequency range applies. Note 2: These guidelines may not apply in all situations.
-
Page 31: Fcc Statement
FCC Statement FCC Warning: FCC ID: 2ADXK-6600 Any Changes or modifications not expressly approved by the party responsible for compliance could void the user's authority to operate the equipment. This device complies with part 15 of the FCC Rules. Operation is subject to the following two conditions: (1) This device may not cause harmful interference, and (2) this device must accept any interference received, including interference that may... - Page 32 Shenzhen Viatom Technology Co., Ltd (Hereinafter called Viatom) owns the intellectual property rights to this Viatom product and this manual. This manual may refer to information protected by copyrights or patents and does not convey any license under the patent rights of Viatom, nor the rights of others. Viatom intends to maintain the contents of this manual as confidential information.
Need help?
Do you have a question about the Checkme Pro Health Monitor and is the answer not in the manual?
Questions and answers