
Related Manuals for Shenzhen Xunlong Software Orange Pi Zero 2w


Summary of Contents for Shenzhen Xunlong Software Orange Pi Zero 2w
- Page 1 Pi User Manual Copyright reserved by Shenzhen Xunlong Software Co., Ltd Orange Pi Zero 2w User Manual...
-
Page 2: Table Of Contents
1.3. Who is Orange Pi Zero 2w designed for? ................ 1 1.4. Hardware features of Orange Pi Zero 2w ................2 1.5. Top view and bottom view of Orange Pi Zero 2w ...............3 1.6. Orange Pi Zero 2w interface details ..................4 1.7. - Page 3 Pi User Manual Copyright reserved by Shenzhen Xunlong Software Co., Ltd 3.2. Linux kernel driver adaptation situation ................42 3.3. Linux command format description in this manual ............43 3.4. Linux system login instructions ..................45 3.4.1. Linux system default login account and password ........45 3.4.2.
- Page 4 Pi User Manual Copyright reserved by Shenzhen Xunlong Software Co., Ltd 3.11.3. How to set HDMI resolution in Linux5.4 system ......107 3.11.4. How to modify the width and height of Framebuffer in Linux5.4 system ........................ 108 3.11.5. Framebuffer cursor setting ..............109 3.12.
- Page 5 Pi User Manual Copyright reserved by Shenzhen Xunlong Software Co., Ltd 3.20.2. 40pin GPIO port test ................159 3.20.3. 40pin SPI test ..................162 3.20.4. 40pin I2C test ..................165 3.20.5. 40pin UART test ................169 3.21. Hardware watchdog test ....................173 3.22.
- Page 6 Pi User Manual Copyright reserved by Shenzhen Xunlong Software Co., Ltd 3.32.2. Debian Bookworm system ..............227 3.32.3. Ubuntu Focal system ................. 228 3.32.4. Ubuntu Jammy system ..............230 3.33. Method of uploading files to the development board Linux system ......232 3.33.1.
- Page 7 Pi User Manual Copyright reserved by Shenzhen Xunlong Software Co., Ltd 6.3. Onboard LED light display instructions ................278 6.4. How to return to the previous interface in Android ............278 6.5. How to use ADB ......................279 6.5.1. Use network connection adb debugging ..........279 6.5.2.
- Page 8 Pi User Manual Copyright reserved by Shenzhen Xunlong Software Co., Ltd 8.2. Image update history ......................322...
-
Page 9: Basic Features Of Orange Pi Zero 2W
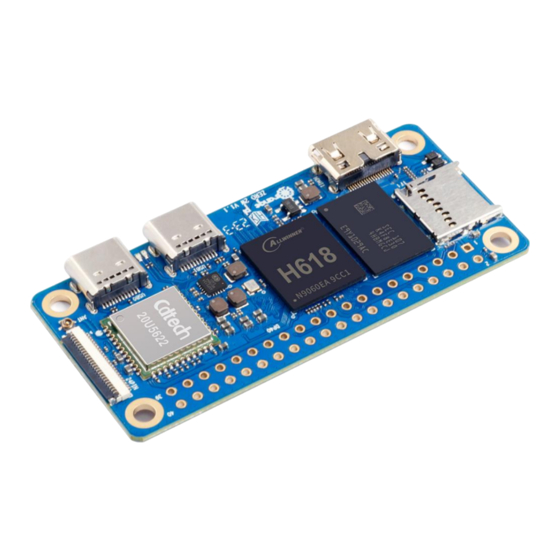
Orange Pi is an open source single-board card computer, a new generation of arm64 development board, which can run operating systems such as Android TV 12, Ubuntu and Debian. The Orange Pi Zero 2w development board uses the Allwinner H618 system-on-chip, and can optionally have 1GB or 1.5GB or 2GB or 4GB LPDDR4 memory. -
Page 10: Hardware Features Of Orange Pi Zero 2W
Android 12 TV , Debian11 , Debian12 , Ubuntu22.04 , Supported OS Ubuntu20.04,Orange Pi OS(Arch)etc. Appearance specifications introduction PCB Size 30mm x 65mm x 1.2mm Weight 12.5g range Pi™ is a registered trademark of Shenzhen Xunlong Software Co., Ltd. www.orangepi.cn www.xunlong.tv... -
Page 11: Top View And Bottom View Of Orange Pi Zero 2W
Pi User Manual Copyright reserved by Shenzhen Xunlong Software Co., Ltd 1.5. Top view and bottom view of Orange Pi Zero 2w Top view: Bottom view: www.orangepi.cn www.xunlong.tv... -
Page 12: Orange Pi Zero 2W Interface Details
Pi User Manual Copyright reserved by Shenzhen Xunlong Software Co., Ltd 1.6. Orange Pi Zero 2w interface details www.orangepi.cn www.xunlong.tv... -
Page 13: Orange Pi Zero 2W 24Pin Expansion Board Interface Details
Pi User Manual Copyright reserved by Shenzhen Xunlong Software Co., Ltd 1.7. Orange Pi Zero 2w 24pin expansion board interface details www.orangepi.cn www.xunlong.tv... - Page 14 Pi User Manual Copyright reserved by Shenzhen Xunlong Software Co., Ltd The diameters of the four positioning holes are all 3.0mm. www.orangepi.cn www.xunlong.tv...
-
Page 15: Introduction To The Use Of Development Boards
TF card and find problems with system startup or use, please replace it with a SanDisk TF card and then test again. There are currently reports that some TF cards have problems booting on Orange Pi Zero 2w. In addition, TF cards that can be used normally on other types of development boards are not guaranteed to be able to start normally on Orange Pi Zero 2w. - Page 16 Pi User Manual Copyright reserved by Shenzhen Xunlong Software Co., Ltd 3) Mini HDMI to HDMI cable, used to connect the development board to an HDMI monitor or TV for display 4) Power supply. If you have a 5V/2A or 5V/3A power supply, you only need to prepare a USB to Type C interface data cable as shown in the picture on the left below.
- Page 17 Pi User Manual Copyright reserved by Shenzhen Xunlong Software Co., Ltd 6) USB interface mouse and keyboard, as long as it is a standard USB interface mouse and keyboard, the mouse and keyboard can be used to control the Orange Pi development...
- Page 18 Pi User Manual Copyright reserved by Shenzhen Xunlong Software Co., Ltd 10) Heat sink. If you are worried that the temperature of the development board is too high, you can add some heat sinks and stick the heat sinks on the H618 chip and memory chip.
-
Page 19: Download The Development Board Image And Related Information
Pi User Manual Copyright reserved by Shenzhen Xunlong Software Co., Ltd The pin headers on the 40pin interface are not soldered by default, and you need to solder them yourself before you can use them. 12) Type-C to USB cable for connecting USB devices 13) USB to TTL module and Dupont cable. -
Page 20: Method Of Burning Linux Image To Tf Card Based On Windows Pc
Pi User Manual Copyright reserved by Shenzhen Xunlong Software Co., Ltd 2) The download URL for the English version of the information is http://www.orangepi.org/html/hardWare/computerAndMicrocontrollers/service-and -support/Orange-Pi-Zero-2W.html 3) The information mainly includes a.Android source code: saved on Google Cloud Drive b.Linux source code: saved on Github c.Android image: saved on Google Cloud Drive... - Page 21 Pi User Manual Copyright reserved by Shenzhen Xunlong Software Co., Ltd address is https://www.balena.io/etcher/ 5) After entering the balenaEtcher download page, click the green download button to jump to the software download location. 6) Then you can choose to download the Portable version of balenaEtcher software. The Portable version does not need to be installed.
- Page 22 Pi User Manual Copyright reserved by Shenzhen Xunlong Software Co., Ltd If the following error is prompted when opening balenaEtcher: Please select balenaEtcher, right-click, and select Run as administrator. 8) The specific steps to use balenaEtcher to burn a Linux image are as follows a.
- Page 23 Pi User Manual Copyright reserved by Shenzhen Xunlong Software Co., Ltd 9) The interface displayed during the process of burning the Linux image by balenaEtcher is as shown in the figure below. In addition, the progress bar displays purple to indicate that the Linux image is being burned into the TF card.
-
Page 24: How To Burn Linux Image Using Win32Diskimager
Pi User Manual Copyright reserved by Shenzhen Xunlong Software Co., Ltd 11) After successful burning, the display interface of balenaEtcher is as shown below. If the green indicator icon is displayed, it means that the image burning is successful. At this time, you can exit balenaEtcher, then pull out the TF card and insert it into the TF card slot of the development board for use. - Page 25 Pi User Manual Copyright reserved by Shenzhen Xunlong Software Co., Ltd other brands. 2) Then use the card reader to insert the TF card into the computer 3) Then format the TF card You can use the SD Card Formatter software to format the TF card. Its download address is: https://www.sdcard.org/downloads/formatter/eula_windows/SDCardFormatterv5_WinEN.zip...
- Page 26 Pi User Manual Copyright reserved by Shenzhen Xunlong Software Co., Ltd After formatting the TF card, the information shown in the picture below will pop up, click OK. 4) Download the compressed package of the Linux operating system image file you want...
-
Page 27: Method To Burn Linux Image To Tf Card Based On Ubuntu Pc
Pi User Manual Copyright reserved by Shenzhen Xunlong Software Co., Ltd can pull out the TF card and insert it into the development board to start. 2.4. Method to burn Linux image to TF card based on Ubuntu Note that the Linux image mentioned here specifically refers to the Linux distribution image such as Debian or Ubuntu downloaded from the Orange Pi information download page. - Page 28 Pi User Manual Copyright reserved by Shenzhen Xunlong Software Co., Ltd 6) Download the compressed package of the Linux operating system image file you want to burn from the Orange Pi information download page, and then use the decompression software to decompress it. In the decompressed file, the file ending with ".img"...
- Page 29 Pi User Manual Copyright reserved by Shenzhen Xunlong Software Co., Ltd 9) The specific steps to use balenaEtcher to burn a Linux image are as follows a. First select the path of the Linux image file to be burned.
- Page 30 Pi User Manual Copyright reserved by Shenzhen Xunlong Software Co., Ltd 11) After the Linux image is burned, balenaEtcher will also verify the image burned into the TF card by default to ensure that there are no problems during the burning process. As shown in the figure below, a green progress bar indicates that the image has been burned, and balenaEtcher is verifying the burned image.
-
Page 31: Method Of Burning Android Image To Tf Card
Pi User Manual Copyright reserved by Shenzhen Xunlong Software Co., Ltd 2.5. Method of burning Android image to TF card The Android image of the development board can only be burned to the TF card using the PhoenixCard software under the Windows platform. The version of the PhoenixCard software must be PhonixCard-4.2.8. - Page 32 Pi User Manual Copyright reserved by Shenzhen Xunlong Software Co., Ltd 2) If Microsoft Visual C++ 2008 Redistrbutable - x86 is not installed , using PhoenixCard to format the TF card or burn the Android image will prompt the following error 3) Microsoft Visual C++ 2008 Redistrbutable - x86 installation package can be www.orangepi.cn...
- Page 33 Copyright reserved by Shenzhen Xunlong Software Co., Ltd official tool downloaded from the of Orange Pi Zero 2w, or you can download it from Microsoft's official website 4) Then prepare a TF card with 8GB or larger capacity. The transmission speed of the TF card must be class10 or above.
- Page 34 Pi User Manual Copyright reserved by Shenzhen Xunlong Software Co., Ltd 8) Then use decompression software to decompress PhonixCard4.2.8.zip. This software does not need to be installed. Just find PhoenixCard in the decompressed folder and open 9) After opening PhoenixCard, if the TF card is recognized normally, the drive letter and Please make sure that the capacity of the TF card will be displayed in the middle list.
- Page 35 Pi User Manual Copyright reserved by Shenzhen Xunlong Software Co., Ltd If there is a problem with formatting, please try to remove the TF card and then test again. If there is still a problem after re-inserting the TF card, you can restart the Windows computer or try another computer.
- Page 36 Pi User Manual Copyright reserved by Shenzhen Xunlong Software Co., Ltd 12) After burning, the display of PhoenixCard is as shown below. At this time, click the "Close" button to exit PhoenixCard, and then you can pull out the TF card from the computer and insert it into the development board to start.
- Page 37 Pi User Manual Copyright reserved by Shenzhen Xunlong Software Co., Ltd After burning the Android system, you can only see a 128 MB partition on the TF card in Windows. The displayed partition is as shown below (some computers may pop up more than twenty disk partitions, but they can only open the 128 MB one.
-
Page 38: Instructions For Using Micro-Linux System In Onboard Spi Flash
Pi User Manual Copyright reserved by Shenzhen Xunlong Software Co., Ltd Using the df -h command, you can see that after burning the Android system on the 16GB TF card, there is about 11 GB of space available (not all of the more than twenty partitions will be mounted to the Android system, focus on these to see to the partition you want to reach). -
Page 39: Start The Orange Pie Development Board
Pi User Manual Copyright reserved by Shenzhen Xunlong Software Co., Ltd startup is completed, the command line interface of the micro Linux system can be seen on the HDMI screen. I would like to emphasize again that the micro Linux system in SPI Flash is only used to prove that the development board can start normally (you can light up the development board without burning the system). -
Page 40: How To Use The Debugging Serial Port
Pi User Manual Copyright reserved by Shenzhen Xunlong Software Co., Ltd 6) Then turn on the power adapter. If everything is normal, the system startup screen will be visible on the HDMI monitor. 7) If you want to view the output information of the system through the debugging serial port, please use the serial port cable to connect the development board to the computer. - Page 41 Pi User Manual Copyright reserved by Shenzhen Xunlong Software Co., Ltd Note: The pin header on the 40pin interface is not soldered by default, and you need to solder it yourself before it can be used. 3) The GND, TX and RX pins of the USB to TTL module need to be connected to the debugging serial port of the development board through Dupont lines.
-
Page 42: How To Use The Debugging Serial Port On Ubuntu Platform
Pi User Manual Copyright reserved by Shenzhen Xunlong Software Co., Ltd How to use the debugging serial port on Ubuntu platform 2.8.2. There are many serial port debugging software that can be used under Linux, such as putty, minicom, etc. The following demonstrates how to use putty. - Page 43 Pi User Manual Copyright reserved by Shenzhen Xunlong Software Co., Ltd 6) Then set the parameters of the serial port Set the Serial line to connect to to /dev/ttyUSB0 (modify to the corresponding node name, usually /dev/ttyUSB0) b. Set Speed(baud) to 115200 (baud rate of the serial port) Set Flow control to None 7) After setting up the serial port setting interface, return to the Session interface.
-
Page 44: How To Use The Debugging Serial Port On Windows Platform
Pi User Manual Copyright reserved by Shenzhen Xunlong Software Co., Ltd First select Connection type as Serial b. Then click the Open button to connect to the serial port 8) Then start the development board, and you can see the Log information output by the system from the open serial terminal. - Page 45 Pi User Manual Copyright reserved by Shenzhen Xunlong Software Co., Ltd 1) Download MobaXterm Download MobaXterm URL as follows https://mobaxterm.mobatek.net/ b. Enter the MobaXterm download webpage and click GET XOBATERM NOW! Then choose to download the Home version d. Then select the Portable version. There is no need to install it after downloading.
- Page 46 Pi User Manual Copyright reserved by Shenzhen Xunlong Software Co., Ltd 2) After downloading, use decompression software to decompress the downloaded compressed package to get the executable software of MobaXterm, and then double-click to open it. 3) After opening the software, the steps to set up the serial port connection are as follows: a.
-
Page 47: Instructions For Using The 5V Pin In The 40Pin Interface Of The Development Board For
Pi User Manual Copyright reserved by Shenzhen Xunlong Software Co., Ltd Instructions for using the 5v pin in the 40pin interface of 2.9. the development board for power supply The power supply method we recommend for the development board is to use a 5V/2A or 5V/3A Type C interface power cord and plug it into the development board's Type C power interface. - Page 48 Pi User Manual Copyright reserved by Shenzhen Xunlong Software Co., Ltd 1) First you need to prepare a power cord as shown in the picture below The power cord shown in the picture above can be purchased on Taobao, please search and buy it yourself.
-
Page 49: Debian/Ubuntu Server And Xfce Desktop System Usage Instructions
Pi User Manual Copyright reserved by Shenzhen Xunlong Software Co., Ltd 3. Debian/Ubuntu Server and Xfce desktop system usage instructions 3.1. Supported linux image types and kernel versions Linux image type Kernel version Server desktop version version Ubuntu 20.04 - Focal Linux5.4... -
Page 50: Linux Kernel Driver Adaptation Situation
Pi User Manual Copyright reserved by Shenzhen Xunlong Software Co., Ltd development board Linux mirror is an even number. c. Type of Linux distribution: Ubuntu and Debian are currently supported. Since Ubuntu is derived from Debian, there is not much difference in usage between the two systems. -
Page 51: Linux Command Format Description In This Manual
Pi User Manual Copyright reserved by Shenzhen Xunlong Software Co., Ltd Type-C USB2.0 x 2 TF card startup WIFI Bluetooth USB Camera LED Light 40pin GPIO 40pin I2C 40pin SPI 40pin UART 40pin PWM Temperature Sensor Hardware watchdog Mali GPU... - Page 52 Pi User Manual Copyright reserved by Shenzhen Xunlong Software Co., Ltd enclosed in the following boxes As shown below, the content in the yellow box indicates content that requires special attention, except for the commands inside. 2) Description of the prompt type before the command The prompt in front of the command refers to the red part in the box below.
-
Page 53: Linux System Login Instructions
Pi User Manual Copyright reserved by Shenzhen Xunlong Software Co., Ltd output, and some may not output). This part of the content does not need to be input. root@orangepi:~# cat /boot/orangepiEnv.txt verbosity=7 bootlogo=false console=serial As shown below, some commands that cannot be written in one line will be placed on the next line. -
Page 54: How To Set Up Automatic Login Of Linux System Terminal
Pi User Manual Copyright reserved by Shenzhen Xunlong Software Co., Ltd How to set up automatic login of Linux system terminal 3.4.2. 1) The Linux system automatically logs in to the terminal by default. The default login orangepi user name is 2) Use the following command to set the root user to automatically log in to the terminal orangepi@orangepi:~$ sudo auto_login_cli.sh root... - Page 55 Pi User Manual Copyright reserved by Shenzhen Xunlong Software Co., Ltd 2) Run the following command to prevent the desktop system from automatically logging into the desktop. orangepi@orangepi:~$ sudo disable_desktop_autologin.sh 3) Then restart the system and a login dialog box will appear. At this time, you need to enter a password to enter the system.
-
Page 56: Setting Method For Automatic Login Of Root User In Linux Desktop System48
Pi User Manual Copyright reserved by Shenzhen Xunlong Software Co., Ltd Setting method for automatic login of root user in Linux 3.4.4. desktop system 1) Execute the following command to set the desktop version of the system to automatically log in using the root user orangepi@orangepi:~$ sudo desktop_login.sh root... -
Page 57: Onboard Led Light Test Instructions
Pi User Manual Copyright reserved by Shenzhen Xunlong Software Co., Ltd 3.5. Onboard LED light test instructions 1) There are two LED lights on the development board, one green light and one red light. The default display of the LED lights when the system is started is as follows:... - Page 58 Pi User Manual Copyright reserved by Shenzhen Xunlong Software Co., Ltd method to turn off the green light flashing First run orangepi-config. Ordinary users remember to add sudo permissions. orangepi@orangepi:~$ sudo orangepi-config b. Then select System Then select Hardware d.
-
Page 59: Operation Instructions For Rootfs Partition Capacity Of Linux System In Tf Card
Pi User Manual Copyright reserved by Shenzhen Xunlong Software Co., Ltd g. Then select <Reboot> to restart the system to make the configuration take effect. h. After restarting and entering the system, you can see that the green LED light on the development board will no longer light up. - Page 60 Pi User Manual Copyright reserved by Shenzhen Xunlong Software Co., Ltd d. The picture above shows the situation of the TF card after burning the Linux desktop system. It can be seen that although the total capacity of the TF card is 16GB (displayed as 14.84GiB in GParted), the rootfs partition (/dev/ sdc1) Only...
-
Page 61: Method To Prohibit Automatic Expansion Of Rootfs Partition Capacity In
Pi User Manual Copyright reserved by Shenzhen Xunlong Software Co., Ltd It should be noted that the Linux system has only one ext4 format partition and does not use a separate BOOT partition to store files such as kernel images, so there is no problem of BOOT partition expansion. -
Page 62: Tf Card
Pi User Manual Copyright reserved by Shenzhen Xunlong Software Co., Ltd root@test:/media/test/opi_root/root# ls .no_rootfs* .no_rootfs_resize 5) Then you can uninstall the TF card, then pull out the TF card and insert it into the development board to start. When the Linux system starts, when the .no_rootfs_resize file is detected in the /root directory, rootfs will not be automatically expanded. - Page 63 Pi User Manual Copyright reserved by Shenzhen Xunlong Software Co., Ltd the rootfs partition of the Linux system to use all the capacity of the TF card, you only want to allocate a part of the capacity, such as 16GB, to the Linux system, and then the remaining capacity of the TF card can be used for other purposes.
- Page 64 Pi User Manual Copyright reserved by Shenzhen Xunlong Software Co., Ltd 7) After opening gparted, you can select the TF card in the upper right corner, and then you can see the usage of the TF card capacity. The picture below shows the situation of the TF card after burning the Linux desktop system.
- Page 65 Pi User Manual Copyright reserved by Shenzhen Xunlong Software Co., Ltd 10) Then select the rootfs partition again, right-click, and select Resize/Move to start expanding the size of the rootfs partition. 11) After the Resize/Move option is turned on, the following setting interface will pop www.orangepi.cn...
- Page 66 Pi User Manual Copyright reserved by Shenzhen Xunlong Software Co., Ltd 12) Then you can directly drag the position shown in the figure below to set the size of the capacity, or you can set the size of the rootfs partition by setting the number in New size(MiB) 13) After setting the capacity, click Resize/Move in the lower right corner.
- Page 67 Pi User Manual Copyright reserved by Shenzhen Xunlong Software Co., Ltd 15) Then select Apply, and the capacity expansion of the rootfs partition will officially begin. 16) After the expansion is completed, click Close to close it. 17) Then you can unplug the TF card and insert it into the development board to start.
-
Page 68: Method To Reduce The Capacity Of Rootfs Partition In Tf Card
Pi User Manual Copyright reserved by Shenzhen Xunlong Software Co., Ltd Filesystem Size Used Avail Use% Mounted on udev 925M 0 925M 0% /dev tmpfs 199M 3.2M 196M 2% /run /dev/mmcblk0p1 7.7G 3.2G 4.4G 42% / Method to reduce the capacity of rootfs partition in TF card 3.6.4. - Page 69 Pi User Manual Copyright reserved by Shenzhen Xunlong Software Co., Ltd 6) Right-click the mouse again to see the operation options shown in the picture below. If the TF card is already mounted, you first need to Umount the rootfs partition of the TF card.
- Page 70 Pi User Manual Copyright reserved by Shenzhen Xunlong Software Co., Ltd 8) After the Resize/Move option is turned on, the following setting interface will pop up. 9) Then you can directly drag the position shown in the figure below to set the size of the...
- Page 71 Pi User Manual Copyright reserved by Shenzhen Xunlong Software Co., Ltd 11) After final confirmation, click the green as shown in the picture below. √ 12) Then select Apply, and the capacity expansion of the rootfs partition will officially begin.
-
Page 72: 24Pin Expansion Board Interface Pin Description
Pi User Manual Copyright reserved by Shenzhen Xunlong Software Co., Ltd 14) Then you can unplug the TF card and insert it into the development board to start. After entering the Linux system of the development board, if you use the df -h command,... - Page 73 Pi User Manual Copyright reserved by Shenzhen Xunlong Software Co., Ltd 3) The way to connect the expansion board to the development board is as follows. Please pay attention to the forward and reverse directions of the cable and do not plug it in backwards.
-
Page 74: How To Use The Two Lradc Buttons On The 24Pin Expansion Board
Pi User Manual Copyright reserved by Shenzhen Xunlong Software Co., Ltd 100M network port Used to connect to a wired network to access the Internet Analog audio and video In Linux system, it can be used to connect output interface headphones to play music, but the TV-OUT function cannot be used. - Page 75 Pi User Manual Copyright reserved by Shenzhen Xunlong Software Co., Ltd as shown in the figure below: 2) In the Linux system, the default key values of KEY1 and KEY2 are Linux kernel KEY1 KEY2 Linux5.4 KEY_1, the number 1 on the...
- Page 76 Pi User Manual Copyright reserved by Shenzhen Xunlong Software Co., Ltd Input device ID: bus 0x19 vendor 0x1 product 0x1 version 0x100 Input device name: "sunxi-keyboard" Supported events: Event type 0 (EV_SYN) Event type 1 (EV_KEY) Event code 2 (KEY_1)
- Page 77 Pi User Manual Copyright reserved by Shenzhen Xunlong Software Co., Ltd Input device name: "5070800.lradc" Supported events: Event type 0 (EV_SYN) Event type 1 (EV_KEY) Event code 2 (KEY_1) Event code 28 (KEY_ENTER) Properties: Testing ... (interrupt to exit) #The following are the key values reported after pressing KEY1 and KEY2 Event: time 1694075818.810877, type 1 (EV_KEY), code 2 (KEY_1), value 1...
- Page 78 Pi User Manual Copyright reserved by Shenzhen Xunlong Software Co., Ltd /plugin/; fragment@0 { target = <&keyboard>; __overlay__ { status = "okay"; key0 = <600 2>; key1 = <800 28>; The contents of the c.linux6.1 system sun50i-h618-lradc-keys.dts file are as follows: a) KEY1 corresponding: modify linux,code = <2>;...
-
Page 79: Network Connection Test
Pi User Manual Copyright reserved by Shenzhen Xunlong Software Co., Ltd button-800 { label = "KEY_ENTER"; linux,code = <28>; d. For the key values that can be set, please refer to the macro definition in the input-event-codes.h header file. Its path in the kernel source code is: orange-pi-5.4-sun50iw9/include/uapi/linux/input-event-codes.h... - Page 80 Pi User Manual Copyright reserved by Shenzhen Xunlong Software Co., Ltd 2) Then plug one end of the network cable into the Ethernet interface of the expansion board, and the other end of the network cable into the router, and make sure the network is smooth.
-
Page 81: Wifi Connection Test
Pi User Manual Copyright reserved by Shenzhen Xunlong Software Co., Ltd A) First check whether the Linux system has started normally. If the green light of the development board flashes, it usually means that it has started normally. If only the red light is on, or the red and green lights are not on, it means that the system has not started normally;... - Page 82 Pi User Manual Copyright reserved by Shenzhen Xunlong Software Co., Ltd 3.9.2.1. Server version image connects to WIFI through commands When the development board is not connected to Ethernet or HDMI display, but only to the serial port, it is recommended to use the commands demonstrated in this section to connect to the WIFI network.
- Page 83 Pi User Manual Copyright reserved by Shenzhen Xunlong Software Co., Ltd wifi_name needs to be replaced with the name of the WIFI hotspot you want to connect to b. wifi_passwd needs to be replaced with the password of the WIFI hotspot you want to connect to.
- Page 84 Pi User Manual Copyright reserved by Shenzhen Xunlong Software Co., Ltd 3.9.2.2. Server version image connects to WIFI graphically 1) First log in to the Linux system, there are three ways: a. If the development board is connected to a network cable, you can remotely log in the Linux system through ssh.
- Page 85 Pi User Manual Copyright reserved by Shenzhen Xunlong Software Co., Ltd 5) Then you can see all the searched WIFI hotspots 6) Select the WIFI hotspot you want to connect to, then use the Tab key to position the cursor on Activate and press Enter.
- Page 86 Pi User Manual Copyright reserved by Shenzhen Xunlong Software Co., Ltd 7) Then a dialog box for entering the password will pop up. Enter the corresponding password in Password and press Enter to start connecting to WIFI. 8) After the WIFI connection is successful, a "*" will be displayed in front of the connected WIFI name.
- Page 87 Pi User Manual Copyright reserved by Shenzhen Xunlong Software Co., Ltd 9) You can check the IP address of the wifi through the ip a s wlan0 command orangepi@orangepi:~$ ip a s wlan0 11: wlan0: <BROADCAST,MULTICAST,UP,LOWER_UP> mtu 1500 qdisc pfifo_fast...
- Page 88 Pi User Manual Copyright reserved by Shenzhen Xunlong Software Co., Ltd --- www.orangepi.org ping statistics --- 5 packets transmitted, 5 received, 0% packet loss, time 4006ms rtt min/avg/max/mdev = 41.321/44.864/48.834/2.484 ms 3.9.2.3. Test method for desktop image 1) Click the network configuration icon in the upper right corner of the desktop (please...
- Page 89 Pi User Manual Copyright reserved by Shenzhen Xunlong Software Co., Ltd WIFI 4) After connecting to WIFI, you can open the browser to check whether you can access the Internet. The browser entrance is as shown below 5) If you can open other web pages after opening the browser, it means the WIFI connection is normal.
-
Page 90: Method To Create Wifi Hotspot Through Create_Ap
Pi User Manual Copyright reserved by Shenzhen Xunlong Software Co., Ltd Method to create WIFI hotspot through create_ap 3.9.3. create_ap is a script that helps quickly create WIFI hotspots on Linux, and supports bridge and NAT modes. It can automatically combine hostapd, dnsmasq and iptables to complete the setting of WIFI hotspots, avoiding users from complicated configurations. - Page 91 Pi User Manual Copyright reserved by Shenzhen Xunlong Software Co., Ltd Network Manager found, set wlan0 as unmanaged device... DONE Sharing Internet using method: nat hostapd command-line interface: hostapd_cli -p /tmp/create_ap.wlan0.conf.TQkJtsz1/hostapd_ctrl wlan0: interface state UNINITIALIZED->ENABLED wlan0: AP-ENABLED wlan0: STA ce:bd:9a:dd:a5:86 IEEE 802.11: associated...
- Page 92 Pi User Manual Copyright reserved by Shenzhen Xunlong Software Co., Ltd Note that in the following command, Debian12 needs to modify eth0 to end0. orangepi@orangepi:~$ sudo ifconfig eth0 eth0: flags=4163<UP,BROADCAST,RUNNING,MULTICAST> mtu 1500 inet 192.168.1.150 netmask 255.255.255.0 broadcast 192.168.1.255 inet6 fe80::938f:8776:5783:afa2 prefixlen 64 scopeid 0x20<link>...
- Page 93 Pi User Manual Copyright reserved by Shenzhen Xunlong Software Co., Ltd At this time, after connecting to the hotspot through the mobile phone, click on the connected WIFI hotspot orangepi, and then you can see that the IP address of the mobile phone is 192.168.2.X...
- Page 94 Pi User Manual Copyright reserved by Shenzhen Xunlong Software Co., Ltd 3.9.3.2. create_ap method to create WIFI hotspot in bridge mode 1)Enter the following command to create a WIFI hotspot with the name orangepi and password orangepi in bridge mode Note that in the following command, Debian12 needs to modify eth0 to end0.
- Page 95 Pi User Manual Copyright reserved by Shenzhen Xunlong Software Co., Ltd wlan0: EAPOL-4WAY-HS-COMPLETED ce:bd:9a:dd:a5:86 3)At this time, take out your mobile phone and find the WIFI hotspot named orangepi created by the development board in the searched WIFI list. Then you can click orangepi to connect to the hotspot.
- Page 96 Pi User Manual Copyright reserved by Shenzhen Xunlong Software Co., Ltd device interrupt 83 The IP of the device connected to the WIFI hotspot is also assigned by the main router, so the mobile phone connected to the WIFI hotspot and the development board are in the same network segment.
-
Page 97: How To Set A Static Ip Address
Pi User Manual Copyright reserved by Shenzhen Xunlong Software Co., Ltd How to set a static IP address 3.9.4. Please do not set a static IP address by modifying the /etc/network/interfaces configuration file. 3.9.4.1. Use the nmtui command to set a static IP address... - Page 98 Pi User Manual Copyright reserved by Shenzhen Xunlong Software Co., Ltd 4) Then select Edit via the Tab key and press the Enter key 5) Then use the Tab key to move the cursor to the <Automatic> position shown in the...
- Page 99 Pi User Manual Copyright reserved by Shenzhen Xunlong Software Co., Ltd 7) The display after selection is as shown below 8) Then move the cursor to <Show> via the Tab key www.orangepi.cn www.xunlong.tv...
- Page 100 Pi User Manual Copyright reserved by Shenzhen Xunlong Software Co., Ltd 9) Then press Enter. After pressing Enter, the following setting interface will pop up. 10) Then you can set the IP address (Addresses), gateway (Gateway) and DNS server...
- Page 101 Pi User Manual Copyright reserved by Shenzhen Xunlong Software Co., Ltd 11) After setting, move the cursor to <OK> in the lower right corner, and then press Enter to confirm. 12) Then click <Back> to return to the previous level selection interface 13) Then select Activate a connection, then move the cursor to <OK>, and finally click...
- Page 102 Pi User Manual Copyright reserved by Shenzhen Xunlong Software Co., Ltd 14) Then select the network interface that needs to be set, such as Wired connection 1, then move the cursor to <Deactivate>, and then press the Enter key to disable Wired...
- Page 103 Pi User Manual Copyright reserved by Shenzhen Xunlong Software Co., Ltd 16) Then you can exit nmtui through the <Back> and Quit buttons 17) Then through ip a s eth0 you can see that the IP address of the network port has become the static IP address set previously.
- Page 104 Pi User Manual Copyright reserved by Shenzhen Xunlong Software Co., Ltd valid_lft 259149sec preferred_lft 172749sec inet6 fe80::957d:bbbe:4928:3604/64 scope link noprefixroute valid_lft forever preferred_lft forever 18) Then you can test the network connectivity to check whether the IP address is configured OK.
-
Page 105: How To Set Up The Linux System To Automatically Connect To The Network For The First Time
Pi User Manual Copyright reserved by Shenzhen Xunlong Software Co., Ltd 3) 中 Then enter the following command, where "Wired connection 1" means setting the static IP address of the Ethernet port. If you need to set the static IP address of WIFI, please change it to the name... - Page 106 Pi User Manual Copyright reserved by Shenzhen Xunlong Software Co., Ltd the Linux system, it will automatically connect to the Ethernet port through DHCP. Assign an IP address, and then we can obtain the IP address of the Ethernet port through the HDMI screen, serial port, or view the router's background, and then log in to the Linux system remotely.
- Page 107 Pi User Manual Copyright reserved by Shenzhen Xunlong Software Co., Ltd generally automatically mount the Linux root file system partition in the TF card. From the following command, we can know that /media/test/opi_root is the Linux root file in the TF card.
- Page 108 Pi User Manual Copyright reserved by Shenzhen Xunlong Software Co., Ltd configuration. If you need to set the development board to automatically connect to WIFI hotspots, you must set it to 1. Also please note that if this variable is set to 1, the Ethernet port settings will be invalid.
- Page 109 Pi User Manual Copyright reserved by Shenzhen Xunlong Software Co., Ltd d) Set FR_net_wifi_key to the password of the WIFI hotspot you want to connect to e) Set FR_net_use_static to 1 Set FR_net_static_ip to the desired IP address g) Set R_net_static_gateway to the corresponding gateway address...
-
Page 110: Ssh Remote Login Development Board
Pi User Manual Copyright reserved by Shenzhen Xunlong Software Co., Ltd 3.10. SSH remote login development board Linux systems enable ssh remote login by default and allow root users to log in to the system. Before ssh login, you first need to ensure that the Ethernet or wifi... -
Page 111: Ssh Remote Login Development Board Under Windows
Pi User Manual Copyright reserved by Shenzhen Xunlong Software Co., Ltd If ssh cannot log in to the Linux system normally, first check whether the IP address of the development board can be pinged. If there is no problem with pinging, you can log in to the Linux system through the serial port or HDMI display and enter the following command on the development board before trying again. - Page 112 Pi User Manual Copyright reserved by Shenzhen Xunlong Software Co., Ltd 3) You will then be prompted to enter a password. The default passwords for both root and orangepi users are orangepi. Note that when entering a password, the specific content of the entered password will not be displayed on the screen.
-
Page 113: Hdmi Test
Pi User Manual Copyright reserved by Shenzhen Xunlong Software Co., Ltd 3.11. HDMI test 3.11.1. HDMI display test 1) Use Mini HDMI to HDMI cable to connect the Orange Pi development board and HDMI display 2) After starting the Linux system, if there is image output on the HDMI display, it means that the HDMI interface is working normally. -
Page 114: Hdmi To Vga Display Test
Pi User Manual Copyright reserved by Shenzhen Xunlong Software Co., Ltd interface of your laptop, please first confirm that your laptop supports the HDMI in function When HDMI does not display, please first check whether the HDMI cable is plugged in tightly. - Page 115 Pi User Manual Copyright reserved by Shenzhen Xunlong Software Co., Ltd When using HDMI to VGA display, the development board and the Linux system of the development board do not need to make any settings. You only need the Mini HDMI interface of the development board to display normally. So if there is a problem with the test, please check whether there is a problem with the HDMI to VGA converter, VGA cable and monitor.
- Page 116 Pi User Manual Copyright reserved by Shenzhen Xunlong Software Co., Ltd disp_mode supported HDMI resolution HDMI refresh rate values 480i 720x480 576i 720x480 480p 720x480 576p 720x576 720p50 1280x720 720p60 1280x720 1080i50 1920x1080 1080i60 1920x1080 1080p24 1920x1080 1080p50 1920x1080...
- Page 117 Pi User Manual Copyright reserved by Shenzhen Xunlong Software Co., Ltd verbosity=1 console=both disp_mode=1080p60 fb0_width=1920 fb0_height=1080 The reference values corresponding to different resolutions of fb0_width and fb0_height are as follows:: HDMI resolution fb0_width fb0_height 480p 576p 720p 1280 1080p...
- Page 118 Pi User Manual Copyright reserved by Shenzhen Xunlong Software Co., Ltd 3.12. How to use Bluetooth 3.12.1. Testing method for desktop image 1) Click the Bluetooth icon in the upper right corner of the desktop 2) Then select the adapter 3) If prompted with the following interface, please select Yes.
- Page 119 Pi User Manual Copyright reserved by Shenzhen Xunlong Software Co., Ltd 5) Then open the configuration interface of the Bluetooth device 6) Click Search to start scanning for surrounding Bluetooth devices 7) Then select the Bluetooth device you want to connect, and then right-click the mouse to pop up the operation interface for the Bluetooth device.
- Page 120 Pi User Manual Copyright reserved by Shenzhen Xunlong Software Co., Ltd 8) When pairing, a pairing confirmation box will pop up in the upper right corner of the desktop. Just select Confirm to confirm. At this time, you also need to confirm on the mobile phone.
- Page 121 Pi User Manual Copyright reserved by Shenzhen Xunlong Software Co., Ltd 3.12.2. How to use server version image 1) After entering the system, you can first check whether there is a Bluetooth device node through the hciconfig command. If it exists, it means that the Bluetooth initialization is normal.
- Page 122 Pi User Manual Copyright reserved by Shenzhen Xunlong Software Co., Ltd [CHG] Controller 10:11:12:13:14:15 Discovering: yes [NEW] Device 76:60:79:29:B9:31 76-60-79-29-B9-31 [NEW] Device 9C:2E:A1:42:71:11 Xiaomi mobile phone [NEW] Device DC:72:9B:4C:F4:CF orangepi [bluetooth]# scan off #After scanning to the Bluetooth device you want to connect, you can turn off the scan, and then write down the MAC address of the Bluetooth device.
- Page 123 Pi User Manual Copyright reserved by Shenzhen Xunlong Software Co., Ltd 5) To connect to a Bluetooth device, you need to install the pulseaudio-module-bluetooth software package, and then start the pulseaudio service orangepi@orangepi:~$ sudo apt update orangepi@orangepi:~$ sudo apt -y install pulseaudio-module-bluetooth...
- Page 124 Pi User Manual Copyright reserved by Shenzhen Xunlong Software Co., Ltd 3.13. USB interface test The USB interface can be connected to a USB hub to expand the number of USB interfaces. 3.13.1. USB interface extension description As shown in the figure below, there are only two Type-C USB2.0 interfaces on the main board of the development board, which cannot directly connect USB Type-A mice, keyboards and other USB devices.
- Page 125 Pi User Manual Copyright reserved by Shenzhen Xunlong Software Co., Ltd If you purchase a 24pin expansion board, you do not need a Type-C to USB cable, because the 24pin expansion board can expand two USB2.0 interfaces. 3.13.2. How to set USB0 to HOST mode As shown in the figure below, there are two Type-C interfaces on the main board of the development board: USB0 and USB1.
- Page 126 Pi User Manual Copyright reserved by Shenzhen Xunlong Software Co., Ltd If you need to use USB0 to connect USB devices, you need to set USB0 to HOST mode. The method is as follows: First run orangepi-config. Ordinary users remember to add sudo permissions.
- Page 127 Pi User Manual Copyright reserved by Shenzhen Xunlong Software Co., Ltd g. Then select <Reboot>to restart the system to make the configuration take effect. h. After restarting, USB0 can use USB devices such as mouse and keyboard normally. 3.13.3. Connect USB mouse or keyboard to test...
- Page 128 Pi User Manual Copyright reserved by Shenzhen Xunlong Software Co., Ltd orangepi@orangepi:~$ ls /mnt/ test.txt 4) After mounting, you can check the capacity usage and mount point of the U disk through the df -h command. orangepi@orangepi:~$ df -h | grep "sd"...
- Page 129 Pi User Manual Copyright reserved by Shenzhen Xunlong Software Co., Ltd assigned IP address through the ifconfig command orangepi@orangepi:~$ sudo ifconfig enx00e04c362017: flags=4163<UP,BROADCAST,RUNNING,MULTICAST> 1500 inet 192.168.1.177 netmask 255.255.255.0 broadcast 192.168.1.255 inet6 fe80::681f:d293:4bc5:e9fd prefixlen 64 scopeid 0x20<link> ether 00:e0:4c:36:20:17 txqueuelen 1000 (Ethernet) RX packets 1849 bytes 134590 (134.5 KB)
- Page 130 Pi User Manual Copyright reserved by Shenzhen Xunlong Software Co., Ltd orangepi@orangepi:~$ sudo apt update orangepi@orangepi:~$ sudo apt install -y v4l-utils orangepi@orangepi:~$ v4l2-ctl --list-devices USB 2.0 Camera (usb-sunxi-ehci-1): /dev/video0 Note that the l in v4l2 is the lowercase letter l, not the number 1.
- Page 131 Pi User Manual Copyright reserved by Shenzhen Xunlong Software Co., Ltd b. Install dependent software packages a) Ubuntu system orangepi@orangepi:~$ sudo apt-get install -y cmake libjpeg8-dev b) Debian system orangepi@orangepi:~$ sudo apt-get install -y cmake libjpeg62-turbo-dev Compile and install mjpg-streamer...
- Page 132 Pi User Manual Copyright reserved by Shenzhen Xunlong Software Co., Ltd 3.14. Audio test 3.14.1. How to play audio using the command line Headphone interface audio playback test 3.14.1.1. 1) There is no headphone interface on the main board of the development board. We can expand it through a 24pin expansion board.
- Page 133 Pi User Manual Copyright reserved by Shenzhen Xunlong Software Co., Ltd Subdevices: 1/1 Subdevice #0: subdevice #0 3) Then use the aplay command to play the audio, and the sound can be heard through the headphones root@orangepi:~# aplay -D hw:0,0 /usr/share/sounds/alsa/audio.wav Playing WAVE 'audio.wav' : Signed 16 bit Little Endian, Rate 44100 Hz, Stereo...
- Page 134 Pi User Manual Copyright reserved by Shenzhen Xunlong Software Co., Ltd 3) Then select the audio.wav file, right-click and select open with vlc to start playing. 4) How to switch between different audio devices such as HDMI playback and...
- Page 135 Pi User Manual Copyright reserved by Shenzhen Xunlong Software Co., Ltd 3.15. Infrared reception test 1) There is no infrared receiver on the main board of the development board. We can expand it through a 24pin expansion board. 2) Install ir-keytable infrared test software...
- Page 136 Pi User Manual Copyright reserved by Shenzhen Xunlong Software Co., Ltd linux5.4 system output is as follows orangepi@orangepi:~$ ir-keytable Found /sys/class/rc/rc0/ with: Name: sunxi-ir Driver: sunxi-rc-recv Default keymap: rc_map_sunxi Input device: /dev/input/event1 LIRC device: /dev/lirc0 Attached BPF protocols: Operation not permitted...
- Page 137 Pi User Manual Copyright reserved by Shenzhen Xunlong Software Co., Ltd 5) Then enter the ir-keytable -t command in the terminal, and then use the infrared remote control to press the button against the infrared receiver of the Orange Pi development board to see the received key code in the terminal.
- Page 138 Pi User Manual Copyright reserved by Shenzhen Xunlong Software Co., Ltd temperature sensor orangepi@orangepi:~$ cat /sys/class/thermal/thermal_zone1/type ddr_thermal_zone orangepi@orangepi:~$ cat /sys/class/thermal/thermal_zone1/temp 57410 sensor2: GPU temperature sensor, the first command is used to view the type of temperature sensor, the second command is used to view the value of the...
- Page 139 Note: The pin header on the 40pin interface is not soldered by default, and you need to solder it yourself before it can be used. 1) For the order of the 40 Pin interface pins of the Orange Pi Zero 2w development board, please refer to the silk screen diagram on the development board.
- Page 140 Pi User Manual Copyright reserved by Shenzhen Xunlong Software Co., Ltd PI10 TWI2-SDA/UART3_RX TWI2-SCL/UART3_TX PI15 PWM1 PI11 PI12 PWM2 PC12 PI16 3) There are a total of 28 GPIO ports in the 40pin interface. The high-level voltage of all 3.3v...
- Page 141 Pi User Manual Copyright reserved by Shenzhen Xunlong Software Co., Ltd 1) Download the code of wiringOP orangepi@orangepi:~$ sudo apt update orangepi@orangepi:~$ sudo apt install -y git orangepi@orangepi:~$ git clone https://github.com/orangepi-xunlong/wiringOP.git -b next Note that the source code needs to download the code of wiringOP next branch. Please don’...
- Page 142 Pi User Manual Copyright reserved by Shenzhen Xunlong Software Co., Ltd 3) The output of the test gpio readall command is as follows 3.19. 40pin interface GPIO, I2C, UART, SPI and PWM testing Note: The pin header on the 40pin interface is not soldered by default, and you need to solder it yourself before it can be used.
- Page 143 Pi User Manual Copyright reserved by Shenzhen Xunlong Software Co., Ltd number of the wPi corresponding to the input pin. root@orangepi:~/wiringOP# gpio mode 3) Then set the GPIO port to output a low level. After setting, you can use a multimeter to measure the voltage value of the pin.
- Page 144 Pi User Manual Copyright reserved by Shenzhen Xunlong Software Co., Ltd it means that the pull-up mode is set successfully. root@orangepi:~/wiringOP# gpio read 5) Then execute the following command to set the GPIO port to pull-down mode root@orangepi:~/wiringOP# gpio mode down 6) Then enter the following command to read the level of the GPIO port.
- Page 145 Pi User Manual Copyright reserved by Shenzhen Xunlong Software Co., Ltd 2) In Linux systems, spi1 is turned off by default and needs to be turned on manually before it can be used. The opening steps are as follows: First run orangepi-config.
- Page 146 Pi User Manual Copyright reserved by Shenzhen Xunlong Software Co., Ltd Then select <Save> to save Then select <Back> g. Then select <Reboot>to restart the system to make the configuration take effect. 3) Then check whether there is a spidev1.x device node in the Linux system. If it exists, it means that the SPI1 configuration has taken effect.
- Page 147 Pi User Manual Copyright reserved by Shenzhen Xunlong Software Co., Ltd orangepi@orangepi:~$ sudo spidev_test -v -D /dev/spidev1.0 spi mode: 0x0 bits per word: 8 max speed: 500000 Hz (500 KHz) TX | FF FF FF FF FF FF 40 00 00 00 00 95 FF FF FF FF FF FF FF FF FF FF FF FF FF FF FF FF FF FF F0 0D | ..@..▒....▒.
- Page 148 Pi User Manual Copyright reserved by Shenzhen Xunlong Software Co., Ltd SPI1_MOSI SPI1_MISO TWI0_SDA/UART2_RX SPI1_CLK SPI1_CS0 SPI1_CS1 PI10 TWI2-SDA/UART3_RX TWI2-SCL/UART3_TX PI15 PWM1 PI11 PI12 PWM2 PC12 PI16 2) i2c is turned off by default in Linux systems and needs to be turned on manually to use it.
- Page 149 Pi User Manual Copyright reserved by Shenzhen Xunlong Software Co., Ltd d. Then use the keyboard’s arrow keys to locate the position shown in the picture below, and then use the space to select the corresponding i2c configuration in the picture below.
- Page 150 Pi User Manual Copyright reserved by Shenzhen Xunlong Software Co., Ltd 3) After starting the Linux system, first confirm that there is an open i2c device node under /dev orangepi@orangepi:~$ ls /dev/i2c-* /dev/i2c-* Sometimes the i2c device node and the i2c bus serial number do not correspond one to one. For example, the i2c device node of the i2c1 bus may be /dev/i2c-3.
- Page 151 Pi User Manual Copyright reserved by Shenzhen Xunlong Software Co., Ltd 4) Then start testing i2c, first install i2c-tools orangepi@orangepi:~$ sudo apt-get update orangepi@orangepi:~$ sudo apt-get install -y i2c-tools 5) Then connect an i2c device to the i2c pin of the 40pin connector 6) Then use the i2cdetect -y x x command.
- Page 152 Pi User Manual Copyright reserved by Shenzhen Xunlong Software Co., Ltd SPI1_CLK SPI1_CS0 SPI1_CS1 PI10 TWI2-SDA/UART3_RX TWI2-SCL/UART3_TX PI15 PWM1 PI11 PI12 PWM2 PC12 PI16 2) In Linux systems, uart is turned off by default and needs to be turned on manually before it can be used.
- Page 153 Pi User Manual Copyright reserved by Shenzhen Xunlong Software Co., Ltd below, and then use the space to select the serial port you want to open. Multiplexing function in 40pin Corresponding dtbo configuration 40pin - uart2 pi-uart2 40pin - uart3...
- Page 154 Pi User Manual Copyright reserved by Shenzhen Xunlong Software Co., Ltd 3) After entering the Linux system, first confirm whether there is a uart5 device node under /dev Note that the linux5.4 system is /dev/ttyASx. orangepi@orangepi:~$ ls /dev/ttyS* /dev/ttySx 4) Then start testing the uart interface.
- Page 155 Pi User Manual Copyright reserved by Shenzhen Xunlong Software Co., Ltd TWI1-SDA TWI1-SCL PI13 PWM3/UART4_TX UART0_TX UART0_RX UART5_TX UART5_RX TWI0_SCL/UART2_TX PWM4/UART4_RX PI14 3.3V SPI1_MOSI SPI1_MISO TWI0_SDA/UART2_RX SPI1_CLK SPI1_CS0 SPI1_CS1 PI10 TWI2-SDA/UART3_RX TWI2-SCL/UART3_TX PI15 PWM1 PI11 PI12 PWM2 PC12 PI16 2) pwm is turned off by default in Linux systems and needs to be turned on manually to use it.
- Page 156 Pi User Manual Copyright reserved by Shenzhen Xunlong Software Co., Ltd d. Then use the keyboard's arrow keys to locate the position shown in the figure below, and then use the space to select the configuration corresponding to the pwm you want to open.
- Page 157 Pi User Manual Copyright reserved by Shenzhen Xunlong Software Co., Ltd 3) After restarting, you can start the PWM test Please execute the following commands under the root user. Enter the following command on the command line to make pwm1 output a 50Hz square wave root@orangepi:~# echo 1 >...
- Page 158 Pi User Manual Copyright reserved by Shenzhen Xunlong Software Co., Ltd 3.20. How to use wiringOP hardware PWM Before using the wiringOP hardware PWM function, please download the latest wiringOP source code and then compile and install it. The wiringOP preinstalled in the v1.0.0 version of the Linux image cannot use the hardware PWM function.
- Page 159 Pi User Manual Copyright reserved by Shenzhen Xunlong Software Co., Ltd 3.20.1. How to set PWM using wiringOP’s gpio command Set the corresponding pin to PWM mode 3.20.1.1. 1) The corresponding relationship between the 4 PWM pins and the wPi serial number is...
- Page 160 Pi User Manual Copyright reserved by Shenzhen Xunlong Software Co., Ltd Method of adjusting PWM duty cycle 3.20.1.2. 1) The calculation formula of PWM duty cycle is as follows. We can adjust the PWM duty cycle by setting the values of CCR and ARR.
- Page 161 Pi User Manual Copyright reserved by Shenzhen Xunlong Software Co., Ltd 4) We can use the following command to set the CCR of the PWM1 pin to 1024 orangepi@orangepi:~$ gpio 1024 5) After running the above command, you can observe through the oscilloscope that the PWM duty cycle changes from 25% (512/2048) to 50% (1024/2048) www.orangepi.cn...
- Page 162 Pi User Manual Copyright reserved by Shenzhen Xunlong Software Co., Ltd Method of adjusting PWM frequency 3.20.1.3. 3.20.1.3.1. Method to adjust PWM frequency by setting frequency division coefficient 1) After setting the frequency division coefficient, the PWM frequency will become one/one of the frequency division coefficient.
- Page 163 Pi User Manual Copyright reserved by Shenzhen Xunlong Software Co., Ltd 3.20.1.3.2. Method of directly setting the PWM frequency 1) We can use the gpio pwmTone command to set the frequency of the PWM pin. For example, use the following command to set the PWM frequency of the PWM1 pin to 20000Hz.
- Page 164 Pi User Manual Copyright reserved by Shenzhen Xunlong Software Co., Ltd orangepi@orangepi:~$ cd wiringOP/examples/ orangepi@orangepi:~/wiringOP/examples$ ls pwm.c pwm.c 2) The command to compile pwm.c into an executable program is as follows sorangepi@orangepi:~/wiringOP/examples$ gcc -o pwm pwm.c -lwiringPi 3) Then you can execute the PWM test program. When executing the PWM test program, you need to specify the PWM pin.
- Page 165 Pi User Manual Copyright reserved by Shenzhen Xunlong Software Co., Ltd can observe through the oscilloscope that the PWM waveform changes every 0.5 seconds. After changing 9 times, the PWM frequency becomes 1/10 of the default PWM frequency, which is 2347Hz, and remains for 5 seconds. , and then the PWM waveform changes every 0.5 seconds.
- Page 166 Pi User Manual Copyright reserved by Shenzhen Xunlong Software Co., Ltd wiringOP-Python source code that comes with the Linux image. The storage location is: /usr/src/wiringOP-Python root@orangepi:~# git clone --recursive https://github.com/orangepi-xunlong/wiringOP-Python -b next root@orangepi:~# cd wiringOP-Python root@orangepi:~/wiringOP-Python# git submodule update --init --remote...
- Page 167 Pi User Manual Copyright reserved by Shenzhen Xunlong Software Co., Ltd wiringOP-Python. Press the q key to exit the help information interface. >>> help(wiringpi) Help on module wiringpi: NAME wiringpi DESCRIPTION # This file was automatically generated by SWIG (http://www.swig.org).
- Page 168 Pi User Manual Copyright reserved by Shenzhen Xunlong Software Co., Ltd 1) The following uses pin No. 7 - corresponding to GPIO PI13 - corresponding to wPi serial number 2 - as an example to demonstrate how to set the high and low levels of the GPIO port.
- Page 169 Pi User Manual Copyright reserved by Shenzhen Xunlong Software Co., Ltd b. Then set the GPIO port to output a low level. After setting, you can use a multimeter to measure the voltage value of the pin. If it is 0v, it means the low level is set successfully.
- Page 170 Pi User Manual Copyright reserved by Shenzhen Xunlong Software Co., Ltd refer to the blink.py test program in the examples. The blink.py test program will set the voltage of all GPIO ports in the 40 Pin of the development board to continuously change high and low.
- Page 171 Pi User Manual Copyright reserved by Shenzhen Xunlong Software Co., Ltd orangepi@orangepi:~$ sudo orangepi-config b. Then select System Then select Hardware d. Then use the keyboard's arrow keys to locate the position shown in the figure below, and then use the space to select the dtbo configuration of the SPI you want to open.
- Page 172 Pi User Manual Copyright reserved by Shenzhen Xunlong Software Co., Ltd g. Then select <Reboot> to restart the system to make the configuration take effect. 3) Then check whether there is a spidev1.x device node in the Linux system. If it exists, it means that the SPI1 configuration has taken effect.
- Page 173 Pi User Manual Copyright reserved by Shenzhen Xunlong Software Co., Ltd Opening device /dev/spidev1.1 40 00 00 00 00 95 TX | FF FF FF FF FF FF FF FF FF FF FF FF FF FF FF FF FF FF FF FF FF FF FF FF F0 0D |..@..|...
- Page 174 Pi User Manual Copyright reserved by Shenzhen Xunlong Software Co., Ltd SPI1_CLK SPI1_CS0 SPI1_CS1 PI10 TWI2-SDA/UART3_RX TWI2-SCL/UART3_TX PI15 PWM1 PI11 PI12 PWM2 PC12 PI16 2) i2c is turned off by default in Linux systems and needs to be turned on manually to use it.
- Page 175 Pi User Manual Copyright reserved by Shenzhen Xunlong Software Co., Ltd below, and then use the space to select the corresponding i2c configuration in the picture below. Multiplexing function in 40pin Corresponding dtbo configuration 40pin - i2c0 pi-i2c0 40pin - i2c1...
- Page 176 Pi User Manual Copyright reserved by Shenzhen Xunlong Software Co., Ltd the i2c device node of the i2c1 bus may be /dev/i2c-3. The method to accurately confirm the device node under /dev corresponding to the i2c bus is: c. First run the following command to check the corresponding relationship of i2c orangepi@orangepizero2w:~$ ls /sys/devices/platform/soc*/*/i2c-* | grep "i2c-[0-9]"...
- Page 177 Pi User Manual Copyright reserved by Shenzhen Xunlong Software Co., Ltd be detected, it means that the i2c device is connected correctly. Note that x in the i2cdetect -y x command needs to be replaced with the serial number of the device node corresponding to the i2c bus.
- Page 178 Pi User Manual Copyright reserved by Shenzhen Xunlong Software Co., Ltd UART5_RX TWI0_SCL/UART2_TX PWM4/UART4_RX PI14 3.3V SPI1_MOSI SPI1_MISO TWI0_SDA/UART2_RX SPI1_CLK SPI1_CS0 SPI1_CS1 PI10 TWI2-SDA/UART3_RX TWI2-SCL/UART3_TX PI15 PWM1 PI11 PI12 PWM2 PC12 PI16 2) In Linux systems, uart is turned off by default and needs to be turned on manually before it can be used.
- Page 179 Pi User Manual Copyright reserved by Shenzhen Xunlong Software Co., Ltd d. Then use the keyboard’s arrow keys to locate the position shown in the picture below, and then use the space to select the serial port you want to open.
- Page 180 Pi User Manual Copyright reserved by Shenzhen Xunlong Software Co., Ltd g. Then select <Reboot> to restart the system to make the configuration take effect. 3) After entering the Linux system, first confirm whether there is a uart5 device node under /dev 注意,linux5.4 系统为/dev/ttyASx。...
- Page 181 Pi User Manual Copyright reserved by Shenzhen Xunlong Software Co., Ltd Out: 3: -> 6) Finally, you can run the serialTest.py program in examples to test the loopback function of the serial port. If you can see the following print, it means that the serial port loopback test is normal.
- Page 182 Pi User Manual Copyright reserved by Shenzhen Xunlong Software Co., Ltd return ENOTTY,if -1,success:0 put_user return,if 0,success:0 put_usr return,if 0,success:0 keep alive keep alive keep alive 3.23. Check the chipid of H618 chip The command to view the H618 chip chipid is as follows. The chipid of each chip is different, so you can use chipid to distinguish multiple development boards.
- Page 183 Pi User Manual Copyright reserved by Shenzhen Xunlong Software Co., Ltd https://www.python.org/ftp/python/3.9.10/Python-3.9.10.tgz orangepi@orangepi:~$ tar xvf Python-3.9.10.tgz 3) Then run the configuration command orangepi@orangepi:~$ cd Python-3.9.10 orangepi@orangepi:~$ ./configure --enable-optimizations 4) Then compile and install Python3.9. The compilation time takes about half an hour.
- Page 184 Pi User Manual Copyright reserved by Shenzhen Xunlong Software Co., Ltd index-url = https://pypi.tuna.tsinghua.edu.cn/simple trusted-host = pypi.tuna.tsinghua.edu.cn b. Then use pip3 to install the Python library very quickly 3) How to temporarily change the pip source under Linux, where <packagename> needs to be replaced with a specific package name orangepi@orangepi:~$ pip3 install <packagename>...
- Page 185 Pi User Manual Copyright reserved by Shenzhen Xunlong Software Co., Ltd orangepi@orangepi:~$ sudo usermod -aG docker $USER Note: You need to log out and log in again to the system to take effect. You can also restart the system.
- Page 186 Pi User Manual Copyright reserved by Shenzhen Xunlong Software Co., Ltd 4) Then you can use the following command to view the docker image of Home Assistant you just downloaded orangepi@orangepi:~$ docker images homeassistant/home-assistant REPOSITORY IMAGE ID CREATED SIZE...
- Page 187 Pi User Manual Copyright reserved by Shenzhen Xunlong Software Co., Ltd 8) Then follow the interface prompts to set according to your own preferences, and then click Next 9) Then click Next www.orangepi.cn www.xunlong.tv...
- Page 188 Pi User Manual Copyright reserved by Shenzhen Xunlong Software Co., Ltd 10) Then click Finish 11) The main interface finally displayed by Home Assistant is as shown below 12) Method to stop Home Assistant container The command to view the docker container is as follows orangepi@orangepi:~$ docker ps -a b.
- Page 189 Pi User Manual Copyright reserved by Shenzhen Xunlong Software Co., Ltd orangepi@orangepi:~$ docker stop homeassistant The command to delete the Home Assistant container is as follows orangepi@orangepi:~$ docker rm homeassistant 3.26.2. Installation via python Before installation, please change the source of pip to a domestic source to speed up the installation of Python packages.
- Page 190 Pi User Manual Copyright reserved by Shenzhen Xunlong Software Co., Ltd orangepi@orangepi:~$ sudo chown orangepi:orangepi /srv/homeassistant orangepi@orangepi:~$ cd /srv/homeassistant orangepi@orangepi:~$ python3.9 -m venv . orangepi@orangepi:~$ source bin/activate (homeassistant) orangepi@orangepi:/srv/homeassistant$ 4) Then install the required Python packages (homeassistant) orangepi@orangepi:/srv/homeassistant$ python3 -m pip install wheel...
- Page 191 Pi User Manual Copyright reserved by Shenzhen Xunlong Software Co., Ltd 3.27. OpenCV installation method 3.27.1. Use apt to install OpenCV 1) The installation command is as follows orangepi@orangepi:~$ sudo apt-get update orangepi@orangepi:~$ sudo apt-get install -y libopencv-dev python3-opencv 2) Then use the following command to print the version number of OpenCV.
- Page 192 Pi User Manual Copyright reserved by Shenzhen Xunlong Software Co., Ltd used) Then set the default locale to zh_CN.UTF-8 d. After exiting the interface, the locale setting will begin. The output displayed on the command line is as follows: orangepi@orangepi:~$ sudo dpkg-reconfigure locales Generating locales (this might take a while)...
- Page 193 Pi User Manual Copyright reserved by Shenzhen Xunlong Software Co., Ltd 3) Then select OK 4) Then select Yes www.orangepi.cn www.xunlong.tv...
- Page 194 Pi User Manual Copyright reserved by Shenzhen Xunlong Software Co., Ltd 5) Then select fcitx 6) Then select OK Then restart the Linux system to make the configuration take effect. www.orangepi.cn www.xunlong.tv...
- Page 195 Pi User Manual Copyright reserved by Shenzhen Xunlong Software Co., Ltd 8) Then open Fcitx configuration 9) Then click the + sign as shown in the picture below 10) Then search Google Pinyin and click OK www.orangepi.cn www.xunlong.tv...
- Page 196 Pi User Manual Copyright reserved by Shenzhen Xunlong Software Co., Ltd 11) Then put Google Pinyin on top 12) Then open the Geany editor to test the Chinese input method www.orangepi.cn www.xunlong.tv...
- Page 197 Pi User Manual Copyright reserved by Shenzhen Xunlong Software Co., Ltd 13) The Chinese input method test is as follows 14) You can switch between Chinese and English input methods through the Ctrl+Space shortcut key 15) If you need the entire system to be displayed in Chinese, you can set all variables in /etc/default/locale to zh_CN.UTF-8...
- Page 198 Pi User Manual Copyright reserved by Shenzhen Xunlong Software Co., Ltd LANGUAGE=zh_CN.UTF-8 restart the system 16) Then and you will see that the system is displayed in Chinese. 3.28.2. Installation method of Ubuntu 20.04 system 1) First open Language Support www.orangepi.cn...
- Page 199 Pi User Manual Copyright reserved by Shenzhen Xunlong Software Co., Ltd 2) Then find the Chinese (China) option 3) Then please use the left button of the mouse to select Chinese (China) and hold it down, then drag it up to the starting position. After dragging, the display will be as shown below: Note that this step is not easy to drag, please be patient and try it a few times.
- Page 200 Pi User Manual Copyright reserved by Shenzhen Xunlong Software Co., Ltd 4) Then select Apply System-Wide to apply the Chinese settings to the entire system 5) Then set the Keyboard input method system system to fcitx Then restart the Linux system to make the configuration take effect...
- Page 201 Pi User Manual Copyright reserved by Shenzhen Xunlong Software Co., Ltd folder should also be updated to Chinese 8) Then you can see that the desktop is displayed in Chinese 9) Then we can open Geany to test the Chinese input method. The opening method is as shown in the figure below www.orangepi.cn...
- Page 202 Pi User Manual Copyright reserved by Shenzhen Xunlong Software Co., Ltd 10) After opening Geany, the English input method is still the default. We can switch to the Chinese input method through the Ctrl+Space shortcut key, and then we can input Chinese.
- Page 203 Pi User Manual Copyright reserved by Shenzhen Xunlong Software Co., Ltd 2) Then find the Chinese (China) option 3) Then please use the left button of the mouse to select Chinese (China) and hold it down, then drag it up to the starting position. After dragging, the display will be as shown below: www.orangepi.cn...
- Page 204 Pi User Manual Copyright reserved by Shenzhen Xunlong Software Co., Ltd Note that this step is not easy to drag, please be patient and try it a few times. 4) Then select Apply System-Wide to apply the Chinese settings to the entire system...
- Page 205 Pi User Manual Copyright reserved by Shenzhen Xunlong Software Co., Ltd 7) Then you can see that the desktop is displayed in Chinese 8) Then open the Fcitx5 configuration program www.orangepi.cn www.xunlong.tv...
- Page 206 Pi User Manual Copyright reserved by Shenzhen Xunlong Software Co., Ltd 9) Then choose to use Pinyin input method 10) The interface after selection is as shown below, then click OK www.orangepi.cn www.xunlong.tv...
- Page 207 Pi User Manual Copyright reserved by Shenzhen Xunlong Software Co., Ltd 11) Then we can open Geany to test the Chinese input method. The opening method is as shown in the figure below 12) After opening Geany, the English input method is still the default. We can switch to the Chinese input method through the Ctrl+Space shortcut key, and then we can enter Chinese.
- Page 208 Pi User Manual Copyright reserved by Shenzhen Xunlong Software Co., Ltd 3.29. How to remotely log in to the Linux system desktop 3.29.1. Remote login using NoMachine Please ensure that the Ubuntu or Debian system installed on the development...
- Page 209 Pi User Manual Copyright reserved by Shenzhen Xunlong Software Co., Ltd arm64 1) First download the installation package of the NoMachine software Linux version, and then install it into the Linux system of the development board Since H618 is an ARMv8 architecture SOC and the system we use is Ubuntu or Debian, we need to download the NoMachine for ARM ARMv8 DEB installation package.
- Page 210 Pi User Manual Copyright reserved by Shenzhen Xunlong Software Co., Ltd Then upload the downloaded nomachine_x.x.x_x_arm64.deb to the Linux system of the development board d. Then use the following command to install NoMachine in the Linux system of the development board orangepi@orangepi:~$ sudo dpkg -i nomachine_x.x.x_x_arm64_arm64.deb...
- Page 211 Pi User Manual Copyright reserved by Shenzhen Xunlong Software Co., Ltd 6) Then click OK 7) Then enter the username and password of the development board Linux system in the corresponding positions in the figure below, and then click OK to start logging in.
- Page 212 Pi User Manual Copyright reserved by Shenzhen Xunlong Software Co., Ltd 3.29.2. Remote login using VNC Before operating, please make sure that the Windwos computer and the development board are in the same LAN, and that you can log in to the Ubuntu or Debian system of the development board through ssh normally.
- Page 213 Pi User Manual Copyright reserved by Shenzhen Xunlong Software Co., Ltd New 'X' desktop is orangepi:1 Starting applications specified in /root/.vnc/xstartup Log file is /root/.vnc/orangepi:1.log 2) The steps to use MobaXterm software to connect to the development board Linux...
- Page 214 Pi User Manual Copyright reserved by Shenzhen Xunlong Software Co., Ltd 3.30. QT installation method 1) Use the following script to install QT5 and QT Creator orangepi@orangepi:~$ install_qt.sh 2) After installation, the QT version number will be automatically printed.
- Page 215 Pi User Manual Copyright reserved by Shenzhen Xunlong Software Co., Ltd d. The QT version that comes with Debian12 is 5.15.8 orangepi@orangepi:~$ install_qt.sh ..QMake version 3.1 Using Qt version 5.15.8 in /usr/lib/aarch64-linux-gnu 3) Then you can see the QT Creator startup icon in Applications...
- Page 216 Pi User Manual Copyright reserved by Shenzhen Xunlong Software Co., Ltd 5) The version of QT Creator is as follows The default version of QT Creator in Ubuntu20.04 is as follows b. The default version of QT Creator in Ubuntu22.04 is as follows www.orangepi.cn...
- Page 217 Pi User Manual Copyright reserved by Shenzhen Xunlong Software Co., Ltd The default version of QT Creator in Debian11 is as follows d. The default version of QT Creator in Debian12 is as follows 6) Then set up QT www.orangepi.cn...
- Page 218 Pi User Manual Copyright reserved by Shenzhen Xunlong Software Co., Ltd First open Help->About Plugins..b. Then remove the check mark of ClangCodeModel After setting up, you need to restart QT Creator d. Then make sure the GCC compiler used by QT Creator. If the default is Clang, please change it to GCC.
- Page 219 Pi User Manual Copyright reserved by Shenzhen Xunlong Software Co., Ltd 7) Then you can open a sample code www.orangepi.cn www.xunlong.tv...
- Page 220 Pi User Manual Copyright reserved by Shenzhen Xunlong Software Co., Ltd 8) After clicking on the sample code, the corresponding instruction document will automatically open. You can read the instructions carefully. 9) Then click Configure Project www.orangepi.cn www.xunlong.tv...
- Page 221 Pi User Manual Copyright reserved by Shenzhen Xunlong Software Co., Ltd 10) Then click the green triangle in the lower left corner to compile and run the sample code 11) After waiting for a period of time, the interface shown in the figure below will pop up, which means that QT can compile and run normally.
- Page 222 Pi User Manual Copyright reserved by Shenzhen Xunlong Software Co., Ltd 12) References https://wiki.qt.io/Install_Qt_5_on_Ubuntu https://download.qt.io/archive/qtcreator https://download.qt.io/archive/qt 3.31. ROS installation method 3.31.1. How to install ROS 1 Noetic on Ubuntu20.04 1) The currently active version of ROS 1 is as follows, the recommended version is Noetic Ninjemys www.orangepi.cn...
- Page 223 Pi User Manual Copyright reserved by Shenzhen Xunlong Software Co., Ltd http://docs.ros.org https://wiki.ros.org/Distributions 2) The link to the official installation documentation of ROS 1 Noetic Ninjemys is as follows: http://wiki.ros.org/noetic/Installation/Ubuntu 3) In the official installation documentation of ROS Noetic Ninjemys, Ubuntu recommends using Ubuntu20.04, so please ensure that the system used by the...
- Page 224 Pi User Manual Copyright reserved by Shenzhen Xunlong Software Co., Ltd components in ROS. Note that when running the following command, you need to ensure that the development board can access github normally, otherwise an error will be reported due to network problems.
- Page 225 Pi User Manual Copyright reserved by Shenzhen Xunlong Software Co., Ltd Add distro "foxy" Add distro "galactic" Skip end-of-life distro "groovy" Add distro "humble" Skip end-of-life distro "hydro" Skip end-of-life distro "indigo" Skip end-of-life distro "jade" Skip end-of-life distro "kinetic"...
- Page 226 Pi User Manual Copyright reserved by Shenzhen Xunlong Software Co., Ltd 9) At this time, press the direction keys on the keyboard to control the little turtle to move up, down, left, and right. 3.31.2. How to install ROS 2 Galactic on Ubuntu20.04...
- Page 227 Pi User Manual Copyright reserved by Shenzhen Xunlong Software Co., Ltd http://docs.ros.org http://docs.ros.org/en/galactic/Releases.html 2) The link to the official installation documentation of ROS 2 Galactic Geochelone is as follows: docs.ros.org/en/galactic/Installation.html http://docs.ros.org/en/galactic/Installation/Ubuntu-Install-Debians.html 3) In the official installation documentation of ROS 2 Galactic Geochelone, Ubuntu Linux recommends using Ubuntu20.04, so please ensure that the system used by the...
- Page 228 Pi User Manual Copyright reserved by Shenzhen Xunlong Software Co., Ltd Debian packages. 4) Use the install_ros.sh script to install ros2 orangepi@orangepi:~$ install_ros.sh ros2 5) The install_ros.sh script will automatically run the ros2 -h command after installing ros2. If you can see the following print, it means that the ros2 installation is complete.
- Page 229 Pi User Manual Copyright reserved by Shenzhen Xunlong Software Co., Ltd If you can see the following print, it means ROS 2 can run normally. orangepi@orangepi:~$ test_ros.sh [INFO] [1671174101.200091527] [talker]: Publishing: 'Hello World: 1' [INFO] [1671174101.235661048] [listener]: I heard: [Hello World: 1] [INFO] [1671174102.199572327] [talker]: Publishing: 'Hello World: 2'...
- Page 230 Pi User Manual Copyright reserved by Shenzhen Xunlong Software Co., Ltd usage: ros2 [-h] Call `ros2 <command> -h` for more detailed usage..ros2 is an extensible command-line tool for ROS 2. optional arguments: -h, --help show this help message and exit...
- Page 231 Pi User Manual Copyright reserved by Shenzhen Xunlong Software Co., Ltd [INFO] [1671174103.204019965] [listener]: I heard: [Hello World: 3] 4) Run the following command to open rviz2 orangepi@orangepi:~$ source /opt/ros/humble/setup.bash orangepi@orangepi:~$ ros2 run rviz2 rviz2 5) Reference documentation http://docs.ros.org/en/humble/index.html http://docs.ros.org/en/humble/Installation/Ubuntu-Install-Debians.html...
- Page 232 Pi User Manual Copyright reserved by Shenzhen Xunlong Software Co., Ltd 2) Use the following command to install the deb package of the kernel header file orangepi@orangepi:~$ sudo dpkg -i /opt/linux-headers*.deb 3) After installation, you can see the folder where the kernel header file is located under /usr/src.
- Page 233 Pi User Manual Copyright reserved by Shenzhen Xunlong Software Co., Ltd 8) Use the rmmod command to uninstall the hello.ko kernel module sudo rmmod hello orangepi@orangepi:/usr/src/hello$ dmesg | grep "Hello" orangepi@orangepi:/usr/src/hello$ [ 2871.893988] Hello Orange Pi -- init [ 3173.800892] Hello Orange Pi -- exit 3.33.
- Page 234 Pi User Manual Copyright reserved by Shenzhen Xunlong Software Co., Ltd The specific version of Python is as follows orangepi@orangepi:~$ python3 Python 3.9.2 (default, Feb 28 2021, 17:03:44) [GCC 10.2.1 20210110] on linux Type "help", "copyright", "credits" or "license" for more information.
- Page 235 Pi User Manual Copyright reserved by Shenzhen Xunlong Software Co., Ltd 3.33.2. Debian Bookworm system 1) Debian Bookworm is installed with the gcc compilation tool chain by default, which can directly compile C language programs in the Linux system of the development board.
- Page 236 Pi User Manual Copyright reserved by Shenzhen Xunlong Software Co., Ltd The result of running hello_world.py is as follows orangepi@orangepi:~$ python3 hello_world.py Hello World! 3) Debian Bookworm does not install Java compilation tools and operating environment by default. You can use the following command to install openjdk. The latest version in...
- Page 237 Pi User Manual Copyright reserved by Shenzhen Xunlong Software Co., Ltd orangepi@orangepi:~$ vim hello_world.c #include <stdio.h> int main(void) printf("Hello World!\n"); return 0; Then compile and run hello_world.c orangepi@orangepi:~$ gcc -o hello_world hello_world.c orangepi@orangepi:~$ ./hello_world Hello World! 2) Ubuntu Focal has Python3 installed by default...
- Page 238 Pi User Manual Copyright reserved by Shenzhen Xunlong Software Co., Ltd openjdk 17.0.2 2022-01-18 OpenJDK Runtime Environment (build 17.0.2+8-Ubuntu-120.04) OpenJDK 64-Bit Server VM (build 17.0.2+8-Ubuntu-120.04, mixed mode, sharing) Write the Java version of hello_world.java orangepi@orangepi:~$ vim hello_world.java public class hello_world public static void main(String[] args) System.out.println("Hello World!");...
- Page 239 Pi User Manual Copyright reserved by Shenzhen Xunlong Software Co., Ltd Then compile and run hello_world.c orangepi@orangepi:~$ gcc -o hello_world hello_world.c orangepi@orangepi:~$ ./hello_world Hello World! 2) Ubuntu Jammy has Python3 installed by default The specific version of Python3 is as follows orangepi@orangepi:~$ python3 Python 3.10.6 (main, May 29 2023, 11:10:38) [GCC 11.3.0] on linux...
- Page 240 Pi User Manual Copyright reserved by Shenzhen Xunlong Software Co., Ltd System.out.println("Hello World!"); d. Then compile and run hello_world.java orangepi@orangepi:~$ javac hello_world.java orangepi@orangepi:~$ java hello_world Hello World! 3.34. Method of uploading files to the development board Linux system 3.34.1. Method to upload files to the development board Linux system...
- Page 241 Pi User Manual Copyright reserved by Shenzhen Xunlong Software Co., Ltd How to upload files using filezilla 3.34.1.2. 1) First install filezilla in Ubuntu PC test@test:~$ sudo apt install -y filezilla 2) Then use the following command to open filezilla test@test:~$ filezilla 3) The interface after opening filezilla is as shown below.
- Page 242 Pi User Manual Copyright reserved by Shenzhen Xunlong Software Co., Ltd 5) Then choose to save the password and click OK 6) Then select Always trust this host and click OK 7) After the connection is successful, you can see the directory structure of the development board's Linux file system on the right side of the filezilla software.
- Page 243 Pi User Manual Copyright reserved by Shenzhen Xunlong Software Co., Ltd 8) Then select the path to be uploaded to the development board on the right side of the filezilla software, select the file to be uploaded in Ubuntu PC on the left side of the filezilla software, right-click the mouse, and then click the upload option to start uploading the file to the development board.
- Page 244 Pi User Manual Copyright reserved by Shenzhen Xunlong Software Co., Ltd 9) After the upload is completed, you can go to the corresponding path in the development board Linux system to view the uploaded file. 10) The method of uploading a folder is the same as the method of uploading a file, so I won’t go into details here.
- Page 245 Pi User Manual Copyright reserved by Shenzhen Xunlong Software Co., Ltd 2) The downloaded installation package is as shown below, then double-click to install it directly FileZilla_Server_1.5.1_win64-setup.exe During the installation process, please select Decline on the following installation interface, and then select Next>...
- Page 246 Pi User Manual Copyright reserved by Shenzhen Xunlong Software Co., Ltd 3) The interface after opening filezilla is as shown below. At this time, the remote site on the right is empty. 4) The method of connecting the development board is as shown in the figure below: www.orangepi.cn...
- Page 247 Pi User Manual Copyright reserved by Shenzhen Xunlong Software Co., Ltd 5) Then choose to save the password and click OK 6) Then select Always trust this host and click OK 7) After the connection is successful, you can see the directory structure of the development board's Linux file system on the right side of the filezilla software.
- Page 248 Pi User Manual Copyright reserved by Shenzhen Xunlong Software Co., Ltd 8) Then select the path to be uploaded to the development board on the right side of the filezilla software, select the file to be uploaded on the Windows PC on the left side of the filezilla software, right-click the mouse, and then click the upload option to start uploading the file to the development board.
- Page 249 Pi User Manual Copyright reserved by Shenzhen Xunlong Software Co., Ltd development board Linux system to view the uploaded file. 10) The method of uploading a folder is the same as the method of uploading a file, so I won’t go into details here.
- Page 250 Pi User Manual Copyright reserved by Shenzhen Xunlong Software Co., Ltd The power on/off button of the Linux 6.1 image is turned on by default, but the power on/off button of the Linux 5.4 kernel image is turned off by default and needs to be turned on manually for normal use.
- Page 251 Pi User Manual Copyright reserved by Shenzhen Xunlong Software Co., Ltd 5) Then select <Save> to save 6) Then select <Back> 7) Then select <Reboot> to restart the system to make the configuration take effect. 3.37. How to shut down and restart the development board 1) During the running of the Linux system, if you directly unplug the power supply, it may cause the file system to lose some data.
- Page 252 Pi User Manual Copyright reserved by Shenzhen Xunlong Software Co., Ltd replug the power supply before it can be turned on. 2) In addition to using the poweroff command to shut down, you can also use the power on/off button on the expansion board to shut down.
- Page 253 Pi User Manual Copyright reserved by Shenzhen Xunlong Software Co., Ltd test@test:~$ lsb_release -a No LSB modules are available. Distributor ID: Ubuntu Description: Ubuntu 22.04 LTS Release: 22.04 Codename: jammy If the computer is installed with a Windows system and does not have Ubuntu 22.04 installed on it, you can consider usingVirtualBox or VMware to install an Ubuntu 22.04...
- Page 254 Pi User Manual Copyright reserved by Shenzhen Xunlong Software Co., Ltd The contents of the /etc/apt/sources.list file that need to be replaced are: test@test:~$ sudo mv /etc/apt/sources.list cat /etc/apt/sources.list.bak test@test:~$ sudo vim /etc/apt/sources.list # The source code image is commented by default to improve apt update speed. You can uncomment it yourself if necessary.
- Page 255 Pi User Manual Copyright reserved by Shenzhen Xunlong Software Co., Ltd Note that when using the H618 Soc development board, you need to download the source code of the next branch of orangepi-build. The above git clone command needs to specify the branch of the orangepi-build source code as next.
- Page 256 Pi User Manual Copyright reserved by Shenzhen Xunlong Software Co., Ltd distinguish different kernel source code versions. We define the linux5.4 bsp kernel currently provided by Allwinner as the current branch. The latest linux6.1 LTS kernel is defined as the next branch.
- Page 257 Pi User Manual Copyright reserved by Shenzhen Xunlong Software Co., Ltd The mirror URL of the cross-compilation tool chain in China is the open source software mirror site of Tsinghua University: https://mirrors.tuna.tsinghua.edu.cn/armbian-releases/_toolchain/ After toolchains is downloaded, it will contain multiple versions of cross-compilation...
- Page 258 Pi User Manual Copyright reserved by Shenzhen Xunlong Software Co., Ltd gcc-arm-11.2-2022.02-x86_64-aarch64-none-linux-gnu b. linux6.1 gcc-arm-11.2-2022.02-x86_64-aarch64-none-linux-gnu The cross-compilation tool chain used to compile the H618 u-boot source code is: v2018.05 gcc-linaro-7.4.1-2019.02-x86_64_arm-linux-gnueabi b. v2021.07 gcc-arm-11.2-2022.02-x86_64-aarch64-none-linux-gnu orangepi-build complete directory structure description 4.2.3.
- Page 259 Pi User Manual Copyright reserved by Shenzhen Xunlong Software Co., Ltd d. LICENSE: GPL 2 license file README.md: orangepi-build documentation output: Store compiled u-boot, linux and other deb packages, compilation logs, and compiled images and other files g. scripts: Common script for compiling linux images h.
- Page 260 Pi User Manual Copyright reserved by Shenzhen Xunlong Software Co., Ltd 4) Then select the branch type of u-boot The current branch will compile the u-boot v2018.05 version code that needs to be used by the linux5.4 image. b. The next branch will compile the u-boot v2021.07 version code that needs to be used by the linux6.1 image.
- Page 261 Pi User Manual Copyright reserved by Shenzhen Xunlong Software Co., Ltd Version of u-boot source code [ o.k. ] Compiling u-boot [ v2021.07 ] b. Version of the cross-compilation tool chain [ o.k. ] Compiler version [ aarch64-linux-gnu-gcc 11 ] Path to the compiled u-boot deb package [ o.k.
- Page 262 Pi User Manual Copyright reserved by Shenzhen Xunlong Software Co., Ltd development board. test@test:~/orangepi-build$ cd output/debs/u-boot test@test:~/orangepi_build/output/debs/u-boot$ scp \ linux-u-boot-next-orangepizero2w_x.x.x_arm64.deb root@192.168.1.xxx:/root b. Install the new u-boot deb package just uploaded linux-u-boot-next-orangepizero2w_x.x.x_arm64.deb orangepi@orangepi:~$ sudo dpkg -i Then run the nand-sata-install script...
- Page 263 Pi User Manual Copyright reserved by Shenzhen Xunlong Software Co., Ltd g. Then you can restart the development board to test whether the u-boot modification has taken effect. 4.4. Compile the linux kernel 1) Run the build.sh script, remember to add sudo permissions test@test:~/orangepi-build$ sudo ./build.sh...
- Page 264 Pi User Manual Copyright reserved by Shenzhen Xunlong Software Co., Ltd 5) Then select the branch type of the kernel source code a. The current branch will compile the linux5.4 kernel source code b. The next branch will compile the linux6.1 kernel source code 6) If you choose to display the kernel configuration menu (the second option) in step 3), the kernel configuration interface opened through make menuconfig will pop up.
- Page 265 Pi User Manual Copyright reserved by Shenzhen Xunlong Software Co., Ltd If you do not need to modify the kernel configuration options, when running the build.sh script, pass KERNEL_CONFIGURE=no to temporarily block the pop-up of the kernel configuration interface.
- Page 266 Pi User Manual Copyright reserved by Shenzhen Xunlong Software Co., Ltd 7) Part of the information prompted when compiling the next branch kernel source code is explained as follows: Version of the linux kernel source code [ o.k. ] Compiling current kernel [ 6.1.31 ] b.
- Page 267 Pi User Manual Copyright reserved by Shenzhen Xunlong Software Co., Ltd the github server. Therefore, if you want to modify the linux kernel source code, you first need to turn off the update function of the source code (it needs to be completely...
- Page 268 Pi User Manual Copyright reserved by Shenzhen Xunlong Software Co., Ltd 4) Then select the branch type of the kernel source code. Different versions of the kernel source code maintain different rootfs types. In the current branch, you can see three options: debian11, ubuntu20.04, and ubuntu22.04.
- Page 269 Pi User Manual Copyright reserved by Shenzhen Xunlong Software Co., Ltd 7) If you are compiling the server version of the image, you can also choose to compile the Standard version or the Minimal version. The Minimal version will have much less pre-installed software than the Standard version (please do not choose the Minimal version without special needs, because many things are not pre-installed by default.
- Page 270 Pi User Manual Copyright reserved by Shenzhen Xunlong Software Co., Ltd 9) Then the compilation of rootfs will start. Some of the information prompted during compilation are as follows: Type of rootfs [ o.k. ] local not found [ Creating new rootfs cache for bullseye ] b.
- Page 271 Pi User Manual Copyright reserved by Shenzhen Xunlong Software Co., Ltd package names of all packages installed by rootfs test@test:~/orangepi-build$ ls external/cache/rootfs/ bullseye-xfce-arm64.5250ec7002de9e81a41de169f1f89721.tar.lz4 bullseye-xfce-arm64.5250ec7002de9e81a41de169f1f89721.tar.lz4.current bullseye-xfce-arm64.5250ec7002de9e81a41de169f1f89721.tar.lz4.list 11) If the required rootfs already exists under external/cache/rootfs, then compiling the rootfs again will directly skip the compilation process and will not restart the compilation.
- Page 272 Pi User Manual Copyright reserved by Shenzhen Xunlong Software Co., Ltd 4) Then select the branch type of the kernel source code. Different versions of the kernel source code maintain different rootfs types. In the current branch, you can see three options: debian11, ubuntu20.04, and ubuntu22.04.
- Page 273 Pi User Manual Copyright reserved by Shenzhen Xunlong Software Co., Ltd 7) Then select the type of image Image with console interface (server) Represents the image of the server version, which is relatively small in size. d. Image with desktop environmentRepresents an image with a desktop, which is relatively large in size.
- Page 274 Pi User Manual Copyright reserved by Shenzhen Xunlong Software Co., Ltd You can then select additional packages that need to be installed. Please press the Enter key here to skip directly. 10) Then the compilation of the linux image will begin. The general process of compilation is as follows a.
- Page 275 Pi User Manual Copyright reserved by Shenzhen Xunlong Software Co., Ltd m. Then copy the configured rootfs to the mirror partition. n. Then update initramfs o. Finally, write the bin file of u-boot into the image through the dd command.
- Page 276 Pi User Manual Copyright reserved by Shenzhen Xunlong Software Co., Ltd 5. Instructions for using the Orange Pi OS Arch system 5.1. Orange Pi OS Arch system function adaptation status Motherboard functions OPi OS Arch HDMI video HDMI Audio Type-C USB2.0 x 2...
- Page 277 Pi User Manual Copyright reserved by Shenzhen Xunlong Software Co., Ltd TV-OUT 5.2. Orange Pi OS Arch System User Guide Instructions First of all, please note that the OPi OS Arch system does not have a default orangepi user and password, so you cannot directly log in remotely through the serial port and ssh after the system is started after burning (not even the root user).
- Page 278 Pi User Manual Copyright reserved by Shenzhen Xunlong Software Co., Ltd c) After selecting the language, the user wizard will immediately switch to the corresponding language interface, as shown below in Chinese d) Then select the area www.orangepi.cn www.xunlong.tv...
- Page 279 Pi User Manual Copyright reserved by Shenzhen Xunlong Software Co., Ltd e) Then select the keyboard model f) Then create a new username and set a password www.orangepi.cn www.xunlong.tv...
- Page 280 Pi User Manual Copyright reserved by Shenzhen Xunlong Software Co., Ltd g) Then make sure there is no problem with the selection, and then click the install button h) Then wait for the installation to complete www.orangepi.cn www.xunlong.tv...
- Page 281 Pi User Manual Copyright reserved by Shenzhen Xunlong Software Co., Ltd i) After the installation is complete, you need to click the Finish button to restart the system. j) The Orange Pi Hello program will automatically start after restarting. At this time,...
- Page 282 Pi User Manual Copyright reserved by Shenzhen Xunlong Software Co., Ltd At this point, you can use the newly created username and password to log in to the OPi OS system through the serial port or ssh. 5.3. How to set DT overlays...
- Page 283 Pi User Manual Copyright reserved by Shenzhen Xunlong Software Co., Ltd KERNEL /Image FDT /dtbs/allwinner/sun50i-h616-orangepi-zero2w.dtb FDTOVERLAYS /dtbs/allwinner/overlay/xxx.dtbo #Configuration that needs to be added 3) The storage path of xxx.dtbo in the OPi OS Arch image is as follows. Please note that not all dtbo under this path can be used.
- Page 284 Pi User Manual Copyright reserved by Shenzhen Xunlong Software Co., Ltd [orangepi@orangepi-pc ~]$ sudo vim /boot/extlinux/extlinux.conf LABEL Orange Pi KERNEL /Image FDT /dtbs/allwinner/sun50i-h616-orangepi-zero2w.dtb FDTOVERLAYS /dtbs/allwinner/overlay/sun50i-h616-pi-i2c1.dtbo /dtbs/allwinner/overlay/sun50i-h616-ph-uart5.dtbo 6) After setting, you need to restart the system for the configuration to take effect.
- Page 285 Pi User Manual Copyright reserved by Shenzhen Xunlong Software Co., Ltd 6. Android 12 TV system usage instructions 6.1. Supported Android versions Android Version Kernel version Android 12 TV Version linux5.4 6.2. Android 12 TV function adaptation status Motherboard functions...
- Page 286 Pi User Manual Copyright reserved by Shenzhen Xunlong Software Co., Ltd Infrared reception Headphone audio playback On/off button LRADC Custom buttons OK,The default setting is the volume up and down keys. TV-OUT 6.3. Onboard LED light display instructions green light...
- Page 287 Pi User Manual Copyright reserved by Shenzhen Xunlong Software Co., Ltd 6.5. How to use ADB Use network connection adb debugging 6.5.1. Using network adb does not require a USB Typc C interface data cable to connect the computer and the development board. Instead, it communicates through the network, so first make sure that the development board's wired or wireless network is connected, and then obtain the IP address of the development board.
- Page 288 Pi User Manual Copyright reserved by Shenzhen Xunlong Software Co., Ltd 5) Then you can log in to the android system through adb shell on Ubuntu PC test@test:~$ adb shell apollo-p2:/ # Use data cable to connect adb debugging 6.5.2.
- Page 289 Pi User Manual Copyright reserved by Shenzhen Xunlong Software Co., Ltd 2) Then select Device Preferences 3) Then select Display & Sound 4) Then select Advanced display settings 5) Then select HDMI output mode www.orangepi.cn www.xunlong.tv...
- Page 290 Pi User Manual Copyright reserved by Shenzhen Xunlong Software Co., Ltd 6) Then you can see the list of resolutions supported by the monitor. At this time, clicking the corresponding option will switch to the corresponding resolution. Please note that different monitors may support different resolutions.
- Page 291 Pi User Manual Copyright reserved by Shenzhen Xunlong Software Co., Ltd A monitor or TV that supports VGA interface 2) HDMI to VGA display test is as follows When using HDMI to VGA display, the development board and the Android system of the development board do not need to make any settings.
- Page 292 Pi User Manual Copyright reserved by Shenzhen Xunlong Software Co., Ltd 2) Then select Network & Internet 3) Then turn on WI-FI 4) After turning on WI-FI, you can see the searched signals under Available networks. 5) After selecting the WI-FI you want to connect to, the password input interface shown below will pop up.
- Page 293 Pi User Manual Copyright reserved by Shenzhen Xunlong Software Co., Ltd 6) Then use the keyboard to enter the password corresponding to the WI-FI, and then use the mouse to click the Enter button on the virtual keyboard to start connecting to the WI-FI.
- Page 294 Pi User Manual Copyright reserved by Shenzhen Xunlong Software Co., Ltd 3) Then select Network & Internet 4) Then select WIFI hotspot 5) Then open Hotspot Enable. You can also see the name and password of the generated hotspot in the picture below. Remember them and use them when connecting to the...
- Page 295 Pi User Manual Copyright reserved by Shenzhen Xunlong Software Co., Ltd under the Hotspot password in the picture above. 7) After the connection is successful, it will be displayed as shown below (the interface will be different on different mobile phones, the specific interface is subject to the one displayed on your mobile phone).
- Page 296 Pi User Manual Copyright reserved by Shenzhen Xunlong Software Co., Ltd 2) Then make sure the network port of the expansion board is connected to the router or switch 3) Then open Settings 4) Then select Network & Internet 5) Then you can see the IP address of the development board’s wired network port at the...
- Page 297 Pi User Manual Copyright reserved by Shenzhen Xunlong Software Co., Ltd 6.10. Bluetooth connection method 1) Choose first Settings 2) Then select Bluetooth 3) Then Open Bluetooth Enable www.orangepi.cn www.xunlong.tv...
- Page 298 Pi User Manual Copyright reserved by Shenzhen Xunlong Software Co., Ltd 4) Then click Pair new deviceto start scanning for surrounding Bluetooth devices 5) The searched Bluetooth devices will be displayed under Available devices 6) Then click on the Bluetooth device you want to connect to start pairing. When the...
- Page 299 Pi User Manual Copyright reserved by Shenzhen Xunlong Software Co., Ltd 8) After pairing is completed, open Paired devices and you will see the paired Bluetooth devices. 9) At this time, you can use the Bluetooth of your mobile phone to send a picture to the development board.
- Page 300 Pi User Manual Copyright reserved by Shenzhen Xunlong Software Co., Ltd 6.11. How to set USB0 to HOST mode As shown in the figure below, there are two Type-C interfaces on the motherboard of the development board: USB0 and USB1. Both of these interfaces can be used to power the development board, and they can also be used as USB2.0 HOST interfaces.
- Page 301 Pi User Manual Copyright reserved by Shenzhen Xunlong Software Co., Ltd Run the following command to switch back to Device mode apollo-p2:/ # cat /sys/devices/platform/soc@3000000/soc@3000000\:usbc0@0/usb_device device_chose finished! apollo-p2:/ # g. The command to view the current mode of USB0 is...
- Page 302 Pi User Manual Copyright reserved by Shenzhen Xunlong Software Co., Ltd 5) Then use the adb command to install the USB camera test APP into the Android system. Of course, you can also use a USB disk copy to install it.
- Page 303 Pi User Manual Copyright reserved by Shenzhen Xunlong Software Co., Ltd 2) Then make sure that the adb connection between the Ubuntu PC and the development board is normal. For how to use adb, please refer to the instructions in the section "How...
- Page 304 Pi User Manual Copyright reserved by Shenzhen Xunlong Software Co., Ltd 6) Then you can click CHECK NOW to start checking the ROOT status of the Android system. After the check is completed, the display is as follows. You can see that the Android system has obtained ROOT permissions.
- Page 305 Pi User Manual Copyright reserved by Shenzhen Xunlong Software Co., Ltd 4) Then find the screen mirroring function in the phone settings. Here we take Xiaomi 12S Pro mobile phone as an example. Please research other brands of mobile phones by yourself.
- Page 306 Pi User Manual Copyright reserved by Shenzhen Xunlong Software Co., Ltd 6) Then the selection box shown in the figure below will pop up in the MiracastReceiver application interface of the development board. Here we can select Accept 7) Then you can see the content of the mobile phone screen on the HDMI screen connected to the development board www.orangepi.cn...
- Page 307 Pi User Manual Copyright reserved by Shenzhen Xunlong Software Co., Ltd 6.15. Method of turning on and off the machine through buttons or infrared remote control We can turn off or turn on the Android system of the development board through the power on/off button or infrared remote control.
- Page 308 Pi User Manual Copyright reserved by Shenzhen Xunlong Software Co., Ltd The location of the power button on the 24pin expansion board is as shown in the figure below: The location of the infrared remote control power button is as follows:...
- Page 309 Pi User Manual Copyright reserved by Shenzhen Xunlong Software Co., Ltd After shutting down, press and hold the power button or the power button on the infrared remote control again to turn it on. 6.16. 40pin interface GPIO, UART, SPI test Note: The pin header on the 40pin interface is not soldered by default, and you need to solder it yourself before it can be used.
- Page 310 Pi User Manual Copyright reserved by Shenzhen Xunlong Software Co., Ltd get information such as wPi number, GPIO mode, pin level, etc.; when you click theBLINK ALL GPIO button, all GPIO ports will cycle through outputting high and low levels.
- Page 311 Pi User Manual Copyright reserved by Shenzhen Xunlong Software Co., Ltd following takes pin 12 - corresponding to GPIO PI01 - corresponding to wPi serial number 6 - as an example to demonstrate how to set the high and low levels of the GPIO port.
- Page 312 Pi User Manual Copyright reserved by Shenzhen Xunlong Software Co., Ltd 7) Click the CheckBox button in the picture below again to uncheck it, and pin 12 will be set to low level. After setting, you can use a multimeter to measure the voltage value of the pin.
- Page 313 Pi User Manual Copyright reserved by Shenzhen Xunlong Software Co., Ltd 3.3V TWI1-SDA TWI1-SCL PI13 PWM3 UART0_TX UART0_RX UART5_TX UART5_RX UART2_TX PWM4 PI14 3.3V SPI1_MOSI SPI1_MISO UART2_RX SPI1_CLK SPI1_CS0 SPI1_CS1 PI10 TWI2-SDA TWI2-SCL PI15 PWM1 PI11 PI12 PWM2 PC12...
- Page 314 Pi User Manual Copyright reserved by Shenzhen Xunlong Software Co., Ltd 5) The serial port test interface of wiringOP is as shown in the figure below 6) Then select the /dev/ttyAS2 or/dev/ttyAS5 node in the selection box 7) Enter the baud rate you want to set in the edit box, and then click the OPEN button to open the uart node.
- Page 315 Pi User Manual Copyright reserved by Shenzhen Xunlong Software Co., Ltd 9) Then you can enter a paragraph of characters in the send edit box below and click the SEND button to start sending. 10) If everything is normal, the received string will be displayed in the receiving box 6.16.3.
- Page 316 Pi User Manual Copyright reserved by Shenzhen Xunlong Software Co., Ltd UART2_TX PWM4 PI14 3.3V SPI1_MOSI SPI1_MISO UART2_RX SPI1_CLK SPI1_CS0 SPI1_CS1 PI10 TWI2-SDA TWI2-SCL PI15 PWM1 PI11 PI12 PWM2 PC12 2) The device node corresponding to SPI1 CS0 is /dev/spidev1.0, and the device node corresponding to SPI1 CS1 is /dev/spidev1.1...
- Page 317 Pi User Manual Copyright reserved by Shenzhen Xunlong Software Co., Ltd 6) Then select the spi device node in the upper left corner. If you test the onboard SPIFlash directly, just keep the default /dev/spidev0.0. If the w25qxx module is connected to the 40pin spi1 cs0, then please select/dev/spidev1.0, if the w25qxx module...
- Page 318 Pi User Manual Copyright reserved by Shenzhen Xunlong Software Co., Ltd 9) Finally, the APP will display the read ID information of the onboard SPI Flash. 10) If the w25qxx module connected to 40pin SPI1 is read, the ID information of the onboard SPI Flash is also similar.
- Page 319 Pi User Manual Copyright reserved by Shenzhen Xunlong Software Co., Ltd UART5_RX UART2_TX PWM4 PI14 3.3V SPI1_MOSI SPI1_MISO UART2_RX SPI1_CLK SPI1_CS0 SPI1_CS1 PI10 TWI2-SDA TWI2-SCL PI15 PWM1 PI11 PI12 PWM2 PC12 PI16 2) The device node corresponding to i2c1 is /dev/i2c-1, and the device node...
- Page 320 Pi User Manual Copyright reserved by Shenzhen Xunlong Software Co., Ltd 5) The i2c test interface of wiringOP is shown in the figure below 6) Then click the device node selection box in the upper left corner to select the i2c you want to test 7) Then connect an i2c device to the 40pin i2c pin.
- Page 321 Pi User Manual Copyright reserved by Shenzhen Xunlong Software Co., Ltd apollo-p2:/ # i2cdetect -y 2 9) Then set the i2c address to 0x68 in wiringOP, and then click the OPEN button to open 10) After clicking the OPEN button to open i2c, the display is as follows...
- Page 322 Pi User Manual Copyright reserved by Shenzhen Xunlong Software Co., Ltd b. Then set the value to be written to 0x55 Then click the WRITE BYTE button to perform the writing action 12) Then click the READ BYTE button to read the value of the 0x1c register. If it displays 0x55, it means that the i2c read and write test has passed.
- Page 323 Pi User Manual Copyright reserved by Shenzhen Xunlong Software Co., Ltd 6.16.5. 40pin PWM test 1) As can be seen from the table below, the available pwm are pwm1, pwm2, pwm3 and pwm4. GPIO GPIO Function Function GPIO GPIO...
- Page 324 Pi User Manual Copyright reserved by Shenzhen Xunlong Software Co., Ltd 2) First click the wiringOP icon to open wiringOP APP 3) Then click the PWM_TEST button on the main interface of wiringOP to enter the PWM test interface 4) The PWM test interface is as follows 5) Then set which PWM you want to use in the Channel.
- Page 325 Pi User Manual Copyright reserved by Shenzhen Xunlong Software Co., Ltd 6) Then you can set the PWM period. The default configuration is 50000ns. The converted PWM frequency is 20KHz 7) Then click the EXPORTbutton to export PWM 8) Then drag the progress bar below to change the PWM duty cycle, and then check Enable to output the PWM waveform.
- Page 326 Pi User Manual Copyright reserved by Shenzhen Xunlong Software Co., Ltd 7. How to compile Android 12 source code 7.1. Download the source code of Android 12 1) First download the compressed package of the Android 12 source code and the compressed package of the files modified by Orange Pi Zero2w from Google Cloud www.orangepi.cn...
- Page 327 Pi User Manual Copyright reserved by Shenzhen Xunlong Software Co., Ltd Drive Google Cloud Drive 2) After downloading the compressed package of Android 12 source code, please check whether the MD5 checksum is correct. If it is incorrect, please download the source code again.
- Page 328 Pi User Manual Copyright reserved by Shenzhen Xunlong Software Co., Ltd 7.2. Compile the source code of Android 12 Android12 is compiled on an x86_64 computer with Ubuntu 22.04 installed. Other versions of Ubuntu system package dependencies may have some differences.
- Page 329 Pi User Manual Copyright reserved by Shenzhen Xunlong Software Co., Ltd 0. ft 1. p1 2. p2 3. p7 4. p7l 5. perf1 6. perf2 7. perf3 8. qa Choice [p2]: All available flash: 0. default 1. nor Choice [default]: All available kern_ver: 0.
- Page 330 Pi User Manual Copyright reserved by Shenzhen Xunlong Software Co., Ltd INFO: Prepare toolchain ..INFO: build kernel OK. INFO: build rootfs ... INFO: skip make rootfs for android INFO: ---------------------------------------- INFO: build lichee OK. INFO: ---------------------------------------- 3) Then use the following command to compile the Android source code and generate...
- Page 331 Pi User Manual Copyright reserved by Shenzhen Xunlong Software Co., Ltd 2023-09-14 orangepizero2w_1.0.0_debian_bullseye_server_linux5.4.125.7z orangepizero2w_1.0.0_ubuntu_focal_server_linux5.4.125.7z orangepizero2w_1.0.0_ubuntu_focal_desktop_xfce_linux5.4.125.7z orangepizero2w_1.0.0_debian_bullseye_desktop_xfce_linux5.4.125.7z orangepizero2w_1.0.0_ubuntu_jammy_server_linux6.1.31.7z orangepizero2w_1.0.0_debian_bookworm_server_linux6.1.31.7z orangepizero2w_1.0.0_debian_bullseye_server_linux6.1.31.7z orangepizero2w_1.0.0_ubuntu_jammy_desktop_xfce_linux6.1.31.7z orangepizero2w_1.0.0_debian_bookworm_desktop_xfce_linux6.1.31.7z orangepizero2w_1.0.0_debian_bullseye_desktop_xfce_linux6.1.31.7z OrangePi_Zero2w_Android12_v1.0.tar.gz Opios-arch-aarch64-xfce-opizero2w-23.09-linux6.1.31.img.xz * initial version www.orangepi.cn www.xunlong.tv...
Need help?
Do you have a question about the Orange Pi Zero 2w and is the answer not in the manual?
Questions and answers