
Subscribe to Our Youtube Channel
Related Manuals for Shenzhen Xunlong Software Orange Pi 5


Summary of Contents for Shenzhen Xunlong Software Orange Pi 5
- Page 1 Pi User Manual Copyright reserved by Shenzhen Xunlong Software Co., Ltd Orange Pi 5 User Manual...
-
Page 2: Table Of Contents
1.2. Purpose of Orange Pi 5 .......................1 1.3. Hardware features of Orange Pi 5 ..................2 1.4. Top view and bottom view of Orange Pi 5 ................. 4 1.5. Interface details of Orange Pi 5 ..................6 2. Introduction to the use of the development board ............8 2.1. - Page 3 Pi User Manual Copyright reserved by Shenzhen Xunlong Software Co., Ltd 2.12. Instructions for using the 5v pin in the 26pin interface of the development board to supply power ..........................75 3. Debian system instructions ....................76 3.1. Supported Debian image types and kernel versions ............76 3.2.
- Page 4 Pi User Manual Copyright reserved by Shenzhen Xunlong Software Co., Ltd 3.10. How to use Bluetooth use .....................121 3.10.1. The test method of the desktop image ..........121 3.11. USB interface test ......................125 3.11.1. Connect the USB mouse or keyboard test ......... 125 3.11.2.
- Page 5 Pi User Manual Copyright reserved by Shenzhen Xunlong Software Co., Ltd 3.24. The method of shutting down and restarting the development board ......174...
- Page 6 Pi User Manual Copyright reserved by Shenzhen Xunlong Software Co., Ltd User Manual Update History Version date Release Notes v0.1 2022-12-02 initial version v0.2 2022-12-05 1. How to write Linux image to SPI Flash+NVMe SSD 2. The method of uploading files to the Linux system of the development board 3.
-
Page 7: Basic Features Of Orange Pi 5
4GB/8GB/16GB/32GB (LPDDR4/4x) memory, and has up to 8K display processing capabilities. Orange Pi 5 brings out quite a lot of interfaces, including HDMI output, Type-C, M.2 PCIe2.0x1, Gigabit Ethernet port, USB2.0, USB3.0 interface and 26pin expansion pin header, etc. It can be widely used in high-end tablet, edge computing, artificial intelligence, cloud computing, AR/VR, smart security, smart home and other fields, covering various AIoT industries. -
Page 8: Hardware Features Of Orange Pi 5
Pi User Manual Copyright reserved by Shenzhen Xunlong Software Co., Ltd 1.3. Hardware features of Orange Pi 5 Introduction to hardware features • Rockchip RK3588S (8nm LP process) • 8-core 64-bit processor • 4-core Cortex-A76 and 4-core Cortex-A55 core architecture •... - Page 9 Power Type-C interface power supply 5V/4A; Orange Pi OS (Droid), Android12.1, Debian11 and other Supported OS operating systems Introduction of Appearance Specifications Product Size 100mm*62mm weight range Pi™ is a registered trademark of Shenzhen Xunlong Software Co., Ltd. www.orangepi.org www.xunlong.tv...
-
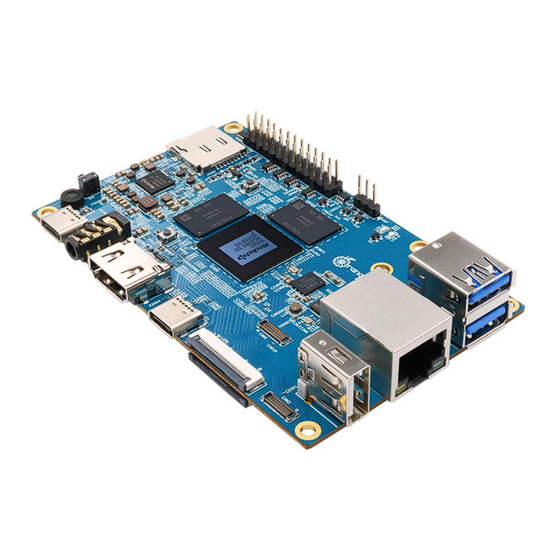
Page 10: Top View And Bottom View Of Orange Pi 5
Pi User Manual Copyright reserved by Shenzhen Xunlong Software Co., Ltd 1.4. Top view and bottom view of Orange Pi 5 Top view: Bottom view: www.orangepi.org www.xunlong.tv... - Page 11 Pi User Manual Copyright reserved by Shenzhen Xunlong Software Co., Ltd www.orangepi.org www.xunlong.tv...
-
Page 12: Interface Details Of Orange Pi 5
Pi User Manual Copyright reserved by Shenzhen Xunlong Software Co., Ltd 1.5. Interface details of Orange Pi 5 www.orangepi.org www.xunlong.tv... - Page 13 Pi User Manual Copyright reserved by Shenzhen Xunlong Software Co., Ltd The diameter of the four positioning holes is 3.0mm, and the diameter of the two M.2 PICE device fixing holes is 3.5mm. www.orangepi.org www.xunlong.tv...
-
Page 14: Introduction To The Use Of The Development Board
Pi User Manual Copyright reserved by Shenzhen Xunlong Software Co., Ltd Introduction to the use of the development board 2.1. Prepare the required accessories 1) TF card, a high-speed SanDisk card of class 10 or above with a minimum capacity of... - Page 15 Pi User Manual Copyright reserved by Shenzhen Xunlong Software Co., Ltd Note, if you want to connect a 4K or 8K display, please make sure that the HDMI cable supports 4K or 8K video output. 5) Type-C to HDMI cable, connect the development board to an HDMI monitor or TV...
- Page 16 Pi User Manual Copyright reserved by Shenzhen Xunlong Software Co., Ltd 8) Power adapter, Orange Pi 5 is recommended to use 5V/4A Type-C power supply for power supply There are two Type-C ports that look the same on the development board. The one on the right is the power port, and the one in the middle has no power supply function.
- Page 17 Pi User Manual Copyright reserved by Shenzhen Xunlong Software Co., Ltd the standard USB interface are acceptable, the mouse and keyboard can be used to control the Orange Pi development board 10) USB camera 11) 5V cooling fan. As shown in the figure below, the 5V and GND pins on the 26pin interface of the development board can be connected to the cooling fan.
- Page 18 Pi User Manual Copyright reserved by Shenzhen Xunlong Software Co., Ltd 12) 100M or 1000M network cable, used to connect the development board to the Internet 13) The data cable of the Type-C interface, used to burn the image to NVMe SSD, use...
-
Page 19: Download The Image Of The Development Board And Related Materials
Pi User Manual Copyright reserved by Shenzhen Xunlong Software Co., Ltd 17) Personal computer with Ubuntu and Windows operating systems installed Ubuntu22.04 PC Optional, used to compile Linux source code Windows PC For burning Android and Linux images 2.2. Download the image of the development board and related... - Page 20 Pi User Manual Copyright reserved by Shenzhen Xunlong Software Co., Ltd 2) Then use the card reader to insert the TF card into the computer 3) Download the Linux operating system image file compression package that you want to burn from the Orange Pi data download page, and then use the decompression software to decompress it.
- Page 21 Pi User Manual Copyright reserved by Shenzhen Xunlong Software Co., Ltd When opening balenaEtcher, if the following error is prompted: Please select balenaEtcher, right-click, and select Run as administrator. 7) The specific steps to use balenaEtcher to burn the Linux image are as follows First select the path of the Linux image file to be burned b.
- Page 22 Pi User Manual Copyright reserved by Shenzhen Xunlong Software Co., Ltd 8) The interface displayed in the process of burning the Linux image by balenaEtcher is shown in the figure below, and the progress bar displays purple, indicating that the Linux...
-
Page 23: How To Use Win32Diskimager To Burn Linux Image
Pi User Manual Copyright reserved by Shenzhen Xunlong Software Co., Ltd 10) After successful burning, the display interface of balenaEtcher is shown in the figure below. If the green indicator icon is displayed, it means that the image burning is successful. - Page 24 Pi User Manual Copyright reserved by Shenzhen Xunlong Software Co., Ltd brands 2) Then use the card reader to insert the TF card into the computer 3) Then format the TF card SD Card Formatter can be used to format the TF card. The download address https://www.sdcard.org/downloads/formatter/eula_windows/SDCardFormatterv5_WinEN.zip...
- Page 25 Pi User Manual Copyright reserved by Shenzhen Xunlong Software Co., Ltd After formatting the TF card, the information shown in the figure below will pop up, click OK 4) Download the Linux operating system image file compression package that you want to burn from the Orange Pi data download page, and then use the decompression software to decompress it.
-
Page 26: Method Of Burning Linux Image To Tf Card Based On Ubuntu Pc
Pi User Manual Copyright reserved by Shenzhen Xunlong Software Co., Ltd you can pull out the TF card and insert it into the development board to start 2.4. Method of burning Linux image to TF card based on Ubuntu... - Page 27 Pi User Manual Copyright reserved by Shenzhen Xunlong Software Co., Ltd 5) Download the Linux operating system image file compression package that you want to burn from the Orange Pi data download page, and then use the decompression software to decompress it.
- Page 28 Pi User Manual Copyright reserved by Shenzhen Xunlong Software Co., Ltd b. Then select the drive letter of the TF card Finally, click Flash to start burning the Linux image to the TF card 9) The interface displayed in the process of burning the Linux image by balenaEtcher is...
-
Page 29: How To Write Linux Image To Spi Flash+Nvme Ssd
Pi User Manual Copyright reserved by Shenzhen Xunlong Software Co., Ltd The display interface of balenaEtcher after the successful burning is shown as the figure below. If the green indicator icon is displayed indicating that the image is burned successfully, you can exit... -
Page 30: The Method Of Using The Dd Command To Burn
Pi User Manual Copyright reserved by Shenzhen Xunlong Software Co., Ltd Linux distributions such as Debian or Ubuntu downloaded from the Orange Pi data download page. The method of using the dd command to burn 2.5.1. 1) First, you need to prepare an NVMe SSD. The PCIe supported by the M.2 slot of the development board is PCIe2.0x1, and the theoretical maximum speed is 500MB/s. - Page 31 Pi User Manual Copyright reserved by Shenzhen Xunlong Software Co., Ltd 3) The position of the SPI Flash on the development board is shown in the figure below, no other settings are required before starting the programming 4) Burning the linux image to SPIFlash+NVMe SDD needs to be completed with the help of a TF card, so first you need to burn the linux image to the TF card, and then use the TF card to start the development board to enter the linux system.
- Page 32 Pi User Manual Copyright reserved by Shenzhen Xunlong Software Co., Ltd d. Then please wait patiently for the burning to complete. After the burning is completed, the display will be as follows (a Done will be displayed in the lower...
- Page 33 Pi User Manual Copyright reserved by Shenzhen Xunlong Software Co., Ltd the instructions in the section on how to use the debugging serial port. 2. Use ssh to remotely log in to the Linux system, please refer to the instructions in the section of SSH remote login to the development board.
- Page 34 Pi User Manual Copyright reserved by Shenzhen Xunlong Software Co., Ltd The detailed description of all parameters of the dd command and more usage can be viewed by executing the man dd command in the linux system. 11) After successfully burning the linux image of the development board to the NVMe SSD, you can use the poweroff command to shut down.
-
Page 35: The Method Of Burning With Balenaetcher Software
Pi User Manual Copyright reserved by Shenzhen Xunlong Software Co., Ltd 13) When the same system is burned in the TF card and the NVMe SSD, if both the TF card and the NVMe SSD are inserted into the development board, then power on and start the development board, and u-boot will give priority to starting the system in the TF card. - Page 36 Pi User Manual Copyright reserved by Shenzhen Xunlong Software Co., Ltd 3) Then insert the NVMe SSD into the M.2 PCIe interface of the development board and fix it 4) The position of the SPI Flash on the development board is shown in the figure below,...
- Page 37 Pi User Manual Copyright reserved by Shenzhen Xunlong Software Co., Ltd PC and the method of burning the Linux image to the TF card based on the Ubuntu PC. 6) After booting into the linux system in the TF card, please confirm that the NVMe SSD has been properly recognized by the linux of the development board.
- Page 38 Pi User Manual Copyright reserved by Shenzhen Xunlong Software Co., Ltd 9) The method of using balenaEtcher to burn u-boot to the SPI Flash of the development board is as follows: click Flash from file first b. Then enter the /usr/lib/linux-u-boot-legacy-orangepi5_1.x.x_arm64 directory, select rkspi_loader.img, and click Open to open...
- Page 39 Pi User Manual Copyright reserved by Shenzhen Xunlong Software Co., Ltd d. Then click Select target Then click Show 2 hidden to open more options for storage devices Then select the device name of SPI Flash /dev/mtdblock0, and click Select www.orangepi.org...
- Page 40 Pi User Manual Copyright reserved by Shenzhen Xunlong Software Co., Ltd g. Then click Flash h. Then click Yes, I’m sure www.orangepi.org www.xunlong.tv...
- Page 41 Pi User Manual Copyright reserved by Shenzhen Xunlong Software Co., Ltd Then enter the password orangepi of the development board Linux system, and the U-Boot image will be recorded in SPI Flash The display of the burning process is shown below:...
- Page 42 Pi User Manual Copyright reserved by Shenzhen Xunlong Software Co., Ltd k. The display after the burning is completed is shown below: 10) Methods from the linux system in the TF card to the NVMe SSD method (this method is equivalent to cloning the system in the TF card to NVME SSD) First click Clone drive www.orangepi.org...
- Page 43 Pi User Manual Copyright reserved by Shenzhen Xunlong Software Co., Ltd b. Then select the device name of the TF card /dev/mmcblk1 The interface after opening the TF card is shown below d. Then click Select target Then click Show 2 Hidden to open more storage equipment options www.orangepi.org...
- Page 44 Pi User Manual Copyright reserved by Shenzhen Xunlong Software Co., Ltd Then select NVME SSD's device name/dev/nvme0n1, and then click Select g. Then click Flash h. Then click Yes, I’m sure www.orangepi.org www.xunlong.tv...
- Page 45 Pi User Manual Copyright reserved by Shenzhen Xunlong Software Co., Ltd Then enter the password orangepi of the development board Linux system, and the U-Boot image will be recorded in SPI Flash The display of the burning process is shown below: www.orangepi.org...
- Page 46 Pi User Manual Copyright reserved by Shenzhen Xunlong Software Co., Ltd k. The display after the recording is complete shown below: Then you need to expand the capacity of the rootfs partition in the NVME SSD, the steps are shown below:...
- Page 47 Pi User Manual Copyright reserved by Shenzhen Xunlong Software Co., Ltd b) Then enter the password of the linux system, click Authenticate c) Then click Fix www.orangepi.org www.xunlong.tv...
- Page 48 Pi User Manual Copyright reserved by Shenzhen Xunlong Software Co., Ltd d) Then choose NVMe SSD e) The display interface after selecting NVME SSD is shown below:: then select the/dev/nvme0n1p2 partition, click right, then select Resize/Move g) Then drag the capacity to maximize the position shown in the figure below www.orangepi.org...
- Page 49 Pi User Manual Copyright reserved by Shenzhen Xunlong Software Co., Ltd h) Then click Resize/move √ Then click the of the location in the figure below Click Apply www.orangepi.org www.xunlong.tv...
- Page 50 Pi User Manual Copyright reserved by Shenzhen Xunlong Software Co., Ltd k) And then click close to close m. At this point, you can use the sudo poweroff command to shut down. Then please unplug the TF card and press the power button to turn on the power supply.At this time, the Linux system in SPIFLASH+NVME SSD will be started...
-
Page 51: The Method Of Burning The Android Image To The Tf Card
Pi User Manual Copyright reserved by Shenzhen Xunlong Software Co., Ltd Use this method to burn the image without manual expansion. The first start will automatically expand. 2.6. The method of burning the Android image to the TF card 1) First prepare a 8GB or larger TF card. - Page 52 Pi User Manual Copyright reserved by Shenzhen Xunlong Software Co., Ltd b. After entering the TF card image folder, you can see the following two image. The difference between them is as below: a) The image without LCD is specifically used for HDMI display. It supports 8K display.
- Page 53 Pi User Manual Copyright reserved by Shenzhen Xunlong Software Co., Ltd confirm that the disk device you want to burn is consistent with the TF card you want to burn. If it is not displayed, you can try to insert the TF card...
- Page 54 Pi User Manual Copyright reserved by Shenzhen Xunlong Software Co., Ltd b. Then select the path of Android image in the "Select Upgrade firmware" column Finally, click the "Start Creation" button to start burning the Android image in the TF card 10) After the burning is recorded, you can exit the SDDiskTool software, and then you can pull the TF card out of the computer and insert it into the development board.
-
Page 55: The Method Burning Android Image To Spi Flash+Nvme Ssd
Pi User Manual Copyright reserved by Shenzhen Xunlong Software Co., Ltd 2.7. The Method Burning android image to SPI Flash+NVME Note that all of the following operations are performed in Windows computers. 1) First of all, you need to prepare a NVMe SSD solid -state hard drive M.2 2230 specification SSD is shown below... - Page 56 Pi User Manual Copyright reserved by Shenzhen Xunlong Software Co., Ltd 3) The position of the SPI Flash on the development board is shown below, and no other settings are required before the recording. 4) You also need to prepare a data cable of a good quality Type-C interface 5) Then download the Rockchip Driverassitant_v5.12.zip from...
- Page 57 Pi User Manual Copyright reserved by Shenzhen Xunlong Software Co., Ltd b. After entering the SPIFlash-NVME SSD folder, you can see the following two images. The difference between them is as below: a) The image without LCD is specifically used for HDMI display. It supports 8K display.
- Page 58 Pi User Manual Copyright reserved by Shenzhen Xunlong Software Co., Ltd b. After waiting for a while, the window will pop up to prompt "Installation Drives Success", and then click the "OK" button 9) Then decompress the RKDevTool_Release_v2.96.zip. This software does not need to be installed.
- Page 59 Pi User Manual Copyright reserved by Shenzhen Xunlong Software Co., Ltd 11) Then start burning the Android image to Spiflash+NVMe SSD First connect to the development board and Windows computer through the Type-C data cable. The position of the development board Type-C interface is shown in the figure below b.
- Page 60 Pi User Manual Copyright reserved by Shenzhen Xunlong Software Co., Ltd d. Then connect the power supply of the Type-C interface to the development board and connect to power If the previous steps are smooth, at this time the development board will enter the Maskrom mode, and the interface of the burning tool will be prompted "Find a Maskrom device"...
-
Page 61: How To Burn Orange Pi Os (Droid) Image To Tf Card
Pi User Manual Copyright reserved by Shenzhen Xunlong Software Co., Ltd g. Then click the "Firmware" button to select the Android image to be burned h. Finally, click the "Upgrade" button to start burning. The burning process is shown in the figure below. You can see that the firmware will be burned to SPIFlash first, and then burned to PCIE. - Page 62 Pi User Manual Copyright reserved by Shenzhen Xunlong Software Co., Ltd 2) Then use the card reader to insert the TF card into the computer Orange Pi data 3) Then download the SDDiskTool programming tool from the download page, please ensure that the version of the SDDiskTool tool is the latest v1.72...
- Page 63 Pi User Manual Copyright reserved by Shenzhen Xunlong Software Co., Ltd 8) After confirming the drive letter, you can format the TF card first, click the restore disk button in SDDiskTool, or use the SD Card Formatter mentioned above to format the TF card.
- Page 64 Pi User Manual Copyright reserved by Shenzhen Xunlong Software Co., Ltd 9) Then start to write the Orange Pi OS (Droid) image to the TF card First check "SD Boot" in "Select Function Mode" b. Then select the path of the Orange Pi OS (Droid) image in the "Select to upgrade firmware"...
-
Page 65: Burn Orange Pi Os (Droid) Image To Spiflash+Nvme Sdd
Pi User Manual Copyright reserved by Shenzhen Xunlong Software Co., Ltd 2.9. Burn Orange Pi OS (Droid) image to SPIFlash+NVMe SDD Note that all the following operations are performed on a Windows computer. 1) First, you need to prepare an NVMe SSD solid state drive The M.2 2230 SSD is as follows... - Page 66 Pi User Manual Copyright reserved by Shenzhen Xunlong Software Co., Ltd 4) It is also necessary to prepare a data cable with a good quality Type-C interface DriverAssitant_v5.12.zip 5) Then download Rockchip burning tool RKDevTool_Release_v2.96.zip from the Orange Pi data download page, please make sure that the version of the downloaded RKDevTool tool is v2.96...
- Page 67 Pi User Manual Copyright reserved by Shenzhen Xunlong Software Co., Ltd 8) After opening DriverInstall.exe, the steps to install the Rockchip driver are as follows Click the "Driver Installation" button b. After waiting for a period of time, a pop-up window will prompt "The driver is installed successfully", and then click the "OK"...
- Page 68 Pi User Manual Copyright reserved by Shenzhen Xunlong Software Co., Ltd 10) After opening the RKDevTool burning tool, because the computer has not been connected to the development board through the Type-C cable at this time, the lower left corner will prompt "No device found"...
- Page 69 Pi User Manual Copyright reserved by Shenzhen Xunlong Software Co., Ltd Then press and hold the MaskROM button on the development board, the position of the MaskROM button on the development board is shown in the figure below: d. Then connect the power supply of the Type-C interface to the development board,...
- Page 70 Pi User Manual Copyright reserved by Shenzhen Xunlong Software Co., Ltd Then click the "Upgrade Firmware" column of the burning tool g. Then click the "Firmware" button to select the Android image that needs to be burned h. Finally, click the "Upgrade" button to start burning. The burning process is shown in the figure below.
-
Page 71: Start The Orange Pi Development Board
Pi User Manual Copyright reserved by Shenzhen Xunlong Software Co., Ltd 2.10. Start the Orange Pi development board 1) Insert the TF card with the burned image into the TF card slot of the Orange Pi development board. If the image of SPIFlash+NVMe SSD has been burnt, then there is no need to insert a TF card, just make sure that the NVMe SSD is inserted into the development board normally. -
Page 72: How To Use The Debugging Serial Port
Pi User Manual Copyright reserved by Shenzhen Xunlong Software Co., Ltd restart during the startup process, please replace the power supply or the Type-C data cable and try again. The Type-C power port does not support PD negotiation. In addition, please do not connect the USB interface of the computer to power the development board. - Page 73 Pi User Manual Copyright reserved by Shenzhen Xunlong Software Co., Ltd 2) The corresponding relationship between GND, RXD and TXD pins of the debugging serial port of the development board is shown in the figure below 3) The GND, TXD and RXD pins of the USB to TTL module need to be connected to...
-
Page 74: How To Use The Debugging Serial Port On The Ubuntu Platform
Pi User Manual Copyright reserved by Shenzhen Xunlong Software Co., Ltd The TX and RX of the serial port need to be cross-connected. If you don’t want to carefully distinguish the order of TX and RX, you can connect the TX and RX of the serial port casually. - Page 75 Pi User Manual Copyright reserved by Shenzhen Xunlong Software Co., Ltd 5) First select the setting interface of the serial port 6) Then set the parameters of the serial port Set the Serial line to connect to as /dev/ttyUSB0 (modify to the corresponding node name, generally /dev/ttyUSB0) b.
- Page 76 Pi User Manual Copyright reserved by Shenzhen Xunlong Software Co., Ltd 7) After setting the serial port setting interface, return to the Session interface First select the Connection type as Serial b. Then click the Open button to connect to the serial port...
-
Page 77: How To Use The Debugging Serial Port On Windows Platform
Pi User Manual Copyright reserved by Shenzhen Xunlong Software Co., Ltd 2.11.3. How to use the debugging serial port on Windows platform There are many serial port debugging software that can be used under Windows, such as SecureCRT, MobaXterm, etc. The following demonstrates how to use MobaXterm. - Page 78 Pi User Manual Copyright reserved by Shenzhen Xunlong Software Co., Ltd Then choose to download the Home version d. Then select Portable portable version, no need to install after downloading, just open it and use it www.orangepi.org www.xunlong.tv...
- Page 79 Pi User Manual Copyright reserved by Shenzhen Xunlong Software Co., Ltd 2) After downloading, use decompression software to decompress the downloaded compressed package, you can get the executable software of MobaXterm, and then double-click to open 3) After opening the software, the steps to set up the serial port connection are as follows Open the session settings interface b.
- Page 80 Pi User Manual Copyright reserved by Shenzhen Xunlong Software Co., Ltd 4) After clicking the "OK" button, you will enter the following interface. At this time, start the development board and you can see the output information of the serial port www.orangepi.org...
-
Page 81: Instructions For Using The 5V Pin In The 26Pin Interface Of The Development Board To
Pi User Manual Copyright reserved by Shenzhen Xunlong Software Co., Ltd 2.12. Instructions for using the 5v pin in the 26pin interface of the development board to supply power The power supply method we recommend for the development board is to use the 5V/4A Type C interface power cord to plug into the Type-C power interface of the development board for power supply. -
Page 82: Debian System Instructions
Pi User Manual Copyright reserved by Shenzhen Xunlong Software Co., Ltd (please do not plug into the plugged into the 5V/4A power adapter connector USB port of the computer for power supply) b. The red DuPont line needs to be plugged into the 5V pin of the development... -
Page 83: The Format Of Linux Commands In This Manual
Pi User Manual Copyright reserved by Shenzhen Xunlong Software Co., Ltd AP6275P-WIFI AP6275P-Bluetooth GPIO(26pin) UART(26pin) SPI(26pin) I2C(26pin) CAN(26pin) PWM(26pin) 3pin debugging serial port TF card start HDMI video HDMI audio MIPI Camera 1 MIPI Camera 2 MIPI Camera 3... - Page 84 Pi User Manual Copyright reserved by Shenzhen Xunlong Software Co., Ltd As shown below, the content in the yellow box indicates the content that needs special attention, except for the commands in it. 2) Description of the prompt type in front of the command...
-
Page 85: Linux System Login Instructions
Pi User Manual Copyright reserved by Shenzhen Xunlong Software Co., Ltd root@orangepi:~# cat /boot/orangepiEnv.txt verbosity=7 bootlogo=false console=serial b. As shown below, some commands cannot be written in one line and will be placed on the next line. As long as the black and bold parts are all commands that need to be input. -
Page 86: Instructions For Automatic Login Of Linux Desktop Version System
Pi User Manual Copyright reserved by Shenzhen Xunlong Software Co., Ltd 2) Use the following command to set the root user to automatically log in to the terminal orangepi@orangepi:~$ sudo auto_login_cli.sh root 3) Use the following command to disable automatic login terminal orangepi@orangepi:~$ sudo auto_login_cli.sh -d... - Page 87 Pi User Manual Copyright reserved by Shenzhen Xunlong Software Co., Ltd 2) Run the following command to prohibit the desktop system from automatically logging into the desktop orangepi@orangepi:~$ sudo disable_desktop_autologin.sh 3) Then restart the system and a login dialog box will appear, at which point a...
-
Page 88: Setting Method Of Root User Automatic Login In Linux Desktop Version System
Pi User Manual Copyright reserved by Shenzhen Xunlong Software Co., Ltd Setting method of root user automatic login in Linux desktop 3.4.4. version system 1) Execute the following command to set the desktop system to automatically log in as the root user orangepi@orangepi:~$ sudo desktop_login.sh root... - Page 89 Pi User Manual Copyright reserved by Shenzhen Xunlong Software Co., Ltd 3) Then select Desktop 4) Then select <Stop> www.orangepi.org www.xunlong.tv...
- Page 90 Pi User Manual Copyright reserved by Shenzhen Xunlong Software Co., Ltd 5) Then restart the Linux system and you will find that the desktop will not be displayed. 6) The steps to reopen the desktop are as follows: please remember to...
-
Page 91: Onboard Led Light Test Instructions
Pi User Manual Copyright reserved by Shenzhen Xunlong Software Co., Ltd After selection, the HDMI monitor will display the desktop 3.5. Onboard LED Light Test Instructions 1) There are two LED lights on the development board, one is green and the other is red. -
Page 92: Network Connection Test
Pi User Manual Copyright reserved by Shenzhen Xunlong Software Co., Ltd The command to set the green light to be on is as follows root@orangepi:/sys/class/leds/status_led# echo 1 > brightness d. The command to set the green light to flash is as follows root@orangepi:/sys/class/leds/status_led# echo heartbeat >... - Page 93 Pi User Manual Copyright reserved by Shenzhen Xunlong Software Co., Ltd There are three ways to view the IP address after the development board starts: 1. Connect the HDMI display, then log in to the system and use the ip addr show eth0 command to view the IP address 2.
-
Page 94: Wifi Connection Test
Pi User Manual Copyright reserved by Shenzhen Xunlong Software Co., Ltd WIFI connection test 3.6.2. Please do not connect to WIFI by modifying the /etc/network/interfaces configuration file. There will be problems connecting to the WIFI network in this way. - Page 95 Pi User Manual Copyright reserved by Shenzhen Xunlong Software Co., Ltd 3) Then use the nmcli command to connect to the scanned WIFI hotspot, where: wifi_name needs to be replaced with the name of the WIFI hotspot you want to connect to b.
- Page 96 Pi User Manual Copyright reserved by Shenzhen Xunlong Software Co., Ltd orangepi@orangepi:~$ ping www.orangepi.org -I wlan0 PING www.orangepi.org (182.92.236.130) from 192.168.1.49 wlan0: 56(84) bytes of data. 64 bytes from 182.92.236.130 (182.92.236.130): icmp_seq=1 ttl=52 time=43.5 ms 64 bytes from 182.92.236.130 (182.92.236.130): icmp_seq=2 ttl=52 time=41.3 ms 64 bytes from 182.92.236.130 (182.92.236.130): icmp_seq=3 ttl=52 time=44.9 ms...
- Page 97 Pi User Manual Copyright reserved by Shenzhen Xunlong Software Co., Ltd 4) Select Activate a connect and press Enter 5) Then you can see all the searched WIFI hotspots 6) Select the WIFI hotspot you want to connect to, then use the Tab key to position the cursor on Activate and press Enter www.orangepi.org...
- Page 98 Pi User Manual Copyright reserved by Shenzhen Xunlong Software Co., Ltd 7) Then a dialog box for entering a password will pop up, enter the corresponding password in Pssword and press Enter to start connecting to WIFI 8) After the WIFI connection is successful, a "*" will be displayed in front of the connected WIFI name www.orangepi.org...
- Page 99 Pi User Manual Copyright reserved by Shenzhen Xunlong Software Co., Ltd 9) You can view the IP address of wifi through the ip addr show wlan0 command orangepi@orangepi:~$ ip addr show wlan0 11: wlan0: <BROADCAST,MULTICAST,UP,LOWER_UP> mtu 1500 qdisc pfifo_fast...
- Page 100 Pi User Manual Copyright reserved by Shenzhen Xunlong Software Co., Ltd 2) Click More networks in the pop-up drop-down box to see all scanned WIFI hotspots, and then select the WIFI hotspot you want to connect to 3) Then enter the password of the WIFI hotspot, and then click Connect to start connecting to WIFI www.orangepi.org...
-
Page 101: How To Set A Static Ip Address
Pi User Manual Copyright reserved by Shenzhen Xunlong Software Co., Ltd 4) After connecting to WIFI, you can open the browser to check whether you can access the Internet. The entrance of the browser is shown in the figure below... - Page 102 Pi User Manual Copyright reserved by Shenzhen Xunlong Software Co., Ltd 3.6.3.1. Use the nmtui command to set a static IP address 1) First run the nmtui command orangepi@orangepi:~$ nmtui 2) Then select Edit a connection and press Enter 3) Then select the network interface that needs to set a static IP address, for example, to set the static IP address of the Ethernet interface, select Wired connection 1.
- Page 103 Pi User Manual Copyright reserved by Shenzhen Xunlong Software Co., Ltd 5) Then use the Tab key to move the cursor to the <Automatic> position shown in the figure below to configure IPv4 6) Then press Enter, select Manual through the up and down arrow keys, and press Enter...
- Page 104 Pi User Manual Copyright reserved by Shenzhen Xunlong Software Co., Ltd 8) Then move the cursor to <Show> via the Tab key 9) Then press Enter, and the following setting interface will pop up after entering www.orangepi.org www.xunlong.tv...
- Page 105 Pi User Manual Copyright reserved by Shenzhen Xunlong Software Co., Ltd 10) Then you can set the IP address (Addresses), gateway (Gateway) and DNS server (there are many other setting options address in the position shown in figure below...
- Page 106 Pi User Manual Copyright reserved by Shenzhen Xunlong Software Co., Ltd 12) Then click <Back> to return to the previous selection interface 13) Then select Activate a connection, then move the cursor to <OK>, and finally click Enter www.orangepi.org...
- Page 107 Pi User Manual Copyright reserved by Shenzhen Xunlong Software Co., Ltd 14) Then select the network interface that needs to be set, such as Wired connection 1, then move the cursor to <Deactivate>, and press Enter to disable Wired connection 1...
- Page 108 Pi User Manual Copyright reserved by Shenzhen Xunlong Software Co., Ltd 17) Then through ip addr show eth0, you can see that the IP address of the network port has changed to the static IP address set earlier orangepi@orangepi:~$ ip addr show eth0 3: eth0: <BROADCAST,MULTICAST,UP,LOWER_UP>...
- Page 109 Pi User Manual Copyright reserved by Shenzhen Xunlong Software Co., Ltd --- 192.168.1.47 ping statistics --- 5 packets transmitted, 5 received, 0% packet loss, time 4042ms rtt min/avg/max/mdev = 0.233/0.262/0.275/0.015 ms 3.6.3.2. Use the nmcli command to set a static IP address 1) If you want to set the static IP address of the network port, please plug the network cable into the development board first.
-
Page 110: Ssh Remote Login Development Board
Pi User Manual Copyright reserved by Shenzhen Xunlong Software Co., Ltd 4) Then restart the linux system orangepi@orangepi:~$ sudo reboot 5) Then re-enter the linux system and use the ip addr show eth0 command to see that the IP address has been set to the desired value orangepi@orangepi:~$ ip addr show eth0 3: eth0: <BROADCAST,MULTICAST,UP,LOWER_UP>... -
Page 111: Ssh Remote Login Development Board Under Windows
Pi User Manual Copyright reserved by Shenzhen Xunlong Software Co., Ltd Note that when entering the password, the specific content of the entered password will not be displayed on the screen, please do not think that there is any fault, just press Enter after inputting. - Page 112 Pi User Manual Copyright reserved by Shenzhen Xunlong Software Co., Ltd b. Then select SSH in Session Setting Then enter the IP address of the development board in the Remote host d. Then enter the user name root or orangepi of the linux system in Specify...
-
Page 113: The Method Of Uploading Files To The Linux System Of The Development Board
Pi User Manual Copyright reserved by Shenzhen Xunlong Software Co., Ltd 4) After successfully logging in to the system, the display is as shown in the figure below 3.8. The method of uploading files to the Linux system of the... - Page 114 Pi User Manual Copyright reserved by Shenzhen Xunlong Software Co., Ltd test@test:~$ scp dir_path orangepi@192.168.xx.xx:/home/orangepi/ 3) There are more usages of scp, please use the following command to view the man manual test@test:~$ man scp 3.8.1.2. How to upload files with Filezilla...
- Page 115 Pi User Manual Copyright reserved by Shenzhen Xunlong Software Co., Ltd 4) The method of connecting the development board is shown in the figure below 5) Then select to save the password, and then click OK 6) Then choose to trust the host, and then click OK...
- Page 116 Pi User Manual Copyright reserved by Shenzhen Xunlong Software Co., Ltd 8) Then select the path to the development board on the right of the Filezilla software, and then select the file to be uploaded in the Ubuntu PC on the left of the Filezilla software, right -click the mouse, and then click the upload option to start uploaded files to the development board to the development board .
-
Page 117: Upload Files In Windows Pc To The Method Of Upload Files To The Development Board Linux System
Pi User Manual Copyright reserved by Shenzhen Xunlong Software Co., Ltd 9) After the upload is completed, you can go to the corresponding path in the linux system to view the uploaded file 10) The method of uploading the folder is the same as the method of uploading the file,... - Page 118 Pi User Manual Copyright reserved by Shenzhen Xunlong Software Co., Ltd 2) The downloaded installation package is shown below, and then double -click to install it directly FileZilla_Server_1.5.1_win64-setup.exe During the installation process, please select Decline in the installation interface below, and then select NEXT>...
- Page 119 Pi User Manual Copyright reserved by Shenzhen Xunlong Software Co., Ltd 3) The interface after Filezilla is opened as shown below. At this time, the empty remote site is empty. 4) The method of connecting the development board is shown in the figure below: www.orangepi.org...
- Page 120 Pi User Manual Copyright reserved by Shenzhen Xunlong Software Co., Ltd 5) Then select to save the password, and then click OK 6) Then choose to trust the host, and then click OK 7) After the connection is successful, you can see the directory structure of the development board Linux file system on the right side of the Filezilla software www.orangepi.org...
- Page 121 Pi User Manual Copyright reserved by Shenzhen Xunlong Software Co., Ltd 8) Then select the path to the development board on the right of the Filezilla software, and then select the files to be uploaded in the Windows PC on the left of the Filezilla...
-
Page 122: Hdmi Test
Pi User Manual Copyright reserved by Shenzhen Xunlong Software Co., Ltd 9) After the upload is completed, you can go to the corresponding path in the linux system to view the uploaded file 10) The method of uploading the folder is the same as the method of uploading the file, so I won't go into details here 3.9. -
Page 123: Hdmi To Vga Display Test
Pi User Manual Copyright reserved by Shenzhen Xunlong Software Co., Ltd 2) After starting the Linux system, if the HDMI display has an image output instructions, the HDMI interface is normal Note that although many laptops have an HDMI interface, the HDMI interface of the notebook generally only has the output function and does not have the function of HDMI in. -
Page 124: Hdmi Resolution Setting Method
Pi User Manual Copyright reserved by Shenzhen Xunlong Software Co., Ltd When using HDMI to VGA display, the linux system of the development board and the development board does not need to make any settings. It only needs to be displayed normally for the development board HDMI interface. - Page 125 Pi User Manual Copyright reserved by Shenzhen Xunlong Software Co., Ltd 2) Then you can see the current resolution of the system 3) Click the drop -down box of resolution (resolution) to see all the resolution currently www.orangepi.org www.xunlong.tv...
- Page 126 Pi User Manual Copyright reserved by Shenzhen Xunlong Software Co., Ltd supported by the display 4) Then select the resolution you want to set, and then click Apply www.orangepi.org www.xunlong.tv...
-
Page 127: How To Use Bluetooth Use
Pi User Manual Copyright reserved by Shenzhen Xunlong Software Co., Ltd 5) After the new resolution is settings, select Keep The Configuration 3.10. How to use Bluetooth use 3.10.1. The test method of the desktop image 1) Click the Bluetooth icon in the upper right corner of the desktop 2) Then select the adapter www.orangepi.org... - Page 128 Pi User Manual Copyright reserved by Shenzhen Xunlong Software Co., Ltd 3) If there is a prompt interface, please select YES 4) Then set VISIBILITY SETTING as Always Visible in the Bluetooth adapter setting interface, and then close it 5) Then open the configuration interface of the Bluetooth device www.orangepi.org...
- Page 129 Pi User Manual Copyright reserved by Shenzhen Xunlong Software Co., Ltd 6) Click Search to start scanning the surrounding Bluetooth equipment 6) Then select the Bluetooth device you want to connect, and then click the right mouse button to pop up the operating interface of this Bluetooth device. Select Pair to start pairing.
- Page 130 Pi User Manual Copyright reserved by Shenzhen Xunlong Software Co., Ltd 8) After pairing with the mobile phone, you can choose the paired Bluetooth device, then right -click to select Send A File to start sending a picture to the phone 9) The interface of the sending picture is shown below www.orangepi.org...
-
Page 131: Usb Interface Test
Pi User Manual Copyright reserved by Shenzhen Xunlong Software Co., Ltd 3.11. USB interface test The USB interface can connect to USB Hub to expand the number of USB interfaces. 3.11.1. Connect the USB mouse or keyboard test 1) Insert the keyboard of the USB interface into the USB interface of Orange PI... -
Page 132: Usb Wireless Network Card Test
Pi User Manual Copyright reserved by Shenzhen Xunlong Software Co., Ltd mounting orangepi@orangepi:~$ df -h | grep "sd" /dev/sda1 29G 208K 1% /mnt 3.11.3. USB wireless network card test The current USB wireless network card that can be tested is shown below. Please test it by yourself if you cannot use the USB wireless network card driver if you cannot use it. - Page 133 Pi User Manual Copyright reserved by Shenzhen Xunlong Software Co., Ltd 83.588375] usb 2-1: New USB device found, idVendor=0bda, idProduct=b720, bcdDevice= 2.00 83.588403] usb 2-1: New USB device strings: Mfr=1, Product=2, SerialNumber=3 83.588422] usb 2-1: Product: 802.11n WLAN Adapter 83.588443] usb 2-1: Manufacturer: Realtek...
- Page 134 Pi User Manual Copyright reserved by Shenzhen Xunlong Software Co., Ltd wlx0013eff458ae: flags=4099<UP,BROADCAST,MULTICAST> mtu 1500 ether 00:13:ef:f4:58:ae txqueuelen 1000 (Ethernet) RX packets 0 bytes 0 (0.0 B) RX errors 0 dropped 0 overruns 0 frame 0 TX packets 0 bytes 0 (0.0 B)
- Page 135 Pi User Manual Copyright reserved by Shenzhen Xunlong Software Co., Ltd 8) The display after opening Bluetooth is shown below use of Bluetooth. 9) For the test method of Bluetooth, please refer to the RTL8811 Test 3.11.3.2. 1) First insert the RTL8811 wireless network card module into the USB interface of the...
-
Page 136: Usb Camera Test
Pi User Manual Copyright reserved by Shenzhen Xunlong Software Co., Ltd 3) You can see the loading information of the RTL8723BU module through the DMESG command orangepi@orangepi:~$ dmesg [ 118.618194] usb 2-1: new high-speed USB device number 2 using ehci-platform 118.767152] usb 2-1: New USB device found, idVendor=0bda, idProduct=c811,... - Page 137 Pi User Manual Copyright reserved by Shenzhen Xunlong Software Co., Ltd 2) You can see that the USB camera's device node information is/dev/video0 through the V4L2-CTL command orangepi@orangepi:~$ v4l2-ctl --list-devices Q8 HD Webcam: Q8 HD Webcam (usb-fc880000.usb-1): /dev/video0 /dev/video1 /dev/media0 Note that L in V4L2 is a lowercase letter L, not numbers 1.
- Page 138 Pi User Manual Copyright reserved by Shenzhen Xunlong Software Co., Ltd 4) How to test the USB camera using FSWEBCAM to test the USB camera Install fswebcam orangepi@orangepi:~$ sudo apt update orangepi@orangepi:~$ sudo apt-get install -y fswebcam b. After installing fswebcam, you can use the following command to take pictures...
-
Page 139: Audio Test
Pi User Manual Copyright reserved by Shenzhen Xunlong Software Co., Ltd 3.12. Audio Test 3.12.1. Test the audio method in the desktop system 1) First open the file manager 2) Then find the following file (if there is no audio file in the system, you can upload an audio file to the system by yourself) 3) Then select the Audio.WAV file, right -click and select VLC to open it to start playing... - Page 140 Pi User Manual Copyright reserved by Shenzhen Xunlong Software Co., Ltd 4) Methods to switch different audio equipment such as HDMI playback and headset playback First open the volume control interface b. When playing audio, the audio device options that play software can be used will be displayed in PlayBack.
-
Page 141: How To Play The Audio With The Command Line
Pi User Manual Copyright reserved by Shenzhen Xunlong Software Co., Ltd 3.12.2. How to play the audio with the command line Play audio test of the headset interface 3.12.2.1. 1) First insert the headset into the headphone jack of the development board 2) Then you can check the sound card device supported by the Linux system through the aplay -l command. - Page 142 Pi User Manual Copyright reserved by Shenzhen Xunlong Software Co., Ltd Subdevice #0: subdevice #0 card 2: rockchipes8388 [rockchip-es8388], device 0: dailink-multicodecs ES8323.6-0010-0 [dailink-multicodecs ES8323.6-0010-0] Subdevices: 1/1 Subdevice #0: subdevice #0 3) Then use the aplay command to play the audio file that comes with the system.
-
Page 143: Temperature Sensor
Pi User Manual Copyright reserved by Shenzhen Xunlong Software Co., Ltd 3.13. Temperature Sensor The command of the system temperature sensor is: orangepi@orangepi:~$ sensors gpu_thermal-virtual-0 Adapter: Virtual device temp1: +47.2°C littlecore_thermal-virtual-0 Adapter: Virtual device temp1: +47.2°C bigcore0_thermal-virtual-0 Adapter: Virtual device temp1: +47.2°C... -
Page 144: Pin Interface Pin Explanation
+47.2°C (crit = +115.0°C) 3.14. 26 PIN interface pin explanation 1) Orange Pi 5 Development board 26 PIN interface pins, please refer to the figure below 2) Orange Pi 5 Development board 26 PIN interface pins The function as shown in the... -
Page 145: How To Install Wiringop
Pi User Manual Copyright reserved by Shenzhen Xunlong Software Co., Ltd can be seen clearly In the table above, the PWM is marked with the address of the corresponding register. Which PWMCHIP corresponds to which PWMCHIP corresponding to the 26PIN pins in the/SYS/Class/PWM//is useful. - Page 146 -y git orangepi@orangepi:~$ git clone https://github.com/orangepi-xunlong/wiringOP.git -b next Note that Orange Pi 5 needs to download the code of the Wiringop NEXT branch, please don't miss the parameter of -b next. If you have a problem with the download code from GitHub, you can download the source code compression package of Wiringop-opi5.gz...
-
Page 147: 26Pin Interface Gpio, I2C, Uart, Spi And Pwm Test
Pi User Manual Copyright reserved by Shenzhen Xunlong Software Co., Ltd 3.16. 26Pin interface GPIO, I2C, UART, SPI and PWM test Note that if you need to set overlays at the same time, open multiple configurations at the same time, please use the space to write in one line as follows. - Page 148 Pi User Manual Copyright reserved by Shenzhen Xunlong Software Co., Ltd 2) First set the GPIO port as the output mode, the third parameter needs to enter the serial number of the wpi corresponding to the pins root@orangepi:~/wiringOP# gpio mode 3) Then set the GPIO port to output the low level.
-
Page 149: 26Pin Spi Test
3.16.2. 26pin SPI test 1) From the schematic diagram of the 26PIN interface, the SPI available for Orange Pi 5 is SPI4 In the Debian11 system, the SPI4 in 26PIN is closed by default and needs to be opened manually. -
Page 150: 26Pin I2C Test
FF FF FF FF FF FF FF FF FF FF FF FF FF FF FF FF FF FF F0 0D | ..@..▒....▒. 3.16.3. 26pin I2C test 1) From the table below, the I2C available for ORANGE PI 5 is I2C1, I2C3, and I2C5. www.orangepi.org www.xunlong.tv... - Page 151 Pi User Manual Copyright reserved by Shenzhen Xunlong Software Co., Ltd It can be seen from the above table that I2C1 can be exported from the 12 and 15 pins of 26pin (I2C1_M2), or it can also be exported from the 16 and 18 pins of 26pin (I2C1_M4).
-
Page 152: 26Pin Uart Test
#i2c5 command 3.16.4. 26pin UART Test 1) From the table below, the UART available for Orange Pi 5 is UART0, UART1, UART3, and UART4. There are four sets of UART bus In the Debian11 system, the UART in 26Pin is closed by default, and it needs to be opened manually to use. - Page 153 Pi User Manual Copyright reserved by Shenzhen Xunlong Software Co., Ltd then restart the Linux system to open UART0, UART1, UART3, and UART4 at the same time. If you only need to open one, then fill in one. orangepi@orangepi:~$ sudo vim /boot/orangepiEnv.txt...
-
Page 154: Pwm Test Method
1: -> Out: 2: -> Out: 3: -> Out: 4: -> Out: 5: -> 3.16.5. PWM Test Method 1) From the table below, the PWM available for Orange Pi 5 includes PWM0, PWM1, PWM3, PWM13, PWM14, and PWM15. www.orangepi.org www.xunlong.tv... - Page 155 Pi User Manual Copyright reserved by Shenzhen Xunlong Software Co., Ltd You can see from the above table: pwm1 can be exported from No. 16 in 26pin (PWM1_M1), or you can also guide from the 26th pin of 26Pin (PWM1_M2) pwm3 can be exported from No.
- Page 156 Pi User Manual Copyright reserved by Shenzhen Xunlong Software Co., Ltd orangepi@orangepi:~$ sudo vim /boot/orangepiEnv.txt overlays=pwm3-m0 Select the settings of pwm3_m2 as shown below: orangepi@orangepi:~$ sudo vim /boot/orangepiEnv.txt overlays=pwm3-m2 2) After opening a PWM, a PWMCHIPX (x is a specific number) will be available in/sys/class/pwm/in.
-
Page 157: Hardware Watch The Door Dog Test
Pi User Manual Copyright reserved by Shenzhen Xunlong Software Co., Ltd 6) The other PWM testing methods are similar to the PWM15 above 3.17. Hardware Watch The Door Dog Test The WatchDog_teest program is pre -installed in the Debian11 system released by Orange PI for testing directly. -
Page 158: View The Serial Number Of The Rk3588S Chip
Pi User Manual Copyright reserved by Shenzhen Xunlong Software Co., Ltd put_user return,if 0,success:0 put_usr return,if 0,success:0 keep alive keep alive keep alive 3.18. View the serial number of the RK3588S chip The commands of the RK3588S chip serial number are shown below. The serial number of each chip is different, so you can use the serial number to distinguish multiple development boards. -
Page 159: Download The Method Of Downloading And Installing Arm64 Balenaetcher
Pi User Manual Copyright reserved by Shenzhen Xunlong Software Co., Ltd ..3.20. Download the method of downloading and installing ARM64 Balenaetcher 1) The download address of Balenaetcher ARM64 is: The download address of the .deb installation package is shown below, you need to install it to use https://github.com/Itai-Nelken/BalenaEtcher-arm/releases/download/v1.7.9/balena-e... - Page 160 Pi User Manual Copyright reserved by Shenzhen Xunlong Software Co., Ltd The interface after the opening of Balenaetcher is opened as follows: 3) How to use the AppImage version of Balenaetcher: First add permissions to Balenaetcher orangepi@orangepi:~/Desktop$ chmod +x balenaEtcher-1.7.9+5945ab1f-arm64.AppImage b.
-
Page 161: The Installation Method Of The Pagoda Linux Panel
Pi User Manual Copyright reserved by Shenzhen Xunlong Software Co., Ltd 3.21. The installation method of the pagoda Linux panel Pagoda Linux panel is a server management software that improves operation and maintenance efficiency. It supports more than 100 server management functions... - Page 162 Pi User Manual Copyright reserved by Shenzhen Xunlong Software Co., Ltd 5) Enter the board address displayed above in the browser to open the login interface of the pagoda Linux panel, and then enter the username and password displayed in the corresponding position.
- Page 163 Pi User Manual Copyright reserved by Shenzhen Xunlong Software Co., Ltd 7) After entering the pagoda, you will first prompt the account that needs to be bound to the official website of the pagoda. If there is no account number, you can go to the official website of the pagoda (https://www.bt.cn) to register a account...
- Page 164 Pi User Manual Copyright reserved by Shenzhen Xunlong Software Co., Ltd 9) Test the SSH terminal login of the pagoda After opening the SSH terminal of the pagoda, you will first prompt the password of the development board system. At this time, enter orangepi in the password box (the default password, if you have modification, please fill in the modified one).
- Page 165 Pi User Manual Copyright reserved by Shenzhen Xunlong Software Co., Ltd 10) Software such as Apache, MySQL, and PHP can be installed in the software store of the pagoda, and various applications can be deployed in one click. Please explore it yourself.
-
Page 166: How To Remotely Log In To The Linux System Desktop
Pi User Manual Copyright reserved by Shenzhen Xunlong Software Co., Ltd 12) For more functions of the pagoda, please refer to the following information to explore by yourself manual:http://docs.bt.cn Forum link:https://www.bt.cn/bbs GitHub link:https://github.com/aaPanel/BaoTa 3.22. How to remotely log in to the Linux system desktop 3.22.1. - Page 167 Pi User Manual Copyright reserved by Shenzhen Xunlong Software Co., Ltd Nomachine supports Windows, Mac, Linux, iOS, and Android platforms, so we can remotely log in to control Orange PI development boards through Nomachine on a variety of devices. The following demonstrates the Linux system desktop of the Orange PI development board through Nomachine in Windows.
- Page 168 Pi User Manual Copyright reserved by Shenzhen Xunlong Software Co., Ltd First enter the remote login software-Nomachine folder Then download the arm64 version of the deb installation package Then upload the downloaded nomachine_8.2.3_arm64.deb to the Linux system of the development board d.
- Page 169 Pi User Manual Copyright reserved by Shenzhen Xunlong Software Co., Ltd 3) Then install nomachine in Windows, please restart the computer after installation 4) Then open NoMachine in Window 5) After NoMachine starts, it will automatically scan the other equipment installed in the local area network with NoMachine.
- Page 170 Pi User Manual Copyright reserved by Shenzhen Xunlong Software Co., Ltd 7) Then enter the user name and password of the linux system in the corresponding position in the figure below, and then click login to start logging in 8) Then click OK in the next interface www.orangepi.org...
-
Page 171: Use Vnc Remote Login
Pi User Manual Copyright reserved by Shenzhen Xunlong Software Co., Ltd 9) Finally, you can see the desktop of the development board Linux system Debian11 3.22.2. Use VNC Remote Login Please ensure that Windwos computers and development boards are in the same... - Page 172 Pi User Manual Copyright reserved by Shenzhen Xunlong Software Co., Ltd #Set the vnc password here, 8 -bit characters Password: #Set the vnc password here, 8 -bit characters Verify: Would you like to enter a view-only password (y/n)? xauth: file /root/.Xauthority does not exist New 'X' desktop is orangepi5:1 Creating default startup script /root/.vnc/xstartup...
- Page 173 Pi User Manual Copyright reserved by Shenzhen Xunlong Software Co., Ltd b. Then enter the password of the VNC set before The interface after the login is successfully displayed as shown in the figure below, and then you can remotely operate the desktop of the linux system remotely.
- Page 174 Pi User Manual Copyright reserved by Shenzhen Xunlong Software Co., Ltd 3) The steps to log in to the development board Linux system desktop using the remote desktop connection of Windows are First open the remote desktop connection that comes with Windows b.
- Page 175 Pi User Manual Copyright reserved by Shenzhen Xunlong Software Co., Ltd Then set the connection information according to the description below a) Session:You need to choose vnc-ay b) ip:You can enter 127.0.0.0 or the IP address of the development board c) port:Generally 5901...
-
Page 176: Some Programming Language Test Supported By The Linux System
Pi User Manual Copyright reserved by Shenzhen Xunlong Software Co., Ltd 3.23. Some programming language test supported by the Linux system 3.23.1. Debian Bullseye system 1) Debian Bullseye is installed with the gcc compilation tool chain by default, which can... - Page 177 Pi User Manual Copyright reserved by Shenzhen Xunlong Software Co., Ltd #include <stdio.h> int main(void) printf("Hello World!\n"); return 0; Then compile and run hello_world.c orangepi@orangepi:~$ gcc -o hello_world hello_world.c orangepi@orangepi:~$ ./hello_world Hello World! 2) Debian Bullseye's default installation with Python3...
-
Page 178: Ubuntu Jammy System
Pi User Manual Copyright reserved by Shenzhen Xunlong Software Co., Ltd public class hello_world public static void main(String[] args) System.out.println("Hello World!"); d. Then compile and run hello_world.java orangepi@orangepi:~$ javac hello_world.java orangepi@orangepi:~$ java hello_world Hello World! 3.23.2. Ubuntu Jammy System... - Page 179 Pi User Manual Copyright reserved by Shenzhen Xunlong Software Co., Ltd Hello World! 2) Ubuntu jammy is installed with Python3 by default Python3 specific version is shown below orangepi@orangepi:~$ python3 3.10.4 Python (main, Apr 2 2022, 09:04:19) [GCC 11.2.0] on linux Type "help", "copyright", "credits"...
- Page 180 Pi User Manual Copyright reserved by Shenzhen Xunlong Software Co., Ltd orangepi@orangepi:~$ java hello_world Hello World! 3.24. The method of shutting down and restarting the development board 1) In the process of running the linux system, if the Type-C power supply is directly out of power, it may cause the file system to lose certain data or damage.
- Page 181 Pi User Manual Copyright reserved by Shenzhen Xunlong Software Co., Ltd In addition, please note that the Suspend function shown in the figure above is unavailable 3) After shutting down, press the switch button on the development board to turn on.
Need help?
Do you have a question about the Orange Pi 5 and is the answer not in the manual?
Questions and answers