Table of Contents
Advertisement
Quick Links
Advertisement
Table of Contents

Related Manuals for Nokia 2115


Summary of Contents for Nokia 2115
- Page 1 Nokia 2115 and Nokia 2115i User Guide...
- Page 2 Includes RSA BSAFE cryptographic or security protocol software from RSA Security. The information contained in this user guide was written for the Nokia 2115 and the Nokia 2115i products. Nokia operates a policy of ongoing development. Nokia reserves the right to make changes to any of the products described in this document without prior notice.
-
Page 3: Table Of Contents
7. Settings ....................52 8. Organizer ....................68 9. Games ....................... 76 10.Minibrowser ..................77 11.PC Connectivity ..................79 12.Enhancements ..................80 13.Battery information ................82 Care and maintenance ................85 Additional safety information..............86 Nokia one-year limited warranty............91 Index......................107... - Page 4 C o n t e n t s...
-
Page 5: For Your Safety
F o r y o u r s a f e t y For your safety Read these simple guidelines. Not following them may be dangerous or illegal. Read the complete user guide for further information. SWITCH ON SAFELY Do not switch the device on when wireless phone use is prohibited or when it may cause interference or danger. - Page 6 F o r y o u r s a f e t y WATER-RESISTANCE Your device is not water-resistant. Keep it dry. BACKUP COPIES Remember to make backup copies or keep a written record of all important information stored in your device. CONNECTING TO OTHER DEVICES When connecting to any other device, read its user guide for detailed safety instructions.
-
Page 7: Welcome
W e l c o m e Welcome Congratulations on your purchase of the Nokia 2115 or Nokia 2115i mobile device. Your device provides many functions which are practical for daily use, such as a hands-free loudspeaker, alarm clock, calculator, calendar, and more. To... - Page 8 ■ Get help Find your device label If you need help, Nokia Customer Care is available for assistance. Before calling, we recommend that you write down the electronic serial number (ESN) and have it available.
- Page 9 Tel: 1-888-22-NOKIA (1-888-226-6542) Fax: 1-905-619-4360 Updates From time to time, Nokia updates this guide to reflect changes. The latest version may be available at www.nokiausa.com. An interactive tutorial for this product may be available at the web site www.nokiahowto.com. Accessibility solutions Nokia is committed to making mobile devices easy to use for all individuals, including those with disabilities.
-
Page 10: Device At A Glance
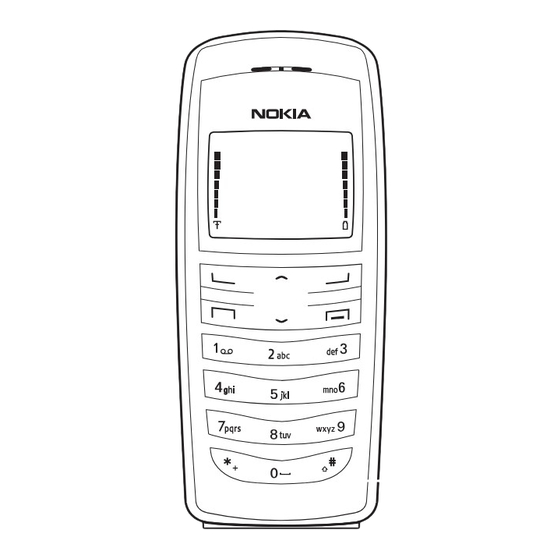
D e v i c e a t a g l a n c e 1. Device at a glance Power key (1) Microphone (7) Earpiece (2) Charger port (8) Right selection key (3) Scroll up and down key (9) End key (4) Call key (10) Keypad (5) - Page 11 D e v i c e a t a g l a n c e ■ The start screen The start screen is home base and indicates your device is in idle mode. Signal strength (1)—A higher bar indicates a stronger network signal. Battery level (2)—A higher bar indicates more power in the battery.
- Page 12 D e v i c e a t a g l a n c e Icon Indicates... The countdown timer is running. See "Countdown timer," page 73. The stopwatch timing is running in the background. See "Stopwatch," page 74. Integrated hands free is active. The timed profile is selected.
- Page 13 D e v i c e a t a g l a n c e ■ Device menus Device features are grouped according to function and are accessed through the main menus. Each main menu contains submenus and lists from which you can select or view items and customize your device features.
-
Page 14: Set Up Your Phone
S e t u p y o u r p h o n e 2. Set up your phone ■ The antenna Your device has an internal antenna located towards the top of the device. Hold the device as you would any other telephone with the antenna area pointed up and over your shoulder. - Page 15 S e t u p y o u r p h o n e Replace the battery Always use original Nokia batteries. See "Battery information," page 82. 1. Position the battery so the gold-colored contacts match up with those on the device.
- Page 16 S e t u p y o u r p h o n e ■ Turn on or off To turn your device on or off, press and hold the power key on top of the device for at least 3 seconds. ■...
- Page 17 S e t u p y o u r p h o n e Remove the front cover Gently pull the bottom of the front cover away from the rest of the device, and remove the front cover. Install the key mat and front cover 1.
- Page 18 S e t u p y o u r p h o n e Replace the battery and back cover See "Replace the battery," page 17 and "Replace the back cover," page 17. Insert a photo in the back cover If your device has a picture frame, you can insert one of your favorite photos in the back cover to personalize it.
- Page 19 S e t u p y o u r p h o n e Make a conference call Conference calling is a network service that allows you to take part in a conference call with two other participants. 1. Make a call to the first participant. 2.
- Page 20 S e t u p y o u r p h o n e Adjust the volume during a call To increase or decrease the volume during a call, scroll up or down during the call. When adjusting the volume, a bar chart indicates the volume level. Loudspeaker You can use the loudspeaker on your device during a call.
- Page 21 S e t u p y o u r p h o n e ■ Flashlight Your device has a built-in flashlight that you can activate when the device is in the standby mode or when there is a call in progress. To activate the flashlight, scroll up.
-
Page 22: Text Entry
T e x t e n t r y 3. Text entry You can use two methods for entering text and numbers: • Standard mode is the only way to enter text into the contacts list, and to rename caller groups. •... - Page 23 Text entry The following illustration simulates your display each time a key is pressed. For example, to write Nokia with predictive text on and with the English dictionary selected, press each of the following keys once: • Press 0 to enter a space and begin writing the next word.
- Page 24 T e x t e n t r y Sentence case text: standard mode is on. Sentence case text: predictive text is on. Lowercase text: predictive text is on.
-
Page 25: Contacts
C o n t a c t s 4. Contacts The contacts list can hold up to 250 contacts, with multiple numbers and text notes for each contact. The amount of numbers and text entries that you can save may vary, depending on length and the total number of entries in the contacts list. - Page 26 C o n t a c t s Save an entry 1. At the start screen, select Contacts > new. 2. Enter the name, and select OK. 3. Enter the phone number, and select > Done. Save numbers, text items, and details You can save different types of phone numbers and short text items per name to the contacts list.
- Page 27 C o n t a c t s 3. Scroll to the entry you wish to delete, and select Delete > to confirm. 4. To delete the entire contents of your contacts list, select Delete all > OK. 5. Enter the lock code, and select OK. See "Security settings," page 62. ■...
- Page 28 C o n t a c t s 5. Select to activate 1-touch dialing. Change 1-touch dialing numbers 1. At the start screen, select Contacts > 1-touch dialing. 2. Select the 1-touch dialing entry you wish to change and Options >...
- Page 29 C o n t a c t s number—Add a number to the contact. detail—Add an address or note to the contact. Caller groups—Add the contact to an existing caller group. Custom tone—Add a custom ring tone to the contact. Send bus.
- Page 30 C o n t a c t s Edit other text items 1. Highlight the address entry you would like to edit, and select Options. 2. Select the option you wish to perform and OK. ■ Voice tags Voice tags allow you to dial a contact by speaking. You can also playback, change, or delete voice tags.
- Page 31 C o n t a c t s Dial a number 1. Select and hold Contacts. 2. When you hear several beeps and Please speak now appears, release the key. 3. Pronounce the voice tag clearly into the microphone. When the device finds the voice tag, Found: appears, and the device automatically dials the number.
- Page 32 C o n t a c t s ■ Caller groups Caller groups allows you to organize your contact information into groups. You can add contacts list entries to any of five caller groups, and assign a unique ringing tone or graphic to that group. This enables you to identify callers from the group by their unique ringing tone or graphic.
- Page 33 C o n t a c t s 3. To send the business card as a message, select Via text msg. > Primary no. All details (only if contact has more than one phone number). 4. Enter the number for your recipient, or select Search to retrieve a number from your contacts list.
-
Page 34: Messages
M e s s a g e s 5. Messages If you have subscribed to a messaging service through your wireless provider, you can send and receive messages to compatible devices that also subscribe to a compatible message service. You may also be able to send and receive picture messages and e-mail messages. - Page 35 M e s s a g e s Write and send 1. At the start screen, select Menu > Messages > Text messages > Create message. 2. Select Add number to add the recipient’s phone number, Add e-mail to add the e-mail address, or Add list to add a distribution list.
- Page 36 M e s s a g e s Clear text—Erase the text clipboard. Exit editor—Save the message to your sent items folder automatically, and leave the message editor. Insert contact—Insert a name from your contacts list into your message. Insert number—Insert a phone number or find a phone number in the contacts list.
- Page 37 M e s s a g e s 2. Select list, scroll to a distribution list, and select OK. 3. Select Options > Edit message Edit text. 4. Compose a message using the keypad, and select Options > Send. 5. Select Options >...
- Page 38 M e s s a g e s Change sending options 1. At the start screen, select Menu > Messages > Text messages > Message settings > Sending options. 2. Select the setting you wish to change: Priority—Select the priority of the note as Normal or Urgent.
- Page 39 M e s s a g e s Save the message to another folder While viewing a message, select Options > Save message and the destination folder. View saved messages 1. At the start screen, select Menu > Messages > Text messages.
- Page 40 M e s s a g e s Add a folder 1. At the start screen, select Menu > Messages > Text messages > My folders > Options > folder. 2. Enter a name for the new folder, and select OK. Rename a folder 1.
- Page 41 M e s s a g e s All messages in a folder 1. At the start screen, select Menu > Messages > Text messages > Delete messages. 2. Select the folder containing the messages you wish to delete. All—Deletes all messages in all of the folders. read—Deletes any messages that have been read in all of the folders.
- Page 42 M e s s a g e s Call and set up your voice mail 1. When you have saved the voice mailbox number, press and hold 1. 2. When you connect to voice mail and the prerecorded greeting begins, follow the automated instructions to set up your voice mail.
- Page 43 M e s s a g e s Be precise; you need this information to set up your voice mail with dialing codes. Dialing codes Press * repeatedly to cycle through dialing codes. When the desired code appears in the display, pause briefly and the code is inserted into the dialing string. The following dialing codes are available: Dialing code Indicates...
- Page 44 M e s s a g e s ■ Picture messages Picture messaging is a network service. If your wireless service provider supports this feature, your device comes with five preloaded pictures. You can, however, over-write any of the five pictures that come with your device. Pictures can be attached to a message and sent using text messaging to compatible devices or PCs.
- Page 45 M e s s a g e s View a picture message When you receive a picture message, appears in the display. 1. Select Show to view the picture message, or select Exit to move it to your inbox. 2. If you have more than one picture message, select the message of your choice.
-
Page 46: Call Log
C a l l l o g 6. Call log Call log stores information about the last 20 missed, 20 received, or 20 dialed calls. It also adds the total duration of all calls. When the number of calls exceed the maximum, the most recent call replaces the oldest. - Page 47 C a l l l o g ■ Dialed numbers Dialed calls are previous numbers you have dialed from your device: 1. At the start screen, press Call, or select Menu > Call log > Dialed numbers. 2. Select a name or number and Options. 3.
- Page 48 C a l l l o g Dialed calls At the start screen, select Menu > Call log > Call timers > Duration of dialed calls > Details for more information. Received calls At the start screen, select Menu > Call log >...
- Page 49 C a l l l o g All received data/fax—View the size (kB) of all received data and fax calls. Duration of all data/fax calls—View the duration time of all calls. Clear all data/fax logs—Select > to clear all data and fax registers. ■...
-
Page 50: Settings
S e t t i n g s 7. Settings Use this menu to set or change profiles, tone settings, call settings, phone settings, time and date settings, enhancement settings, security settings, network settings, or to restore the factory settings. ■... - Page 51 ■ Call settings Location info sharing Location info sharing is only available for the Nokia 2115i phone. Location info sharing is a network service. See "Network Services," page 9. If your wireless service provider supports this feature, location info sharing allows the phone to share position information over the network.
- Page 52 S e t t i n g s On—The phone location information is shared with the network whenever the phone is powered on and activated. The screen displays in the upper left-hand corner of the start screen. Location information will always be shared with the network during emergency calls to the official emergency number programmed into the phone, regardless of which setting is selected.
- Page 53 S e t t i n g s Minibrowser confirmation You can specify whether or not you want your device to display messages when you begin or end a browser session. 1. Select Menu > Settings > Call settings > Minibrowser confirmation.
- Page 54 S e t t i n g s 7. Enter the card name, and select OK. Contact your calling card company for more information. Make calls After you have saved your calling card information in your device, you can make a call using your calling card.
- Page 55 Do not move the device by holding it in your hand during a data call. For more information on connectivity, see the PC/PDA Connectivity Guide. The PC/PDA Connectivity Guide can be downloaded from the Nokia web site at http://www.nokiausa.com/us.
- Page 56 S e t t i n g s Automatic keyguard You can set the keypad of your device to lock automatically after a preset time delay. 1. At the start screen, select Menu > Settings > Phone settings > Automatic keyguard >...
- Page 57 S e t t i n g s Predictive text input is not available for entering Welcome note text. 1. At the start screen, select Menu > Settings > Phone settings > Welcome note. 2. Enter a note (up to 44 characters). Press * to display and select from available special characters.
- Page 58 S e t t i n g s ■ Time and date settings Time Show or hide the clock At the start screen, select Menu > Settings > Time and date settings > Clock > Show clock Hide clock. Set the time 1.
- Page 59 S e t t i n g s Set the auto-update Auto-update is a network service. See "Network Services," page 9. If your wireless service provider supports this feature, you can allow the digital network to set the clock, which is useful when you are out of your home area (for example, when you travel to another network or time zone).
- Page 60 S e t t i n g s Activate a voice command After you have associated a voice command with a device function, you can request the function by speaking the voice command. 1. Select and hold Contacts. 2. When Please speak now appears, pronounce the voice command clearly into the microphone.
- Page 61 S e t t i n g s 3. Select one of the following options: turns the phone lock feature on immediately after the device is turned off and then on. immediately turns off the phone lock feature. Call not allowed is displayed if you attempt to place a call while the device is locked.
- Page 62 S e t t i n g s Restrict calls Call restriction is a network service. See "Network Services," page 9. If your wireless service provider supports this feature, you can restrict the calls your device can make and receive. When calls are restricted, calls still may be possible to the official emergency number programmed into your device.
- Page 63 S e t t i n g s 2. Select one of the following: Home only—You can make and receive calls in your home area only. Automatic—The device automatically searches for service in another digital network. If one is not found, the device uses analog service. The roaming rate applies when not in the home service area.
- Page 64 S e t t i n g s 2. Select one of the following options: Forward all calls—Forwards all calls to the number you specify. Forward if busy—Forward incoming calls when you are in a call. Forward if not answered—Forward incoming calls to another number if you are unable to answer.
- Page 65 S e t t i n g s Send my caller ID If your wireless service provider supports this feature, then you can prevent your number from appearing on the receiving party’s caller ID. At the start screen, select Menu >...
-
Page 66: Organizer
O r g a n i z e r 8. Organizer Your device contains features to help organize your everyday life, including an alarm clock, calendar, calculator, countdown timer, and stopwatch. ■ Alarm clock Set an alarm The alarm clock is based on the device clock. It sounds an alert any time you specify and works even when the device is turned off. - Page 67 O r g a n i z e r ■ Calendar The calendar keeps track of reminders, calls you need to make, meetings, memo, and birthdays. It can even sound an alarm for any of these events. Monthly view provides an overview of the selected month and weeks. It also allows you to jump to a specific date.
- Page 68 O r g a n i z e r Reminder—You are prompted to enter the subject of the reminder. You are then given the option to set an alarm. 4. Enter your note, and select Options > Save. View notes (day view) After you have created some calendar notes, you can view them as follows: 1.
- Page 69 O r g a n i z e r Send a note 1. At the start screen, select Menu > Organizer > Calendar. 2. Scroll to the date containing the note you wish to send. Any days containing notes will be in bold type. 3.
- Page 70 O r g a n i z e r Record speech or sound 1. At the start screen, select Menu > Organizer > Voice recorder > Record. 2. After the recorder start tone is heard, begin recording speech or sound. 3.
- Page 71 O r g a n i z e r Currency converter You can convert foreign currency to domestic or vice versa. 1. At the start screen, enter a currency amount to convert. 2. Select Options > To home foreign. home—converts foreign currency to domestic currency. foreign—converts domestic currency to foreign currency.
- Page 72 O r g a n i z e r When the time runs out, your device sounds an alarm, displays the timer note, and flashes its lights. • Press any key during the alarm to stop the timer. • After 60 seconds the timer alert expires automatically. Change the time After you have set the timer, you can change the time.
- Page 73 O r g a n i z e r timing—You can use the lap time function when you want to track how long it takes to complete each cycle or lap. Select to note the lap time. The clock stops, then immediately from zero. The lap time appears below the running time.
-
Page 74: Games
G a m e s 9. Games Challenge yourself or a friend to one of the fun games in your device. Some menus listed are network services. Contact your wireless provider for more information. ■ Game settings At the start screen, select Menu >... -
Page 75: Minibrowser
Your device may have some bookmarks loaded for sites not affiliated with Nokia. Nokia does not warrant or endorse these sites. If you choose to access them, you should take the same precautions, for security or content, as you would with any Internet site. - Page 76 M i n i b r o w s e r ■ Navigate the mobile Internet Since your device screen is much smaller than a computer screen, mobile Internet content is displayed differently than you may be accustomed to seeing. This section contains guidelines for using device keys to navigate a WAP site.
-
Page 77: Pc Connectivity
With the PC Suite you can create and send text and picture messages and synchronize contacts and calendar between your device and a compatible PC. You may find more information for PC suite in the support area on the Nokia web site, www.nokiausa.com. -
Page 78: Enhancements
Your device contains a Standard 1070-mAh LI-Ion Battery (BL-6C). Warning: Use only batteries, chargers and enhancements approved by Nokia for use with this particular model. The use of any other types may invalidate any approval or warranty, and may be dangerous. For availability of approved enhancements, please check with your dealer. - Page 79 E n h a n c e m e n t s • TTY/TDD adapter (HDA-10) Car and Desk Stand • Desk Stand (DCV-14) • Easy-to-use Handsfree (HF-3) • Headrest Handsfree (BHF-3) Miscellaneious • Data Cable (CA-42) • Xpress-on Color Covers • Carry Case See www.nokia.com/phones for more information about enhancements.
-
Page 80: Battery Information
The battery can be charged and discharged hundreds of times but it will eventually wear out. When the talk and standby times are noticeably shorter than normal, replace the battery. Use only Nokia approved batteries, and recharge your battery only with Nokia approved chargers designated for this device. - Page 81 B a t t e r y i n f o r m a t i o n ■ Nokia battery authentication guidelines Always use original Nokia batteries for your safety. To check that you are getting an original Nokia battery, purchase it from an authorized Nokia dealer, look for the Nokia Original Enhancements logo on the packaging, and inspect the hologram label using the following steps.
- Page 82 If you cannot confirm that your Nokia battery with the hologram label is an authentic Nokia battery, please do not use the battery, but take it to the nearest authorized Nokia service point or dealer for assistance. The use of a battery that is not approved by the manufacturer may be dangerous and may result in poor performance and damage to your device and its enhancements.
-
Page 83: Care And Maintenance
C a r e a n d m a i n t e n a n c e Care and maintenance Your device is a product of superior design and craftsmanship and should be treated with care. The suggestions below will help you protect your warranty coverage. -
Page 84: Additional Safety Information
A d d i t i o n a l s a f e t y i n f o r m a t i o n Additional safety information ■ Operating environment Remember to follow any special regulations in force in any area and always switch off your device when its use is prohibited or when it may cause interference or danger. - Page 85 A d d i t i o n a l s a f e t y i n f o r m a t i o n If you have any reason to suspect that interference is taking place, switch off your phone immediately.
- Page 86 Do not end the call until given permission to do so. ■ Certification Information (SAR) THE NOKIA 2115 AND NOKIA 2115i DEVICES MEET THE GOVERNMENT'S REQUIREMENTS FOR EXPOSURE TO RADIO WAVES. Your mobile device is a radio transmitter and receiver. It is designed and manufactured not to exceed the limits for exposure to radio frequency (RF) energy recommended by international guidelines (ICNIRP).
- Page 87 Use of device accessories and enhancements may result in different SAR values. Additional SAR information may be provided under product information at www.nokia.com. USA and Canada: The SAR limit of USA (FCC) and Canada (IC) is 1.6 W/kg averaged over one gram of tissue.
- Page 88 A d d i t i o n a l s a f e t y i n f o r m a t i o n Feature Specification Frequency Range (Rx) AMPS: 869.04–893.97 PCS: 1931.25–1988.75 MHz Cellular: 869.70–893.37 MHz GPS (2115i) 1575.42 MHz ■...
-
Page 89: Nokia One-Year Limited Warranty
Product at the time the Consumer returns the Product for repair, determined by the price paid by the Consumer for the Product less a reasonable amount for usage. Nokia shall not be liable for any other losses or damages. These remedies are the Consumer’s exclusive remedies for breach of warranty. - Page 90 Trojan Horses, cancelbots or damage caused by the connection to other products not recommended for interconnection by Nokia. c) Nokia was not advised in writing by the Consumer of the alleged defect or malfunction of the Product within fourteen (14) days after the expiration of the applicable limited warranty period.
- Page 91 Product. If Nokia cannot perform repairs covered under this limited warranty within 30 days, or after a reasonable number of attempts to repair the same defect, Nokia at its option, will provide a replacement Product or refund the purchase price of the Product less a reasonable amount for usage.
- Page 92 13. This is the entire warranty between Nokia and the Consumer, and supersedes all prior and contemporaneous agreements or understandings, oral or written, relating to the Product, and no representation, promise or condition not contained herein shall modify these terms.
- Page 93 7725 Woodland Center Blvd., Ste. 150 Tampa, FL 33614 Telephone: 1-888-NOKIA-2U (1-888-665-4228) Facsimile: (813) 249-9619 TTY/TDD Users Only: 1-800-24-NOKIA (1-800-246-6542) 17. The limited warranty period for Nokia supplied attachments and accessories is specifically defined within their own warranty cards and packaging.
- Page 94 A d d i t i o n a l s a f e t y i n f o r m a t i o n Appendix A Message from the CTIA (Cellular Telecommunications & Internet Association) to all users of mobile phones ©...
- Page 95 A d d i t i o n a l s a f e t y i n f o r m a t i o n But with wireless phone use, driving safely means a little more. This brochure is a call to wireless phone users everywhere to make safety their first priority when behind the wheel of a car.
- Page 96 A d d i t i o n a l s a f e t y i n f o r m a t i o n driving, follow this simple tip—dial only a few numbers, check the road and your mirrors, then continue.
- Page 97 A d d i t i o n a l s a f e t y i n f o r m a t i o n Appendix B Message from the FDA (U.S. Food and Drug Administration) to all users of mobile phones ©July 18, 2001For updates: http://www.fda.gov/cdrh/phones Consumer Update on Wireless Phones...
- Page 98 A d d i t i o n a l s a f e t y i n f o r m a t i o n manufacturers of wireless phones to notify users of the health hazard and to repair, replace or recall the phones so that the hazard no longer exists.
- Page 99 A d d i t i o n a l s a f e t y i n f o r m a t i o n because of the short distance between the phone and the user’s head. These RF exposures are limited by Federal Communications Commission safety guidelines that were developed with the advice of FDA and other federal health and safety agencies.
- Page 100 A d d i t i o n a l s a f e t y i n f o r m a t i o n However, very large numbers of animals would be needed to provide reliable proof of a cancer promoting effect if one exists. Epidemiological studies can provide data that is directly applicable to human populations, but 10 or more years follow-up may be needed to provide answers about some health effects, such as cancer.
- Page 101 A d d i t i o n a l s a f e t y i n f o r m a t i o n FDA and the other federal health and safety agencies. The FCC limit for RF exposure from wireless telephones is set at a Specific Absorption Rate (SAR) of 1.6 watts per kilogram (1.6 W/kg).
- Page 102 A d d i t i o n a l s a f e t y i n f o r m a t i o n much exposure a person receives, reducing the amount of time spent using a wireless phone will reduce RF exposure.
- Page 103 A d d i t i o n a l s a f e t y i n f o r m a t i o n tested hearing aids for interference from handheld wireless phones and helped develop a voluntary standard sponsored by the Institute of Electrical and Electronic Engineers (IEEE).
- Page 104 A d d i t i o n a l s a f e t y i n f o r m a t i o n...
-
Page 105: Index
I n d e x Index NUMERICS care and maintenance 85 certification information (SAR) 88 1-touch dialing 29 charger connecting 17 times 84 contact information 28 alarm clock 68 contact name 28 antenna 16 contacts 27 anykey answer 54 contacts list automate voicemail 44 add 27 automatic redial 54... - Page 106 I n d e x phone settings 57 picture frame cover 20 headset 18 picture messages 46 help 10 predictive text 25 help text 15 profiles 52 indicators and icons 13 quick keys 13 Keyguard 22 restore factory settings 67 automatic 58 restrict calls 64 languages 57...
- Page 107 I n d e x view call duration 49 call times 49 data/fax call duration 50 minibrowser duration 51 missed calls 48 picture messages 47 received calls 48 saved messages 41 voice commands 61 voice dialing 32 voice messages 43 voice tags 32 assign a tag 32 options 33...
- Page 108 I n d e x...
Need help?
Do you have a question about the 2115 and is the answer not in the manual?
Questions and answers