
Related Manuals for Arnica SOLARA


Summary of Contents for Arnica SOLARA
- Page 1 Kablosuz Dikey Süpürge Cordless Vacuum Cleaner Kabelloser Staubsauger KULLANMA KILAVUZU INSTRUCTION MANUAL BETRIEBSANLEITUNG...
- Page 3 KULLANMA KILAVUZU Süpürgemizi kullandıkça ne kadar doğru bir seçim yaptığınızı anlayacaksınız. Hedefimiz size ödediğinizden fazlasını verebilmektir. Ürünümüzü seçtiğiniz için teşekkür ederiz. Süpürgemizi bu kullanma kılavuzunu okuyup kılavuzda belirtilen şekilde kullanırsanız her şeyin ne kadar kolay olduğunu göreceksiniz. Böylece, süpürgemizden en yüksek performansı...
- Page 4 1.EMNİYET KURALLARI • Emniyet kurallarını mutlaka okuyunuz. • Bu kılavuzda yer alan tüm uyarı ve talimatlar cihazınız ile ilgili önemli bilgileri içerir.Cihazınızın bu talimatlara uygun kullanılması son derece önemlidir. Bu talimat ve uyarılara uyulmaması sonucu oluşabilecek hasarlar ile ilgili üretici firma sorumluluk kabul etmez. •...
- Page 5 • Cihazınız açık hava koşullarında kalmışsa, gözle görülür hasar belirtisi varsa veya suya düşürülmüşse kullanmayınız. • Cihazınızda elektrik kaçağı, anormal motor ısınması, anormal ses veya koku oluşması tespit ederseniz cihazınızı kullanmayınız ve en yakın yetkili servis ile irtibata geçiniz. • Cihazınızı...
- Page 6 • Cihazınızın şarj adaptörü ile başka bir cihazı şarj etmeyiniz. • Cihazınız 4°C ve 40°C arasındaki sıcaklıklarda kullanıma uygundur. • Süpürme yaparken hava çıkış kanallarının açık olduğundan emin olunuz. • Bu cihazdaki piller sadece yetkili servis tarafından değiştirilebilir. • Döner fırça gibi hareketli parçaları ve hava emiş aralıklarını parmak, saç, bol ve püsküllü...
- Page 7 Cihazınızı benzin, tiner, alkol, gazyağı ve benzeri yanıcı sıvıları, 60°C’ den daha yüksek sıcaklıktaki toz ve sıvıları ve yangın tehlikesi oluşturacak cisimleri, sağlığa zararlı atıkları çekmek için kullanmayınız. Cihazınız kuru süpürme için tasarlanmıştır. Asla su vb. sıvıları çekmek için kullanmayınız. Cihazınızı...
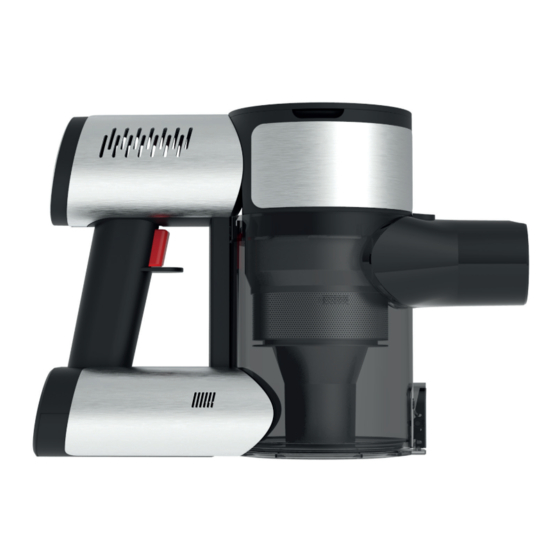
- Page 8 2.CİHAZ TANIMI 1. Ana gövde 12. Şarj gösterge ışıkları 2. Toz haznesi 13. Boru 3. Hazne kapağı 14. Parke süpürme ucu 4. Hazne kapak açma düğmesi 15. Halı süpürme ucu 5. Hava giriş kanalı 16. Koltuk süpürme ucu 6. Hazne çıkarma düğmesi 17.
- Page 9 3.TEKNİK ÖZELLİKLER Model : Solara Gerilim : 28.8V AC Güç : 440W : 28.8V 2500mAh 72Wh Şarj Cihazı modeli : R241-3501000E Şarj Cihazı Giriş : 100-240V DC 50/60Hz 1.5A Şarj Cihazı Çıkış : 35.0V 1.0A 35.0W Standartlara Uygunluk : CE , AEEEK Bu cihaz 2014/30/EU ( Elektromanyetik Uyumluluk Yönetmeliği) ve...
- Page 10 Şarj ünitesini duvara sabitlemek isterseniz, şarj ünitesin alt çizgisi zeminden 90cm yukarıda olacak şekilde yerleştirin. Vida deliklerini bir kalem ile işaretleyin.İşaretli noktalara 6 mm uçlu bir matkap ile delik açın ve dübelleri yerleştirin. Vidaları sıkarak şarj ünitesini duvara sabitleyin. 90cm 90cm Duvar bağlantı...
- Page 11 Şarj edebilmek için şarj adaptörünün ucunu şarj istasyonundaki yuvasına takmalısınız. Dilerseniz şarj istasyonunu kullanmadan şarj adaptörünün ucunu gövdenin ön yüzündeki yuvaya takarak da şarj edebilirsiniz. Cihazınızı şarj ünitesinin üstüne doğru şekilde yerleştirdiğinizde cihazınız şarj olmaya başlayacaktır. Cihazınızın tamamen şarj olması 4 saate kadar sürebilir.
- Page 12 5.KULLANIM Açma/Kapama düğmesine basarak süpürgeyi çalıştırınız. Emiş gücünü ayarlamak için devir ayar paneli üzerindeki düğmeleri kullanabilirsiniz. Aksesuarları dilerseniz borunun ucuna takarak dilerseniz doğrudan gövdenin emiş ağzına takarak kullanabilirsiniz. Aksesuarı çıkarmak için aksesuar üzerindeki butona basarak hafifçe çekmek yeterli olacaktır. Perde, klavye, araç Parke, fayans, ince içi, sehpa gibi alanları...
- Page 14 6.TEMİZLİK VE BAKIM • Temizlik ve bakım işlemlerine başlamadan önce mutlaka fişi prizden çıkarınız. Elektrik şokuna maruz kalmamak için kabloyu, fişi ya da cihazı suya veya herhangi bir sıvıya sokmayınız ve ıslak bez ile temizlemeyiniz. • Hijyenik nedenlerle ve süpürgenizin ömrünün uzaması için süpürgenizi ve filtrelerini her kullanımdan sonra temizleyiniz.
- Page 15 •Cihazınızın toz haznesini içindeki siklon fitre grubunu çıkarmak için toz haznesinin alt kapağını mandala basarak açın ve siklon filtre grubunu çevirerek haznenin içinden çıkarın. • Siklon filtre grubunu çekerek metal filtre gövdesinden ayırabilir ve temizleme fırçası yardımıyla tıkanmış delikleri temizleyebilirsiniz. •...
- Page 16 • Gövde üzerindeki Hepa Filtre grubunu yukarı doğru çekerek çıkarınız. Hepa filtreyi akan su ile yıkayabilirsiniz ancak tekrar yerine takmadan önce iyice kuruduğundan emin olunuz. • Parke süpürme ucunu ve halı süpürme ucunu temizlemek için yan tarafta bulunan küçük düğmeye basın ve yandaki kapağı kaldırın. Dönen fırçaları...
- Page 17 • Koltuk fırçasını çıkarmak için yan taraftaki kilit simgesinin altındaki kanalı bir bozuk para yardımıyla sola doğru çeviriniz ve dönen fırçayı çekerek çıkarınız. • Parke fırçasını, halı fırçasını ve koltuk fırçasını yıkayabilirsiniz. Tekrar kullanmadan önce iyice kuruduğuna emin olunuz. 7.TAŞIMA VE NAKLİYE Cihazın naklini kendi orijinal kutusu ve bölmeleri ile veya cihazın etrafını...
- Page 18 SORUN ÇÖZME Cihazınızda oluşan sorunları aşağıdaki tabloda verilen yöntemler ile çözemiyorsanız cihazınızı Arnica Yetkili Servisine götürünüz. SORUN NEDENİ ÇÖZÜMÜ Şarj etmek için, şarj adaptörünün fişe takılı olduğunu ve cihazın şarj Yeterli şarjı olmayabilir. konnektörünün adaptöre bağlı Süpürge hiç emiş olduğunu kontrol ediniz.
- Page 19 Garanti belgesini satış tarihinde muhakkak yetkili satıcıya (ürününüzü satın aldığınız kişi) tasdik ettiriniz.(Unvan kaşesi ve satış tarihi) • Herhangi bir arıza durumunda Arnica Yetkili Servisimize başvurunuz. • Malın kusurlu olduğunun anlaşılması durumunda tüketici, 6502 sayılı Tüketicinin Korunması Hakkında Kanunun 11inci maddesinde yer alan;...
- Page 20 Cihazınızın yasal ömrü 10 yıldır. İMALATÇI / İTHALATÇI FİRMA: SENUR ELEKTRİK MOTORLARI SAN. VE TİC. A.Ş. Cihangir Mah. Dolum Tesisleri Cad. Şehit Piyade Er Yavuz Bahar Sok. No :7 34310 Avcılar/İSTANBUL Telefon : (0212) 422 13 30 Faks : (0212) 422 09 29 Menşei : Türkiye...
-
Page 22: Table Of Contents
INSTRUCTION MANUAL You will appreciate that you have made a great choice as you use your vacuum. We intend to offer you more than you have paid. Thank you for choosing our product. If you read this instruction manual carefully and use your vacuum as described in the manual, you will see how easy everything will be. -
Page 23: Safety Rules
1.SAFETY RULES • Be sure to read the safety rules. • All the warnings and instructions in this manual include important information about your appliance. It is extremely important that the appliance is operated in accordance with these instructions. Manufacturer company does not accept any responsibility for any damages that may occur when these instructions and warnings are not followed. - Page 24 • If your appliance is exposed to outside air conditions, has a visible damage or has been dropped into water, do not use it. • Do not use your appliance if you detect a stray voltage, abnormal engine heat, or abnormal sound or smell occurrence and contact the nearest authorized service.
- Page 25 • Do not charge another appliance with your appliance’s charger. • Your appliance is suitable for use at temperatures between 4 °C and 40 °C. • Ensure that air outlets are open when vacuuming. • The batteries on this appliance can only be replaced by the authorized service.
- Page 26 • Use only the adapter with R241-3501000E code to charge your appliance. Do not use your appliance to vacuum gasoline, thinner, alcohol, kerosene and similar flammable liquids, dust and liquids at temperatures higher than 60 °C, objects that pose a fire hazard, and harmful wastes. Your appliance is designed for dry vacuuming.
-
Page 27: Introduction Of Appliance
2. INTRODUCTION OF APPLIANCE 1. Main body 12. Charge indicator lights 2. Dust container 13. Pipe 3. Container lid 14. Parquet vacuum nozzle 4. Container lid unlocking button 15. Carpet vacuum nozzle 5. Air intake duct 16. Sofa vacuum nozzle 6. -
Page 28: Technical Specifications
3. TECHNICAL SPECIFICATIONS Model : Solara Voltage : 28.8V AC Power : 440W Battery : 28.8V 2500mAh 72Wh Charger Device model : R241-3501000E Charging Device Input : 100-240V DC 50/60Hz 1.5A Charging Device Output : 35.0V 1.0A 35.0W Compliance with Standards : CE , AEEEK... - Page 29 If you want to fix the charging unit to the wall, place the charging unit so that its bottom line is 90 cm above the floor. Mark the screw holes with a pencil. Bore holes into the marked points with a drill with a 6 mm tip and insert the dowels.
- Page 30 In order to be able to charge, you should plug the end of the charger into its socket in the charging station. You can also charge the appliance by plugging the end of the charger into the slot on the front face of the body without using the charging station.
- Page 31 5.OPERATION Operate the vacuum cleaner by pressing the on/off button. You can use the buttons on the speed adjustment panel to adjust the suction power. You can use the accessories either by attaching them to the end of the pipe, or by attaching them directly to the vacuum opening of the body. To remove the accessory, it would be enough to press the button on the accessory and pull it slightly.
-
Page 33: Cleaning And Maintenance
6.CLEANING AND MAINTENANCE • Always unplug the appliance before starting cleaning and maintenance. To avoid electrical shock, do not immerse the cord, plug, or appliance in water or any other liquid, and do not clean them with wet cloths. • Clean your vacuum cleaner and its filters after each use for hygienic reasons and to prolong the life of your vacuum cleaner. - Page 34 •To remove the cyclone filter assembly located inside the dust container of your appliance, open the bottom lid of the dust container by pressing the latch and unscrew the cyclone filter assembly from the container. • You can separate the cyclone filter assembly from the metal filter body...
- Page 35 • Remove the Hepa Filter assembly located on the body by pulling upwards. You can wash the HEPA filter, but make sure it is thoroughly dry before reassembling it. • To clean the parquet vacuum nozzle and the carpet vacuum nozzle, press the small button located on the side and open the side lid.
-
Page 36: Transportation And Handling
• To remove the sofa brush, turn the duct under the lock symbol located on the side to the left with the help of a coin and remove the rotating brush by pulling it. • You can wash the parquet brush, carpet brush and sofa brush. - Page 37 TROUBLESHOOTING If you cannot resolve the problems with your appliance using the methods given in the table below, take your appliance to Arnica Authorized Service . PROBLEM REASON SOLUTION To charge, check that the charger It may not have is plugged in and that the charging The vacuum sufficient charge.
- Page 38 • When the rotating brush is clogged, the brush stops and its lights turn off. The charging LEDs of the appliance switch to the warning mode. • When the rotating brush is clogged, the vacuuming mode of the appliance reduces to a minimum level. Since the performance of the battery in your device changes depending on the usage conditions, the reduction in operating time over time is not covered by the warranty.
- Page 40 BETRIEBSANLEITUNG Danke, dass Sie sich für unser Produkt entschieden haben. Während Sie unseren Staubsauger verwenden, werden Sie mit der Zeit sehen, was für eine richtige Wahl Sie getroffen haben. Unser Ziel ist es, Ihnen mehr zu geben als Sie bezahlt haben. Wenn Sie diese Betriebsanleitung lesen und unseren Staubsauger wie in der Anleitung beschrieben verwenden, werden Sie sehen, wie einfach alles ist.
-
Page 41: Sicherheitsregeln
1. SICHERHEITSREGELN • Lesen Sie unbedingt die Sicherheitsregeln. • Alle Warnhinweise und Anweisungen in dieser Bedienungsanleitung enthalten wichtige Informationen über Ihr Gerät. Es ist äußerst wichtig, dass Sie Ihr Gerät in Übereinstimmung mit dieser Anleitung verwenden. Der Hersteller übernimmt keine Verantwortung für Schäden, die durch die Nichtbeachtung dieser Anweisungen und Warnhinweise entstehen können. - Page 42 • Wenn das Stromkabel beschädigt ist, muss es vom Hersteller oder Servicecenter ausgetauscht werden, um eine gefährliche Situation zu vermeiden. • Bedienen Sie Ihr Gerät nicht mit beschädigtem Kabel oder Zubehör, nachdem es heruntergefallen ist oder eine Fehlfunktion vorliegt. Wenden Sie sich für Reparatur und Ersatzteile an Ihren nächstgelegenen autorisierten Servicecenter.
- Page 43 • Stellen Sie den Staubsauger und das Ladegerät nicht in die Nähe von heißen Öfen oder Heizgeräten. • Es gibt keine Teile in Ihrem Gerät, in die der Benutzer eingreifen kann. Das Gerät kann nur von autorisierten Diensten repariert werden. •...
- Page 44 • Saugen Sie mit Ihrem Gerät keinen Tonerstaub aus Druckern und Kopiergeräten auf. • Verwenden Sie das Gerät nicht zur Reinigung von feinen Partikeln wie Baustaub, Mehl usw. • Lassen Sie frisch gewischte oder gewaschene Teppiche und Sofamatten gründlich trocknen, bevor Sie sie mit Ihrem Gerät reinigen.
- Page 45 Dieses Gerät entspricht der AEEEK-Verordnung zur Kontrolle von elektrischen und elektronischen Altgeräten. Aus Teilen Materialien produziert, welche Eigenschaften Wiederverwertung besitzen. Es ist daher nicht geeignet, Ihr Gerät mit dem Hausmüll oder anderen Abfällen zu entsorgen. Elektrische und elektronische Geräte müssen zum Recycling zu einer geeigneten Sammelstelle gebracht werden.
-
Page 46: Gerätebeschreibung
2.GERÄTEBESCHREIBUNG 1. Hauptgehäuse 12. Ladeanzeigeleuchte 2. Staubbehälter 13. Rohr 3. Behälterdeckel 14. Parkettaufsatz 4. Taste zum Öffnen der 15. Teppichaufsatz Behälterdeckel 16. Polsteraufsatz 5. Lufteinlasskanal 17. 2in1 Bürstenaufsatz 6. Behälter-Auswurftaste 18. Schmalrohr 7. Ladeanschluss 19. Verlängerungsschlauch 8. HEPA Filterdeckel 20. Ladestation 9. -
Page 47: Technische Eigenschaften
3.TECHNISCHE EIGENSCHAFTEN Modell : Solara Spannung : 28.8V AC Leistung : 440W Batterie : 28.8V 2500mAh 72Wh Ladegerät Modell : R241-3501000E Ladegerät Eingang : 100-240V DC 50/60Hz 1.5A Ladegerät Ausgang : 35.0V 1.0A 35.0W Einhaltung von Normen : CE , AEEEK Dieses Gerätentspricht 2014/30/EU (elektromagnetische Verträglichkeit) - Page 48 Wenn Sie die Ladestation an der Wand befestigen möchten, stellen Sie sie so auf, dass sich die untere Linie der Ladestation 90 cm über dem Boden befindet. Markieren Sie die Schraubenlöcher mit einem Bleistift. Bohren Sie die markierten Stellen mit einem 6-mm-Bohrer und setzen Sie die Dübel ein.
- Page 49 Zum Laden müssen Sie das Ende des Ladeadapters in die Buchse der Ladestation stecken. Wenn Sie möchten, können Sie das Gerät auch ohne die Ladestation aufladen, indem Sie das Ende des Ladeadapters in den Schlitz an der Vorderseite des Gehäuses stecken. Wenn Sie Ihr Gerät richtig auf die Ladestation stellen, beginnt der Ladevorgang des Geräts.
- Page 50 5.VERWENDUNG Schalten Sie den Staubsauger, durch Drücken der Taste Ein/Aus ein. Das Gerät funktioniert so lange, wie Sie die Taste gedrückt halten. Mit den Tasten auf dem G e s c h w i n d i g k e i t s r e g l e r können Sie die Saugleistung einstellen.
-
Page 52: Reinigung Und Pflege
6. REINIGUNG UND PFLEGE • Ziehen Sie vor der Reinigung und Wartung unbedingt den Stecker aus der Steckdose. Um einen elektrischen Schlag zu vermeiden, tauchen Sie das Kabel, den Stecker oder das Gerät nicht in Wasser oder andere Flüssigkeiten und reinigen Sie es nicht mit einem nassen Tuch. - Page 53 • Um die Zyklonfiltergruppe Staubbehälter Ihres Geräts zu entfernen, öffnen Sie die unteren Deckel des Staubbehälters durch Drücken des Riegels und nehmen Sie die Zyklonfiltergruppe durch Drehen aus dem Behälter. • Sie können die Zyklonfiltergruppe vom Metallfilterkörper trennen, indem Sie sie herausziehen und die verstopften Löcher mit einer feinen Bürste reinigen.
- Page 54 • Entfernen Sie die Hepa-Filtergruppe am Gehäuse, indem Sie sie nach oben ziehen. Sie können den Hepa-Filter waschen, aber stellen Sie sicher, dass er gründlich getrocknet ist, bevor Sie ihn wieder einsetzen. •Um die Parkett- und Teppichkehrdüse zu reinigen, drücken Sie den kleinen Knopf an der Seite und heben Sie den Deckel an der Seite an.
-
Page 55: Transport Und Versand
Um die Sitzbürste zu entfernen, drehen Sie mit einer Münze die Rille unter dem Verriegelungssymbol auf der linken Seite und ziehen Sie die rotierende Bürste heraus. • Sie können die Parkettbürste, die Teppichbürste und die Sitzbürste waschen. Vergewissern Sie sich, dass sie gründlich getrocknet sind, bevor Sie sie wieder verwenden. - Page 56 PROBLEMBEHEBUNG Wenn Sie die Probleme, die in Ihrem Gerät auftreten, nicht mit den in der folgenden Tabelle aufgeführten Methoden lösen können, bringen Sie Ihr Gerät zum autorisierten Arnica-Kundendienst. PROBLEM URSACHE LÖSUNG Vergewissern Sie sich zum Laden, dass Möglicherweise ist er...
- Page 57 • Wenn die rotierende Bürste blockiert ist, bleibt die Bürste stehen und die Beleuchtung schaltet sich aus. Die Lade-LEDs des Geräts schalten in den Warnmodus. • Wenn die rotierende Bürste blockiert ist, wird der Saugmodus des Geräts minimiert. Da die Leistung der Batterie in Ihrem Gerät je nach Einsatzbedingungen schwankt, ist eine nachlassende Betriebsdauer nicht von der Garantie abgedeckt.
- Page 58 Der Hersteller haftet nicht für Unfälle Verletzungen von Menschen oder Tieren, Sachschäden durch unsachgemäße Behandlung Bedienung von Geräten. Auch bei Unkenntnis oder Nichtbeachtung der Bedienungsanleitung bei der Inbetriebnahme. SENUR Europe Haushaltsgeräte Vertriebs GmbH Zeppelinstr. 4 85748 Garching b. München E-Mail: info@arnica-shop.de Tel: +49(0)8935651377 arnica-shop.de...
- Page 60 FİRMA YETKİLİSİNİN İmzası - Kaşesi MALIN ÜRETİM KODU / HAFTASI / SERİ NO Cinsi : Şarjlı Süpürge Markası : Arnica Modeli : Solara Menşei : Türkiye Teslim Tarihi ve Yeri SATICI FİRMANIN TARİH / İMZA / KAŞE Ünvan Adres Telefon...
Need help?
Do you have a question about the SOLARA and is the answer not in the manual?
Questions and answers