Lenoxx CD114BL Manual
Hide thumbs
Also See for CD114BL:
- Instruction manual (13 pages) ,
- Instruction manual (12 pages) ,
- Instructions manual (15 pages)

Subscribe to Our Youtube Channel
Related Manuals for Lenoxx CD114BL


Summary of Contents for Lenoxx CD114BL
- Page 1 Home Entertainment System Model: CD1 14BL CD1 14BR | Batch: PR4802 Carefully read all instructions before use and save for future reference.
-
Page 2: Safety Instructions
CAUTION The images used in this manual are to illustrate the operation method and product structure of the item. In case there are minor discrepancies between the physical product and the illustrations, please consider the physical item as the accurate reference. To reduce the risk of fire or electric shock, do not expose this product, its power cord and remote to rain or moisture;... -
Page 4: Preparations For Use
PREPARATIONS FOR USE • Carefully remove the unit from the carton and box and remove all packing material from the unit. • Unwind the AC power cord and extend it to its full length. • Unwind the FM Antenna wire and extend it to its full length when necessary. -
Page 5: Back Panel
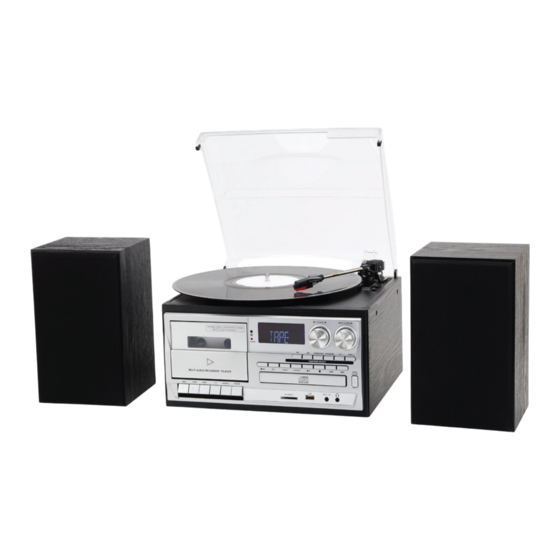
10. Function Selector Button 1. Dust Cover 1 1. CD/USB/SD Playback 2. Cassette Door Control Button 3. Speaker 12. CD Door 4. Cassette Controls 13. CD Door Open/Close Button 5. Bluetooth Indicator Light 14. 3.5mm Headphone Jack 6. Stanby Light 15. -
Page 6: Remote Control
REMOTE CONTROL 1) Power Button (Device On/Off) 2) Record Button 3) Equaliser 4) Play/Pause Button 5) Repeat Button 6) Program Button 7) Delete Button 8) CD Open/Close 9) Function Mode Button 10) Rewind Button 1 1) Forward Button 12) Stop Button 13) Mute Button NOTE: The remote control works with CD/USB/SD modes. - Page 7 Phono operation 1. Open the dust cover and press the volume knob to power on. 2. Use the function selector to select PHONO mode. 3. Set the speed selector to the appropriate position: 33, 45 or 78, depending on the record to be played. 4.
-
Page 8: Phono Encoding
Phono encoding 1. Set the function button to PHONO mode and then insert a memory device (USB drive, SD or MMC card). 2. Put your record onto the turntable and get it ready for playback. 3. Press the record REC button. It will take about 3 - 4 seconds to read the memory device, then the USB or SD icon will be flashing on the LCD display. - Page 9 1. Press the volume knob to turn on the power. 2. Select the TAPE function to set the unit to tape mode. 3. Press the Stop/Eject button to open the cassette door. 4. Insert the prerecorded cassette into the cassette tray and press the play button.
- Page 10 IMPORTANT! Ensure that you insert the cassette in the correct direction. To prevent damage to the cassette, it is highly recommended to remove it from the equipment after playing. Cassette encoding 1. Set the function button to TAPE mode and then insert a memory device (USB drive, SD or MMC card).
- Page 11 4. During the playback, press the Play/Pause button to pause. Press it again to resume playback. 5. To skip to the next or previous track, press the Forward Skip or Backward Skip button. 6. To skip to a specific time within a track, press and hold the Forward Skip or Backward Skip button until you reach the desired time.
-
Page 12: Usb & Sd Operation
USB & SD operation The system is able to decode and playback all MP3/WMA files stored in the memory media connected to the USB port or SD/MMC card slot. Following the illustration below, insert a USB device face up into the USB port, making sure it is fully inserted. -
Page 13: Playback Controls
Playback controls PLAY/PAUSE Press this button once to stop playing, press it again to continue. STOP Press this button to stop audio playback, the display will then show the total number of MP3/WMA files. SKIP UP Press this button once to play the next file, press and hold this button to fast forward through the files/tracks. - Page 14 Programming tracks for playback Up to 64 tracks can be programmed for MP3/WMA file playback in any order. Before programming, however, be sure the system is in STOP mode. 1. Set the function selector to CD/USB/SD mode, then press the stop button.
- Page 15 Copying a folder 1. Insert a USB storage device and SD card, then select USB/SD mode (as described previously). When the system has recognised the device, press the stop button. 2. Turn the tuning knob to select the desired folder for copying. 3.
- Page 16 Deleting a single file/track 1. Insert the USB storage device or SD card, then select USB/SD mode (as described previously). 2. Press the delete DEL button during the playback of the track you want to delete: “ONE” will be flashing on the display. Press the delete DEL button again to confirm.
- Page 17 Removing the USB device/SD card First move the function selector to another mode (tuner, phono, tape), then press the volume knob to turn off the power. To remove a USB device, pull it out of the USB port. To remove a memory card, press the memory card inwards and then release it.
-
Page 18: Bluetooth Input
Bluetooth input 1. Press the BT button and set the unit to Bluetooth mode. Long-press the BT button if you’re pairing with a new device for the first time. 2. Turn on the Bluetooth feature of your device, search for “CD1 14” and pair. -
Page 19: Troubleshooting Guide
TROUBLESHOOTING GUIDE If you are experiencing problems with your Home Entertainment System, check in the list below whether there are any quick and easy checks you can do that may help solve the problem. If you cannot solve the problem by yourself, contact our after sales support for advice. - Page 20 1300 666 848 LenoxxElectronics LenoxxElectronics @LenoxxAustralia...
Need help?
Do you have a question about the CD114BL and is the answer not in the manual?
Questions and answers