Lenoxx CD114BL Instructions Manual
Hide thumbs
Also See for CD114BL:
- Instruction manual (13 pages) ,
- Instruction manual (12 pages) ,
- Manual (21 pages)

Related Manuals for Lenoxx CD114BL


Summary of Contents for Lenoxx CD114BL
- Page 1 Model: CD114BL / CD114BR Batch: PR4098 PLEASE READ AND RETAIN THESE INSTRUCTIONS FOR FUTURE REFERENCE.
-
Page 2: Safety Instructions
The illustrations used in this manual are to illustrate the operation method and product structure of the product. Where there is a small difference between the physical item and the illustrations, please take the physical as the standard. CAUTION: To reduce the risk of fire or electric shock, do not expose this product, it’s power cord and remote to rain or moisture;... -
Page 3: Preparations For Use
REMOTE CONTROL BATTERY WARNING: This product contains a coin/button cell battery inside. If swallowed, go straight to a hospital emergency room. • WARNING - KEEP BATTERIES OUT OF REACH OF CHILDREN • Swallowing may lead to serious injury in as little as 2 hours or death, due to chemical burns and potential perforation of the oesophagus. -
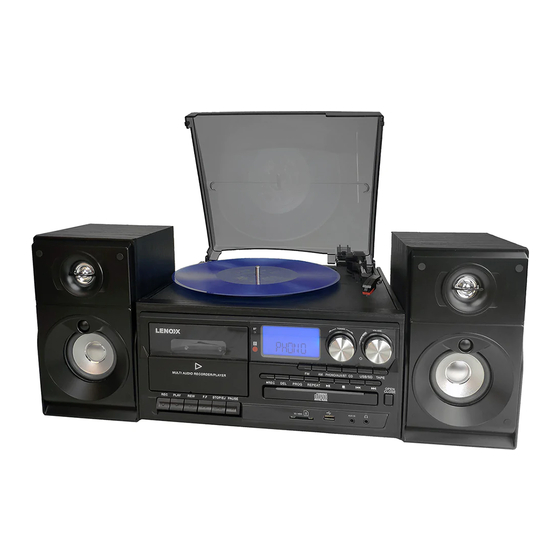
Page 4: Location Of Controls And Indicators
LOCATION OF CONTROLS AND INDICATORS 1. Dust Cover 2. LCD Screen 3. Bluetooth Indicator 4. Cassette Door 5. Record Button - cassette 6. Play Button - cassette 7. Rewind Button - cassette 8. Fast Forward Button - cassette 9. Stop/Eject Button - cassette 10. - Page 5 17. AM Button 18. FM Button 19. Record Button 20. Delete Button 21. Program Button 22. Repeat Button 23. Play/Pause Button 24. Phono/Aux/Bluetooth Button 25. Stop Button 26. CD Button 27. Backward Skip Button 28. Forward Skip Button 29. Tape Button 30.
-
Page 6: Rear Panel
REAR PANEL: RCA Line out jack (L&R) FM wire antenna External speakers’ clips. RCA Jacks • The RCA Jacks output analog line-level signals and could be connected directly with a pair of active/powered speakers or the appropriate input of your stereo system. •... -
Page 7: Turntable Operation
TURNTABLE OPERATION: 1. Rotate the on/Off Volume Knob to turn on the power. 2. Press the Phono/AUX/BT button to set the unit to Phono mode. 3. Set the Speed Switch accordingly. 4. Place the record on the turntable. Use the 45 RPM Adapter if necessary. 5. -
Page 8: Radio Operation
RADIO OPERATION: 1. Rotate the on/Off Volume Knob to turn on the power. 2. Press the AM Button or FM Button to the desired band. 3. Rotate the Tuning Knob for desired radio station. Note: • The unit is equipped with a FM wire antenna. To improve FM reception, fully extend and move the wire around until the reception is clear without interferences. -
Page 9: Cassette Operation
button is pressed. 9. Press the Stop button if you want to completely stop playback. Programmed Playback 1. Press the Stop Button before starting, press the Program button once to enter program mode. Program Indicator will start flashing. The LCD display will flash “01” as the track sequence which is to be edited. - Page 10 sounds from USB/SD. 3. To pause recording, press the Pause button. Press it again to resume recording. 4. To stop recording, press the Stop/Eject button. PHONO to TAPE 1. Press the Phono/AUX/BT button and set the unit to phono mode. 2.
-
Page 11: Usb/Sd Playback
USB/SD PLAYBACK: 1. Rotate the on/Off Volume Knob to turn on the power. 2. Press the USB/SD button to set the unit to USB/SD mode. 3. Insert a USB device into the USB port or a SD memory card into the SD card slot. 4. - Page 12 4. Press the delete DEL button again to confirm. 5. “DELETE” will show on the display while the files/tracks are being deleted until the deletion is complete. USB/SD RECORDING: The recording format is preset at MP3 bit rate 128 kbps. RADIO to USB/SD RECORDING 1.
- Page 13 AUX to USB/SD RECORDING 1. Connect the 3.5mm auxiliary cable between your audio device and the Aux in Jack of this unit. 2. Press the Phono/AUX/ BT button to set to Aux In mode. 3. Insert a USB device or an SD memory card and press the record button. 4.
-
Page 14: Troubleshooting
TROUBLESHOOTING: Problems with sound • Clockwise rotate the power/volume knob to increase the volume. • Make sure the unit’s power cord is connected to an appropriate electrical outlet. • Make sure the wall socket is switched on. • Make sure the function switch is set to your desired function. •...
Need help?
Do you have a question about the CD114BL and is the answer not in the manual?
Questions and answers