Table of Contents
Advertisement
Quick Links
Advertisement
Table of Contents

Subscribe to Our Youtube Channel
Related Manuals for iToma 729


Summary of Contents for iToma 729
-
Page 3: Table Of Contents
CONTENTS Warning................. 1 Preparation for Use..............2 Important Notes..............2 Location of Controls and Indicators.......... 3 Setting the Date / Time Manually ..........4 Setting the Alarm..............4 Snooze / Repeat..............6 Playing the FM Radio.............. 6 Using the Sleep Timer..............7 Playing the DAB Radio.............8 Dimmer Control ..............10 2-Level LED decor..............10 Bluetooth Connection............11... -
Page 4: Warning
WARNING 1.) Read these instructions. Keep these instructions. Follow all instructions. Heed all warnings. 2.) Do not block any ventilation openings. 3.) Do not install near any heat sources such as radiators, heaters, stoves, or other apparatus (including audio amplifiers) that produce heat. -
Page 5: Preparation For Use
PREPARATION FOR USE Unpacking and Set Up •Remove the alarm clock radio from the carton and packaging materials. Retain the carton and packaging for future reference and in case the alarm clock radio ever needs to be serviced or transported. •Remove any descriptive labels or stickers on the front or top of the cabinet. -
Page 6: Location Of Controls And Indicators
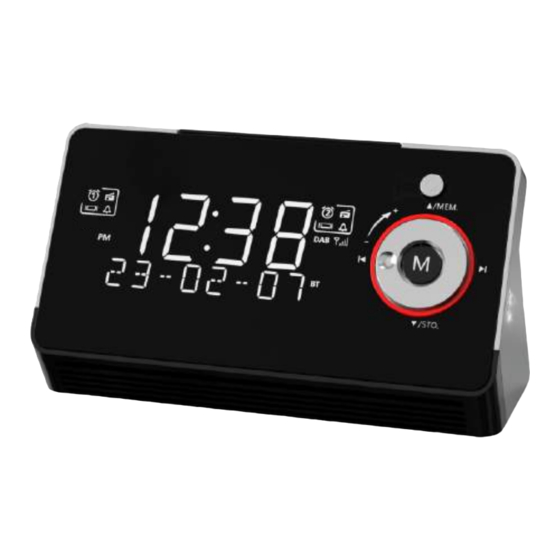
LOCATION OF CONTROLS AND INDICATORS MENU/ INFO SCAN/ SLEEP DIMMER PRESET SELECT 1. ALARM 1 Indicator 16. SLEEP/DIMMER Button 2. AM Indicator ("on"=AM) 17. SCAN/BT Button ("on"=PM) 18. SELECT Button PM Indicator 4. SLP Indicator 19. TUNE-Button 5. BT Indicator 20. -
Page 7: Setting The Date/Time Manually
SETTING THE DATE/TIME MANUALLY MENU/INFO MENU/ INFO SCAN/ To check the current date and time, short press "MENU/INFO" repeatedly to see the time,month,day and year. MENU/ INFO SCAN/ Press and hold "MENU/INFO" button, the HOUR digits blinks on the display, then circulate the silver rotating knob to adjust the hour. Press the "TUNE+"... - Page 8 :Wake to Vibration :Wake to Buzzer(BB) : Wake to radio :Wake to DAB radio MENU/ INFO (four alarm ringtones are available) Setting Alarms for the Day(s) of the Week SCAN/ SETTING THE WAKEUP ALARMS PRESET MENU/ INFO SELECT SCAN/ Push the AL1 switch slide to ON to turn on the alarm1. Push the AL2 switch slide to ON to turn on the alarm2.
-
Page 9: Snooze/Repeat
SNOOZE/REPEAT PRESET MENU/ INFO SELECT SCAN/ When the alarm goes off, press "SNOOZE" button to doze for another 9 minutes. You can repeatedly press "SNOOZE" for more dozings during the 60-minute cycle. Press "AL1" or "AL2" button to stop the alarm from sounding. To deactivate the alarm completely, Push the AL1/AL2 slide switch to OFF. -
Page 10: Using The Sleep Timer
C: Store FM/DAB radio station presets (max. up to 20 stations) PRESET PRESET SELECT In the FM/DAB radio mode, press "TUNE-" or "TUNE+" button to search your desired station. Press and hold “PRESET" button until the Program Number (from 01 to 20) appears on the display. Press "TUNE-"... -
Page 11: Playing The Dab Radio
MENU/ INFO SCAN/ SLEEP DIMMER Press " " to turn on the FM or DAB radio. Press and hold the”SLEEP/DIMMER” button, then the "SLP" digits will appear on the display which indicates the sleep timer has been set for 5 minutes. To change the sleep timer duration, press "TUNE-"... - Page 12 Manual Tuning DAB When the clock is in DAB mode.Press and hold the "MENU/INFO" button to enter the menu(FULL SCAN will shows on the display), then press“TUNE+”or"TUNE-" until the display shows MANUAL,press"SELECT" to enter the service menu. Press"TUNE-"or"TUNE+" to highligt the desired channel. Dynamic Range Control(DRC)Setting of DAB When the clock is in DAB mode.Press and hold the "MENU/INFO"...
-
Page 13: Dimmer Control
DIMMER CONTROL To adjust the display brightness, press "SLEEP/DIMMER" buttonuntil your desired brightness level appears. Brightness is available in 5 levels and can be adjusted even when the radio or Bluetooth connection is in use. Press “SLEEP/DIMMER”button,you can adjust the brightness level as below: Highlighted Medium... -
Page 14: Bluetooth Connection
When the "BT" indicator blinks, the clock is searching for Bluetooth connection. Please turn on the Bluetooth of your external audio device and look for 729 for connecting. Once connected, the "BT" indicator stops blinking. Then you can play music from your external audio device through the clock speaker. -
Page 15: Earphone Jack
EARPHONE JACK SLEEP DIMMER Press the " " button to turn the unit On. Press the "M" button to select and listen to your desired audio source (Bluetooth,Radio or DAB Radio.). Adjust the output volume by circulating the silver rotating knob. Connect your headphone plug into the 3.5mm earphone jack to enjoy streaming stereo through your headphone. -
Page 16: Care And Maintenance
CARE AND MAINTENANCE If the cabinet becomes dusty, wipe it with a soft cloth. it the cabinet becomes smudged or dirty, clean it with a soft, slightly dampened cloth. Never allow water or any liquid to get inside the cabinet. Never use any abrasive cleaners or cleaning pads as these will damage the finish of your radio. -
Page 17: Fcc Warning
(Hong Kong) Company Limited (iTOMA) warrants to the original consumer of this iTOMA product that it will furnish a replacement for, or, at its sole discretion, repair any part which proves (upon inspection by iTOMA) to be defective under normal use within 1 year of the original purchase date.
Need help?
Do you have a question about the 729 and is the answer not in the manual?
Questions and answers