Table of Contents
Advertisement
Quick Links
Advertisement
Table of Contents

Related Manuals for Metabo ELEKTRA BECKUM Multi 310 G


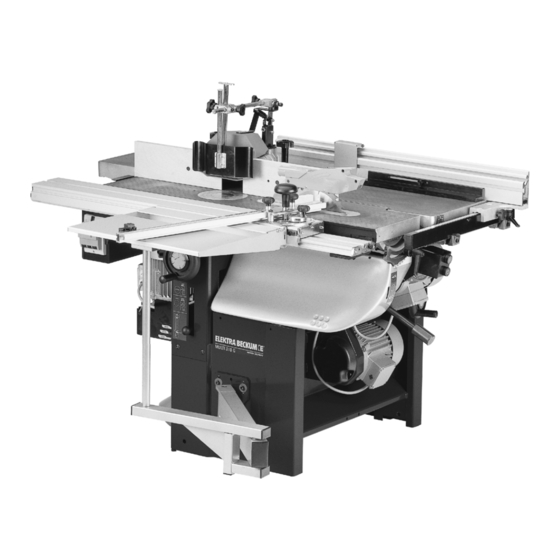
Summary of Contents for Metabo ELEKTRA BECKUM Multi 310 G
- Page 1 Multi 310 G Betriebsanleitung ....3 Operating Instruction ....18 Betjeningsvejledning .
- Page 2 U2W0045.fm D DEUTSCH ENG ENGLISH KONFORMITÄTSERKLÄRUNG DECLARATION OF CONFORMITY Wir erklären in alleiniger Verantwortlichkeit, daß dieses Produkt mit We herewith declare in our sole repsonsibility that this product den folgenden Normen übereinstimmt* gemäß den Bestimmungen complies with the following standards* der Richtlinien**.
-
Page 3: Table Of Contents
XW0008E.fm Operating Instruction ENGLISH ENGLISH • Dispose of the packing in an envi- out to work with reason. Do not operate Table of Contents ronmentally friendly manner. Take electric tool while under the influence of to a proper collecting point. drugs, alcohol or medication. -
Page 4: Symbols Used Throughout These Instructions
ENGLISH always work with a properly set riving parts must be correctly installed and Lead carrying straps though under- knife. meet all conditions necessary for the neath the combination machine at Do not jam workpieces. proper operation of the electric tool. the marked locations (1). -
Page 5: Operating Elements
ENGLISH outlet. To do so, start the circular saw Press red pushbutton – each oper- briefly and check to see if the saw ating mode can be switched OFF by blade turns in the direction indicated any of the three red pushbuttons or by the arrow. -
Page 6: Safety
ENGLISH Risk of injury by cuts with cut- terblock at standstill: − Always cover the cutterlock with the guard extrusion of the cutterblock cover when the machine is not used as thickness planer. Operation Place stock against the jointer fence (16). -
Page 7: Thickness Planer Mode
ENGLISH − Use a feeding aid (push stick) if you Workpiece dimensions • want to feed short stock into the Width: max. 309 mm. thicknesser. Stock to be thicknessed • Thickness: at least 4 mm more than must be at least 200 mm long. the set planing thickness. -
Page 8: Operation As Table Saw
ENGLISH − Wait until machine has come to a complete stop. Work area preparation Ensure the removal of all not required objects from the work area: Cutter fence completely dis- mounted? Cutter spindle fully retracted and covered by table rings and insert? Feed workpiece slowly and straight Sliding carriage side extension instal- Cutterblock cover lowered on the... -
Page 9: Safety
ENGLISH • − Tilt the sawhead to obtain the When used behind the workpiece – and from chips flying about. especially suitable cutting When using the saw, the blade guard desired bevel angle. − Tighten lock lever (52) to hold the sheets: must alway be positioned so that the dis- tance between the workpiece and lower... - Page 10 ENGLISH Cutting speed in m/s Work area preparation Tighten spindle nut, with the open end wrench supplied, hand-tight Ensure the removal of all not required Tool Cutter spindle- only. objects from the work area: ∅ –1 speed (min Saw blade and blade guard fully Danger! retracted and covered by table 4300...
-
Page 11: Safety
ENGLISH Make a test pass with the sliding tentional contact with the rotating Use a push block when working the carriage (motor OFF, without stock): cutter. Adapt these safety devices ends of narrow stock. The guard plate must always stay exactly to the respective application clear of the cutter by at least 10 mm. -
Page 12: Replacing Cutter Knives
ENGLISH After all servicing: At first remove cutter knife (78), then − Check to see that all safety cutter knife lockbar (77) from the cutterblock (79). devices are operational. In the cutterblock’s groove there are − Make sure that no tools or other still two springs. -
Page 13: Care And Maintenance
ENGLISH Loosen arbor bolt (87) with spanner be used until these faults have been 11. Available Accessories (L.H. thread!). remedied in a workmanlike manner. For special tasks the following accesso- Remove outer blade flange, saw Before starting any work ries are available at your specialized blade and inner blade flange from Check power supply cable for dam- dealer –... -
Page 14: Environmetal Protection
ENGLISH Please attach a description of the fault to Planed surface not smooth Blocked dust port the power tool. Cutter knives blunt. No dust collector hooked up: − Install sharp knives. − connect dust collector. 13. Environmetal Protection Cutter knives blocked by chips. Dust build-up around the cutter spindle. -
Page 15: Technical Specifications
ENGLISH 15. Technical Specifications Multi 310 G Multi 310 G 1 ~ 230V 3 ~ 400V Combination machine Length (in transport mode, w/o add-on parts) 1530 1530 Width (in transport mode, w/o add-on parts) Height (in transport mode, w/o add-on parts) Weight (w/o add-on parts) Operating mode S6 (%) - Page 16 ENGLISH Multi 310 G Multi 310 G 1 ~ 230V 3 ~ 400V spindle moulder No-load speed n 4300/6750/8500 4300/6750/8500 Cutter spindle diameter Max. cutter diameter in table Max. cutter diameter in cutter fence Cutter spindle vertical setting range Cutter spindle capacity under nut Cutter spindle direction of rotation (viewed from top) –...
- Page 17 U3w0057.fm 092 005 4064 092 005 4072 092 005 4110 092 005 4080 092 005 4099 092 005 4102 092 005 4048 091 003 0990 091 003 1015 091 003 1023 091 003 1031 091 005 3353 431 306 2258 091 101 8691...
- Page 18 U4BA_EB1.FM...
Need help?
Do you have a question about the ELEKTRA BECKUM Multi 310 G and is the answer not in the manual?
Questions and answers