
Related Manuals for FESLEY FED200


Summary of Contents for FESLEY FED200
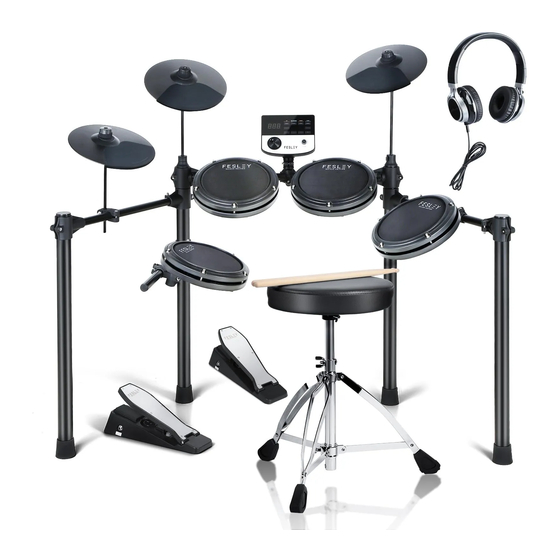
- Page 1 TO LEAD A NEW COOL FED200 INSTRUCTION MANUAL Electric Drum To connect directly with our support team, please email support@fesleymusic.com...
-
Page 2: Function Introduction
FUNCTION INTRODUCTION Thank you for choosing the Fesley electronic drum. The elegant and delicate Fesley electronic drum is the perfect combination of modern and new electronic technology. It is strongly recommended that you read this instruction before using it. Please store this instruction in a safe place for future reference. -
Page 3: Table Of Contents
CONTENTS FUNCTION INTRODUCTION ------------------------------------------------------------ CONTENTS ----------------------------------------------------------------------------- INSTALLATION GUIDE ------------------------------------------------------------------ ------------------------------------------------------------------------- Check the attached items ----------------------------------------------------------------------------------- lron pipe holder --------------------------------------------------------------------------- Drum pan installation -- Install a bracket and drum tray------------------------------------------------------------------- Install cymbals, module place pedals ---------------------------------------------------------- Plug in the striking part connection ---------------------------------------------------------- HOST BOX SOCKET DIAG RAM ---------------------- -------------------------------- Power cord connection -------------------------------------------------------------------------... -
Page 4: Installation Guide
INSTALLATION GUIDE Note! Please follow the instructions and read the "safety precautions" in the instruction manual carefully before using. This product must be installed by an adult, please do not install by the minor independently, don't let the minor install it independently. Check the attached items After opening the package, please check whether it contains all the items immediately. -
Page 5: Lron Pipe Holder
INSTALLATION GUIDE lron pipe holder ●The stand is located in a small individual package inside the box. Drum pan installation ●Please be careful to pinch your fingers when insalling. tom1 tom2 tom3 snare... -
Page 6: Install A Bracket And Drum Tray
INSTALLATION GUIDE Install a bracket and drum tray ●The bracket must be inserted into place and the screws should be tightened to avoid dropping. Insert the bracket and drum tray into the corresponding positions, and then tighten the screws. Note: (tom, Snare) The functions are different, you must refer to the accessories logo for correct installation! -
Page 7: Install Cymbals, Module Place Pedals
INSTALLATION GUIDE Install cymbals, module, place pedals ●Don't tighten the cymbals, leave some room for them to bob up and down. Install the cymbal and the main case on the bracket as shown in the picture Note: The function of each cymbal is different, you need to refer to the accessory logo for correct installation! module... -
Page 8: Plug In The Striking Part Connection
INSTALLATION GUIDE Plug in the striking part connection cable ●Please insert the connection cable in place to avoid poor contact and insert it correctly as shown in the diagram. Please check the drum for sound,If there is no sound, please turn the switch, Switch in A: mechanical kick drum mode, Switch in B: pedal mode. -
Page 9: Host Box Socket Diag Ram
MOUDLE SOCKET DIAGRAM SONG MANU POWER TERMINAL CONNECTION 1. When in use, connect the power terminal according to the diagram, and insert the power outlet of the module box at one end and the 100-240V household power outlet at the other end. (Fig. 1) 2. -
Page 10: Operation Guide
OPERATION GUIDE POWER OFF 1. Turn the switch on, the display will light up and the host will be turned on. 2. Turn the switch off , the display goes out and the host is turned off. DRUM GROUP SELECTION 1. -
Page 11: Song Mode
OPERATION GUIDE 2、At this time, press the < click > key, the metronome sounds, and starts to hit the drum for practice. 3、After four preliminary beats, the display will show. (It's too slow) (very good) (It's too fast) 4、After the exercise, the score of the whole hitting exercise will be displayed, with 0- 100 points to evaluate the accuracy of the current exercise. -
Page 12: Appendix
APPENDIX Kick 85 Blues Tom3 124 Rock Hi-Hat Open 43 Dancehall Snare Rim 1 Funk Kick 125 Seesion Hi-Hat Open 86 Popular Tom3 44 Synthgaze Snare Rim 2 Original Kick 87 Fuse Tom3 126 SpeedMetal Hi-Hat Open 45 Standard Snare Rim 3 Poprock Kick 127 ClassicDry Hi-Hat Open 88 Dancehall Tom3... -
Page 13: Product Maintenance
PRODUCT MAINTENANCE... -
Page 14: Safety Precautions
SAFETY PRECAUTIONS... - Page 15 SAFETY PRECAUTIONS...
-
Page 16: Warranty Card
Pictures may be required for some returns to ensure an item is not damaged prior to its return. Items returned are not considered undamaged until they are received by Fesley and verified as such. All damages to items are the customer’s responsibility until the item has been received by and acknowledged by Fesley as undamaged.
Need help?
Do you have a question about the FED200 and is the answer not in the manual?
Questions and answers