Table of Contents
Advertisement
Quick Links
Advertisement
Table of Contents

Related Manuals for POLYPOOL EASY TOUCH PP1467


Summary of Contents for POLYPOOL EASY TOUCH PP1467
- Page 1 User instructions “EASY TOUCH” DIGITAL CHRONOTHERMOSTAT PP1467...
-
Page 2: General Warnings
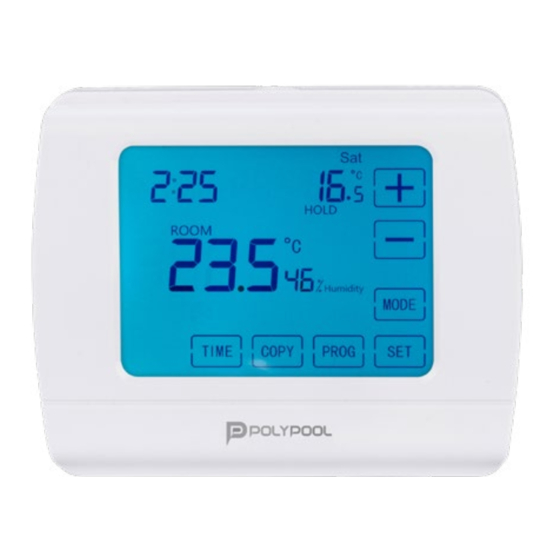
GENERAL WARNINGS DESCRIPTION The installation must be performed by qua- This type of relay room chronothermostat can lified personnel, in compliance with the CEI be easily connected to any boiler or air condi- standards in force for electrical systems. The tioner that has a two-wire connector, regardless product is intended for use in dry and non- of the 24V or 230V power supply. - Page 3 THERMOSTAT DISPLAY LEGEND MANUAL CONTROL INDICATOR COOLING MODE ACTIVE SET TEMPERATURE AMBIENT TEMPERATURE SET PROGRAM NUMBER CLOCK 10 DAYS WEEK MANUAL TIME CONTROL INDICATOR 11 ROOM HUMIDITY PERCENTAGE BATTERY LEVEL HEATING MODE ACTIVE...
-
Page 4: The Thermostat Buttons
THE THERMOSTAT The switch-on sensitivity of the thermostat can be set from the thermostat menu (please re- BUTTONS fer to the PARAMETERS Section for changing of the switch-on sensitivity from the factory default of ±0.2°C). The following are recom- mended: ±0.2°C (factory setting, recommended for ra- diator heating systems) +0°C (this setting is recommended for under-... - Page 5 PARAMETERS Press MODE to scroll through the various Select OFF: to deactivate this function. (De- parameters to be set and SET to confirm or fault: OFF) wait 15 seconds to automatically confirm. Backlight setting: Press MODE until reaching Set the temperature calibration: Press MODE the letters bL, press + or - to select ON / OFF;...
- Page 6 01. PARAMETERS HEATING/COOLING setting: approximately 1.5 m above floor level. Press MODE until reaching the word HEAT, N.B. = If the radiator valves in your flat are press + or - to select HEAT (HEATING) / COOL equipped with a thermostatic head, replace (COOLING).
- Page 7 THERMOSTAT POSITION Place the thermostat in a position protected from sudden changes in temperature or exter- nal heat (e.g. direct sunlight, refrigerator, fire- place, etc.). The optimal installation position is approximately 1.5 m above floor level. N.B. = If the radiator valves in your apartment are equipped with a thermostatic head, repla- ce the thermostatic head of the radiator valve with a manual control handle or adjust it to the...
-
Page 8: Installing The Thermostat
INSTALLING THE THERMOSTAT ATTENTION! • The relay output of the thermostat has th- Always follow the manufacturer’s instructions ree potential-free connection points, i.e. when connecting the thermostat to any hea- NO; COM and NC. To control the heating, ting or cooling devices. The voltage appearing connect the two cables of the device to be at the NO, NC or COM terminal depends only connected to the NO and COM terminals,... -
Page 10: Basic Settings
PLACE THE THERMOSTAT INTO OPERATION BASIC SETTINGS BATTERY INSERTION SET THE CURRENT DATE AND TIME While pressing the closure on the upper side of Press the “TIME” button to enter the screen to be configured. The day will start flashing on the the thermostat housing, remove the rear ther- display. -
Page 11: Programming The Thermostat
Note! The thermostat software recognises only To complete the settings, confirm them by pressing the “SET” button. At this point the adjusted data consecutive increasing progressions to be set, are stored and the device returns to the main scre- based on the serial number (P1; P2; etc.) of the en or after approximately 10 seconds, the settings ignitions. -
Page 12: Programming Steps
PROGRAMMING STEPS • Press the “SET” button The following diagram shows the temperature pat- • Press the “PROG” button tern according to the factory settings for 24 hours • The device enters programming mode and a day. the numbers indicating the days of the The temperature scheme can, of course, be freely week (SUN MON TUE WED THU FRI) will changed so that the ideal temperature is available... - Page 13 • Press the (-) or (+) buttons to set the starting screen. (After approximately 10 seconds the time for program P1 (the time can be set in programmed values will be automatically 10 minute intervals). confirmed and the display will return to the •...
- Page 14 COPYING A PROGRAM WITH THE HELP OF THE “COPY” BUTTON The “COPY” function is used to copy a pro- button to copy the program of the selected gram of one day to another day or to different day. days. • After finishing copying the program, press the “SET”...
- Page 15 FACTORY SETTINGS PROGRAM / TEMPERATURE CHANGE FOR 1-99 RESET CANCELLATION HOURS Set the required temperature by pressing, or Press MODE until reaching the letters Rese. repeatedly pressing, the (-) or (+) button on the Once it appears keep the HOLD button pres- front panel of the device, and then press the sed for approximately 4 seconds to reset the “TIME”...
-
Page 16: Manual Mode
TEMPERATURE CHANGE FOR 1-99 MANUAL MODE DAYS Set the required temperature by pressing, or Press the “HOLD” button. repeatedly pressing, the (-) or (+) button on the The word HOLD will appear below the set tem- front panel of the device, and then press the perature “TIME”... -
Page 17: Changing The Battery
CHANGING THE BATTERY The average life of the batteries is 1 year, but frequent use of the backlight can considerably reduce this time. If the symbol indicating a low battery level appears on the display, replace the batteries. After replacing the batteries proceed to set the day, hour and minutes again, while the set pro- grams remain stored and it is therefore not ne- cessary to reprogram the thermostat. -
Page 18: Technical Specifications
TECHNICAL SPECIFICATIONS VOLTAGE 24V AC/DC …. 230V AC ; 50Hz FLOW ON CONTACTS 8A (2A INDUCTIVE CHARGE) TEMPERATURE MEASUREMENT RANGE 0°C – 45°C (WITH 0.1°C INCREASE) TEMPERATURE REGULATION RANGE 5°C – 40°C (WITH 0.5°C INCREASE) HUMIDITY FIELD 20% - 90% TEMPERATURE PRECISION ±1°C MINIMUM PROGRAMMING RANGE... - Page 19 Appliance compliant with the Electromagnetic Compatibility and Low Voltage Directives subject to technical modifications. DISPOSAL USER INFORMATION “Implementation of Directive 2012/19/EU on Waste Electrical and Electronic Equipment (WEEE)”, pertaining to reduced use of hazardous substances in electrical and electronic equipment, as well as to waste disposal”. The symbol of the crossed-out wheelie bin on the equipment or on its packaging indicates that the product must be disposed of separately from other waste at the end of its service life.
- Page 20 Poly Pool S.p.A. via Sottocorna, 21/B 24020 Parre (BG) - Italy Tel. +390354104000 - www.polypool.it...
Need help?
Do you have a question about the EASY TOUCH PP1467 and is the answer not in the manual?
Questions and answers