Advertisement
Advertisement
Table of Contents

Related Manuals for Blaupunkt ORLANDO 750


Summary of Contents for Blaupunkt ORLANDO 750
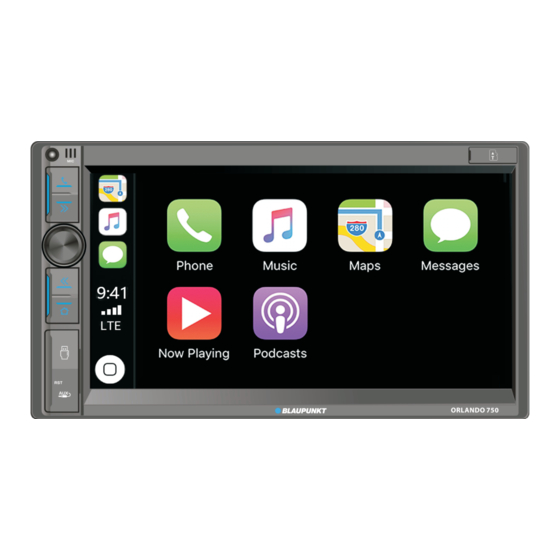
- Page 1 ORLANDO 750 Compatible with Android Auto & Apple CarPlayer...
-
Page 2: Installation
IMPORTANT NOTICE & PRECAUTIONS Thank you for using our company multi-media player! To operate the unit correctly, please read the operation manual carefully before using. Keep this operation manual for further reference. The unit is designed only for DC 12V negative ground operation system. Make sure your vehicle is connected to DC 12V negative ground electrical system. -
Page 3: Wiring Connection
WIRING CONNECTION BAGIAN BELAKANG UNIT F-CAM R-CAM V-OUT ISO-C Yellow Memory back up (B+) Orange Headlamp detection / backlight illumination Blue Auto antenna Black Ground (GND) Ignition switch Purple / Black Rear right speaker (-) Purple Rear right speaker (+) Grey / Black Front right speaker (-) Grey... -
Page 4: Main Unit Operation
MAIN UNIT OPERATION power turn on or off & adjust sound output level Bluetooth Mode During unit operation, press to shift to Bluetooth mode for operation. Press to pick up an incoming call; dial out after input a phone number; redial last dial out number. - Page 5 REMOTE HANDSET – GENERAL OPERATION BATTERY REPLACEMENT Refer to the back of remote handset for details on how to replace the battery. Replace only with the same or equivalent type of battery. BATTERY DISPOSAL Attention should be drawn to the environmental aspects of used battery disposal.
- Page 6 1 – 6 Radio Mode Press any one of the number key 1-6 to select a station that had been stored in the preset memory number key 1-6 for broadcasting. Press & hold shortly the number key 1-6 to store the current broadcasting frequency or station into the respective preset memory key number 1-6.
- Page 7 Folder/Playlist Mode ▲ ▼ During folder/playlist display at media playback mode, press /▶/◀ to select the desired setting/setup and press ENT to confirm/enter. Radio Mode Press repeatedly to fine tune radio frequency upward or downward. Press & hold shortly to tune radio frequency to the upward or downward station for broadcasting.
- Page 8 VOL + / VOL - Press repeatedly or press & hold to adjust sound output level. # / MENU / Bluetooth Mode Press for “#” symbol input. SETUP During unit operation, press & hold shortly to activate setup menu on screen for various system setup.
- Page 9 ON SCREEN – MAIN MENU OPERATION MAIN MENU MAIN MENU 1. Touch to start radio operation (when the radio antenna connected). 2. Touch to start BT operation (when the mobile phone connected). Touch Apps to enter the main interface. Touch to start USB input operation (when an USB device inserted). Touch to activate SYSTEM SETUP MENU on screen to have various setup of the unit.
- Page 10 Touch to shift to MAIN MENU for selection of various operation and setup. Touch to shift to previous mode Touch < > to turn frequency upward or downward and stop for broadcasting when a station received. Touch & hold repeatedly to fine tune radio frequency upward or downward. This shows the preset memory stations.
- Page 11 - after searched, new device or similar) searched out, confirm the search ORLANDO 750 - in case of need, input default code “0000” or “8888” in the mobile phone - at the same time, Bluetooth icon & BT DEVICES MENU appeared on screen - connection succeeded and you can start using Bluetooth function 1.
- Page 12 ON SCREEN – MOBILE PHONE LINKING OPERATION At MAIN MENU, touch to shift to mirror link mode For IOS devices (supported iPhone 5 to iPhone 13), mobile phone linking operation will start automatically without any setting. Mirror linking appeared on screen. For Android devices, when the phone is connected at the first time, below photo appeared on screen.
- Page 13 ON SCREEN – USB / SD CARD INPUT OPERATION to shift to multi-media playback mode and playback will start At MAIN MENU, touch automatically. Depends on the input device and playback media, touch on screen (at music playback, touch repeatedly on screen) to show various playback menus for operation. ON SCREEN –...
- Page 14 ON SCREEN – FRONT CAMERA INPUT OPERATION At MAIN MENU, touch to shift to front camera viewing (provided front camera and the pink/black wires connected). At front camera viewing mode, touch any portion of screen to activate FRONT CAMERA INPUT MENU for operation. ON SCREEN –...
-
Page 15: Specification
SPECIFICATION GENERAL Power Requirement: DC 12 Volts, negative ground Load Impedance: 4 Ohms Maximum Power Output: 60 watts x 4 (RMS) AM RADIO SECTION Frequency Range 530 - 1710 K Hz FM RADIO SECTION Frequency Range 87.5 – 107.9 MHz [14]... -
Page 16: Simple Troubleshooting
SIMPLE TROUBLE SHOOTING PROBLEMS, CAUSES & SOLUTIONS No power Check and make sure the connecting wires are connected correctly - Check whether the fuse is blown. Replace with the proper value fuse if necessary. No sound - Check and make sure the speaker wires are connected correctly. No picture - Check whether the video wire is connected to the video device.
Need help?
Do you have a question about the ORLANDO 750 and is the answer not in the manual?
Questions and answers